background image

92

Using other functions

09

Setting

What it does

Option(s)

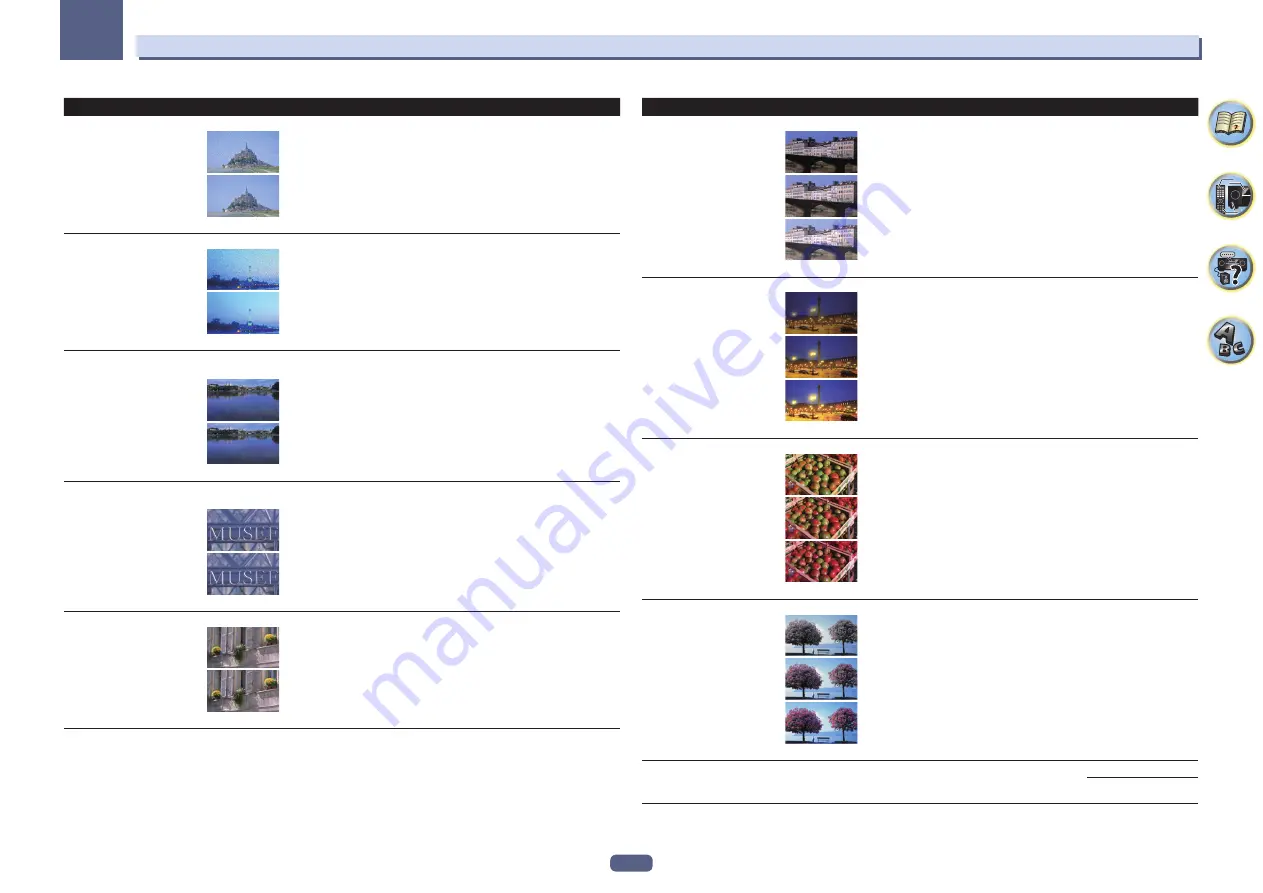
YNR

<e>
<f>

Reduces noise in the luminance (Y) signal.


c


d

(The image is only an example for checking the effect.)

c

 0 to +8 

d

Default: 

0

CNR

<e>
<f>

Reduces noise in the input’s color (C) signal.


c


d

(The image is only an example for checking the effect.)

c

 0 to +8 

d

Default: 

0

BNR

<e>
<f>

Reduces block noise (block-shaped distortion generated upon MPEG 
compression) in the picture.


c


d

(The image is only an example for checking the effect.)

c

 0 to +8 

d

Default: 

0

MNR

<e>
<f>

Reduces mosquito noise (distortion generated at the contours of the 
picture upon MPEG compression) in the picture.


c


d

(The image is only an example for checking the effect.)

c

 0 to +8 

d

Default: 

0

DETAIL

<e>
<f>

Adjusts how sharp edges appear.


c


d

(The image is only an example for checking the effect.)

c

 0 to +8 

d

Default: 

0

Setting

What it does

Option(s)

BRIGHT


(Brightness)
<e>
<f>

Adjusts the overall brightness.


c


0


d

(The image is only an example for checking the effect.)

c

 –6 to +6 

d

Default: 

0

CONTRAST

<e>
<f>

Adjusts the contrast between light and dark.


c


0


d

(The image is only an example for checking the effect.)

c

 –6 to +6 

d

Default: 

0

HUE

<e>
<f>

Adjusts the red/green balance.


c


0


d

(The image is only an example for checking the effect.)

c

 –6 to +6 

d

Default: 

0

CHROMA


(Chroma Level)
<e>
<f>

Adjusts saturation from dull to bright.


c


0


d

(The image is only an example for checking the effect.)

c

 –6 to +6 

d

Default: 

0

BLK SETUP


(Black Setup)
<g>

Sets the black level according to the video input signal.
Normally select 

7.5

. If the dark parts of the picture are all black with 

this setting, select 

0

.

0

7.5


Содержание Elite SC-97

Страница 1: ...Operating Instructions AV Receiver SC 97 SC 99 ...

Страница 2: ...s apparatus near water Clean only with dry cloth Do not block any ventilation openings Install in accordance with the manufacturer s instructions Do not install near any heat sources such as radiators heat registers stoves or other apparatus including amplifiers that produce heat Do not defeat the safety purpose of the polarized or grounding type plug A polarized plug has two blades with one wider...

Страница 3: ... of headphones may create a traffic hazard and is illegal in many areas S001a_A1_En WARNING Store small parts out of the reach of children and infants If accidentally swallowed contact a doctor immediately D41 6 4_A1_En FEDERAL COMMUNICATIONS COMMISSION DECLARATION OF CONFORMITY This device complies with part 15 of the FCC Rules Operation is subject to the following two conditions 1 This device ma...

Страница 4: ... computer 48 Connecting an IR receiver 49 Switching components on and off using the 12 volt trigger 49 Plugging in the receiver 49 04 Basic Setup Initial settings of this receiver 51 Setting with a special application Start up Navi 51 Perform settings using the AVNavigator built into this receiver 51 Setting by referring to the operating instructions 53 Setting network connection 53 Automatically ...

Страница 5: ... MCACC Expert 105 Manual MCACC setup 107 Checking MCACC Data 109 Data Management 110 12 The System Setup and Other Setup menus Making receiver settings from the System Setup menu 113 Manual speaker setup 113 MHL Setup 115 The Other Setup menu 116 Making network settings using Safari 119 Using Safari to set a friendly name 119 Using Safari to update the firmware 119 13 FAQ Troubleshooting 122 Power...

Страница 6: ...enter Bi amping connection High quality surround M 5 2 channel surround system Center and Surround Bi amping connection High quality surround N 1 Multi ZONE Music connection N 2 5 2 channel surround system ZONE 2 HDZONE connection Multi Zone N 3 5 2 channel surround system ZONE 2 ZONE 3 connection Multi Zone j 3 Connecting the speakers Placing the speakers on page 24 Connecting the speakers on pag...

Страница 7: ...7 Our philosophy 8 Features 8 Checking what s in the box 10 Installing the receiver 11 Loading the batteries 11 Operating range of remote control unit 11 Before you start ...

Страница 8: ...round sound setup which includes the advanced fea tures of Professional Acoustic Calibration EQ Auto Phase Control Plus For discs created with standards other than Phase Control the LFE channel is delayed upon recording in the first place This function automatically corrects phase shifting on such discs and broadcasts This function is particu larly effective when playing multi channel music contai...

Страница 9: ...File Music playback via Network Front USB and HDMI Playback of high sound quality DSD music DSD files and DSD discs SACDs is supported High Resolution Music Playback High resolution music files with resolutions of 96 kHz 24 bit to 192 kHz 24 bit can be played Playback of AIFF Apple Lossless WAV and FLAC files via the front USB port and network is supported Gapless Playback The silent section betwe...

Страница 10: ...he eco mode can easily be set with a dedicated button on the remote control of using iControlAV5 Checking what s in the box Please check that you ve received the following supplied accessories Setup microphone cable 5 m 16 4 ft Remote control unit AAA size IEC R03 dry cell batteries to confirm system operation x2 AM loop antenna FM wire antenna Power cord CD ROM Quick start guide Safety Brochure W...

Страница 11: ...teries in direct sunlight or other excessively hot place such as inside a car or near a heater This can cause batteries to leak overheat explode or catch fire It can also reduce the life or perfor mance of batteries CAUTION Incorrect use of batteries may result in such hazards as leakage and bursting Observe the following precautions Never use new and old batteries together Insert the plus and min...

Страница 12: ...12 Remote control 13 Display 15 Front panel 16 Controls and displays ...

Страница 13: ...erations on the TV to which the TV INPUT button is assigned The TV can be operated with these buttons regardless of the input set for the remote control s operation mode page 99 6 Receiver Control buttons STATUS Displays the IP address and information such as selected set functions and input signals on the display page 96 OUT P OUTPUT PARAMETER Switches the output terminal of the HDMI signal or sp...

Страница 14: ...DZ HDZONE Holding down this button for 1 5 seconds until the remote control LED flashes one time the mode changes to HDZONE operation 16 VOLUME Use to set the listening volume To adjust the main zone sound volume press MAIN RECEIVER first and then press this button When in the sub zone press the SUB ZONE CONTROL button first and then press this button 17 MUTE Mutes the sound or restores the sound ...

Страница 15: ... MULTI ZONE Lights when the MULTI ZONE feature is active page 95 5 FULL BAND Lights when the Full Band Phase Control is switched on page 76 6 Listening mode indicators ALC Lights when the ALC Auto level control mode is selected page 73 AUTO SURROUND Lights when the Auto Surround feature is switched on page 73 STREAM DIRECT Lights when Direct Pure Direct is selected page 74 ADV SURROUND Lights when...

Страница 16: ...h your fingers and pull forward MAST ER VOLU ME STAN DBY ON INPU T SELE CTOR 8 AUDIO PARAMETER Use to access the Audio options page 89 9 i j k l TUNE PRESET ENTER Use the arrow buttons when setting up your HOME MENU Use TUNE i j to find radio frequencies and use PRESET k l to find preset stations page 68 10 VIDEO PARAMETER Use to access the Video options page 91 11 MULTI ZONE controls If you ve ma...

Страница 17: ...Phone terminals Use to connect your Apple iPod iPhone as an audio source page 47 or connect a USB device for audio and photo playback page 48 22 HDMI 5 INPUT terminal Use for connection to a compatible HDMI device Video camera etc page 48 ...

Страница 18: ... or other set top box 41 Connecting other audio components 42 Connecting additional amplifiers 42 Connecting the multichannel analog inputs 43 Connecting AM FM antennas 43 Making MULTI ZONE connections 44 Connecting to the network through LAN interface 47 Connecting an iPod 47 Connecting a USB device 48 Connecting an MHL compatible device 48 Connecting an HDMI equipped component to the front panel...

Страница 19: ...CK SURROUND CENTER FRONT L R ZONE3 PREOUT ZONE2 PREOUT ZONE3 PREOUT ZONE2 PREOUT ANTENNA OPTICAL COAXIAL DIGITAL AUDIO IN 1 TV IN 2 DVR BDR IN 1 SAT CBL IN 2 DVD Single NETWORK 7 MHL SPEAKERS SELECTABLE HDMI OUT HDMI IN ASSIGNABLE 1 7 VIDEO AUDIO 1 2 OUT 1 1 2 ARC CONTROL RS 232C OUT IN OUTPUT12V TOTAL150 mAMAX 1 1 IN 2 2 CONTROL IR 12V TRIGGER SC 97 AC IN 5V 0 9 A ASSIGNABLE ASSIGNABLE ASSIGNABLE...

Страница 20: ... are connected Dolby Atmos does not play Choose one from Plans A to N below Important The Speaker System setting must be made if you use any of the connections shown below other than A see Speaker system setting on page 113 The speakers from which sound is output can be switched according to the speaker layout usage pattern sound is not necessarily output from all connected speakers Use the OUT P ...

Страница 21: ... speakers SBL SBR and the subwoofers SW 1 SW 2 It is not possible to produce sound simultaneously from the top middle speakers and the front height speakers The speakers from which sound is output can be switched using the OUT P button For details see Switching the speaker terminals on page 93 Front wide is output from the PRE OUT EXTRA 2 terminals of the receiver Connect the EXTRA 2 terminal to t...

Страница 22: ...rnal amplifier and connect the external amplifier to the top middle speaker Playback of Dolby Atmos requires a connection with surround back speakers or top middle speakers G 7 2 2 channel surround system Speaker B connection Speaker System setting 7 2 2 7 2ch SP B SBR SBL SR R L SL R SW2 C SW1 L Speaker B TMdL TMdR With these connections you can simultaneously enjoy 7 2 channel surround sound in ...

Страница 23: ... zone with stereo playback of the same sound on the B speakers The B speakers can be bi amped to achieve high quality sound The speakers from which sound is output can be switched using the OUT P button For details see Switching the speaker terminals on page 93 You cannot playback Dolby Atmos with this system K 5 2 channel surround system Front and Surround Bi amping connection High quality surrou...

Страница 24: ...ties for example set this to Multi ZONE Music to associate all zones with the main zone You cannot playback Dolby Atmos with this system Other speaker connections Your favorite speaker connections can be selected even if you have fewer than 5 2 speakers except front left right speakers When not connecting a subwoofer connect speakers with low frequency reproduction capabilities to the front channe...

Страница 25: ... quality Where you put your speakers in the room has a big effect on the quality of the sound The following guidelines should help you to get the best sound from your system The subwoofer can be placed on the floor Ideally the other speakers should be at about ear level when you re listening to them Putting the speakers on the floor except the subwoofer or mounting them very high on a wall is not ...

Страница 26: ... cable to connect the subwoofer It is not possible to connect using speaker cables If you have two subwoofers the second subwoofer can be connected to the SUBWOOFER 2 terminal Connecting two subwoofers increases the bass sound to achieve more powerful sound reproduction In this case the same sound is output from the two subwoofers Banana plug connections If you want to use speaker cables terminate...

Страница 27: ...rround back speaker if you like it must be con nected to the left surround back terminal A 7 2 2 channel surround system Surround back Top middle connection If necessary select 7 2 2 5 2 2 7 2ch from the Speaker System menu See Speaker system setting on page 113 to do this When only connecting one surround back speaker connect it to the SURROUND BACK L Single terminals In Speaker Setting when TMd ...

Страница 28: ...Top middle left Surround left Surround back right Surround back left Surround right When only connecting one surround back speaker connect it to the SURROUND BACK L Single terminals When TMd is set to Dolby Sp Surr in Speaker Setting page 114 PRE OUT SURROUND SURR BACK T MIDDLE Single FRONT CENTER SUBWOOFER 1 2 FRONT CENTER R L SURROUND R L SURROUND BACK R L TOP MIDDLE R L EXTRA 1 EXTRA 2 EXTRA 1 ...

Страница 29: ...plifier to Dolby Enabled Speaker When Speaker System is set to 7 2 2 7 2ch SP B refer to G 7 2 2 channel surround system Speaker B connection on page 32 to connect the top middle channel to Dolby Enabled Speaker Top forward top backward channel connection When Speaker System is set to 7 2 4ch SB Pre out page 113 When TFw is set to Dolby Sp Front and TBw is set to Dolby Sp Surr in Speaker Setting p...

Страница 30: ...be automatically set to NO When Speaker System is set to 7 2 4ch Front Pre out refer to E 7 2 4 channel surround Front Pre Out con nection on page 31 to connect EXTRA 1 and front channel to Dolby Enabled Speaker C 9 2 2 channel surround system Top middle Front height connection Select 9 2 2ch TMd FH from the Speaker System menu See Speaker system setting on page 113 to do this When only connecting...

Страница 31: ...fer 1 Surround left Surround right Surround right Surround back channel amplifier E 7 2 4 channel surround Front Pre Out connection Select 7 2 4ch Front Pre out from the Speaker System menu See Speaker system setting on page 113 to do this When only connecting one surround back speaker connect it to the SURROUND BACK L Single terminals Front is output from the PRE OUT EXTRA 2 terminals of the rece...

Страница 32: ...INELEVEL INPUT High Low High Low R L ANALOG INPUT Bi amp compatible speaker Front right Bi amp compatible speaker Front left Center Subwoofer 2 Subwoofer 1 Surround left Surround back right Surround back left Surround right Top middle channel amplifier G 7 2 2 channel surround system Speaker B connection Select 7 2 2 7 2ch SP B from the Speaker System menu See Speaker system setting on page 113 to...

Страница 33: ...t Front left Front right Center Subwoofer 2 Subwoofer 1 Surround left Surround back right Surround back left Surround right I 5 2 channel surround system Front Bi amping connection High quality surround HDZONE connection Multi Zone Select 5 2 Bi Amp HDZONE from the Speaker System menu See Speaker system setting on page 113 to do this PRE OUT SURROUND SURR BACK T MIDDLE Single FRONT CENTER SUBWOOFE...

Страница 34: ... amp compatible speaker Speaker B right Bi amp compatible speaker Speaker B left K 5 2 channel surround system Front and Surround Bi amping connection High quality surround Select 5 2ch F Surr Bi Amp from the Speaker System menu See Speaker system setting on page 113 to do this PRE OUT SURROUND SURR BACK T MIDDLE Single FRONT CENTER SUBWOOFER 1 2 FRONT CENTER R L SURROUND R L SURROUND BACK R L TOP...

Страница 35: ...mpatible speaker Front left Bi amp compatible speaker Center Subwoofer 2 Subwoofer 1 Surround left Surround right M 5 2 channel surround system Center and Surround Bi amping connection High quality surround Select 5 2ch C Surr Bi Amp from the Speaker System menu See Speaker system setting on page 113 to do this PRE OUT SURROUND SURR BACK T MIDDLE Single FRONT CENTER SUBWOOFER 1 2 FRONT CENTER R L ...

Страница 36: ...ENTER R L SURROUND R L SURROUND BACK R L TOP MIDDLE R L EXTRA 1 EXTRA 2 EXTRA 1 R L Single SPEAKERS SELECTABLE LINELEVEL INPUT LINELEVEL INPUT ZONE 3 left ZONE 3 right HDZONE left HDZONE right Front left Front right Center Subwoofer 2 Subwoofer 1 Surround left ZONE 2 right ZONE 2 left Surround right About the audio connection Transferable audio signals Sound signal priority HDMI HD audio Digital C...

Страница 37: ...3D signal transfer Deep Color signal transfer x v Color signal transfer ARC Audio Return Channel 4K signal transfer This may not operate properly depending on the connected equipment 4K 24p 4K 25p 4K 30p 4K 50p and 4K 60p signals are supported Input of multi channel linear PCM digital audio signals 192 kHz or less for up to 8 channels Input of the following digital audio formats Dolby Digital Dolb...

Страница 38: ...4 In the same way when an HDMI DVI compatible monitor is connected to the HDMI OUT 3 terminal switch the HDMI OUT 3 setting to ON page 94 In this case MAIN HDZONE at ZONE Setup must be set to MAIN page 117 For input components connections other than HDMI connections are also possible see Connecting your DVD player with no HDMI output on page 39 If you want to listen to the sound of the TV over the...

Страница 39: ...MI Setup on page 85 When connecting to a DVD player with an optical digital audio cable or a coaxial digital audio cable perform ing input terminal settings are necessary page 61 If HDZONE is set to on video images connected using a video cable or component cable are not output from the HDMI terminal To output video images turn HDZONE off page 95 Connecting your TV with no HDMI input This diagram ...

Страница 40: ...SIGNABLE L R DVR BDR IN SAT CBL IN OUT MONITOR OUT IN 1 CD PHONO IN SIGNAL GND ZONE3 PREOUT ZONE2 PREOUT ZONE3 PREOUT ZONE2 PREOUT OPTICAL COAXIAL DIGITAL AUDIO IN 1 TV IN 2 DVR BDR IN 1 SAT CBL IN 2 DVD VIDEO AUDIO OUT 1 1 2 DVR BDR IN ZONE3 PREOUT ZONE2 PREOUT SAT CBL IN OUT MONITOR OUT VIDEO AUDIO ASSIGNABLE ASSIGNABLE L R IN 1 CD PHONO IN SIGNAL GND OPTICAL COAXIAL DIGITAL AUDIO IN 1 TV IN 2 D...

Страница 41: ...able and set V CONV to ON page 91 If HDZONE is set to on video images connected using a video cable or component cable are not output from the HDMI terminal To output video images turn HDZONE off page 95 If you use an optical digital audio cable or RCA analog audio cable you ll need to tell the receiver which digi tal input you connected the set top box to see The Input Setup menu on page 61 If yo...

Страница 42: ...hear HDMI audio through this receiver s digital out jack Connecting additional amplifiers This receiver has more than enough power for any home use but it s possible to add additional amplifiers to every channel of your system using the pre outs Make the connections shown below to add amplifiers to power your speakers PRE OUT SURROUND SURR BACK T MIDDLE Single FRONT CENTER SUBWOOFER 1 2 EXTRA 1 EX...

Страница 43: ...r instructions on playing the multichannel analog inputs see Selecting the multichannel analog inputs on page 64 If there is a single surround back output connect it to the SURR BACK L jack on this receiver To use a 5 1 channel speaker set use the surround speakers for the surround channel not the surround back channel The sound from the surround back terminals will depend on how you have configur...

Страница 44: ...b BD DVD SAT CBL DVR BDR INTERNET RADIO PANDORA Spotify MEDIA SERVER FAVORITES iPod USB USB DAC SC 99 only HDMI 1 HDMI 2 HDMI 3 HDMI 4 HDMI 5 HDMI 6 HDMI 7 MHL BT AUDIO Outputs HDMI audio and video signals a It is not possible to down convert the audio input signal from the HDMI input terminals or digital input terminals OPTICAL and COAXIAL and output them to ZONE 2 It is not possible to down conv...

Страница 45: ...er terminals You should have a pair of speakers attached to the surround back speaker terminals as shown below Single SURROUND BACK R L Single SURROUND BACK R L R L Sub zone ZONE 2 Main zone Secondary MULTI ZONE setup ZONE 3 Connect a separate amplifier to the AUDIO ZONE 3 OUT jacks on this receiver You should have a pair of speakers attached to the sub zone amplifier as shown in the following ill...

Страница 46: ...tant The settings must be changed at ZONE Setup in order to use the HDZONE function page 117 To use the HDZONE functions set Control or Control Mode in HDMI Setup to OFF For details see HDMI Setup on page 85 It is neccessary to set the Speaker System to 7 2ch HDZONE 5 2 Bi Amp HDZONE or 5 2 ZONE 2 HDZONE page 113 1 Connect the speakers to the EXTRA 1 terminals or the SURROUND BACK terminals Which ...

Страница 47: ...t in damage Wireless antenna Refer to the operation manual of the equipment you have as the connected equipment and connection method may differ depending on your Internet environment When using a broadband Internet connection a contract with an Internet service provider is required For more details contact your nearest Internet service provider Connecting an iPod This receiver has a dedicated iPo...

Страница 48: ...HL Setup on page 115 The MHL compatible device is recharged whenever it is connected to this unit Recharging is enabled only when the unit s power is turned on For instructions on playing the MHL compatible device see Playing an MHL compatible device on page 67 Do not place the MHL device on this unit which has the power turned on Connecting an HDMI equipped component to the front panel input HDMI...

Страница 49: ...12V TRIGGER OUTPUT12V TOTAL150 mAMAX 1 2 12V TRIGGER 12VTRIGGER INPUT Connect the 12 V TRIGGER jack of this receiver to the 12 V trigger of another component Use a cable with a mono mini plug on each end for the connection After you ve specified the input functions that will switch on the trigger you ll be able to switch the component on or off just by pressing the input function s you ve set on p...

Страница 50: ...orm settings using the AVNavigator built into this receiver 51 Setting by referring to the operating instructions 53 Setting network connection 53 Automatically conducting optimum sound tuning Full Auto MCACC 59 The Input Setup menu 61 Changing the OSD display language OSD Language 62 Basic Setup ...

Страница 51: ...med easily Additionally in order to use various functions easily contents linked to the receiver can be used Operating Environment AVNavigator can be used in the following environments Windows PC Microsoft Windows Vista Windows 7 Windows 8 Windows 8 1 Mac OS X v 10 9 or 10 8 iPad iPhone iPod touch iOS 6 1 or later Android operation confirmation device SONY XPERIA Z1 OS 4 2 2 SAMSUNG GALAXY S5 OS 4...

Страница 52: ... that on the Home screen tap AVNavigator or the icon iPad iPhone iPod touch When using an Android device from Google Play Store download iControlAV5 which is a free application After launching iControlAV5 follow the instructions on the screen After that on the Home screen tap the icon 3 Select and use the desired function AVNavigator includes the following functions Wiring Navi Guides you through ...

Страница 53: ...less LAN WAN 3 2 1 LAN WPS PBC Connecting a router without a WPS PBC function with this receiver WAN 3 2 1 LAN WPS PBC Connecting a router with a WPS PBC function with this receiver WAN 3 2 1 LAN Connecting this receiver and router with a wired LAN If you do not have a router Directly connecting your smart phone to this receiver Wireless Direct D G C B A H E F Connecting the router with this recei...

Страница 54: ... the Network Connection menu 8 Select the DHCP setting you want When you select ON the network is automatically set up and you do not need to follow Steps 9 Proceed with Step 10 If there is no DHCP server on the network and you select ON this receiver will use its own Auto IP function to determine the IP address The IP address determined by the Auto IP function is 169 254 X X You cannot listen to ...

Страница 55: ...n 5 Press HOME MENU 6 Select Network Bluetooth from the HOME MENU 7 Select Network Connection from the Network Bluetooth menu 8 Select Wireless from the Network Connection menu 9 Select Wireless Accessory Config WAC Wireless Accessory Configuration mode is a mode that allows you to set the network settings by operating this receiver as a Wi Fi access point 10 Select START then press ENTER The SSID...

Страница 56: ...r con nection Connection settings are performed by entering the access point to which the 8 digit PIN code shown on the screen of this receiver is to be connected 1 Select the connection point to which the wireless LAN is to be connected with i j and press ENTER The PIN code will be shown 2 Check the PIN code of this receiver 3 Enter the PIN code in the access point Enter in the access point whose...

Страница 57: ...rformed on the browser on your computer Check that the LAN cable is not connected to this receiver 1 Select Network Type from the Network Bluetooth menu 2 Use k l to select Wireless 3 Select OK then press ENTER The confirmation screen will be displayed Select YES and press ENTER The on screen display will close and the home menu will be disabled for about 60 seconds After 60 seconds execute the fo...

Страница 58: ...reen will be displayed Select YES and press ENTER The on screen display will close and the home menu will be disabled for about 60 seconds After 60 seconds execute the following operation Other network settings Set the network other than for connection 1 Press MAIN RECEIVER to switch the remote control to the receiver operation mode and then press HOME MENU A Graphical User Interface GUI screen ap...

Страница 59: ...to confirm your selection It is not possible to set the same port number more than once 4 If there are other port numbers you want to change repeat steps 2 and 3 Note We recommend setting the port number to 00023 or within the range of 49152 to 65535 Automatically conducting optimum sound tuning Full Auto MCACC The Full Auto MCACC Setup measures the acoustic characteristics of your listening area ...

Страница 60: ...omatically In this case you don t need to select OK and press ENTER in step 7 With error messages such as Too much ambient noise or Check microphone select RETRY after check ing for ambient noise see Problems when using the Auto MCACC Setup on page 61 and verifying the mic connection If there doesn t seem to be a problem you can simply select GO NEXT and continue Now Analyzing 2 9 Environment Chec...

Страница 61: ...e rear panel such as DVD or SAT CBL which in turn correspond with the names on the remote control 5 Select the input s to which you ve connected your component For example if your DVD player only has an optical output you will need to change the DVD input function s Audio In setting from COAX 1 default to the optical input you ve connected it to 6 When you re finished proceed to the settings for o...

Страница 62: ...ch on the receiver and your TV Make sure that the TV s video input is set to this receiver for example if you connected this receiver to the VIDEO jacks on your TV make sure that the VIDEO input is now selected 2 Press MAIN RECEIVER to switch the remote control to the receiver operation mode and then press HOME MENU A Graphical User Interface GUI screen appears on your TV Use i j k l and ENTER to ...

Страница 63: ...ource 64 Playing an iPod 65 Playing a USB device 66 Playing an MHL compatible device 67 Playing music from a computer 68 Listening to the radio 68 Music playback using Bluetooth wireless technology 69 Basic playback ...

Страница 64: ...ming from the speakers connected to this receiver Note Depending on the input to be played the playback operation can in some cases be performed using the on screen display With factory default settings the on screen display will be output from all HDMI output terminals and displayed on any TV connected via HDMI cable You can change where the screen is output in the MAIN HDZONE page 117 and HDMI o...

Страница 65: ...o the iPod USB When the display shows the names of folders and files you re ready to play music from the iPod Playing back audio files stored on an iPod To navigate songs on your iPod you can take advantage of the GUI screen of your TV connected to this receiver You can also control all operations for music in the front panel display of this receiver Note that characters that cannot be displayed o...

Страница 66: ... that non Roman characters in the playlist are displayed as 1 Use i j to select a folder then press ENTER to browse that folder To return to the previous level any time press RETURN 2 Continue browsing until you arrive at what you want to play then press d to start playback Copyrighted audio files cannot be played back on this receiver DRM protected audio files cannot be played back on this receiv...

Страница 67: ...1 kHz 48 kHz 88 2 kHz 96 kHz 176 4 kHz 192 kHz Quantization bitrate 16 bit 24 bit Channel 2 ch Category Extension Stream DSD f dff dsf DSDIFF DSF Sampling frequency 2 8224 MHz 5 6448 MHz Quantization bitrate 1 bit Channel 2 ch a MPEG Layer 3 audio decoding technology licensed from Fraunhofer IIS and Thomson multimedia b 32 kHz supports 2 channel audio sources only c Files encoded using Windows Med...

Страница 68: ...upported for DSD When Speaker System is set to 7 2 2 7 2ch SP B or 5 2ch SP B Bi Amp the audio signals of DSD files are not output to Speaker B When USB DAC is selected in the sub zone DSD files and PCM signals with a sampling frequency of 176 4 kHz cannot be played When playing PCM signals at sampling frequency of 176 4 kHz the listening mode becomes PURE DIRECT You will be unable to select anoth...

Страница 69: ...rst character position 3 Input the name you want Use i j or TUNE i j of front panel to select a character k l or PRESET k l of front panel to set the position and ENTER to confirm your selection Notes To erase a station name simply repeat steps 1 to 3 and input eight spaces instead of a name Once you have named a station preset you can press DISP when listening to a station to switch the display b...

Страница 70: ... Bluetooth capable device that pairing has been completed If pairing with the Bluetooth capable device has been completed correctly CONNECTED will be displayed on the front panel of the unit Listen to music on the unit from a Bluetooth capable device 1 A Bluetooth connection will be created between the Bluetooth capable device and the unit Procedures for connecting to the unit should be performed ...

Страница 71: ...uildings Near large metallic furniture In a crowd of people or near a building or obstacle In a location exposed to the magnetic field static electricity or radio wave interference from radio communica tion equipment using the same frequency band 2 4 GHz as this unit such as a 2 4 GHz wireless LAN device IEEE802 11b g or microwave oven If you live in a heavily populated residential area apartment ...

Страница 72: ...es of playback using the listening modes 73 Selecting MCACC presets 75 Choosing the input signal 75 Better sound using Phase Control 75 Better sound using Phase Control and Full Band Phase Control 76 Listening to your system ...

Страница 73: ... can be adjusted using the EFFECT parameter in Setting the Audio options on page 89 Standard surround sound The following modes provide basic surround sound for stereo and multichannel sources While listening to a source press SURR STANDARD SURROUND If necessary press repeatedly to select a listening mode If the source is Dolby Digital DTS or Dolby Surround encoded the proper decoding format will ...

Страница 74: ...MODE 2 can be selected Using Stream Direct Use the Stream Direct modes when you want to hear the truest possible reproduction of a source All unneces sary signal processing is bypassed and you re left with the pure analog or digital sound source Processing differs depending on the input signal and whether or not surround back speakers are connected For details see Auto Surround ALC and Stream Dire...

Страница 75: ...sound will be heard through your TV not from this receiver When set to DIGITAL HDMI or AUTO only selected DIGITAL or HDMI the indicators light according to the signal being decoded see Display on page 15 Better sound using Phase Control This receiver s Phase Control feature uses phase correction measures to make sure your sound source arrives at the listening position in phase preventing unwanted ...

Страница 76: ...ess MAIN RECEIVER to switch the remote control to the receiver operation mode and then press AUDIO P 2 Use i j to select PHASE 3 Use k l to select FULLBND Both the Phase Control and Full Band Phase Control functions are switched on The FULL BAND and indica tor on the front panel lights Notes The original characteristics of group delay of the speakers calibrated and the targeted characteristics aft...

Страница 77: ...77 Introduction 78 Playback with Network functions 79 About network playback 81 About playable file formats 83 Playback with NETWORK features ...

Страница 78: ...VOLUME MUTE and DISP Depending on the external controller being used playback may be interrupted when the volume is adjusted from the controller In this case adjust the volume from the receiver or remote control Using AirPlay on iPod touch iPhone iPad and iTunes AirPlay works with iPhone iPad and iPod touch with iOS 4 3 3 or later Mac with OS X Mountain Lion or later and PC with iTunes 10 2 2 or l...

Страница 79: ...select the desired item When you press ENTER playback starts with the playback screen being displayed for the selected item To return to the list screen press RETURN When the list screen is displayed from the playback screen the playback screen reappears automatically if no operation is performed for three minutes while the list screen is displayed Only audio files with the mark can be played In c...

Страница 80: ...ess code in step 3 to perform user registration following the instructions on the screen 5 Register the desired broadcast stations as your favorites following the instructions on the computer s screen Both broadcast stations not on the vTuner list and stations on the vTuner list can be registered In this case they are registered on the receiver as favorite broadcast stations and can be played List...

Страница 81: ...back audio files stored on components on the network This unit allows you to play music on media servers connected on an identical Local Area Network LAN as the receiver This unit allows for the playing of files stored on the following devices PCs running Microsoft Windows Vista or XP with Windows Media Player 11 installed PCs running Microsoft Windows 7 or Windows 8 with Windows Media Player 12 i...

Страница 82: ...OR SPECIAL INCIDENTAL INDIRECT OR CONSEQUENTIAL DAMAGES OF ANY KIND INCLUDING WITHOUT LIMITATION DAMAGES FOR ATTORNEY S FEES LOST DATA OR LOST PROFITS REGARDLESS OF THE THEORY OF LIABILITY AND WHETHER OR NOT ADVISED OF THE POSSIBILITY OF SUCH DAMAGES IN NO EVENT WILL PIONEER S TOTAL LIABILITY TO YOU FOR ALL DAMAGES ARISING FROM THE USE OR INABILITY TO USE THIRD PARTY CONTENT SERVICES OTHER THAN AS...

Страница 83: ...8 9 d Sampling frequency 32 kHz 44 1 kHz 48 kHz Quantization bitrate 16 bit Channel 2 ch Bitrate 5 kbps to 320 kbps VBR CBR Supported Supported AAC m4a aac 3gp 3g2 MPEG 4 AAC LC MPEG 4 HE AAC Sampling frequency 32 kHz 44 1 kHz 48 kHz Quantization bitrate 16 bit Channel 2 ch Bitrate 16 kbps to 320 kbps VBR CBR Supported Supported Apple Lossless m4a mp4 Apple Lossless Sampling frequency 32 kHz 44 1 ...

Страница 84: ...with HDMI connections 85 HDMI Setup 85 Before using synchronization 86 About synchronized operations 86 Setting the PQLS function 87 About Sound Retriever Link and Stream Smoother Link 87 Cautions on the Control with HDMI function 87 Control with HDMI function ...

Страница 85: ...e 84 To get the most out of this function we recommend that you connect your HDMI component not to a TV but rather directly to the HDMI terminal on this receiver The Control with HDMI function works on the TV connected to the HDMI OUT 1 terminal It does not work on TVs connected to the HDMI OUT 2 or HDMI OUT 3 terminals HDMI Setup You must adjust the settings of this receiver as well as the connec...

Страница 86: ... 1 Put all components into standby mode 2 Turn the power on for all components with the power for the TV being turned on last 3 Choose the HDMI input to which the TV is connected to this receiver and see if video output from connected components displays properly on the screen or not 4 Check whether the components connected to all HDMI inputs are properly displayed About synchronized operations Im...

Страница 87: ...the player Depending on the compressed audio video file format it may not be operated automatically Also see the player s operating instructions Sound Retriever Link When playing a compressed audio file on the player the file s bitrate information is acquired using the Control with HDMI function and the sound is optimized on the receiver based on this information To activate the Sound Retriever Li...

Страница 88: ...60p signal input setting 94 Changing the channel level while listening 94 Using the MULTI ZONE controls 95 Making an audio or a video recording 96 Network settings from a web browser 96 Using the sleep timer 96 Dimming the display 96 Checking your system settings 96 Resetting the system 97 Using other functions ...

Страница 89: ...sts the amount of treble c 6 to 6 dB d Default 0 dB S RTRV Auto Sound Retriever b With the Auto Sound Retriever function DSP processing is used to compensate for the loss of audio data upon compression improving the sound s sense of density and modulation Also when a player supporting the Sound Retriever Link function is connected to the receiver by HDMI by setting this to ON the bitrate informati...

Страница 90: ...rround back channel information OFF ON V HEIGHT Virtual Height o Settings to create virtual front height channel audio OFF ON V WIDE Virtual Wide p When you re not using front wide speakers selecting this mode allows you to hear a virtual front wide channel through your front speakers This improves the continuity of the sound from the front channel to the surround channels OFF ON AMP q This is set...

Страница 91: ... selected on the VIDEO PARAMETER menu it is unavailable due to the current source setting and status of the receiver All of the setting items can be set for each input function However with the audio only input function VIDEO PARAMETER cannot be set Also when HDZONE is set to ON VIDEO PARAMETER cannot be set does not work Setting items other than V CONV can only be selected when V CONV is set to O...

Страница 92: ... 8 d Default 0 DETAIL e f Adjusts how sharp edges appear c d The image is only an example for checking the effect c 0 to 8 d Default 0 Setting What it does Option s BRIGHT Brightness e f Adjusts the overall brightness c 0 d The image is only an example for checking the effect c 6 to 6 d Default 0 CONTRAST e f Adjusts the contrast between light and dark c 0 d The image is only an example for checki...

Страница 93: ...oned above if you have selected 7 2 2 5 2 2 7 2ch 7 2 4ch SB Pre out 7 2 4ch Front Pre out 7 2 2ch Front Bi Amp 7 2ch HDZONE 5 2 Bi Amp HDZONE 5 2ch F Surr Bi Amp 5 2ch F C Bi Amp 5 2ch C Surr Bi Amp Multi ZONE Music 5 2 ZONE 2 HDZONE or 5 2 ZONE 2 ZONE 3 the button will simply switch your main speaker terminal A on or off Pre AMP mode The pre amp mode is a mode for reducing power consumption when...

Страница 94: ... setting if the multizone function is not set to MULTI ZONE OFF page 95 1 Switch the receiver into standby 2 While holding down ENTER on the front panel press u STANDBY ON The display shows RESET c NO d 3 Select an input terminal that you wish to change settings using i j 4K 60pBD Sets the signal for the BD IN terminal 4K 60pH1 Sets the signal for the HDMI IN 1 terminal 4K 60pH2 Sets the signal fo...

Страница 95: ...re for a while turn off the power in both the sub and main rooms so that this receiver is in standby Note When HDZONE is turned on the video converter function is disabled For that reason video connected with the video cable or component cable is not output from the HDMI terminal To enable the video converter function turn off HDZONE ZONE 2 remote controls Before operation hold down Z2 on the remo...

Страница 96: ...put the receiver s IP address into the browser s address input field Access the IP address http the receiver s IP address from a web browser You can display the IP address of the unit on the unit s display by pressing the STATUS button on the remote control When connected with the receiver the AVNavigator menu screen appears in the browser 4 On the AVNavigator menu screen select Network Setup 5 Se...

Страница 97: ...R Brightest Inputs See Input function default and possible settings on page 61 Input Volume Absorber All Inputs 0dB HDMI HDMI Audio AMP Control OFF Control Mode OFF ARC Audio Return Channel OFF PQLS AUTO Standby Through OFF 4K 60pBD 4 2 0 4K 60pH1 HDMI IN 1 4 2 0 4K 60pH2 HDMI IN 2 4 2 0 Setting Default DSP Power On Level LAST Volume Limit OFF Mute Level FULL Phase Control ON Auto Sound Retriever ...

Страница 98: ...amming signals from other remote controls 100 Erasing one of the remote control button settings 100 Erasing all learnt settings that are in one input function 100 Using All Zone Standby 101 Setting the switching time for the receiver operation mode 101 Resetting the remote control settings 101 Controlling components 102 Controlling the rest of your system ...

Страница 99: ...de Setup on page 117 1 Press and hold RCU SETUP then press 4 for three seconds Release the button after the LED flashes once The LED continues to flash To cancel the preset setup mode press RCU SETUP 2 Press the number button for the receiver Receiver 1 to Receiver 4 you wish to operate For example to operate Receiver 2 press 2 If the LED lights for one second the setting has been successfully com...

Страница 100: ...e up more memory note that some signals may take more memory than others Note that interference from TVs or other devices will sometimes result in the remote control learning the wrong signal Some commands from other remote controls cannot be learned but in most cases the remotes just need to be moved closer together or farther apart 5 To program additional signals for the current component repeat...

Страница 101: ...n mode to operate this unit You can set to automatically switch to AV amplifier operation mode when a certain period of time elapses after remote operation of each input function is finished See Setting the switching time for the receiver operation mode on page 101 1 Press and hold RCU SETUP then press 5 for three seconds The LED flashes once 2 Press the number buttons of the time you wish to set ...

Страница 102: ...OWER ON OFF POWER ON OFF POWER ON OFF POWER ON OFF Number buttons numerics numerics numerics numerics numerics numerics CLR dot KURO LINK CLEAR ENTER CLASS CH ENTER CH ENTER ENTER ENTER ENTER EXIT INFO EXIT TOP MENU TOP MENU LIST TOOLS GUIDE EPG USER MENU TOOLS a GUIDE GUIDE i j k l i j k l i j k l i j k l i j k l i j k l ENTER ENTER ENTER ENTER ENTER ENTER HOME MENU HOME MENU HOME MENU HOME MENU ...

Страница 103: ...j k l e g m n ENTER ENTER SACD SETUP b RETURN d d d d d e e e e e g g g g g m m m m m n n n n n o o o o o p p p p p AUDIO AUDIO PURE AUDIO b DISP DISPLAY INFO TIME b a Controls for MD b Controls for SACD TV Projector Button s TV Projector u SOURCE POWER ON 1 MOVIE 2 STANDARD 3 DYNAMIC 4 USER1 5 USER2 6 USER3 7 COLOR 8 SHARP 9 GAMMA 0 COLOR CLR SHARP ENTER CLASS COLOR TEMP EXIT INFO i j k l i j k l...

Страница 104: ...104 Making receiver settings from the MCACC PRO menu 105 Automatic MCACC Expert 105 Manual MCACC setup 107 Checking MCACC Data 109 Data Management 110 The MCACC PRO menu ...

Страница 105: ...een is not displayed refer to Making receiver settings from the MCACC PRO menu on page 105 2 Select the parameters you want to set Use i j to select the item then use k l to set Auto MCACC The default is ALL recommended but you can limit the system calibration to only one set ting to save time if you want When data measurement is taken after selecting ALL or Keep SP System the reverb characteristi...

Страница 106: ... If the speaker is not pointed to the microphone listening position or when using speakers that affect the phase dipole speakers reflective speakers etc Reverse Phase may be displayed even if the speakers are properly connected If Reverse Phase is displayed the speaker s wiring and may be inverted Check the speaker connections If the connections were wrong turn off the power disconnect the power c...

Страница 107: ...aker level so you may want to keep the level around 0 0dB so that you ll have plenty of room to adjust the other speaker levels After pressing ENTER test tones will be output 3 Select each channel in turn and adjust the levels 12 0 dB as necessary Use k l to adjust the volume of the speaker you selected to match the reference speaker When it sounds like both tones are the same volume press j to co...

Страница 108: ...You will return to the Manual MCACC setup menu Notes Changing the frequency curve of one channel too drastically will affect the overall balance If the speaker bal ance seems uneven you can raise or lower channel levels using test tones with the TRIM feature Use k l to select TRIM then use i j to raise or lower the channel level for the current speaker Speaker Setting channels set as SMALL or Dolb...

Страница 109: ...tments that were previ ously performed by skilled installers by ear can easily be performed watching the gauge on the monitor Place the microphone in the same position as when the microphone was connected and the Full Auto MCACC operation was performed 1 Select Precision Distance from the Manual MCACC setup menu 2 Fine adjust the positions of the speakers in sequence starting from the front right ...

Страница 110: ...er group delay results See Better sound using Phase Control on page 75 for more on this 1 Select Group Delay from the MCACC Data Check menu 2 When Channel is highlighted use k l to select the channel you want to check The result of group delay calibration for the selected channel is displayed When measurements have been performed with Full Auto MCACC selected at MCACC PRO or with ALL or Full Band ...

Страница 111: ...to copy them To Make sure you don t overwrite an MCACC preset you re currently using this can t be undone 4 Select OK to confirm and copy the settings When MCACC Memory Copy is displayed select YES If NO is selected the memory is not copied Completed shows in the GUI screen to confirm the MCACC preset has been copied then you automatically return to the Data Management setup menu Clearing MCACC pr...

Страница 112: ...tem Setup menu 113 Manual speaker setup 113 MHL Setup 115 The Other Setup menu 116 Making network settings using Safari 119 Using Safari to set a friendly name 119 Using Safari to update the firmware 119 The System Setup and Other Setup menus ...

Страница 113: ...ance of your speaker system for movie soundtracks page 115 3 Make the adjustments necessary for each setting pressing RETURN to confirm after each screen Speaker system setting Default setting 7 2 2 5 2 2 7 2ch This receiver can be used for various applications such as surround back terminal and top middle speaker termi nal Here application for these terminals are set Select from the following ite...

Страница 114: ...nel is sent to the front speakers You can adjust this setting only when Speaker System setting is 7 2 4ch SB Pre out or 7 2 4ch Front Pre out When you set TBw to NO this setting is automatically set to NO TBw Select LARGE if your top backward speakers reproduce bass frequencies effectively or select SMALL to send bass frequencies to the other speakers or subwoofer When setting up the Dolby Enabled...

Страница 115: ...large rooms The X Curve setting acts as a kind of re equalization for home theater listening and restores proper tonal balance of movie soundtracks 1 Select X Curve from the Manual SP Setup menu 2 Choose the X Curve setting you want Use k l to adjust the setting The X Curve is expressed as a downwards slope in decibels per octave starting at 2 kHz The sound becomes less bright as the slope increas...

Страница 116: ...mum volume of this receiver or specify what the volume level will be when the power is turned on 1 Select Volume Setup from the Other Setup menu 2 Select the Power ON Level setting you want The volume can be set so that it is always set to the same level when the receiver s power is turned on LAST default When the power is turned on the volume is set to the same level as when the power was last tu...

Страница 117: ...ct System Setup and press ENTER 3 Use i j to select Other Setup and press ENTER 4 Use i j to select Update and press ENTER 5 Use i j to select via USB and press ENTER 6 Once OK appears then press ENTER 7 Once UPDATE cNO appears use k to select YES and press ENTER Software update will start On Screen Display Setup When the receiver is operated its status the input name listening mode etc is display...

Страница 118: ...the volume is set to the level set the last time you were listening to that zone When MULTI ZONE is turned on the volume for that zone is set to the minimum 80 0dB to 0dB When MULTI ZONE is turned on the volume is set to the level set here The volume can be set up to the value set at Volume Limit below 5 Select the Volume Limit setting you want The maximum volume for the zone selected in step 2 ca...

Страница 119: ...ly name 1 Launch Safari on your computer 2 Press Bookmark icon Click Bonjour list a and then select this receiver s name Friendly Name b in Bookmark If Bonjour list is not displayed access the IP address http the receiver s IP address from Safari 3 On the AVNavigator menu screen select Network Setup 4 Click Friendly Name 5 Input a friendly name then press Apply Note This setting for the network ha...

Страница 120: ...n screen is displayed If you continue the firmware update press OK Once the firmware update process starts you cannot stop it Wait until the file is uploaded about one minute may be required depending on your LAN connection environment a b 7 The firmware upload status screen is displayed The upload process finished successfully will be shown when the update is completed Once updating is completed ...

Страница 121: ...er audio problems 123 BT AUDIO 124 Video 124 Settings 125 Professional Calibration EQ graphical output 125 Display 125 Remote control 126 HDMI 126 MHL 127 Built in AVNavigator 127 USB interface 127 iPod 128 Network 128 USB DAC 130 Wireless LAN 130 FAQ ...

Страница 122: ...ndependent service company Symptom Remedy During loud playback the power sud denly switches off Turn down the volume Lower the 63 Hz and 125 Hz equalizer levels in the Manual MCACC setup on page 107 Switch on the digital safety feature While holding down ENTER on the front panel press u STANDBY ON to set this receiver to the standby mode Use TUNE i j to select D SAFETY cOFFd and then use PRESET k ...

Страница 123: ...ODE 2 reduce the power consumption the speakers are switched in function of the number of input channels Because of this a speaker switching sound clicking sound may be produced when the number of input channels is switched If this bothers you switch to a different listening mode Depending on the listening mode the top middle and front height speakers may switch automatically in function of change...

Страница 124: ...rrect Some components such as video game units have resolutions that may not be con verted If adjusting this receiver s Resolution setting in Setting the Video options on page 91 and or the resolution settings on your component or display doesn t work try switching V CONV in Setting the Video options on page 91 to OFF When the device is connected using an HDMI OUT terminal press the remote con tro...

Страница 125: ...gs have been erased The power cord was disconnected from the wall while adjusting this setting Settings are only stored if all the zones are turned off Turn off all the zones before unplugging the power cord The various system settings are not stored Do not pull out the power cord while conducting the settings The settings will be stored when both the main zone and sub zone turn off Turn off all z...

Страница 126: ...IN page 117 Symptom Remedy No sound or sound suddenly ceases Check that the HDMI Audio setting is set to AMP Setting the Audio options on page 89 If the component is a DVI device use a separate connection for the audio If analog video is being output over HDMI please use a separate connection for the audio Check the audio output settings of the source component HDMI format digital audio transmissi...

Страница 127: ...tings security settings etc Check the computer s network settings security settings etc Symptom Cause Remedy In the middle of Wiring Navi you are instructed to turn off the power of the unit and then connect other equipment or speakers This is to avoid failure of the receiver due to a short circuit between cables or from static electricity Per the Wiring Navi instructions turn OFF the power of the...

Страница 128: ...nt is properly connected to this receiver or the power supply Symptom Cause Remedy The network function can not be operated with the remote control Press NET to set the remote control to the network function control mode The PC or Internet radio is not properly operated The corresponding IP address is not properly set Switch on the built in DHCP server function of your router or set up the network...

Страница 129: ...an Internet radio station are stopped or inter rupted There are cases where you cannot listen to some Internet radio stations even when they are listed in the list of Inter net radio stations on this receiver page 79 Symptom Cause Remedy This unit cannot be selected from the Spotify application An Internet connection is required for both the mobile digital device and this unit Connect the mobile d...

Страница 130: ...le when using the system with the wireless LAN Multiple devices are connected to the wireless LAN router When connecting multiple devices to the wireless LAN router the IP address of the connected devices must be changed The wireless LAN connection set tings of this receiver and equipment such as wireless LAN router is not correct When wireless LAN connections for this receiver and wire less LAN r...

Страница 131: ... license notice 133 Surround sound formats 138 Auto Surround ALC and Stream Direct with different input signal formats 139 Speaker Setting Guide 140 About messages displayed when using network functions 141 Important information regarding the HDMI connection 141 Cleaning the unit 141 Glossary 142 Features index 145 Specifications 146 Preset code list 148 Additional information ...

Страница 132: ...y works with iPhone iPad and iPod touch with iOS 4 3 3 or later Mac with OS X Mountain Lion or later and PC with iTunes 10 2 2 or later USB works with iPhone 6 Plus iPhone 6 iPhone 5s iPhone 5c iPhone 5 iPhone 4s iPhone 4 iPhone 3GS iPod touch 4th through 5th generation and iPod nano 4th through 7th generation Made for iPod and Made for iPhone mean that an electronic accessory has been designed to...

Страница 133: ...NT OF SUBSTITUTE GOODS OR SERVICES LOSS OF USE DATA OR PROFITS OR BUSINESS INTERRUPTION HOWEVER CAUSED AND ON ANY THEORY OF LIABILITY WHETHER IN CONTRACT STRICT LIABILITY OR TORT INCLUDING NEGLIGENCE OR OTHERWISE ARISING IN ANY WAY OUT OF THE USE OF THIS SOFTWARE EVEN IF ADVISED OF THE POSSIBILITY OF SUCH DAMAGE Bonjour Apple provides developers the opportunity to license and use Apple software te...

Страница 134: ...bution terms for any publically available version or derivative of this code cannot be changed i e this code cannot simply be copied and put under another distribution licence including the GNU Public Licence WPA Supplicant Copyright c 2003 2015 Jouni Malinen j w1 fi and contributors All rights reserved This program is licensed under the BSD license the one with advertisement clause removed If you...

Страница 135: ...consent of the Author Any subroutines or modules supplied by You and linked into the Source Code or Executable Files this Work shall not be considered part of this Work and will not be subject to the terms of this License 4 Patent License Subject to the terms and conditions of this License each Author hereby grants to You a per petual worldwide non exclusive no charge royalty free irrevocable exce...

Страница 136: ...UENTIAL DAMAGES INCLUDING BUT NOT LIMITED TO PROCUREMENT OF SUBSTITUTE GOODS OR SERVICES LOSS OF USE DATA OR PROFITS OR BUSINESS INTERRUPTION HOWEVER CAUSED AND ON ANY THEORY OF LIABILITY WHETHER IN CONTRACT STRICT LIABILITY OR TORT INCLUDING NEGLIGENCE OR OTHERWISE ARISING IN ANY WAY OUT OF THE USE OF THIS SOFTWARE EVEN IF ADVISED OF THE POSSIBILITY OF SUCH DAMAGE libvorbis Copyright c 2002 2004 ...

Страница 137: ... the original software 3 This notice may not be removed or altered from any source distribution Jean loup Gailly jloup gzip org Mark Adler madler alumni caltech edu cURL COPYRIGHT AND PERMISSION NOTICE Copyright c 1996 2011 Daniel Stenberg daniel haxx se All rights reserved Permission to use copy modify and distribute this software for any purpose with or without fee is hereby granted provided tha...

Страница 138: ...1996 through 0 96 May 1997 are Copyright c 1996 1997 Andreas Dilger Distributed according to the same disclaimer and license as libpng 0 88 with the following individuals added to the list of Contributing Authors John Bowler Kevin Bracey Sam Bushell Magnus Holmgren Greg Roelofs Tom Tanner libpng versions 0 5 May 1995 through 0 88 January 1996 are Copyright c 1995 1996 Guy Eric Schalnat Group 42 In...

Страница 139: ...l formats Input signal format Auto Surround PURE DIRECT DIRECT ALC Rendering Mode OBJECT Rendering Mode LEGACY Surround Back speaker s Connected Dolby Surround EX Dolby Surround Dolby Digital Dolby Digital Dolby Surround Dolby Digital Dolby Digital Dolby Digital Plus Dolby Surround Dolby Digital Plus Dolby Digital Plus Dolby TrueHD Dolby Surround Dolby TrueHD Dolby TrueHD DTS ES 6 1 channel source...

Страница 140: ...inting in the same direction the tone will not be the same on the right and left and as a result the sound field will not be reproduced properly However if all the speakers are pointed towards the listening position the sound field will seem cramped Testing by the Pioneer Multi channel Research Group has shown that a good sense of sound positioning can be achieved by pointing all the speakers towa...

Страница 141: ...tibility information If you aren t receiving HDMI signals properly through this receiver from your component please try one of the following configurations when connecting up Configuration A Use component video cables to connect the video output of your HDMI equipped component to the receiver s component video input The receiver can then convert the analog component video signal to a digital HDMI ...

Страница 142: ...rom DTS Inc now widely used for DVD Video DVD Audio 5 1 music discs digital broadcasts and video games DTS HD Master Audio DTS HD Master Audio is a technology that delivers master audio sources recorded in a professional studio to listeners without any loss of data preserving audio quality DTS HD High Resolution Audio A high definition audio technology by which signals can be transferred over HDMI...

Страница 143: ...dec This is a loseless type audio codec and is used for example for iTunes It compresses non compressed files such as WAV and AIFF to about one half the original size with no loss of sound quality FLAC FLAC Free Lossless Audio Codec is an audio format allows lossless codec Audio is compressed in FLAC with out any loss in quality For more details about FLAC visit the following website http flac sou...

Страница 144: ...reless exchange of digital information at relatively low speeds such as computer mouses and keyboards mobile phones smart phones text and audio information for PDAs etc Receiver function MHL MHL Mobile High definition Link is an interface standard for transmitting digital signals with mobile devices MHL can carry high quality multi channel audio data and 3D Full HD video formats This receiver inco...

Страница 145: ...73 Sound Retriever Air See Enjoying various types of playback using the listening modes on page 73 Dialog Enhancement See Setting the Audio options on page 89 Internet radio See Listening to Internet radio stations on page 79 vTuner See Listening to Internet radio stations on page 79 DLNA See About network playback on page 81 AirPlay See Using AirPlay on iPod touch iPhone iPad and iTunes on page 7...

Страница 146: ...quency Range FM 87 5 MHz to 108 MHz Antenna Input FM 75 W unbalanced Frequency Range AM 530 kHz to 1 700 kHz Antenna AM Loop antenna balanced Video Section Signal level Composite Video 1 Vp p 75 W Component Video Y 1 0 Vp p 75 W PB PR 0 7 Vp p 75 W Corresponding maximum resolution Component Video 1080i 1125i Bluetooth Section Version Bluetooth Specification Ver 2 1 EDR Output Bluetooth Specificati...

Страница 147: ...te control unit 1 AAA size IEC R03 dry cell batteries 2 AM loop antenna 1 FM wire antenna 1 Power cord CD ROM Quick start guide Safety Brochure Warranty sheet Notes Specifications and the design are subject to possible modifications without notice due to improvements This product includes FontAvenue fonts licensed by NEC Corporation FontAvenue is a registered trademark of NEC Corporation iOS is a ...

Страница 148: ...074 Initial 0091 Insignia 0085 0086 Inteq 0099 Janeil 0012 JBL 0101 JC Penney 0000 0004 0005 0006 0010 JCB 0002 Jensen 0004 0006 JVC 0007 0010 0044 Kawasho 0002 0004 0006 KEC 0104 Kenwood 0004 0006 0100 KLH 0106 Kloss Novabeam 0008 0012 KTV 0008 0100 0104 0110 LG 0005 0052 0078 0097 Logik 0001 Luxman 0004 0006 LXI 0000 0006 0101 0102 Magnavox 0004 0006 0019 0020 0037 0042 0100 0101 Majestic 0001 M...

Страница 149: ...019 Sanyo 1001 1002 Sears 1001 1003 1004 Sharp 1012 Shogun 1002 Singer 1004 Sonic Blue 1026 Sony 1006 1009 1017 1021 Stack 1017 STS 1004 Sylvania 1004 1005 Symphonic 1005 Systemax 1017 Tagar Systems 1017 Tandy 1001 Tashiko 1003 Teac 1005 Technics 1004 Teknika 1003 1004 1005 Tivo 1016 1020 1021 1022 1025 TMK 1002 Toshiba 1015 1017 1028 Totevision 1002 1003 Touch 1017 UltimateTV 1031 Unitech 1002 Ve...

Страница 150: ... 6113 6060 6059 6114 6115 6116 Dish Network System 6002 6089 Dishpro 6002 6089 Echostar 6002 6089 6003 Expressvu 6002 Hughes Network Systems 6113 6114 6115 6116 JVC 6003 Motorola 6032 Philips 6113 6114 Proscan 6110 Samsung 6114 Sonicview 6055 6107 Sony 6062 Star Choice 6032 Tivo 6113 6114 6115 6116 Cable Set Top Box Pioneer 0297 6028 6029 6095 6099 6325 6328 6329 ABC 6122 Accuphase 6122 Amino 6077...

Страница 151: ...pour acheter des pièces de rechange des modes d emploi ou des accessoires reportez vous aux URL suivantes In the USA Aux Etats Unis http www pioneerelectronics com In Canada Aux Canada http www pioneerelectronics ca S018_B1_EnFr U S A 18 PARK WAY UPPER SADDLE RIVER NEW JERSEY 07458 U S A Tel 1 201 785 2600 Germany Hanns Martin Schleyer Straße 35 47877 Willich Germany Tel 49 0 2154 913222 UK Antero...

Страница 152: ...Quick Start Guide Guide rapide ELITE AV Receiver Recepteur AV SC SC ...

Страница 153: ...AA size IEC R03 dry cell batteries x2 Power cord Safety Brochure Warranty sheet These quick start guide SC 99 SC 97 Setup microphone VENTILATION CAUTION When installing this unit make sure to leave space around the unit for ventilation to improve heat radiation at least 20 em at top 10 em at rear and 20 em at each side WARNING Slots and openings in the cabinet are provided for ventilation to ensur...

Страница 154: ...l settings Use a Mac PC Network connection is required 1 Please read the booklet If you have a Mac PC 2 Follow the guidance of the AVNavigator built into the receiver to proceed with the connection and initial settings Follow the instructions in the booklet to perform connection and initial settings 1 Read the booklet in the order of s1i i1 1l l ls 1i i1 2 ls i i ll 2 Follow the instructions of ea...

Страница 155: ...ting network connection in the CO ROM s operating instructions Plugging in the receiver After connecting to a LAN connect the power cord of the receiver to a power outlet 1 Plug the supplied power cord into the AC IN socket on the back of the receiver 2 Plug the other end into a power outlet Turning the power on Press STANDBY ON to switch on the receiver and your computer Wait a few minutes after ...

Страница 156: ...it indicates that the receiver is not connected to the network Check to make sure that the receiver and router are properly connected 3 Enter number in 2 above in the field in Internet Explorer shown below and then press the ENTER key I GJ ll i i1t Example Input Format 192 168 0 124 With a Windows PC you can use the following method to launch AVNavigator Launch Explorer and then right c lick SC 99...

Страница 157: ...dd le Left TMdR Top middle Right SW Subwoofer IINotes There are also other speaker connection patterns Top forward Top backward etc For details see Connecting your equipment of the operating instructions To play Dolby Atmos you need to connect the speaker of either the Top middle Surround back Top forward Top backward Front height or Front wide The Dolby Enabled Speaker can be used in place of the...

Страница 158: ... in 3 Front Right R Top middle Right TMdR A cAUTION Subwoofer SW LINE LEVEL INPUT 8ffi Surround Right SR Center C 8ffi Surround back Right SBR Surround back Left SBL 8ffi Surround Left SL Front Left l L Silgle 0 e Top middle Left TMdl These speaker terminals carry HAZARDOUS LIVE voltage To prevent the risk of electric shock when connecting or disconnecting the speaker cables disconnect the power c...

Страница 159: ...a Only plug in after you have connected all your components to this receiver including the speakers A cAUTION Handle the power cord by the plug Do not pull out the plug by tugging the cord and never touch the power cord when your hands are wet as this cou ld cause a short circuit or electric shock Do not place the unit a piece of furniture etc on the power cord or pinch the cord Never make a knot ...

Страница 160: ...tant Measure in a quiet environment 1 Connect the supplied setup microphone When connecting the MCACC setup microphone if Please wait displays in the main unit display remove the MCACC setup microphone then try reconnecting after waiting for approximately one minute Set to ear height when using a tripod etc for the microphone The Full Auto MCACC screen appears on your TV 1 2a Full Auto MCACC iJEx ...

Страница 161: ...the volume level When no sound is emitted increase the volume to approximately 30 dB II Notes When the sound is not produced from the center speaker rear speaker and subwoofer refer to Frequently asked questions in the booklet When the remote control does not work refer to the Frequently asked questions in the booklet To enjoy the many functions of the unit to the fullest extent Load the CD ROM in...

Страница 162: ...e operations of this receiver and connecting devices are unresponsive Try resetting To reset turn off the power and press down the STANDBY ON button on the front panel for 5 seconds or more fhe power turns off in 5 seconds after the power is turned on The receiver s setting will be maintained Also try replugging the power cord of the connecting devices The operation mode of the remote control is n...

Страница 163: ...R NEW JERSEY 07458 U S A Tel 1 201 785 2600 Register Your Product on http www pioneerelectronics com US http www pioneerelectronics ca Canada Germany Hanns Martin Schleyer StraBe 35 47877 Willich Germany Tel 49 0 2154 913222 UK Anteros Building Odyssey Business Park West End Road South Ruislip Middlesex HA4 6QQ United Kingdom Tel 44 0 208 836 3612 France 6 Avenue de Marais F 95816 Argenteuil Cedex...

Страница 164: ...J 3DWWHUQV IRU ROE WPRV 9LGHR HDWXUHV 8OWUD 3DVV WKURXJK ZLWK 3 S ELW S ELW S ELW 9LGHR 6FDOHU S WR ZLWK 6XSHU 5HVROXWLRQ 7ULSOH 1RLVH 5HGXFWLRQ GYDQFHG 9LGHR GMXVW 6WUHDP 6PRRWKHU 6WUHDP 6PRRWKHU LQN RPH 1HWZRUN HDWXUHV SSOH LU3OD HUWLÀHG 1 HUWLÀHG 7 RQQHFW HUWLÀHG LQGRZV RPSDWLEOH 0XVLF LOH 3OD EDFN 6HHN YLD 1HWZRUN 86 SSOH RVVOHVV 9 03 0 6 N LW XGLR SOD EDFN SSOH RVVOHVV 9 0XOWL KDQQHO FK FK XG...

Страница 165: ... LV XQGHU OLFHQVH 1 WKH 1 RJR DQG 1 HUWL ÀHG DUH WUDGHPDUNV VHUYLFH PDUNV RU FHUWLÀFDWLRQ PDUNV RI WKH LJLWDO LYLQJ 1HWZRUN OOLDQFH 7 WKH 7 ORJR DQG 7 RQQHFW DUH WUDGHPDUNV RI 7 RUSRUDWLRQ 6 5 LV D WUDGHPDUN RI 66 7HFKQRORJ QF QGURLG DQG RRJOH 3OD DUH WUDGHPDUNV RI RRJOH QF 0 WKH 0 RJR DQG 0RELOH LJK HÀQLWLRQ LQN DUH WUDGHPDUNV RU UHJLVWHUHG WUDGHPDUNV RI 0 LQ WKH 8QLWHG 6WDWHV DQG RWKHU FRXQWULHV...

Страница 166: ......

Страница 167: ...nd touch metal parts of the main unit the rear panel screws etc QOK Make sure that exposed speaker Make sure that exposed wire does not extend outside the speaker wire does not speaker terminal and touch any touch the rear panel other wire screws etc CD Remove about 10 mm 3 8 in of the plastic insulation and twist together the exposed speaker wire Loosen the speaker terminal and insert the speaker...

Страница 168: ...ptions plus detail lees du recepteur referez vous au Mode d emploi sur le CD ROM fourni Le mode d emploi peut aussi etre telecharge du site Pioneer http llwww pioneerelectronics ca Voir ci dessous pour l emploi du CD ROM Environnement d exploitation Concernant le manuel de l uti lisateur PDF inclus sur le CD ROM Ia visualisation a ete confirmee sur les environnements d exploitation Microsoft Windo...

Страница 169: ...ccessories specified by the manufacturer 12 Use on ly with the cart stand tripod bracket or table specified by the manufacturer or sold with the apparatus When a cart is used use caution when moving the cart apparatus combination to avoid injury from tip over 13 Unplug this apparatus during lightning storms or when unused for long periods of time 14 Refer all servictng to qualtfied service personn...

Страница 170: ... 2015 Onkyo Pioneer Corporation All rights reserved 2015 On kyo Pioneer Corporation Tous droits de reproduction et de traduction reserves Printed in Malaysia I 1mprime en Malaisie ARM7182 A ...

Страница 171: ...VICECOMPANYOROTHERDESIGNATEDLOCATION THISWARRANTY DOESNOTCOVER DEFECTSOR DAMAGE CAUSED BYTHEUSEOFUNAUTHORIZEDPARTSOR LABOR OR FROMIMPROPER MAINTENANCE ALTERED DEFACED OR REMOVED SERIAL NUMBERS VOID THIS ENTIRE WARRANTY NO OTHER WARRANTIES PIONEER LIMITS ITS OBLIGATIONS UNDER ANY IMPLIED WARRANTIES INCLUDING BUT NOT LIMITEDTO THE IMPLIED WARRANTIES OF MERCHANTABILITY AND FITNESS FOR A PARTICULAR PU...

Отзывы: