background image

Before you start

01

6

En

Chapter 1

Before you start

What’s in the box

Please confi

r

m that the following 

accesso

r

ies a

r

e in the box when you o

p

en it;

• Remote cont

r

ol

• AA/R6P  d

r

y cell batte

r

ies x 2

• Audio/video cable (

r

ed/white/yellow)

• G-LINK™  cable

• RF antenna cable x 2

• Powe

r

 cable

• These  o

p

e

r

ating inst

r

uctions

• Wa

rr

anty ca

r

d

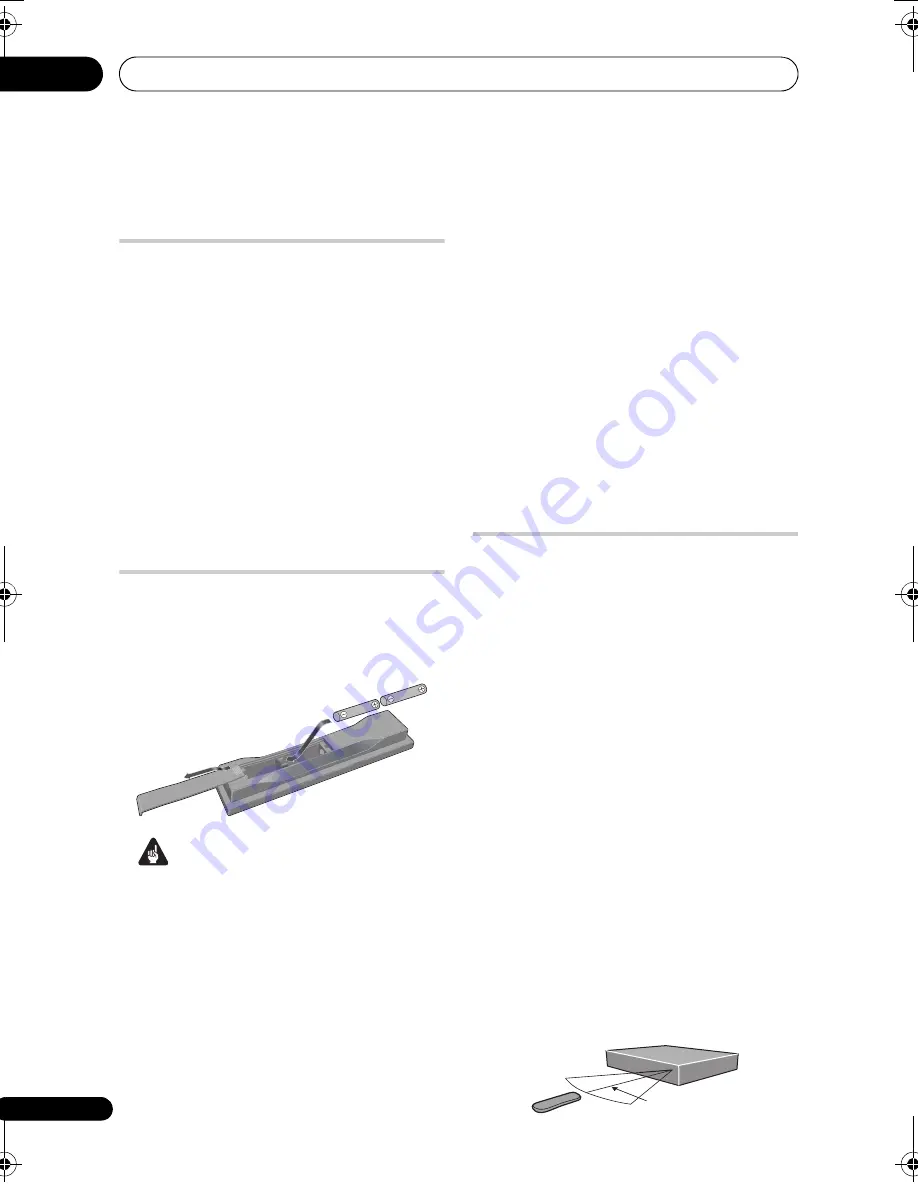
Putting the batteries in the 
remote control

Insert two AA/R6P batteries into the 

battery compartment following the 
indications (

,

) inside the 

compartment.

 Important

Inco

rr

ect use of batte

r

ies can 

r

esult in 

haza

r

ds such as leakage and bu

r

sting. 

Please obse

r

ve the following:

• Don’t mix new and old batte

r

ies 

togethe

r

.

• Don’t  use  diffe

r

ent kinds of batte

r

ies 

togethe

r

 — although they may look 

simila

r

, diffe

r

ent batte

r

ies may have 

diffe

r

ent voltages.

• Make  su

r

e that the 

p

lus and minus ends 

of each batte

r

y match the indications in 

the batte

r

y com

p

a

r

tment.

• Remove batte

r

ies f

r

om equi

p

ment that 

isn’t going to be used fo

r

 a month o

r


mo

r

e.

• When dis

p

osing of used batte

r

ies, 

p

lease com

p

ly with gove

r

nmental 

r

egulations o

r

 envi

r

onmental 

p

ublic 

inst

r

uction’s 

r

ules that a

pp

ly in you

r


count

r

y o

r

 a

r

ea.

Using the remote control

Please kee

p

 in mind the following when 

using the 

r

emote cont

r

ol:

• Make  su

r

e that the

r

e a

r

e no obstacles 

between the 

r

emote and the 

r

emote 

senso

r

 on the unit.

• Remote  o

p

e

r

ation may become 

un

r

eliable if st

r

ong sunlight o

r


fluo

r

escent light is shining on the unit’s 

r

emote senso

r

.

• Remote  cont

r

olle

r

s fo

r

 diffe

r

ent devices 

can inte

r

fe

r

e with each othe

r

. Avoid 

using 

r

emotes fo

r

 othe

r

 equi

p

ment 

located close to this unit.

• Re

p

lace the batte

r

ies when you notice a 

fall off in the o

p

e

r

ating 

r

ange of the 

r

emote.

• When the batte

r

ies 

r

un down o

r

 you 

change the batte

r

ies, the 

r

emote cont

r

ol 

mode is 

r

eset to Reco

r

de

r

 1. See 

Remote 

Control Mode

 on 

p

age 145

.

• Use within the o

p

e

r

ating 

r

ange in f

r

ont of 

the 

r

emote cont

r

ol senso

r

 on the f

r

ont 

p

anel, as shown.

WARNING

Do not use o

r

 sto

r

e batte

r

ies in di

r

ect sunlight o

r


othe

r

 excessively hot 

p

lace, such as inside a ca

r

 o

r


nea

r

 a heate

r

. This can cause batte

r

ies to leak, 

ove

r

heat, ex

p

lode o

r

 catch fi

r

e. It can also 

r

educe the 

life o

r


p

e

r

fo

r

mance of batte

r

ies. 

D3-4-2-3-3_En

7 m

DVR560HX_WV_EN.book  6 ページ  2008年2月22日 金曜日 午後7時26分

Содержание DVR-560HX-K

Страница 1: ...DVR 560HX K DVR 560HX S HDD DVD Recorder HDD DVD Recorder Operating Instructions ...

Страница 2: ... REMOVE COVER OR BACK NO USER SERVICEABLE PARTS INSIDE REFER SERVICING TO QUALIFIED SERVICE PERSONNEL CAUTION RISK OF ELECTRIC SHOCK DO NOT OPEN IMPORTANT D3 4 2 1 1_En A CAUTION D3 4 2 1 8_B_En CAUTION ATTENTION CLASS 3B VISIBLE AND INVISIBLE LASER RADIATION WHEN OPEN AVOID EXPOSURE TO THE BEAM VRW2262 A RADIATIONS LASER VISIBLES ET INVISIBLES DECLASSE 3B QUAND OUVERT ÉVITEZ TOUT EXPOSITION AU FA...

Страница 3: ...btained A replacement fuse cover can be obtained from your local dealer If the fitted moulded plug is unsuitable for your socket outlet then the fuse shall be removed and the plug cut off and disposed of safely There is a danger of severe electrical shock if the cut off plug is inserted into any 13 amp socket If a new plug is to be fitted please observe the wiring code as shown below If in any dou...

Страница 4: ...adcast services 35 Setting up the GUIDE Plus system 35 05 Using the GUIDE Plus electronic programme guide The GUIDE Plus system 39 Using the GUIDE Plus system 39 Areas 41 GUIDE Plus FAQ and troubleshooting 50 06 Using the digital electronic programme guide The Digital EPG system 53 Using the Digital EPG 54 Setting timer programmes 54 Other useful EPG functions 59 07 Recording About DVD recording 6...

Страница 5: ...orting files to the HDD 120 Copying files to a DVD R RW 121 Copying selected files to a DVD R RW 122 Editing files on the HDD 122 Printing files 124 15 Copying files from a PC Connect PC Connecting the PC 125 Copying WMA MP3 files 125 Copying JPEG and DivX files 127 16 The Disc Setup menu Basic settings 128 Initialize settings 129 Finalize settings 129 Optimize HDD 129 Initialize HDD 130 17 The Vi...

Страница 6: ...ed batteries please comply with governmental regulations or environmental public instruction s rules that apply in your country or area Using the remote control Please keep in mind the following when using the remote control Make sure that there are no obstacles between the remote and the remote sensor on the unit Remote operation may become unreliable if strong sunlight or fluorescent light is sh...

Страница 7: ... writer we recommend using ver 1 1 discs The following table shows older Pioneer DVD recorders limited compatibility with DVD RW ver 1 2 discs 1 Discs should be finalized in this recorder before playing Unfinalized VR mode and Video mode discs may not play 2 Cannot read the CPRM information will show in the display when you load a disc However this will not affect playback 3 Copy once protected di...

Страница 8: ...g mode is not set to LPCM 12 CPRM compatible discs only 13 Take the disc out of the cartridge before use Only Panasonic and Maxell discs have been tested to work reliably with this recorder Discs from other makers may become unusable when recorded or edited 14 Erasing a title does not increase the available recording time nor increase the number of recordable titles left 15 Must be compatible with...

Страница 9: ...t play It is possible that when loading or ejecting a DualDisc the opposite side to that being played will be scratched Scratched discs may not be playable The DVD side of a DualDisc plays in this product DVD Audio content will not play For more detailed information on the DualDisc specification please refer to the disc manufacturer or disc retailer Other disc compatibility In addition to DVD this...

Страница 10: ... Inc Keeping the same terminology as DVD Video individual DivX video files are called Titles When naming files titles on a disc prior to burning keep in mind that by default they will be played in alphabetical order Official DivX Certified product Plays all versions of DivX video including DivX 6 with standard playback of DivX media files File extensions avi and divx these must be used for the rec...

Страница 11: ...4 4 2 2 4 2 0 Horizontal resolution 160 to 5120 pixels Vertical resolution 120 to 3840 pixels Progressive JPEG compatible No File extensions jpg jpeg jpe jif jfif must be used for the recorder to recognize JPEG files do not use for other file types File structure The recorder can load up to 99 folders 999 files at one time if there are more files folders that this on the disc then more can be relo...

Страница 12: ...l and use the recorder on a stable level surface Do not block the rear vent cooling fan Do not use the recorder in excessively hot or humid places or in places that may be subject to sudden changes in temperature Sudden changes in temperature can cause condensation to form inside the recorder This can be a cause of HDD failure While the recorder is switched on including during EPG download when th...

Страница 13: ...sc HDD Any type of DVD disc recordable or playback only finalized or not Commercially produced DVD finalized Video mode DVD R RW Video mode DVD R RW unfinalized VR mode DVD R RW DVD R DVD RW DVD RAM Audio CD Video CD Super VCD WMA or MP3 files DivX files All of the above HDD DVD DVD Video DVD Video DVD VR DVD R DVD RW DVD RAM CD Video CD SuperVCD WMA MP3 DivX ALL ...

Страница 14: ...put 7 OUTPUT Stereo analog audio video and S Video outputs for connection to a TV or AV amplifier receiver 8 AV1 RGB TV AV connector Audio video output SCART type AV connector for connecting to a TV or other equipment with a SCART connector The video output is switchable between video S Video and RGB See AV1 Out on page 138 for how to set this up 9 G LINK Use to connect the supplied G LINK cable t...

Страница 15: ...t the other supplied RF antenna cable to connect an antenna to the ANTENNA IN RF IN connector Lastly connect the recorder to your TV from the ANTENNA OUT connector Important If there is only one antenna outlet on your wall use a divider Do not connect a component that can receive analog signals to the ANTENNA DIGITAL OUT If your area is not yet served with terrestrial digital services connect your...

Страница 16: ...sure that all components are switched off and unplugged from the wall outlet 1 Connect your TV antenna to the recorder and TV See Connecting a TV antenna on page 15 for details If you want to incorporate a VCR in your setup connect it before the recorder i e between the antenna wall outlet and the antenna input on the recorder 2 Use a SCART cable not supplied to connect the AV1 RGB TV AV connector...

Страница 17: ... your TV For a component video connection use a component video cable not supplied to connect the COMPONENT VIDEO OUT jacks to a component video input on your TV See also Component Video Out on page 137 for how to set up the component video output for use with a progressive scan compatible TV 2 Connect the AUDIO OUTPUT jacks to the corresponding audio inputs on your TV You can use the supplied aud...

Страница 18: ...ntenna cables as shown See Connecting a TV antenna on page 15 for more on RF antenna connections including from this recorder to your TV 2 Use a SCART cable not supplied to connect the AV1 RGB TV AV connector to a SCART AV connector on your TV This enables you to watch discs 3 Use another SCART cable to connect the AV2 INPUT 1 DECODER AV connector to a SCART AV connector on your cable box satellit...

Страница 19: ...ing to pay TV services is only viewable when this recorder is off in standby For timer recording to work properly on this recorder the VCR satellite receiver cable box must also be switched on during recording It is not possible to watch one TV programme and record another using this setup 1 Connect the cable from the antenna cable TV outlet to the antenna input on your VCR satellite receiver cabl...

Страница 20: ...ital connection we recommend also connecting using the stereo analog connection for compatibility with all discs and sources You ll probably also want to connect a video output to your AV amplifier receiver Use the ordinary video output as shown here or the S Video output Important Noise may be output from your speakers if the recorder is not set up to work with your AV amplifier receiver properly...

Страница 21: ...he HDMI indicator lights HDMI setup is generally automatic There are however settings you can change if you need to See HDMI Output only available when an HDMI device is connected on page 144 for more information Note that the HDMI settings remain in effect until you AC IN COAXIAL IN S VIDEO VIDEO AUDIO L R OUTPUT INPUT3 COMPONENTVIDEOOUT Y PB PR ANTENNA IN OUT AV1 RGB TV AV2 INPUT1 DECODER G LINK...

Страница 22: ...of several cables and connectors and communication between the AV source and AV devices such as DTVs HDMI the HDMI logo and High Definition Multimedia Interface are trademarks or registered trademarks of HDMI Licensing LLC HDMI Control By connecting this unit to an HDMI Control compatible Pioneer Flat Screen TV AV system amplifier or AV receiver etc or HD AV converter with an HDMI cable you can co...

Страница 23: ...res stored on this unit on your Flat Screen TV to improve the situations We cannot guarantee this unit will work with HDMI control compatible components other than those made by Pioneer Connecting other AV sources Connecting a VCR or analog camcorder 1 Connect a set of audio and video inputs of your VCR or camcorder to a set of outputs on this recorder This enables you to record from this recorder...

Страница 24: ...u connect them via USB We recommend connecting USB devices when this recorder is switched off in standby We recommend USB cables 2 meters in length or shorter Connecting an HDD camcorder On the recorder s HDD video files can only be copied with the signal format shown below Video recording format MPEG 2 PS Image resolution 720 x 480 576 704 x 480 576 352 x 480 576 352 x 240 288 Audio recording for...

Страница 25: ... unplugging some devices If the power delivered through a hub is insufficient for the devices connected communication can become unreliable In this case disconnect one or more devices then perform a USB restart See Restart USB Device on page 146 Using a USB printer Use a PictBridge compatible printer Using a USB keyboard Do not use a PS 2 keyboard connected using a PS 2 USB adapter Using a PC Note...

Страница 26: ...onnected to HDMI HDCP compatible component 10 Front panel display and IR remote sensor See Display on page 28 for details 11 STANDBY ON Press to switch the recorder on into standby 12 Front panel inputs See Front panel connections on page 15 for more information on these 13 COMMON INTERFACE slot Slot for CA module and smart card used to decode scrambled D TV channels See Common Interface on page 2...

Страница 27: ...d a CA module and smart card provided by your service provider Different CA modules support different encryption systems This recorder is designed to work with modules that support the DVB standard Contact your service provider to obtain the right kind of CA module Note that neither CA modules nor smart cards are supplied or sold by Pioneer Inserting a CA module The Common Interface card slot is l...

Страница 28: ...n receiving a VPS PDC broadcast during a VPS PDC enabled timer recording 5 Recording quality indicators page 65 XP Lights when the recording mode is set to XP high quality SP Lights when the recording mode is set to SP standard play LP SLP Lights when the recording mode is set to LP long play or SLP super long play EP SEP Lights when the recording mode is set to EP extended play or SEP super exten...

Страница 29: ...ELECT page 71 Press to change the input to use for recording A TV D TV Press to switch between analog TV antenna input and digital TV antenna input The A TV and D TV indicators on the front panel show which is selected 6 HDD pages 66 75 Press to select the hard disk HDD for recording and playback DVD pages 66 75 Press to select DVD for recording and playback 7 HOME MEDIA GALLERY Files stored on th...

Страница 30: ...k controls page 75 Press to start reverse or forward scanning Press again to change the speed While paused press and hold to start slow motion playback Press repeatedly to change the playback speed While paused press to advance a single frame in either direction When GUIDE Plus is displayed use to display the previous next day PLAY Press to start playback PREV NEXT Press to skip to the previous or...

Страница 31: ...rrent TV channel but with playback paused effectively pausing the broadcast 18 TV DVD Press to switch between TV mode in which you get the picture and sound from the TV s tuner and DVD mode in which you get picture and sound from the recorder s tuner or an external input 19 CHANNEL page 62 Press to change the channel of the built in TV tuner 20 HELP Press for help on how to use the current GUI scr...

Страница 32: ...ENTER to exit the Setup Navigator 5 Select an Aerial Power setting1 for the built in digital tuner On power is always supplied to the connected aerial whether the recorder is on or in standby Auto power is only supplied when this recorder is on Off power is never supplied to the aerial 6 Select Auto Scan to start scanning for D TV channels Select Do not set if you want to skip D TV channel setup b...

Страница 33: ... automatic time setting or Manual to set the clock manually If the clock was already set from a D TV channel in step 6 this step is skipped Auto clock setting Some TV channels broadcast time signals together with the programme This recorder can use these signals to set the clock automatically Set Clock Set CH to the channel preset number that broadcasts a time signal then move the cursor down to S...

Страница 34: ...ng output 13 Press to continue after reading the HDD caution 14 Select Finish Setup to exit the Setup Navigator or Go Back if you want to start again That completes basic setup using the Setup Navigator If there are blank channels with no station you can set these to skip using the manual channel setting See Manual CH Setting on page 137 k Setting t Line System er Save P p Navigator p Navigator Ma...

Страница 35: ...en television programming guide The system offers programme listings for all major channels one touch recording search by genre recommendations according to your profile and more For the GUIDE Plus system to function correctly it is important that you set the language and country correctly in the Setup Navigator and that you have performed a scan for available channels as these are all used by the...

Страница 36: ...select Yes to confirm If the channel did not change select No The GUIDE Plus system will try other codes assigned to your external receiver If none of the codes changes the channel successfully tune your external receiver to the Host Channel for your country refer to step 5 below and leave it on overnight The recorder needs to be in standby it will wake up automatically and download new codes from...

Страница 37: ... table then you won t be able to use the GUIDE Plus system In this case do not set the postal code or set Country to Other in the GUIDE Plus setup screen When GUIDE Plus service starts in your area set the postal code again If digital broadcasts start in your area please set the EPG Type Select setting in the Initial Setup menu to Digital EPG Even if you can t use the EPG functions where you live ...

Страница 38: ...ce may be the built in tuner of this recorder or an external receiver The programme number is the number on which the channel can be found on its receiving device source The entry in the Editor screen must match this number for correct recording of that channel The above is especially important for the Host Channel Please make sure that the Host Channel is always switched ON 2 Change the programme...

Страница 39: ...m and 3 subject of various international patents and patent applications owned by or licensed to Gemstar TV Guide International Inc and or its related affiliates Legal Notice GEMSTAR TV GUIDE INTERNATIONAL INC AND OR ITS RELATED AFFILIATES ARE NOT IN ANY WAY LIABLE FOR THE ACCURACY OF THE PROGRAMME SCHEDULE INFORMATION PROVIDED BY THE GUIDE PLUS SYSTEM IN NO EVENT SHALL GEMSTAR TV GUIDE INTERNATIO...

Страница 40: ...for recording When the programme is due to start the recorder will switch to the correct channel and start recording1 You can also use the REC button to set the recording You can review the shows you have set to record in the Schedule Area see also The Schedule Area on page 44 Key What it does REC Press to set or cancel One Button Recording GUIDE Press to display the GUIDE Plus screen also use to ...

Страница 41: ...nel icon you want using the cursor buttons then press ENTER to return to the previous screen on that channel Areas The GUIDE Plus system consists of seven Areas All Areas can be accessed from the Menu bar Grid The GUIDE Plus system Home Area Displays TV listings information for the next seven days by time and channel Search Search for TV programmes by category e g Sport subcategory e g Football or...

Страница 42: ...ss Information panels Searching You can search for programmes by category subcategory or by keyword My Choice Categories for searching include Movies purple Sport green Children blue and Others teal In some countries there is a further subcategory available called Tip of the Day These are programmes recommended by a local partner such as a TV magazine 1 Select Search from the Menu bar 2 Select a c...

Страница 43: ... The My TV Area allows you to set up a personal profile You can define a profile by channels themes and or keywords As soon as a personal profile has been set the GUIDE Plus system continuously scans the TV listings for the next seven days Whenever you access the My TV Area a list of programmes matching your profile appears From the My TV Area you can Set up a profile by channel theme and or keywo...

Страница 44: ...eyword to your profile highlight Keywords and press the YELLOW Action button Use the buttons followed by ENTER to select characters from the on screen keyboard When you re finished press the GREEN Action button to exit and continue 6 Press ENTER to activate your profile You can add up to 16 keywords by repeating step 5 You can edit or delete your profile using the RED and GREEN Action buttons The ...

Страница 45: ...ss the GREEN Action button to go to continue or the RED Action button to go back 4 Enter a name for the scheduled recording Use the buttons followed by ENTER to select characters from the on screen keyboard After entering the whole name press the GREEN Action button to continue 5 Highlight the right recording tile 6 Press the RED Action button Quality to change the recording quality Select from AU...

Страница 46: ...ecording quality to try and fit the recording on the disc If the recording will not fit onto the disc even on MN1 recording quality MN4 for DVD R RW then the Recovery Recording feature will automatically make the recording to the HDD instead If there is very little free space left on the HDD an Auto Replace Recording may not complete successfully If the HDD is being used for playback or high speed...

Страница 47: ...he Menu bar 2 Press the RED Action button VIDEO Plus 3 Use the number buttons to enter a PlusCode programming number If you live in an area not yet covered by the GUIDE Plus system you may also have to input a channel number Follow the on screen display to do this 4 Press ENTER to confirm Setting a manual recording 1 Select Schedule from the Menu bar 2 Press the GREEN Action button Manual Please e...

Страница 48: ...n for you to manage your channels Any changes you make here will affect what is displayed in the Grid Area The Editor Area is mainly used when setting up the GUIDE Plus system to make any manual changes as necessary You can also use the Editor Area if new channels become available in your area or if you change from cable to satellite say or move house From the Editor Area you can Display hide chan...

Страница 49: ... what you want to record The Setup Area The Setup Area is where you can set up the GUIDE Plus system for your particular region TV reception conditions and so on Making changes to your GUIDE Plus setup 1 Select Setup from the Menu bar 2 Highlight the part you want to change You can change the Language Country Postal Code1 and the External Receiver settings 3 Press ENTER to confirm D TV 001 D TV 00...

Страница 50: ...europe guideplus com FAQ When I tried setting up my external receiver I could not get any of the attempts to work what should I do There could be several reasons why your external receiver could not be controlled The connections could be wrong Make sure that the G LINK cable is connected to the G LINK connector on the recorder and the IR blaster is in front of the external receiver pointing toward...

Страница 51: ... cable with external receiver What should I do to receive data for the GUIDE Plus system You can try to receive your Host Channel through your new reception method If you have problems to receive data we recommend that you keep your analog terrestrial or cable connection only to receive data this way It is important that you identify your Host Channel correctly in the Editor Area After I performed...

Страница 52: ...pdate The latest TV listings information is automatically downloaded by the recorder overnight This only happens if the recorder is in standby if the recorder is left on it will not download When not using the recorder please switch it into standby Data downloads can take several hours The front panel display shows EPG when downloading If you switch the recorder on while EPG is displayed the downl...

Страница 53: ...formation is displayed General Programme List 1 Appears when the schedule table can be scrolled forward or backward 2 Time schedule 3 Channel list 4 Highlights the currently selected channel 5 Indicates the programme set for recording 6 Appears when other programmes often short ones have been scheduled for the same period 7 Programme title 8 Time dividers The general programme list may show sectio...

Страница 54: ...e to acquire EPG data 3 Press to view more information about the selected programme Detailed information appears in the schedule window If the screen contains further information More is displayed To quit the display of detailed information press INFO again or RETURN EXIT 4 Press to exit the Digital EPG screen Setting timer programmes Using the Digital EPG it s easy to set digital TV programmes fo...

Страница 55: ...On see page 56 Timer Programme Set Manhattan Open Tennis CH Date Start Stop Extend D TV003 SUN 1 4 18 00 19 00 Off Enter Details Detailed Settings Record To HDD Recording Mode XP VPS PDC Auto Replace Rec Genre No Category Store Programme Cancel VPS PDC 0 8 Set Title Name Set Detailed 2 For a DVD timer recording if Optimized Rec see Optimized Rec on page 141 is set to On and VPS PDC is off the reco...

Страница 56: ...f timer programmes already set is shown next to Tmr Pgms If there are more than five timer programmes already set press NEXT to switch page go back using the PREV button You can also delete a timer programme before it s started before the recorder enters timer recording standby by highlighting it and pressing CLEAR See also Deleting a timer programme on page 58 2 Highlight the timer programme you ...

Страница 57: ...99 DVD 99 Recording The programme is currently recording Standby The recorder is in timer recording standby Valid Until eg Valid Until 13 8 UK only When you have set to make a series recording of a programme that has no new scheduled broadcasts the date displayed indicates the last day until which the scheduled programme settings remain valid If the programme is not broadcast for over 13 weeks its...

Страница 58: ...g at an alternative time slot1 1 Press TIMER REC 2 Highlight the timer programme you want to search 3 Press then select Alternate Search from the command menu panel The search results are displayed Choose the programme you would like to record and press either the RED button or ENTER to schedule a recording Searching for series UK only You can search for broadcasts of programmes of the same series...

Страница 59: ... the EPG screen Programme List Detailed Information or Search Result is displayed 2 In the Date field select a date within one week to search in 3 In the Time field select the time of day 0 00 to 23 00 to search in 4 In the Genre field select the genre to search for You can search for multiple genres by pressing ENTER after each genre 5 Select OK 6 Select Search The results of your search are disp...

Страница 60: ...rdable per disc This recorder cannot play or record unfinalized DVD R RW Video mode and DVD R discs recorded on another recorder DVD RW discs recorded on another recorder are playable on this recorder but are not recordable The maximum continuous recording time for one title is eight hours when using a DVD R RW disc If you delete a title from a DVD R RW disc the total number of recordable titles r...

Страница 61: ...number of titles chapters per title that can be recorded on the HDD is 999 and 99 respectively No more recording is possible on the HDD after the maximum number of titles has been reached The maximum continuous recording time for one title is 12 hours It is possible to record both PAL and NTSC titles on the HDD Before recording you need to make sure that the Input Line System setting page 148 matc...

Страница 62: ...iscs or on the HDD DVD CPRM recordings can only be played on players that are specifically compatible with CPRM Recording equipment and copyright Recording equipment should be used only for lawful copying You are advised to check carefully what constitutes lawful copying in the country in which you are making a copy Copying of copyrighted material such as films or music is unlawful unless permitte...

Страница 63: ... The channel banner displays the Subtitles and Teletext MHEG icon if they apply to the selected channel 3 To see more detailed channel information press INFO again 4 Use the buttons to display information about previous and following programmes Use the buttons to see information about other channels If there is still more information to be displayed More is displayed press the BLUE button to see t...

Страница 64: ... NICAM and you are watching a NICAM broadcast you can switch between NICAM and Regular non NICAM audio If the NICAM broadcast is bilingual you can also select the language You can also select the language for a non NICAM bilingual broadcast When watching a recording made from an external input with Bilingual recording selected see External Audio on page 138 you can switch the audio channel between...

Страница 65: ...ll automatically revert to SLP Press repeatedly to select the recording quality XP High quality setting gives about one hour of recording time on a DVD disc SP Standard Play Default quality used for most applications gives about two hours of recording time on a DVD LP Long Play Lower video quality than SP but doubles the recording time on a DVD to about four hours EP Extended Play Lower quality th...

Страница 66: ...nnels on page 64 for more on this When recording in VR mode DVD or with HDD Recording Format set to Video Mode Off HDD if a broadcast is bilingual both audio channels are recorded allowing you to switch the audio channel on playback The only exception to this is when the picture quality is set to LPCM in which case you do need to select the audio channel before recording 6 If you re recording from...

Страница 67: ... to your TV using a SCART cable and the AV Link setting page 145 should be set to This Recorder Only 1 See also Pause Live TV on page 146 for more on this In order to use Pause Live TV make the following connections and settings Pause Live TV will not work as expected when watching TV via an external component such as a VCR or digital tuner It only works with the channel selected on the TV Importa...

Страница 68: ...from standby After pressing PAUSE LIVE TV it will take at least 10 seconds for the picture to change during this time all controls except the power button are inoperative Note that startup from standby is not possible if you have selected Recorder s Tuner in Pause Live TV on page 146 Please note that you can t record from another component VCR etc that is connected by a SCART cable to the AV2 INPU...

Страница 69: ...ol systems used by many analog TV stations to ensure that a timer recording catches the whole programme even when the programme is not running to schedule Up to eight timer programmes can be set with VPS PDC on Important A timer recording can t be set if there are already 32 timer programmes waiting to be recorded Timer recording will not start if The recorder is already recording A disc is being ...

Страница 70: ...timer recording 2 Select Yes to confirm Preventing use of the recorder before a timer recording child lock You can make all the front panel and remote control buttons inoperative using the child lock feature This is useful when you set a timer recording and want to make sure that the timer settings are not changed before recording has finished 1 If the recorder is on switch it into standby 2 Front...

Страница 71: ... from the beginning of the current recording1 Press during recording to select another title to play You can use all the usual playback controls such as pause slow motion play scan and skip To stop playback press STOP recording will continue To stop recording press F STOP REC playback will continue During recording or in timer recording standby you can t play an HDD title DVD DivX title or Video C...

Страница 72: ... of different styles of title menu to choose from to suit the content of the disc All the title menus are navigated in the usual way pressing MENU or TOP MENU to display the menu then using the followed by ENTER to select titles and start playback Finalizing a disc Finalizing fixes the recordings on the disc so that it can be played on a regular DVD player or computer equipped with a suitable DVD ...

Страница 73: ... cancel Around four minutes before completion the option to cancel disappears You can t cancel the finalization of a DVD R RW disc How long finalization takes depends on the type of disc how much is recorded on the disc and the number of titles on the disc A disc recorded in VR mode can take up to one hour to finalize DVD R RW Video mode and DVD R RW discs can take up to 20 minutes Initializing re...

Страница 74: ... Mode or Initialize DVD RW 4 Select Start It takes about 30 seconds to initialize the disc except DVD RAM discs which can take up to an hour DVD RW Auto Initialize Default setting VR Mode Initialization mode is automatically carried out when you insert a blank DVD RW You must set the desired initialization mode before inserting a disc 1 Display the Home Menu 2 Select Setup Disc Setup 3 Select Basi...

Страница 75: ...rdable DVD If a function is specific to a particular kind of DVD disc it is specified Some DVD Video DVD R and DVD RW discs don t allow certain playback controls to operate at certain points in the disc This is not a malfunction 1 Select the HDD or DVD for playback If playing video from the HDD skip to step 3 below 2 Load a disc Load a disc with the label side facing up using the disc tray guide t...

Страница 76: ...ng playback enter a title number then press ENTER All Press CLEAR to clear a number entry and start again Commercial back skip Each press skips backward forward progressively up to a maximum of two hours in either direction PLAY STOP PAUSE PREV NEXT ENTER CM SKIP CM BACK While paused press and hold to start slow motion playback Press repeatedly to change the playback speed While paused press to ad...

Страница 77: ...tput through the analog outputs Also make sure that STEREO is selected using the AUDIO button see Switching audio channels on page 84 Press to start playback Press to stop playback Pauses playback or restarts playback when paused Press to start scanning Press again to increase the scanning speed There are two scan speeds the current scan speed is shown on screen PREV NEXT ENTER CM SKIP CM BACK PLA...

Страница 78: ...only While paused press to advance a single frame forward only Press to display the disc menu of a Video CD Super VCD playing in PBC mode ENTER CM SKIP CM BACK RETURN EXIT Press to start playback Press to stop playback Pauses playback or restarts playback when paused Press to start scanning Press repeatedly to increase the scanning speed Press to skip to previous next title During playback you can...

Страница 79: ...choose whether to display four or eight titles on the screen at the same time 1 Display the view options panel 2 Choose Style Sort order or Genre then press ENTER to see the available view options Style Select four or eight titles per screen view Sort order Sort by date most recent first unwatched first title name or recording date oldest first Genre Display all genres or just a selected genre 3 C...

Страница 80: ...y to change the scanning speed There are four scanning speeds available when playing HDD video a DVD or a DivX title Reverse playback is also possible with HDD and DVD Video 2 There are two scanning speeds for other types of disc 3 Resume normal playback Playing in slow motion You can play video at various slow motion speeds DVDs and video on the HDD can be played in slow motion in either directio...

Страница 81: ... from a specified point in a disc by time2 or by title chapter track number 1 Select Search Mode from the Play Mode menu then choose a search option The available search options depend on the type of disc 2 Enter a title chapter track number or a search time Time Search HDD DVD For example for 25 minutes into the current title press 2 5 0 0 For 1 hour and 15 minutes and 20 seconds into the title p...

Страница 82: ...back select Repeat Off from the Repeat Play menu or press CLEAR if no menu OSD such as the Play Mode menu is displayed Programme play This feature lets you program the play order of titles chapters3 albums tracks on a disc or the HDD 1 Select Programme from the Play Mode menu then Input Edit Programme The Input Edit Programme screen varies according to the disc type Below is the DVD input screen 2...

Страница 83: ...while stopped to erase the programme list From the programme menu you can also Start Programme Play Starts playback of a saved programme list Cancel Programme Play Turns off programme play but does not erase the programme list Erase Programme List Erases the programme list and turns off programme play Displaying and switching subtitles Some DVD and DivX discs have subtitles in one or more language...

Страница 84: ...eft channel only R Right channel only Stereo Stereo default 1 L Left channel only 2 R Right channel only 1 Stereo Soundtrack 1 Stereo default 1 L Soundtrack 1 Left channel 1 R Soundtrack 1 Right channel 2 Stereo Soundtrack 2 Stereo 2 L Soundtrack 2 Left channel 2 R Soundtrack 2 Right channel Switching camera angles Some DVD Video discs feature scenes shot from two or more angles check the disc box...

Страница 85: ...ideo disc once the disc is finalized The total recording time figure shown in parenthesis is calculated based on a 12 cm 4 7 GB disc at the displayed record setting Recording and playback time of TV recording is approximately 0 1 shorter than the actual time This is because of the slightly different frame rates of TV broadcasts versus DVD The frame number is shown next to the elapsed time display ...

Страница 86: ... should appear on your TV To record the incoming video press HDD or DVD to select the HDD or a DVD for recording then press REC Press F STOP REC to finish recording If there is no signal from the device connected to the DV jack or the signal is copy protected recording will pause It will automatically restart once there is a recordable signal The recorder will only start recording from the DV IN j...

Страница 87: ...der you can use this recorder s remote to control the camcorder using the and buttons 8 Select Start Rec You can pause or stop the recording by selecting Pause Rec or Stop Rec from the on screen display You cannot control the camcorder from this remote control during recording If you restart recording after stopping the camcorder the first few seconds of the camcorder tape will not be recorded Use...

Страница 88: ...art and in some other instances the disc will not be finalized Frequently Asked Questions I can t get my DV camcorder to work with the recorder Check that the DV cable is properly connected Also make sure that what you re trying to record is not copy protected If it still doesn t work try switching off the camcorder then switch back on There s a picture but no sound Try switching the DV Input sett...

Страница 89: ...r are copied Images that have already been copied are not copied even if they have been deleted from the recorder s HDD When All Movie Copy is selected all the images on the HDD camcorder are copied 5 Select Yes to confirm or No to cancel Select Yes and press ENTER The screen shown below appears To cancel copying press ENTER No other recorder operation is possible during copying The timer recordin...

Страница 90: ...RW Video mode DVD R RW DVD R RW DVD RAM VR mode Original Play List Create page 92 Play page 92 Erase page 92 Edit Title Name page 93 Edit Set Thumbnail page 94 Edit Erase Section page 94 Edit Divide page 95 Edit Chapter Edit page 96 Edit Set Genre page 97 Edit Lock page 97 Edit Move page 97 Edit Combine page 97 Genre Name page 98 Multi Mode page 98 Undo page 99 1 1 ...

Страница 91: ...s panel press then select Play List from the view options then Play List 3 Press to exit the Disc Navigator Editing accuracy Some editing commands ask you whether you want to keep Video mode compatibility or frame accuracy Video Mode Compatible Editing or Frame Accurate Editing Frame Accurate Editing is very precise The edit point is accurate to the exact frame you choose However this accuracy is ...

Страница 92: ...space increases accordingly Erasing a title from a DVD RW Video mode or DVD RW disc increases the available recording time only if it is the last title on the disc 1 Erasing Play List titles or titles from a DVD R VR mode or Video mode or DVD R will not result in any more free space on the disc 1 Highlight the title you want to erase 2 Select Erase from the command menu panel 3 Select Yes to confi...

Страница 93: ...aracter set 4 Select OK to enter the name and return to the main Disc Navigator screen To return to the main Disc Navigator screen without saving changes to the title name press RETURN EXIT Using the remote key shortcuts to input a name The table below shows the remote control key shortcuts that you can use to input characters in the name input screen Pressing a button repeatedly cycles through th...

Страница 94: ...this command you can delete a part of a title ideal for cutting out the commercial breaks in a recording made from the TV 1 Highlight the title containing the section you want to erase 2 Select Edit Erase Section from the command menu panel Note 1 It s possible that some USB keyboards will not work exactly as expected when connected to this recorder See also Connecting a USB device on page 24 for ...

Страница 95: ...at once divided the two new HDD titles cannot be recombined into one again 1 Highlight the title you want to divide 2 Select Edit Divide from the command menu panel 3 HDD only Select the type of edit For more information about these options see Editing accuracy on page 91 4 Use the playback controls etc to find the place you want to divide the title 5 Press to divide the title at the current playb...

Страница 96: ...ER 5 Select Exit to get back to the main Disc Navigator screen DVD VR DVD RAM HDD ENTER ENTER Video Mode Compatible Editing Frame Accurate Editing HDD DVD RECORDER Please select the type of editing Video Mode Compatible Editing is recommended for compatibility with high speed copying Chapter Edit DVD VR mode Play List Rec time 1 1 Play 0 00 00 19 00 Mon 29 11 Pr 2 SP 1h00m Chapters 5 Exit Erase Mo...

Страница 97: ...ter pressing ENTER the new updated Play List is displayed Combine Play List only Use this function to combine two Play List titles into one HDD ENTER ENTER Disc Navigator HDD 11 29 MON 7 00PM 11 29Mon 7 00PM 2ch SP 2h00m 1 0G 1 4 Titles Remain All Genres 10Titles 30h30m Recent first HDD SP 9 8 7 10 20 00 FRI 3 12 Pr 9 SP 20 00 Fri 3 12 Pr 9 SP 2h00m 1 0G 22 00 THU 2 12 Pr 7 SP 22 00 Thu 2 12 Pr 7 ...

Страница 98: ...xample 1 Select Multi Mode from the command menu panel 2 Select titles from the title list Selected titles are marked with a ENTER ENTER Disc Navigator DVD 4 Titles Remain 10Titles 0h30m DVD VR Mode MENU Play List 11 29Mon 7 00PM 2ch SP 1 20 00 FRI 3 12 20 00 Fri 3 12 Pr 9 SP 2h00m 1 0G 22 00 THU 2 12 22 00 Thu 2 12 Pr 7 SP 1h00m 1 0G 19 00 MON 29 11 19 00 Mon 29 11 Pr 2 SP 1h00m 1 0G 23 00 FRI 3 ...

Страница 99: ...longer displayed but the content remains on the disc DVD R R are write once media they can t be erased or rewritten I can t edit my disc You may find that as the available recording time is reduced on a VR mode DVD R disc editing is no longer possible This is because information about your edits requires a certain amount of disc space As you edit this information builds up eventually preventing yo...

Страница 100: ... copy at intervals according to the Auto Chapter settings see also Auto Chapter Video and Auto Chapter DVD R RW on page 142 Restrictions on copying Commercial DVD Video discs are protected using Copy Guard These discs cannot be copied to the HDD Some video material is copy once protected This means that it can be recorded to HDD but it can t then be freely copied again If you want to transfer copy...

Страница 101: ...s in the copy may not be in exactly the same positions as the original when recording on to a DVD R RW Video mode or DVD R RW You can t use the One Touch Copy function to copy a title if any part of the title is copy once protected A title that contains mixed aspect ratios can t be copied to a DVD R RW Video mode or DVD R RW Use a DVD R RW VR mode or DVD RAM disc for this type of material Low reso...

Страница 102: ... use a DVD RW VR mode disc for the copy make sure it is initialized before you start 2 Display the Home Menu 3 Select Copy HDD DVD If this is the first time to create a Copy List skip to step 5 below 4 If there is already a Copy List stored in the recorder choose whether to Create New Copy List or Continue Using Previous Copy List If you select Continue Using Previous Copy List skip to step 10 bel...

Страница 103: ...many titles you have that need editing 9 Display the command menu panel Note 1 The following titles cannot be copied at high speed for DVD R RW Titles recorded in MN1 to MN6 SEP SLP or EP mode The following titles cannot be copied at high speed for DVD R RW Video Mode and DVD R RW Widescreen titles recorded at low resolution SEP through LP MN1 to MN15 Video Mode Off or MN1 to MN8 Video Mode On LP ...

Страница 104: ...uch Copy on page 100 The recorder can only store one Copy List at a time The Copy List will be erased if any of the titles on the DVD disc are erased or edited the disc tray is opened playback is switched between Play List and Original the DVD disc is re initialized Video mode disc is finalized the recorder is reset to its factory settings see Resetting the recorder on page 167 It may not be possi...

Страница 105: ...ptimized2 5 The recording quality is automatically adjusted so that the Copy List fits on to the space available on the disc Copying is carried out in real time When you change the recording mode setting you can see how much disc space it will require If this is more than is available it shows up in red and you won t be able to start copying In this case either change the recording quality or pres...

Страница 106: ...OUCH COPY for more than one second 6 When the data has been copied take out the disc and load a blank recordable DVD If you re using a DVD RW or DVD RW the disc doesn t have to be blank although the previous contents of the disc will be erased in the backup process You can use a DVD R ver 2 0 2 1 or 2 2 disc or DVD RW ver 1 1 or ver 1 2 disc for the backup If you backup a DVD R disc to DVD RW you ...

Страница 107: ...rt to make another backup copy or Cancel to finish If you want to make another backup copy return to step 7 above 9 If you don t need to keep the backup data on the HDD you can delete it now Select Yes to delete the data from the HDD select No to keep it you can delete it later if you want to If you decide to leave the backup data on the HDD you can make backup copies to recordable DVD discs anyti...

Страница 108: ...You can also select Play from the command menu panel For a description of operations during playback see Playing DivX video files on page 78 Playing DivX files on the HDD that have not yet been viewed The files can be played easily simply by pressing the PC VIDEO button 1 Playing DivX files If there are multiple DivX files that have not yet been viewed the file recorded on the HDD at the most rece...

Страница 109: ... on the DVD CD or the USB device are copied to the HDD When a folder is selected you can copy only the titles contained in the folder by using Copy to HDD You can also copy titles by selecting Copy DVD CD HDD VIDEO FILE from the Home Menu To cancel copying press ENTER Up to 50 000 files or 999 folders can be recorded on the HDD Up to 999 files can be stored in one folder Up to 99 folders 999 title...

Страница 110: ... CLEAR when the title or folder is highlighted Press ENTER to confirm Naming titles and folders 1 Select the title or folder you want to rename 2 Select Edit from the command menu panel 3 Select Title Name or Folder Name 4 Enter a new name for the title folder Title names or Folder names can be up to 64 characters long See Using the remote key shortcuts to input a name on page 93 and Using a USB k...

Страница 111: ...recorder automatically searches for the titles on that Audio CD see About the automatic display of titles on page 112 Play Music on a USB Device Copies files from a USB device onto the HDD 5 Display the command menu panel 6 Select Edit Copy all to HDD On pressing ENTER all tracks or files on the DVD CD or the USB device are copied to the HDD Note 1 Up to 50 000 tracks can be created in the Jukebox...

Страница 112: ...r been played on the recorder is loaded and the track list screen is opened from the Jukebox the recorder automatically searches for titles The screen shown below is displayed Press ENTER to cancel searching Upon completion of search album name artist name track name and genre are automatically displayed 2 When multiple titles have been found use to select a title and press ENTER If you select No ...

Страница 113: ...w shows artists stored on the HDD To play back all of the tracks of the selected artist proceed to step 7 Press ENTER to switch to the album display of the selected artist This step is for the display mode set to Artist The operation varies when the display mode is set to other settings To play back all artists select All and proceed to step 7 Press SUBTITLE or ANGLE to change the page 5 Select th...

Страница 114: ...acks of an artist being played back Repeat Album Repeats all tracks of an album being played back Repeat Track Repeats the track being played back Repeat Off Cancels repeat playback Playing your favourite music Play List You can collect and play back only your favourite songs stored on the HDD Creating a play list 1 Select a track you want to add to a play list 2 Select Add to Play List from the c...

Страница 115: ...ata Format CD Displays the Audio CD s tracks MUSIC FILE Displays the folders tracks of the WMA MP3 files Cancel Cancels the switching of the display Display Mode Album Displays the folders of the WMA MP3 files Track Displays the tracks of the WMA MP3 files Cancel Cancels the switching of the display Copying albums tracks You can copy the albums stored on the HDD to other folders of a different art...

Страница 116: ...st name Enter a name of up to 64 characters for the artist See Title Name on page 93 for how to enter names Edit Album name Enter a name of up to 64 characters for the album See Title Name on page 93 for how to enter names Edit Track name Enter a name of up to 64 characters for the track See Title Name on page 93 for how to enter names Play List name Enter a name of up to 12 characters for the Pla...

Страница 117: ...s displayed as thumbnail at the bottom of the screen From the Folder Information column you can change thumbnails via the buttons Press PREV or NEXT to change the page 5 Select the file you want to view copy or edit The larger the file size the longer it takes the recorder to load the file Note 1 Up to 999 files or 99 folders are viewable but if there are more files folders than this on the disc o...

Страница 118: ...of thumbnails 1 Display the view options panel 2 Choose Display Mode or Style then press ENTER to see the available view options Display Mode Choose between folder and file display modes Style Choose between displays of 1 4 and 12 thumbnails 3 Choose a view option then press ENTER The display mode will change to that which you have chosen Playing a slideshow 1 Select a folder from the folder list ...

Страница 119: ...cle between zoom off 2x zoom and 4x zoom The zoom factor is displayed on screen 2 Use to move the zoomed area Rotating an image You can rotate the displayed picture during a slideshow so you can always view pictures the right way up whichever way they were taken 1 Press during the slideshow to rotate the displayed picture clockwise by 90º Press repeatedly to continue rotating the picture in increm...

Страница 120: ...os switch with motion enlargement reduction movement etc Normal OFF Photos are displayed on the entire screen and switch Play List Select the music to be used for the photo movie For details see Playing your favourite music Play List on page 114 Play List 1 to Play List 4 Select from the play lists stored in the Jukebox Favourites Use up to 25 of the tracks you listen to most often 4 Select Next C...

Страница 121: ... folder are selected 4 Display the command menu panel 5 Select the command you want to apply to all the selected items Copying files to a DVD R RW Using this feature you can copy all the files1 including audio and movie files stored on a connected USB camera to a recordable DVD disc A slideshow of the files is also recorded on the disc as a Video mode title making it possible to view the photos on...

Страница 122: ...ontain up to 99 files If there are more files than this in the slideshow multiple slideshows are created on the disc If you erase a slideshow title from a DVD the slideshow will become unplayable but the free space will not increase 1 Load a blank or unfinalized Video mode DVD R or DVD RW disc 2 Display the Home Menu 3 Select PhotoViewer View Edit Photos on the HDD 4 Select the file s or folder s ...

Страница 123: ...o 5 Select Yes to confirm or No to cancel Copying to the HDD will not work if there is insufficient space on the HDD if there are already the maximum number of files and or folders on the HDD Naming files and folders 1 Select the file or folder you want to rename You can t rename files that have been locked 2 Select File Options or Folder Options from the command menu panel 3 Select Rename File or...

Страница 124: ...the HDD a CD DVD or directly from a digital camera Make sure that the printer and your digital camera if you are using that as a source is connected to the recorder before starting 1 Select the file s you want to print To print multiple files use the Multi Mode see Selecting multiple files or folders on page 121 2 Select Print from the command menu panel 3 Select Start to confirm or Cancel to canc...

Страница 125: ...not be displayed 2 Display the Home Menu 3 Select Connect PC USB 4 Select Yes to confirm or No to cancel Operating the PC click on the window in step 1 to close it 5 Verify that the import screen is displayed on the device If no actions are carried out for 20 minutes the import screen is automatically closed To reopen it you will have to repeat steps 2 through 4 To copy WMA MP3 files see Copying W...

Страница 126: ...edia Player 11 music artist and album folders are created as follows With Windows Media Player 11 the above music folder is not displayed For the maximum number of tracks that can be copied see Copying music to the HDD on page 111 Note that when there are many tracks contained in one album it may take time to display and transfer these tracks Artists albums and tracks with no set name that are tra...

Страница 127: ...orer on the PC Press ENTER on the recorder s remote control close the import screen on this device If no actions are carried out for 20 minutes after copying the import screen on this device is automatically closed Note JPEG files can only be copied with the folder structure shown below It is not possible to place JPEG files directly into the Picture folder Also it is not possible to create more f...

Страница 128: ...ing the input screen Lock Disc Default setting Off Locking the disc will prevent accidental recording editing or erasing of the disc Important A locked disc can still be initialized which will completely erase the disc 1 Display the Home Menu 2 Select Setup Disc Setup 3 Select Basic Lock Disc then On or Off Set to On to prevent accidental recording editing or erasing of the disc loaded If you need...

Страница 129: ...orded on this recorder in Video mode You need to do this if you want to record more material or edit material already on the disc You can also undo the finalization of VR mode discs which have been finalized on other DVD recorders If when you load a disc the message This disc cannot be recorded Undo the finalization is displayed use this command to be able to record on the disc using this recorder...

Страница 130: ...problem this option is not visible in the Disc Setup menu However if the HDD file system becomes corrupted for some reason you can initialize the HDD to fix the problem Note that initializing the HDD will erase all the data on it 1 Display the Home Menu 2 Select Setup Disc Setup 3 Select Initialize HDD then Start HOME MENU ENTER ENTER Basic Initialize Finalize Optimize HDD Disc Setup Optimize HDD ...

Страница 131: ...asts VCR suitable for video cassettes DTV LDP suitable for digital broadcasts and Laserdiscs Memory1 user preset 1 Memory2 user preset 2 Memory3 user preset 3 You can press DISPLAY to see the individual settings for the current preset Tuner VCR or DTV LDP Creating your own set There are three user presets in which you can save your own set of picture quality settings 1 Follow Choosing a preset abo...

Страница 132: ...eset for any other input or the built in TV tuner Tip To see more of the picture as you adjust different settings press ENTER after selecting the setting you want to adjust Setting the picture quality for disc playback This setting determines how the picture will look when playing discs Choosing a preset 1 With a disc playing or paused press to display the Home Menu 2 Select Setup Video Adjust 3 S...

Страница 133: ...ess of the high frequency detailed elements in the picture Sharpness is ineffective for HDMI output Detail Adjusts how sharp edges appear White Level Adjusts the intensity of white White Level is ineffective for HDMI output Black Level Adjusts the intensity of black Black Level is ineffective for HDMI output Black Setup Corrects the standard reference black level The Black Setup setting is only va...

Страница 134: ...e clock will automatically be set The clock must be set in order to use timer recording Input Line System 525 System Use for NTSC or PAL 60 recording from an external input 625 System Use for standard PAL or SECAM recording This setting is applicable only when recording from an external input See also About the input line system on page 148 for more information on this setting Power Save Mode 1 On...

Страница 135: ...nels are set Channel Sort Next Screen Use this screen to sort channel presets into your prefered order Use the buttons to highlight the channel you want to move press ENTER Use the cursor buttons again to highlight the position you want to move the channel preset to then press ENTER again If there are more channel presets than will fit on one screen you can select the next previous page by highlig...

Страница 136: ...ference for multilingual digital broadcasts your Primary and Secondary Subtitle preference for programmes that are broadcast with subtitles and your Teletext language preference Use the buttons to highlight a field then use the buttons to change it Analog Tuner Auto Channel Setting Auto Scan Select your country and then wait for the recorder to auto tune into channels in your area After auto scan ...

Страница 137: ... Input Colour System Next Screen Proceed to the next screen to set the input colour system for the external input and the built in TV tuner Use the CHANNEL or INPUT SELECT buttons to change the preset or external input On the default Auto setting the recorder can generally correctly detect whether the input signal is PAL SECAM 3 58 NTSC or PAL 60 but in some cases you may have to set it manually i...

Страница 138: ... RGB Decoder Use this setting if you connected a decoder to the AV2 INPUT 1 DECODER SCART connector For scrambled channels make sure that the channel Decoder setting is set to On See Manual CH Setting on page 137 NTSC on PAL TV On NTSC discs will play correctly on PAL only TVs Off Use if your TV is already NTSC compatible Many recent PAL TVs are compatible with NTSC input and so this setting can b...

Страница 139: ...igital source is being played Dolby Digital PCM Convert Dolby Digital sources to Linear PCM output Use if your connected equipment doesn t have a Dolby Digital decoder DTS Out On Output a DTS signal when a DTS source is being played Off Switch off the digital output when a DTS source is being played Use when your connected equipment doesn t have a DTS decoder In this case use the analog audio outp...

Страница 140: ... English available languages Choose from the languages displayed to set the default subtitle language for DVD Video playback Other Select to set the default subtitle language to something other than the ones listed See Selecting other languages for language options on page 147 Discs do not necessarily have subtitles in your selected menu language Also some discs override the Subtitle Language pref...

Страница 141: ...al Recording On go to setup All the standard recording modes plus MN1 to MN32 LPCM and XP modes can be set Off Just the standard recording modes XP SP LP EP SLP and SEP can be set See also Manual recording modes on page 152 for detailed information on manual recording levels Optimized Rec On The recording quality of timer recordings is automatically adjusted to fit on to the selected media if it w...

Страница 142: ...opying to Video mode DVD R RW discs Auto Chapter DVD R RW No Separation Automatic chapter marking is switched off 10 minutes When recording in DVD R RW chapter markers are inserted every 10 minutes 15 minutes Chapter markers are inserted every 15 minutes This settings applies to recording or real time copying to DVD R RW discs HDD Recording Format Video Mode Off Recordings made to the HDD are made...

Страница 143: ...Video disc Off Nothing is indicated on screen when a multi angle scene is showing Parental Lock Set Password Change Password Next Screen If no password has yet been set enter a four digit number to become your password If you want to change the password first enter your old password then enter a new one DVD Playback Change Level From the following screen first enter your password and then set a pa...

Страница 144: ... Select if your HDMI TV does not allow you to change the aspect ratio 4 3 video will be shown with bars on each side Colour RGB 0 255 Use if colours are weak and black appears to float on the RGB 16 235 setting RGB 16 235 Use this setting if colours appear overly rich and the black too deep on the RGB 0 255 setting YCbCr 4 2 2 The video signal is output as a YCbCr 4 2 2 component signal This is th...

Страница 145: ...de Recorder 1 3 default Recorder 1 If you are using more than one recorder in the same room set them to different IDs This setting sets the recorder ID to change the remote controller ID press and hold RETURN EXIT then press 1 2 or 3 to set The remote will only control a recorder with the same ID AV Link This Recorder Only Signals received through the AV input when the recorder is in standby are n...

Страница 146: ... few seconds to load The HDD can be taken out of Sleep Mode by any number of actions including Turning the power off and on again Pressing the HDD button and choosing the HDD When a timer recording begins When you try and make any changes to system settings Gracenote Database Database Update For details see Updating the recorder s Gracenote database below Version Information Shows the current vers...

Страница 147: ...ious screen Note that channel information may be erased when software update is used and that timer recording will not work during the update To cancel manual update before it has completed press HOME MENU Auto Update By default the Auto Update option is On which means that periodically the recorder will check for and update the digital tuner software if it s available We recommend that you leave ...

Страница 148: ...care You can t mix recordings of different TV line systems on the same disc When you change this setting the Input Colour System setting also changes see below About NTSC on PAL TV Depending on the Input Line System setting and the NTSC on PAL TV setting the signal format output when the recorder is stopped varies as shown in the table below About the input colour system The available options of t...

Страница 149: ...able below shows how to use this remote control with your TV Button What it does Press to switch the TV on off standby INPUT SELECT Press to change the TV s video input VOL Use to adjust the TV volume CH Use to change TV channels Maker Code s ACURA 44 ADMIRAL 31 AIWA 60 AKAI 32 35 42 AKURA 41 ALBA 07 39 41 44 AMSTRAD 42 44 47 ANITECH 44 ASA 45 ASUKA 41 AUDIOGONIC 07 36 BASIC LINE 41 44 BAUR 31 07 ...

Страница 150: ...OSO 41 OSUME 48 OTTO VERSAND 31 32 07 42 PALLADIUM 38 PANAMA 46 PANASONIC 31 07 08 42 22 PATHO CINEMA 42 PAUSA 44 PHILCO 32 42 Maker Code s PHILIPS 31 07 34 56 68 PHOENIX 32 PHONOLA 07 PROFEX 42 44 PROTECH 07 42 44 46 49 QUELLE 31 32 07 42 45 53 R LINE 07 RADIOLA 07 RADIOSHACK 10 23 21 02 RBM 53 RCA 01 10 15 16 17 18 61 62 09 REDIFFUSION 32 42 REX 31 46 ROADSTAR 41 44 46 SABA 31 36 42 51 SAISHO 39...

Страница 151: ...nding on the disc the copy speed may be reduced for example although a 6x disc is used the copy may be made at 2x speed Rec mode SEP SLP EP LP SP XP DVD disc type 10 h 8 h 6 h 4 h 2 h 1 h DVD R 1x DVD RW 1x 1x 6 mins 7 5 mins 10 mins 15 mins 30 mins 60 mins DVD RW 2x DVD R DL DVD RAM 2x 2x 3 mins 4 mins 5 mins 7 5 mins 15 mins 30 mins DVD R 2 4x DVD RW 2 4x DVD R DL 2 4x 1 1 1 6 3 mins 12 5 mins 2...

Страница 152: ...mode DVD R DL Video mode On HDD Video mode DVD R RW DVD R RW Video mode DVD R DL DVD R DL MN 1 3 4 803 mins 1440 mins 352 x 240 352 x 288 352 x 240 352 x 288 MN 2 3 4 720 mins 1292 mins MN 3 3 4 SEP 600 mins 1077 mins MN 4 4 SLP 480 mins 861 mins MN 5 4 420 mins 754 mins MN 6 4 EP 360 mins 646 mins MN 7 300 mins 538 mins 352 x 480 352 x 576 352 x 480 352 x 576 MN 8 270 mins 484 mins MN 9 LP 240 mi...

Страница 153: ...three seconds Can t play a disc Check that the disc is a compatible format disc page 7 Take out the disc and clean it page 166 Check that the disc is loaded properly aligned in disc tray and label side up Press DVD to select the DVD There may be condensation in the recorder Leave the recorder for an hour or so for the condensation to evaporate During HDD recording you can t play discs that are rec...

Страница 154: ...On Some 96 kHz discs do not output audio through the digital jack In this case switch the input of your amp receiver to analog Check the audio cable connections page 14 If the sound is distorted try cleaning the cable plugs The picture is distorted Change the Input Line System setting page 148 You can also change it by pressing the Stop button and INPUT SELECT on the front panel simultaneously wit...

Страница 155: ...ining only a small amount of recorded material may not play on other players Finalize the disc and try again DVD RAM discs can only be played on DVD RAM compatible players A DVD R RW recorded using this unit cannot be subjected to time search in other equipment Time search may be unavailable with certain equipment Can t record or does not record successfully Check that there is some remaining blan...

Страница 156: ...for a DVD R RW Video mode or a DVD R the disc isn t finalized Make sure there is a recordable DVD R RW loaded with some free space for recording and fewer than 49 titles already on the disc If you delete a title from a DVD R RW disc the number of remaining recordable titles may not decrease Further recording is not possible on a finalized DVD R Check that there isn t a disc menu on the disc you re...

Страница 157: ...and then back on Try using the Restart USB Device option from the Initial Setup menu page 146 If several USB devices camera USB memory card reader etc are connected at the same time it s possible that only the first device connected to this recorder will be recognized The power automatically turns on Set the Demo Mode to Off after performing the Setup Navigator page 146 A video file recorded on th...

Страница 158: ... 1080i p video input If the recorder s internal HDD is damaged or broken there will be no HDMI output Not all HDCP compatible DVI devices will work with this recorder The power automatically turns on This unit s power may be turned on each time you turn on the power for a connected Flat Screen TV If you do not want this unit to be turned on in this way set this unit s HDMI Control to Off page 145 ...

Страница 159: ... TV some HDMI input terminals do not support the HDMI Control function For details see the operating instructions supplied with your Flat Screen TV HDMI Control may not operate properly if you do not use a High Speed HDMI cable This function may not work properly if you have multiple recorders connected to a single Flat Screen TV AV system or HD AV converter For more information refer to the opera...

Страница 160: ... so will not play Cannot record any more titles No more space for file management data The disc control data limit has been reached or the maximum number of chapters and or titles has been reached Erase titles chapters or combine chapters This disc cannot be recorded Undo the finalization The disc was finalized on a non Pioneer DVD recorder Undo the finalization in order to recording editing Canno...

Страница 161: ... recorder has exceeded the operating limit If this message reappears please ask your nearest Pioneer authorized service center or your dealer to carry out repairs HDD optimization is recommended This can be done using Disc Setup The HDD should be optimized basically HDD housekeeping to maintain playback and recording performance Please perform HDD optimization This can be done using Disc Setup The...

Страница 162: ...r smart card obtained from your service provider is required to watch the selected programme Insert the supplied module or card into the Common Interface card slot on the front panel of the recorder page 27 There is no DV input or the input signal is unrecordable No signal was detected at the DV IN jack This may appear if a blank section of DV tape is playing in the connected camcorder No DV camco...

Страница 163: ...in or select Yes to resume printing select No to cancel the print job See also the operating instructions that came with your printer for possible causes of print errors Message Explanation Action E01 The HDD may be damaged or broken Please ask your nearest Pioneer authorized service center or your dealer to carry out repairs E02 As the HDD info cannot be properly read no new recordings can be mad...

Страница 164: ...n lt 1220 Latvian lv 1222 Malagasy mg 1307 Maori mi 1309 Macedonian mk 1311 Malayalam ml 1312 Mongolian mn 1314 Moldavian mo 1315 Marathi mr 1318 Malay ms 1319 Maltese mt 1320 Burmese my 1325 Nauru na 1401 Nepali ne 1405 Occitan oc 1503 Oromo om 1513 Oriya or 1518 Panjabi pa 1601 Pashto Pushto ps 1619 Quechua qu 1721 Rhaeto Romance rm 1813 Kirundi rn 1814 Romanian ro 1815 Kinyarwanda rw 1823 Sansk...

Страница 165: ...of the screen 4 3 Pan Scan The sides of the programme are cropped so that the picture fills the whole screen 4 3 4 3 Letter Box 4 3 Pan Scan The programme is presented correctly on either setting When viewing on a widescreen TV or monitor Screen format of disc Setting Appearance 16 9 16 9 The programme is presented in widescreen 4 3 16 9 Your TV will determine how the picture is presented check th...

Страница 166: ... paper or put stickers onto the disc or use a pencil ball point pen or other sharp tipped writing instrument These could all damage the disc For more detailed care information see the instructions that come with discs Do not load more than one disc into the recorder Damaged discs Discs spin at high speed inside the recorder If you can see that a disc is cracked chipped warped or otherwise damaged ...

Страница 167: ...interference especially if the television uses an indoor antenna Use in a kitchen or other room where the recorder may be exposed to smoke or steam Use on a thick rug or carpet or cover with cloth this may prevent proper cooling of the unit Place on an unstable surface or one that is not large enough to support all four of the unit s feet Moving the recorder If you need to move the recorder first ...

Страница 168: ... 35 m Long Play LP Approx 7 h 11 m Extended Play EP Approx 10 h 46 m Super Long Play SLP Approx 14 h 21 m DVD R DL Approx 14 h 4 m DVD R DL Super Extended Play SEP Approx 17 h 57 m DVD R DL only Manual Mode MN DVD R DL Approx 1 h 51 m to 24 h DVD R DL Approx 1 h 51 m to 14 h 4 m Timer Programmes 1 month 32 programmes Clock Quartz lock 24 hour digital display Tuner analog Receivable channels Tuner ...

Страница 169: ... R During audio input 2 V rms Input impedance more than 22 kΩ Jacks AV connector Input 1 RCA jacks Input 2 Input 3 Audio output AV1 Output L R During audio output 2 V rms Output impedance less than 1 5 kΩ Jacks AV connector AV1 RCA jacks Output Control input Mini jack Digital audio output Coaxial G LINK Mini jack Common Interface CA module DV input 4 pin front i LINK IEEE 1394 standard USB Type A ...

Страница 170: ...Additional information 19 170 En ...

Страница 171: ...Additional information 171 En 19 ...

Страница 172: ...Additional information 19 172 En Follow the instructions for Replace Channels page 135 ...

Страница 173: ...Software and the Gracenote Servers including all ownership rights Under no circumstances will Gracenote become liable for any payment to you for any information that you provide You agree that Gracenote Inc may enforce its rights under this Agreement against you directly in its own name The Gracenote service uses a unique identifier to track queries for statistical purposes The purpose of a random...

Страница 174: ...HDD DVD Recorder Operating Instructions http www pioneer co uk http www pioneer eu 00 Cover_back_560HX_WV fm 1 ページ 2008年3月6日 木曜日 午前10時54分 ...

Отзывы: