background image

3

Touch a picture you want to set.

4

Touch [Yes].

On this screen, you can select the following
items:
[

No

]:

Select when you want to change to another
picture.
Return to Step 3.

Deleting data

1

Touch [Info/Phone] in the navigation

menu, and then touch [Phone Menu].

2

Touch [Phone Book].

3

Touch [Delete].

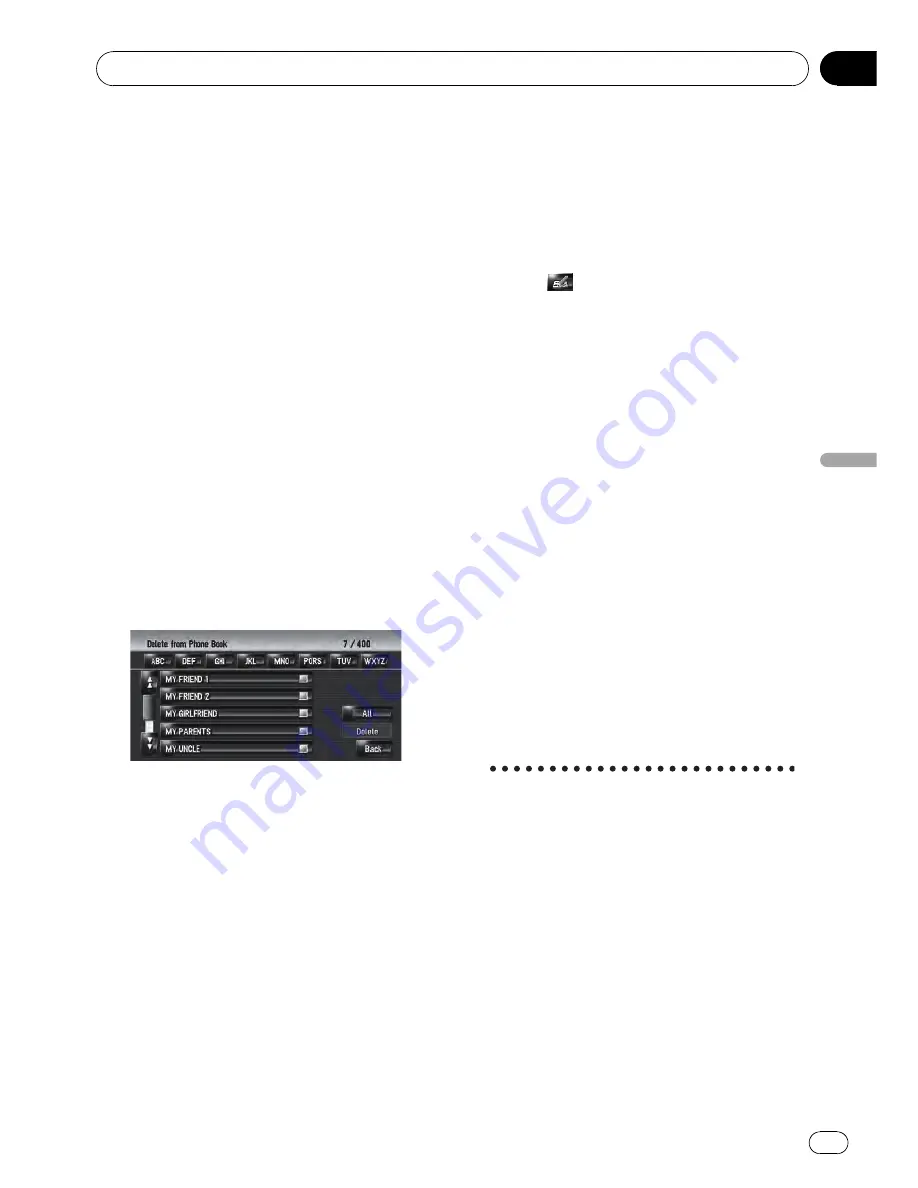
The

Delete from Phone Book

screen ap-

pears.

4

Touch the entry you want to delete.

A red tick mark appears next to the selected
entry. To cancel the selection, touch the entry
again.

5

Touch [Delete].

6

Touch [Yes].

The data is deleted, and the current location
screen appears.

p

To cancel the deletion, touch [

No

].

Editing the received call or
dialled number history

You can edit the data in the dialled number
history or the received call history. You can
edit them and the edited entries are registered
in the phone book. You can also delete the his-
tory data.

Editing data

1

Touch [Info/Phone] in the navigation

menu, and then touch [Phone Menu].

2

Touch [Dialed Numbers] or [Received

Calls].

3

Touch

.

The edit screen appears. Steps after this are
the same as for editing the phone book.

=

For details, refer to

Editing the entry in

Phone Book

on page 73

p

The phone number cannot be edited if it is
already registered in the phone book.

Deleting data

1

Touch [Info/Phone] in the navigation

menu, and then touch [Phone Menu].

2

Touch [Dialed Numbers] or [Received

Calls].

3

Touch [Delete].

4

Touch [Yes].

All history data is deleted, and the current lo-
cation screen appears.

p

To cancel the deletion, touch [

No

].

Notes for hands-free phoning

General notes

!

Connection to all mobile phones featuring
Bluetooth wireless technology is not guar-
anteed.

!

The line-of-sight distance between this na-
vigation system and your mobile phone
must be 10 meters or less when sending
and receiving voice and data via Bluetooth
technology. However, the transmission dis-
tance may become shorter than the esti-
mated distance, depending on the
environment in use.

Using Hands-free Phoning

Engb

75

Chapter

09

Using

Hands-free

Phoning

Содержание AVIC-HD3II

Страница 1: ...Operation Manual HDD AV NAVIGATION HEAD UNIT AVIC HD3II English ...

Страница 2: ...eration Flow from Startup to Termination 22 How to Use Navigation Menu Screens 22 Displaying the Navigation menu 22 Navigation menu overview 23 Basic Navigation 24 Basic flow of operation 24 Calculating your destination by using Address Search 24 Checking and modifying the route 28 When the route guidance starts 29 Cancelling the Route Guidance 29 Modifying the Route Calculation Conditions 29 Item...

Страница 3: ...Location into Address Book 55 Registering a location by scroll mode 55 Registering a location by Address Book 55 Viewing Address Book 56 Editing the entry in Address Book 56 Deleting the entry in Address Book 59 Operating Destination History 60 Deleting the entry in Destination History 60 Using Traffic Information Using RDS TMC Information 61 Viewing traffic list 61 Confirming traffic information ...

Страница 4: ...90 Screen configuration 90 Touch panel key operation 90 Notes on playing MP3 disc 92 Operating the DVD 92 Selecting DVD as the source 92 Screen configuration 92 Touch panel key operation 93 Searching for a desired scene starting playback from a specified time 94 Entering the numerical commands 94 Operating the Radio FM 95 Selecting FM as the source 95 Screen configuration 95 Touch panel key operat...

Страница 5: ...e 123 Screen configuration 123 Touch panel key operation 123 Operate the external unit by using 1 key 6 key 124 Operate the external unit by using Function 1 Function 4 124 Switching the automatic and manual function 124 Operating the AUX input source AUX 125 Selecting AUX as the source 125 Customising the Audio Setting related with Audio Visual AV Setting Overview 126 How to Operate the Audio Set...

Страница 6: ... operation 154 Category list for vicinity search 155 Appendix Troubleshooting 157 Messages and How to React to Them 162 Messages for Audio Functions 165 Returning the Navigation System to the Default or Factory Settings 168 Setting items to be deleted 169 If system errors frequently occur 171 Completely returning the navigation system to the initial state 171 Adjusting the Response Positions of th...

Страница 7: ...navigation system Finding the operation procedure from what you want to do When you have decided what you want to do you can find the page you need from the Contents Finding the operation procedure from a menu name If you want to check the meaning of each item displayed on the screen you will find the ne cessary page from the Display Information at the end of the manual Glossary See the glossary t...

Страница 8: ...rce Music Library You can record a music CD to the hard disk drive in the navigation system This chapter describes recording music and playing back the recorded music d Using the AV Source M CD iPod TV This chapter describes the audio source op erations that can be used when Pioneer audio equipment featuring IP BUS Multi CD player Interface adapter for iPod TV tuner is connected e Using the AV Sou...

Страница 9: ...anual the screen that is attached to the body of this navigation unit will be referred to as the Front Display Any additional op tional screen that is purchased for use in con junction with this navigation unit will be referred to as the Rear Display Video image Video image in this manual indicates the moving image from DVD Video in the built in DVD drive or from the equipment that is con nected t...

Страница 10: ... any other means You shall not use the Software to op erate a service bureau or for any other use involving the processing of data for other persons or entities Pioneer and its licensor s shall retain all copyright trade secret patent and other proprietary ownership rights in the Soft ware The Software is copyrighted and may not be copied even if modified or merged with other products You shall no...

Страница 11: ...is warranty is prohibited by any country or local law which cannot be pre empted 4 EXPORT LAW ASSURANCES You agree and certify that neither the Soft ware nor any other technical data received from Pioneer nor the direct product thereof will be exported outside the country or dis trict the Country governed by the govern ment having jurisdiction over you the Government except as authorised and as pe...

Страница 12: ...lose the Data or any portions in any form including by rent ing leasing publishing leasing sublicen sing or transferring the Data to any third party You are explicitly prohibited from downloading the digital maps and pro grammes contained in the Data or from transferring these to another data carrier or computer You are prohibited from using the POIs i to create mailing lists or ii for other such ...

Страница 13: ...YOU FOR ANY SPECIAL INDIR ECT CONSEQUENTIAL OR INCIDENTAL DA MAGES INCLUDING DAMAGES FOR LOSS OF BUSINESS PROFITS BUSINESS INTER RUPTION LOSS OF BUSINESS INFORMA TION AND THE LIKE ARISING OUT OF THIS AGREEMENT OR THE USE OF OR IN ABILITY TO USE THE DATA EVEN IF PIONEER ITS LICENSORS OR SUPPLIERS HAVE BEEN ADVISED OF THE POSSIBILITY OF SUCH DAMAGES 5 Termination This Agreement will terminate immedi...

Страница 14: ... from using the Data in any printed published form that results in derivative products to be distributed freely or sold to the public without the prior per mission of Ordnance Survey e You shall indemnify and hold harmless Ord nance Survey from and against any claim demand or action irrespective of the nature of the claim demand or action alleging loss costs damages expenses or injury including in...

Страница 15: ...epartment About the Data for the Map Database This database was developed and recorded up to May 2007 Changes to streets high ways made after that time may not be re flected in this database It is strictly prohibited to reproduce and use any part or the whole of this map in any form without permission from the copyright owner If the local traffic regulations or conditions deviate from this data fo...

Страница 16: ...PLOIT GRACENOTE DATA THE GRACENOTE SOFTWARE OR GRACE NOTE SERVERS EXCEPT AS EXPRESSLY PER MITTED HEREIN You agree that your non exclusive licence to use the Gracenote Data the Gracenote Soft ware and Gracenote Servers will terminate if you violate these restrictions If your licence terminates you agree to cease any and all use of the Gracenote Data the Gracenote Soft ware and Gracenote Servers Gra...

Страница 17: ...SERVER IN NO CASE WILL GRACENOTE BE LIABLE FOR ANY CONSE QUENTIAL OR INCIDENTAL DAMAGES OR FOR ANY LOST PROFITS OR LOST REVEN UES Gracenote 2006 Other Precautions Part of the data cannot be acquired The contents of the data in the Gracenote Da tabase included in the hard disk drive are not 100 guaranteed The Gracenote Database included in the hard disk drive contains the titles for the 300 000 mos...

Страница 18: ...isting traffic regulations If you ex perience difficulty in operating the system or reading the display park your vehicle in a safe location and apply the handbrake be fore making the necessary adjustments p Never allow others to use the system un less they have read and understood the op erating instructions p Never use this navigation system to route to hospitals police stations or similar facil...

Страница 19: ... on a display inside a vehicle even by persons other than the driver may be illegal Where such regulations apply they must be obeyed When applying the handbrake in order to view Video image or to enable other functions of fered by the navigation system park your vehi cle in a safe place and keep the brake pedal pushed down before releasing the handbrake if the vehicle is parked on a hill or otherw...

Страница 20: ...e assignment You can store your own pictures on a CD R in JPEG format and import original images in this navigation system These imported images can be set as a background or splash screen or as a picture in an address book or phone book entry Station name auto display While tuning to an RDS station you can dis play a list of the stations you are receiving with the programme service names This fac...

Страница 21: ...rsonal entertainment p Make sure to check the recording operation before recording and check the recorded contents after recording p Recording is not guaranteed for all CDs Data saved or recorded by the customer p The data saved or recorded onto this navi gation system by the customer cannot be extracted from the navigation system and those services cannot be accepted p The data saved or recorded ...

Страница 22: ...r normal operations 3 Press MENU button This displays the navigation menu 4 Assign a destination by using the touch panel key and beginning route guidance or operating the Audio source p Touch panel keys that are not available at this time are inactive For more details about Specifying the ad dress and searching for the destination refer to Calculating your destination by using Ad dress Search on ...

Страница 23: ...vigation system re ceives available traffic information from a RDS TMC station For details refer to Using RDS TMC Infor mation on page 61 p Phone Menu is active only when the Bluetooth unit ND BT1 is connected to the navigation system Map menu You can change View Mode or set the items to be displayed during the navigation function p View Mode can be selected only when the vehicle position is at th...

Страница 24: ...dings appears 8 After releasing the handbrake drive in accordance with the navigation informa tion subject to the important safety in structions noted on Important Safety Information on page 18 and Additional Safety Information on page 19 Calculating your destination by using Address Search The most frequently used function is Address Search in which the address is specified and the destination is...

Страница 25: ...evious page of the list 3 Country list Press one of these items to set it as search area 4 Back Returns previous screen Operation of street name or city name input screen e g QWERTY keyboard a 4 7 8 9 1 3 6 b 5 2 1 Country code key Jump to the country selection screen Se lected country code is displayed 2 OK Confirms the characters displayed in 4 and proceeds to the next step 3 List Lists candidat...

Страница 26: ...he letter H HOLLYBUSH HILL will be filled in automatically The manually input characters are displayed in yellow and the suggested characters are displayed in white so you can distinguish them To confirm the filled in characters touch OK 6 Touch the street from the list If the selected street has only one matching lo cation Route confirmation screen appears Proceed to Step 9 7 Touch the city or ar...

Страница 27: ...Returns previous screen Checking the location on the map Location confirmation screen 1 2 3 1 Calculating the route to the destination Route calculation starts When the route calculation is completed Route confirma tion screen appears p If you press MAP button or MENU but ton during route calculation the calcu lation is cancelled and the map screen appears 2 Scrolling the map The map display chang...

Страница 28: ...e to destination 4 Set the displayed route Sets the displayed route as your route and starts the route guidance For details refer to When the route guidance starts on the next page 5 Display multiple routes You can select a desired route from multiple route options Calculated routes are shown in different colours Touching to switch to another route Touching OK returns to the previous display If yo...

Страница 29: ...section describes only the basic items that are displayed on the Map Mode screen For more details about Details of the map screen refer to How to Use the Map on page 34 2 3 1 4 1 Current location 2 Distance to the destination 3 Estimated time of arrival default 4 ON OFF key for voice guidance Cancelling the Route Guidance If you no longer need to travel to your destina tion or if you want to chang...

Страница 30: ...ntrols whether toll roads in cluding toll areas should be taken into ac count Off Calculate a route that may include toll roads including toll areas On Calculate a route that avoids toll roads includ ing toll areas p The system may calculate a route that in cludes toll road even if On is selected Avoid Ferry This setting controls whether ferry crossings should be taken into account Off Calculate a...

Страница 31: ...treets with a list Checking the entire route overview on the map Checking the passing streets with a list You can check the route details p This function is not available if your vehicle has deviated from the route 1 Touch Destination in the navigation menu and then touch Route Overview Route confirmation screen appears p Route Overview is displayed only when the route is set 2 Touch Profile 3 Tou...

Страница 32: ...to pass through these locations Adding a waypoint Up to 5 waypoints can be selected and se lected points can be sorted automatically or manually 1 Touch Destination in the navigation menu and then touch Route Overview 2 Touch Waypoints The waypoint menu screen appears 3 Touch Add The Select Search Method screen appears After searching for a point display it on a map then touch OK to add to the way...

Страница 33: ...int distance in a straight line from the current location as waypoint 1 and sort the other points including your destination in order of distance from the waypoint 1 Manual You can manually sort destination and way points Touch the destination and waypoints on the left side of the screen in the order you want to visit The touched destination and way points are displayed on the right side of the sc...

Страница 34: ...rea around your current position 2 Press MAP button again 3 Touch the mode name to select the mode you want to display p You can display the view mode screen by touching Map in the navigation menu and touching View Mode How to view the map of the current location p This example shows a case where Second Maneuver Arrow is set to View Map Mode Displays the standard map 1 2 3 4 5 6 7 8 9 b c g k l a ...

Страница 35: ...d in a different way p You can change the items indicated on the left and right meters For details refer to Setting the Vehicle Dynamics Display on page 41 Rear View Rear view image is displayed on the left hand side of the screen while the map of your sur roundings is indicated on the right l 6 d 9 k a f m 8 7 5 2 p If Camera Input is set to Off the rear view image is not displayed Please set it ...

Страница 36: ...ilable at the 50m 0 05 mile map scale or lower The screen changes automatically when you enter certain metropo litan city areas 1 a k 5 6 7 l 4 8 2 3 b p The detailed city map may not appear for the following reasons The data for that city area is not con tained in the hard disk drive You are driving on a motorway Display items p Information with the mark appears only when the route is set p Depen...

Страница 37: ...er to Chapter 16 9 RDS TMC service provider This appears when the RDS TMC signal is re ceived The service provider name of the RDS TMC signal currently being received is shown p The station name or frequency will be shown when the service provider name is not available a Current time b Estimated time of arrival or travel time to your destination The display alternates by pressing it p The estimate...

Страница 38: ...ction after next You can select between display and non display For more details about Selecting display or non display for Second Maneuver Arrow refer to Setting the Item on the Map Screen on page 42 n POI icon The POI icon may appear on the enlarged map of the intersection when available data exists o Suggested lane information The travelling direction screen is displayed when you approach a int...

Страница 39: ...s of the screen to scroll quickly 1 2 3 4 5 1 Scroll cursor The position of scroll cursor shows the loca tion selected on the current map p When the scale is 200 m 0 25 mile or lower the road appears light blue in the vicinity of the scroll cursor 2 Direction line This is the line connecting between the cur rent location and the scroll cursor The direction towards the scroll cursor is indi cated w...

Страница 40: ...se the shortcuts displayed on screen The shortcuts described here are pre pared as the default setting For more details about Changing a short cut refer to Selecting the Shortcut on page 44 p When the Bluetooth unit sold separately is connected to the navigation system you can use shortcuts related to phone func tions p Items marked with an asterisk cannot be removed from Shortcut menu When the ma...

Страница 41: ... system Acceleration Acceleration in a forward direction is dis played The sign indicates acceleration while the sign indicates deceleration Lateral Acceleration Acceleration in a side direction such as when turning is displayed The sign indicates a right turn while the sign indicates a left turn Angular Velocity Displays the vehicle s turning angle over one second how far it has turned in a secon...

Страница 42: ...The Displayed Info screen appears On this screen you can operate the following items 2 To finish the setting touch OK Close Up View You can select the method to display the close up view of the intersection 2D Displays the close up view with the 2D map Off Does not display the close up view City Map You can select whether to display the city map when in certain metropolitan city areas On Automatic...

Страница 43: ...ap of the current location on page 34 View Displays the second turn ahead of the vehi cle on the map Hide Hides the second turn ahead of the vehicle on the map Bluetooth Connected Selects whether to display or hide the icon for current status of the phone connection via Bluetooth wireless technology View Displays the Bluetooth Connected icon on the map Hide Hides the Bluetooth Connected icon on th...

Страница 44: ...on the Map on this page Volume Displays Volume For more details about Volume refer to Setting the Volume for Guidance and Phone on page 77 Phone Book Displays Phone Book For details refer to Calling a number in the phone book on page 71 For details refer to Editing the entry in Phone Book on page 73 Dial Favourite 1 to Dial Favourite 5 Make a call to the phone number registered in Dial Favourites ...

Страница 45: ...details refer to Viewing the information of a specified location on page 39 Viewing the Map Colour Legend You can browse the type of the roads and areas displayed on the map 1 Touch Map in the navigation menu then touch Map Legend 2 Touch the type which you want to see 3 Touch or to switch to the next page or previous page On this screen you can operate the following items Day You can check the co...

Страница 46: ...tails refer to Operating the picture adjustment on page 138 Changing the Setting of Navigation Interruption Screen Set whether to automatically switch to the na vigation screen from the AV screen when your vehicle approaches a guidance point such as an intersection while displaying a screen other than navigation 1 Touch Map in the navigation menu 2 Touch AV Guide Mode to change the setting Each ti...

Страница 47: ...OI Searching for a POI directly from the name of the facilities Searching for POIs by specifying a category first Searching for POIs by specifying a city name first Searching for a POI directly from the name of the facilities 1 Touch Destination in the navigation menu and then touch POI Search 2 Touch the country code key of the des tination and select the country For more details about Selecting ...

Страница 48: ...eet name touch to set the POI as your destination Searching for POIs by specifying a category first 1 Touch Destination in the navigation menu and then touch POI Search 2 Touch the country code key of the des tination and select the country For more details about Selecting the coun try where you want to search refer to Calcu lating your destination by using Address Search on page 24 3 Touch Catego...

Страница 49: ...Vicinity Searching for the facilities around the current position You can search for Points Of Interest in your surroundings Use this function to find a POI to visit during a journey Searching range is approximately 16 km 10 miles square from the current location 1 Touch Destination in the navigation menu and then touch Vicinity Search The list of POI categories appears 2 Touch the desired categor...

Страница 50: ...ursor Searching range is approximately 16 km 10 miles square from the scroll cursor p This can be used when Vicinity Search is selected in Short Cut Selection For more details about Changing a shortcut refer to Selecting the Shortcut on page 44 1 Scroll the map and move the scroll cur sor to the place where you want to search for POI 2 Touch The shortcut menu appears 3 Touch For more details about...

Страница 51: ...ion to Your Home Location or to Your Favourite Location If your home location is registered the route home can be calculated by touching a single key from the navigation menu Also you can register one location such as your workplace as your favourite location and the route is cal culated in a similar way For details refer to Registering your home and your favourite location on page 54 Touch Destin...

Страница 52: ...same as described below Registering a POI shortcut 1 Touch Destination in the navigation menu and then touch Vicinity Search 2 Touch Set Displays a list of already registered POI short cuts 3 Touch Add Displays a POI category list 4 Touch a category 5 Touch the POI selection method Select All Selects all detailed categories that are in cluded in that category E g all categories of restaurants incl...

Страница 53: ...d tick mark will appear or disappear on all registered categories 5 Touch Delete Deletes the selected shortcut from the list Setting a Route to Your Destination Engb 53 Chapter 06 Setting a Route to Your Destination ...

Страница 54: ...n item from Ad dress Book p The items in Address Book are automati cally updated in alphabetic order However Home location and Favourite loca tion always appear at the top if you regis tered them p Selects whether to display or hide all of the registered location icons on the map For details refer to Setting the Item on the Map Screen on page 42 Registering your home and your favourite location Yo...

Страница 55: ...rmation screen appears For details refer to Editing the entry in Ad dress Book on the next page 3 Touch OK Completes the registration Registering a location by Address Book 1 Touch Destination in the navigation menu then touch Address Book 2 Touch Add 3 Select the search method search the lo cation and display the map 4 When the map of the location you want to register is displayed touch OK The lo...

Страница 56: ...ition p Active if there are items in the list and current sort is not by distance form cur rent position 8 Sorts the items in the list in order of the re cently used items p Active if there are items in the list and current sort is not by last used 9 Add The screen for selecting the method for re gistering the location in Address Book ap pears For details refer to Registering a Location into Addre...

Страница 57: ...an make a phone call to the registered phone number 3 by touching For details refer to Dialling the entry in the Address Book on page 71 When you approach a registered location while travelling When a location with a registered sound effect and image comes within an approx 300 m 0 19 mile radius from the vehicle position the sound effect plays and the image appears Changing a name No sounds can be...

Страница 58: ...wn on the left side of the location name displayed in the Address Book menu This mark indicates that this name can be used as a voice command during voice opera tion p You cannot change the pronunciation of your home p If nothing is entered in the text box you cannot use that item as the voice com mands Entering or changing a phone number 1 Touch Phone 2 Input a phone number then touch OK The Addr...

Страница 59: ...is screen you can select the following items No Select when you want to change to another picture Return to Step 3 Selecting sound No sounds can be output during 1 Touch Sound 2 Select the desired sound p To turn off the sound select No Sound 3 Touch Sound to hear the sound 4 Touch Set Changing the position of locations 1 Touch Modify Location The map of the selected area and its surround ings app...

Страница 60: ...letes the selected history 3 Back Returns to the previous screen Deleting the entry in Destination History Items in Destination History can be deleted All entries in Destination History can be de leted at once 1 Touch Destination in the navigation menu then touch Destination History 2 Touch Delete Delete from History screen appears 3 Select the location you want to delete A tick mark appears by th...

Страница 61: ...tion related with these events cannot be turned off If you select other traffic information in Traffic Settings the information can be displayed in a list or on a map For details refer to Selecting traffic informa tion to display on page 64 Viewing traffic list Traffic Information is displayed on screen in a list This allows you to check how many traffic incidents have occurred their location and ...

Страница 62: ...played on screen in a list Touch Info Phone in the navigation menu and then touch Traffic On Route The currently set traffic information on the route appears on the screen p The method for checking the content dis played on the screen is the same for Checking all traffic information Confirming traffic information on the map p A line is displayed only when the map scale is 5 km 2 5 miles or lower p...

Страница 63: ...tems New The recommended route is displayed on the screen Current The current route is displayed on the screen OK The displayed route is set p When no selection is made the screen re turns to previous screen Checking traffic information manually Touching the notification icon on the map screen allows you to check traffic information on your route while icon is displayed The noti fication icon is o...

Страница 64: ... the displayed traffic information items and a list of icons appears on the screen 3 Touch the traffic information item to display A red tick mark appears next to the selected traffic information p Touching All None selects or deselects all traffic information 4 Touch OK The selected traffic information icon is added to the screen p The following types of traffic incidents can not be deselected an...

Страница 65: ...to the map display p When the service provider name is not available the station name or frequency will be shown instead p If available providers cannot be displayed on one screen touch or to view the re maining providers p When the tuning has failed select another service provider or try again after moving to another location Using Traffic Information Engb 65 Chapter 08 Using Traffic Information ...

Страница 66: ... For the sup ported profile refer to the owner s manual of the Bluetooth unit p Please read Notes for hands free phoning for your reference For details refer to Notes for hands free phoning on page 75 p When the power of the navigation system turns off the Bluetooth connection is also disconnected When the system restarts the system automatically attempts to re connect the Previously connected mob...

Страница 67: ...red mobile phones to overwrite For details refer to Connecting a regis tered mobile phone on the next page p The default device name displayed on the mobile phone is PIONEER HDD NAVI The default password is 1111 Operating from the navigation system 1 Activate the Bluetooth wireless tech nology on your mobile phone For some mobile phones no specific action is necessary to activate Bluetooth wireles...

Страница 68: ...e follow ing screen appears p If registration fails repeat the procedure from the beginning Connecting a registered mobile phone The navigation system automatically connects the mobile phone selected as a target of con nection However connect the mobile phone manually in the following cases Two or more mobile phones are registered and you want to manually select the mobile phone to be used You wan...

Страница 69: ... password to be used for authentication on your mobile phone Default is 1111 1 Touch Info Phone in the navigation menu and then touch Phone Menu 2 Touch Phone Settings The phone settings screen appears 3 Touch Password 4 Touch any key to enter the password you want to set and then touch OK For details refer to Calculating your destina tion by using Address Search on page 24 p Four to eight charact...

Страница 70: ... the dialled number history or the received call history 1 Touch Info Phone in the navigation menu and then touch Phone Menu 2 Touch Dialed Numbers or Received Calls The list of either one appears 3 Touch a name or telephone number from the list to make a call Date and time of the call dialled or received To cancel the call after the system starts dial ling touch When you make a call to the phone ...

Страница 71: ... to set the phone number from the phone book to Dial Favourites For details refer to Registering a phone number in Dial Favourites on page 73 1 Touch Info Phone in the navigation menu and then touch Phone Menu 2 Touch Dial Favourites The Dial Favourites screen appears 3 Touch one of Favourite 1 to Favourite 5 to make a call Touch the entry to make a call To cancel the call after the system starts ...

Страница 72: ...rom the phone book stored in your mobile phone to the phone book stored in the navigation system By transferring the phone book to the naviga tion system you can browse the data in the transferred phone book on the screen of the navigation system You can also select the en tries in the phone book to make a call from the navigation system or edit the data on the navi gation system p Depending on th...

Страница 73: ... that you frequently use in Dial Favourites will ease the dialling opera tion The entries registered in Dial Favourites can be operated from the shortcut menu You can also operate them with Voice Recognition to make a call 1 Touch Info Phone in the navigation menu and then touch Phone Menu 2 Touch Dial Favourites 3 Touch Set on any of Favourite 1 Favourite 5 4 Touch the entry you want to register ...

Страница 74: ...t reflected to the data registered in Dial Favourites 4 Picture Sets the image to be displayed when a call is received For details refer to Customising the in coming call picture for a phone book entry on this page Customising the incoming call picture for a phone book entry Be sure to read Limitations for importing pic tures before creating a CD R RW For details refer to Limitations for importing...

Страница 75: ...vigation menu and then touch Phone Menu 2 Touch Dialed Numbers or Received Calls 3 Touch The edit screen appears Steps after this are the same as for editing the phone book For details refer to Editing the entry in Phone Book on page 73 p The phone number cannot be edited if it is already registered in the phone book Deleting data 1 Touch Info Phone in the navigation menu and then touch Phone Menu...

Страница 76: ... regis tered in the phone book When one phone number is registered under different names the name that comes first alphabe tically is displayed If the phone number of the received call is not registered in the phone book the phone number of the received call appears About received call history and dialled number history Calls made or editing performed only on your mobile phone will not be reflecte...

Страница 77: ... This setting controls the beep tone volume for navigation Phone Ringtone This setting controls the incoming ring tone volume Phone Voice This setting controls the incoming voice vo lume p Phone Ringtone and Phone Voice adjust ments are related to the mobile phone fea turing Bluetooth technology No adjustment is needed when the mobile phone featuring Bluetooth technology is not connected p Volume ...

Страница 78: ...hange the time if you are in the summer time period This turns the display below summer time On 5 To finish the setting touch OK Setting the keyboard layout You can select the type of keyboard to be used for inputting characters 1 Touch Settings in the navigation menu then touch Regional Settings 2 Touch Keyboard to select the layout that you want to use Each time you touch the key changes that se...

Страница 79: ...S Antenna Indicates the connection status of the GPS aerial the reception sensitivity and from how many satellites the signal is received If the signal is received correctly OK is dis played If reception is poor NOK appears In such case please change the installation position of the GPS aerial 3 Phone Connection Status Indicates the connection status of the Blue tooth unit sold separately and the ...

Страница 80: ...lly replaces the value for calculating distance p If ND PG1 is connected the distance calculation value cannot be replaced automatically 5 Speed The speed detected by the navigation sys tem is indicated This indication may be different from the actual speed of your vehi cle so please do not use this instead of the speedometer 6 Acceleration or deceleration Rotational speed Acceleration or decelera...

Страница 81: ...bration Status is Simple Hybrid the installation angle can be corrected Checking the device and version information 1 Touch Settings in the navigation menu then touch Hardware 2 Touch Service Info Screen 3 Check the device and version informa tion Checking the hard disk information You can check the volume of the hard disk current used space and remaining space p The hard disk space means free spa...

Страница 82: ... screen you can custo mise a picture for the background Some pic tures are already stored in the hard disk drive and you can also import JPEG format pictures such as a picture from your digital camera by using a CD R RW You can use pictures as background pictures by burning them onto a CD R RW with your PC and inserting it into the navigation system The following types of background pictures can b...

Страница 83: ...e sure the total data size of the CD R RW is greater than 100 MB by storing dummy data or other filler information Otherwise the disc may not be recognised by the built in DVD drive p You cannot use a CD R RW containing MP3 files or Audio data CD DA part for importing pictures p When storing pictures on a CD R RW create a folder named Pictures in the CD R RW and store the picture files in this fol...

Страница 84: ...layed Normally set this to Off 1 Touch Settings in the navigation menu 2 Touch Demo Mode to change the set ting Each time you touch the key changes that set ting On Repeat demo drive Off default Demo Mode is set off Correcting the Current Location Touch the screen to adjust the current position and direction of the vehicle displayed on the map 1 Touch Settings in the navigation menu then touch Mod...

Страница 85: ...creen 2 Touch the source icon Source icon 3 Touch the desired source p Touch OFF to turn the source off p Touch REAR SCREEN to select the source for Rear display For details refer to Selecting the video for Rear display on page 137 Select a source by using AV button You can press AV button to switch the source 1 Press AV button to switch Audio opera tion screen 2 Press AV button to select the desi...

Страница 86: ...urce from radio AM or FM to another source Turn the source off Turn off the ignition switch ACC OFF If Auto ANT mode is set to Power the vehicle s aerial can be stowed or turned off only when the ACC is set to OFF For more details about Auto ANT refer to Switching the auto aerial setting on page 135 About Steering Remote Control p When using CD SR1 Steering Remote Control sold separately the follo...

Страница 87: ...e for Audio Settings 7 System Settings tab Switches the setting items to those for System Settings 8 Setting Items For details refer to Customising the Audio Setting related with Audio Visual on page 126 Operating a Music CD You can play a normal music CD using the built in DVD drive of the navigation unit This section describes that operations Selecting CD as the source Press OPEN CLOSE button an...

Страница 88: ...the current track 8 Track list Shows tracks of the CD currently playing Title display Music recognition technology and related data are provided by Gracenote Gracenote is the industry standard in music recognition technology and related content delivery For more information visit www gracenote com p Title information will be displayed when the information is found in the Gracenote Da tabase on the...

Страница 89: ...ayback by touching g that track number on the disc is memorised en abling playback from that track when you play the disc again p To play the disc again touch f 5 Repeat the current track Each touch of turns the repeat play on or off Track Repeat is displayed on the playback method indicator during track repeat p If you perform track search or fast for ward or rewind repeat play is automati cally ...

Страница 90: ...of the file name 5 Artist name indicator Shows the artist name currently playing only when an ID3 tag has been encoded on the MP3 file 6 Play time indicator Shows the elapsed playing time of the current track 7 Folder and track list Shows contents of the folder currently playing or temporarily displayed 8 Bit rate Shows the bit rate of the file currently playing Touch panel key operation Touch pan...

Страница 91: ... asterisk is displayed only when an ID3 tag has been encoded on MP3 files on the disc If specific information of the ID3 tag has not been encoded on MP3 files on disc the corresponding item may be blank 8 Repeat play Each touch of changes the settings as follows Track Repeat Repeat just the current track Folder Repeat Repeat the folder cur rently playing p If you select another track or perform fa...

Страница 92: ... must stop in a safe place and put on the handbrake before setting your route refer to To ensure safe driving on page 19 You can play a DVD Video using the built in DVD drive of the navigation system This sec tion describes operations for DVD Video Selecting DVD as the source Press OPEN CLOSE button and insert a disc you want to play to disc loading slot The source changes and then playback will s...

Страница 93: ...u can display the menu by touching Menu or Top Menu while a disc is playing Touch ing either of these keys again lets you start playback from the location selected from the menu For details refer to the instructions pro vided with the disc 5 Display the DVD menu keypad 6 Frame by frame playback or slow motion playback Touch and hold to start slow motion playback Touching this during playback pause...

Страница 94: ...s f Select the DVD menu item g Decide the item When you select a certain video item play back starts from the selected item When you select an item with a submenu the next menu screen will appear p The way to display the menu differs de pending on the disc For details refer to the instructions provided with disc Searching for a desired scene starting playback from a specified time You can search f...

Страница 95: ...EWS indicator Shows the status of news programmes 6 TEXT indicator Shows when the radio text is received 7 STEREO indicator Shows that the frequency selected is being broadcast in stereo 8 LOCAL indicator Shows when local seek tuning is on 9 Preset number indicator Shows what preset has been selected a Programme service name indicator Shows the programme service name station name of current statio...

Страница 96: ...fly p If you keep touching or you can skip broadcasting fre quencies Seek tuning starts as soon as you release the keys p You can also perform these operations by using TRK c d button 4 Store the strongest broadcast frequen cies For details refer to Storing the strongest broadcast frequencies on page 103 5 Tune in strong signals For details refer to Tuning in strong sig nals on page 103 6 Display ...

Страница 97: ...ame of the currently broadcast song and the name of the artist p The tuner automatically memorises the three latest radio text broadcasts received replacing text from the least recent recep tion with new text when it is received Displaying radio text You can display the currently received radio text and the three most recent radio text 1 Touch to display radio text Radio text for the currently bro...

Страница 98: ...P or another enhanced net work s TP station When you are tuned in to a TP or another en hanced network s TP station the indi cator will light 2 Press TA NEWS button to turn traffic announcement standby on appears in the display The tuner will standby for traffic announcements If you turned the TA function on while tuned in to neither a TP nor another enhanced network s TP station the indicator lig...

Страница 99: ...on inter ruption is turned OFF data is still received You can receive when information interruption is turned ON The information interruption is turned ON and currently re ceiving data No display Information interruption is turned OFF and no data is being received Receiving PTY alarm broadcasts PTY alarm is a special PTY code for announce ments regarding emergencies such as natural disasters When ...

Страница 100: ...ion of the PI Seek whether or not a differ ent station is found Using Auto PI Seek for preset stations When preset stations cannot be recalled as when travelling long distances the navigation system can be set to perform PI Seek during preset recall p The default setting for Auto PI Seek is off For details refer to Switching Auto PI seek on page 137 Limiting stations to regional programming When A...

Страница 101: ...sic golden oldies Folk Mus Folk music Classic L Class Light classical music Classic Serious classical music Others Educate Educational programmes Drama All radio plays and serials Culture National or regional culture Science Nature science and technology Varied Light entertainment Children Children s Social Social affairs Religion Religion affairs or services Phone In Phone In Touring Travel progr...

Страница 102: ...ist touch and hold the preset list Touch and hold Store broadcast sta tions You can register the frequency currently being received to the preset list You can ea sily store up to six broadcast frequencies for later recall with the touch of a key p Touch to recall the preset frequency p Up to 6 stations can be stored in mem ory 2 Touch Perform manual tuning To perform manual tuning touch or briefly...

Страница 103: ...ing broadcast frequencies with BSM may replace broadcast frequencies you have saved using P1 P6 Tuning in strong signals Local seek tuning lets you tune in only those radio stations with sufficiently strong signals for good reception 1 Touch Local 2 Touch On to turn local seek tuning on p To turn local seek tuning off touch Off 3 Touch c or d to set the sensitivity There are two levels of sensitiv...

Страница 104: ...es preparing recording 4 Source icon Shows which source has been selected 5 Track indicator Shows the number and title of the track cur rently playing 6 Artist name indicator Shows the name of the artist currently play ing when available 7 Play time indicator Shows the elapsed playing time of the current track 8 Track list Shows tracks in the CD 9 Record status of tracks Recorded track Red Track b...

Страница 105: ... recording touch Stop When recording finishes the system returns to the normal playback screen of the CD in the blank between current track and next track p If the CD is scratched or damaged no data can be recorded on that part In such a case the track that falls on that part may be skipped Recording a CD manually You can record only your favourite tracks in the CD 1 REC Mode is set to Manual For ...

Страница 106: ...SCMS that was de veloped to prevent second generation or se rial copies p Recording to the music library is not possi ble from media such as CD Rs in which MP3 files are stored p When you are recording a CD with no track intervals such as a live concert CD if the engine stops and the power turns off the sound may break in a track when the music data is played back Also see Notes for Hard Disk Driv...

Страница 107: ...l order One playlist is automatically cre ated when a CD is recorded Artist group Artists Stores playlists in which tracks are sorted by artist names Genre group Genres Stores playlists in which tracks are sorted by genres My Favorite group My Favorites Stores playlists registered with your favour ite selection Maximum number you can register Group Playlist Tracks for a playlist Albums 400 99 Arti...

Страница 108: ...o Playlist Repeat 9 Play tracks in random order The selected tracks in the repeated range are randomly played p Random play may stop if you perform an operation that affects a track outside the repeating range or perform repeat play or scan play during track repeat play p When the range of repeat play is Track Repeat if you perform random play the repeating range changes to Playlist Repeat Indicat...

Страница 109: ...s 2 Touch Artists Artist playlist appears 3 Touch the artist name Artist playlist you want to play back The first track in the selected playlist is played back Search a playlist by genre Select a playlist formed by a genre and play it back p Only the genre of a recorded track is dis played in a genre playlist 1 Touch Search The group selection screen appears 2 Touch Genres Genre playlist appears 3...

Страница 110: ...e track you want to regis ter 2 Touch then touch Add to My Favorites 3 Touch the playlist My Favorite 1 to My Favorite 4 or My Mix in which you want to register the track 4 Touch Yes The track is registered in the selected My Fa vourite playlist Registering multiple tracks at a time 1 Play back the playlist that contains the tracks you want to register 2 Touch to display the list of play lists 3 T...

Страница 111: ...ist playlist can be edited Switching to the edit mode 1 Touch the playlist in Albums My Favorites or Artists 2 Touch the track you want to edit The item displayed in blue is the track cur rently playing 3 Touch The system enters the track edit mode For details refer to Operating the track edit mode on the next page 4 Touch Back to return the previous screen 5 Touch to return to the previous level ...

Страница 112: ...om the playlist on page 115 7 Update title information For details refer to Assigning another candi date for title information on page 116 8 Add the selected tracks to My Favorite For details refer to Registering multiple tracks at a time on page 110 Operating the track edit mode Album playlist All items can be edited except for 5 The edi ted contents will be reflected to all groups in the hard di...

Страница 113: ...to toggle the selection The system pronounces the character string once and the pronunciation confirmation message appears No Completes the edit without editing the pronun ciation Repeat You can listen to the pronunciation again p If the pronunciation is not the desired one edit the characters so that the pronuncia tion matches your desired pronunciation 5 Touch Yes The changed character string is...

Страница 114: ...r input screen appears and you can change the artist name with the keyboard 4 Select an artist name from the list The artist name is changed to the one you se lected In the playlist edit mode touching Yes changes the artist name to the one you selected Sorting the playlists The playback order of playlists in the group can be changed p If there is only one playlist the playback order cannot be chan...

Страница 115: ...ouch Delete This Playlist 3 Touch Yes The playlist is deleted Deleting a track from the playlist You can delete tracks from the playlist p If you delete a track in Albums group the track is deleted from the hard disk drive It is deleted from My Favorites group at the same time p If you delete the track the system does not delete the edited title information p If you delete the tracks in My Mix pla...

Страница 116: ...chnology and related data are provided by Gracenote Grace note is the industry standard in music re cognition technology and related content delivery For more information visit www gracenote com p Once you update the title information the information you edit before will be overwrit ten by the title information of the Grace note Database Gracenote Database updates are available You can download th...

Страница 117: ... playing 4 Playback method indicator Shows which repeat range has been selected 5 Track number indicator Shows the track currently playing 6 Track title indicator Shows the title of the track currently playing 7 Play time indicator Shows the elapsed playing time of the current track 8 Disc number display Shows the number of the disc in the multi CD player p The titles of the items marked with an a...

Страница 118: ... dom order Disc Repeat and Random Tracks in the selected disc are played in random order p If you perform random play during Track Repeat the repeat play range range changes to Disc Repeat 8 Scan play The first 10 seconds of each track of the current disc or the first track of each disc are played Indicator Implication Scan only The beginning of the first tracks of each disc is played for about 10...

Страница 119: ...l key operation Touch the source icon and then touch iPod to select the iPod When the source icon is not displayed you can display it by touching the screen Touch panel keys 5 6 1 2 2 3 4 1 Playback and Pause Touching f switches between playback and pause 2 Touch Skip back or forward to another song Touching p skips to the start of the next song Touching o once skips to the start of the current so...

Страница 120: ...he list that you want to play Repeat this operation until you find the de sired song p To return to the previous screen touch 4 From the song list touch the song you want to play p To go to the next page of the list touch p To return to the previous page of the list touch Operating the TV tuner CAUTION For safety reasons visual images cannot be viewed while your vehicle is in motion To view vi sua...

Страница 121: ...Perform manual tuning The channels move up or down one step Touch and hold Perform seek tuning The tuner will scan the channels until a broadcast strong enough for good recep tion is found p If you keep touching or you can skip broadcasting channels Seek tuning starts as soon as you release the keys p You can also perform these operations by using TRK c d button 3 Store the strongest broadcast sta...

Страница 122: ...e P LIST a b button to recall stations assigned to preset tuning keys P1 P12 Storing the strongest broadcast stations sequentially Touch and hold BSSM BSSM starts The 12 strongest broadcast sta tions will be stored under preset tuning keys P1 P12 in order from the lowest channel up p To cancel the storage process touch Can cel p Storing broadcast stations with BSSM may replace current broadcast st...

Страница 123: ... unit 2 For details concerning operation refer to the external unit s operation manual This section provides information on external unit opera tions with the navigation system that differ from those described in the external unit s op eration manual p Operation varies depending on the external unit connected In some cases the exter nal unit may not respond Selecting EXT 1 or EXT 2 as the source T...

Страница 124: ... p Operation varies depending on the external unit connected In some cases some func tions may not be used until you touch and hold the key Operate the external unit by using Function 1 Function 4 The external unit can be operated by transmit ting the operating commands set to Function 1 Function 4 p The operating commands set to Function 1 Function 4 vary depending on the exter nal unit 1 Touch F...

Страница 125: ...iliary equip ment featuring RCA output For more details refer to the IP BUS RCA Interconnector own er s manual Selecting AUX as the source 1 AUX Input is set to On For details refer to Switching the auxiliary setting on page 134 2 Touch the source icon and touch AUX For details refer to Selecting a source on page 85 Using the AV Source AV EXT AUX Engb 125 Chapter 14 Using the AV Source AV EXT AUX ...

Страница 126: ... subwoofer controller on page 136 When selecting the FM tuner as the source you cannot select Source Level How to Operate the Audio Settings screen 1 Press AV button The Navigation screen changes to the Audio source screen of any source 2 Touch AV Settings The AV Settings screen appears 3 Touch the item you want to change 4 Change Setting E g Equaliser screen p Touch ESC to return to the selected ...

Страница 127: ...ing equaliser curves You can adjust the currently selected equaliser curve setting as desired A separate Custom1 curve can be created for each source If you make adjustments when a curve Super Bass Powerful Natural Vocal Flat or Custom1 is se lected the equaliser curve settings will be memorised in Custom1 A Custom2 curve can be created common to all sources If you make adjustments when Custom2 cu...

Страница 128: ... Setting the simulated sound stage You can select the desired effect from various simulated sound stages such as Music Studio or Dynamic Theatre You can also adjust a lis tener positioning effect Setting a stage that fits your image 1 Touch Staging in Audio Settings menu 2 Touch desired stage setting p Living Room setting that emphasises mid range sound hardly has any effect near the maximum volum...

Страница 129: ...s menu When Preout the subwoofer controller set ting in System Settings menu is Full you cannot select Sub Woofer For details refer to Setting the rear output and subwoofer controller on page 136 2 Touch On to turn subwoofer output on To turn subwoofer output off touch Off 3 Touch Reverse or Normal to select the phase of subwoofer output p If subwoofer output sound is not clear with Normal change ...

Страница 130: ...roller set ting in System Settings menu is Sub W HPF function is effective for front speakers only If you change the acoustic field after you set it once the high pass filter HPF setting turns Off Adjusting source levels Source Level source level adjustment lets you adjust the volume level of each source to prevent radical changes in volume when switching between sources p Settings are based on th...

Страница 131: ... Switch the audio source to DVD 2 Touch DVD V Setup in System Settings menu 3 Touch Subtitle Language Audio Language or Menu Language Each language menu is displayed and the cur rently set language is selected 4 Touch the desired language When you select Others a language code input display is shown Input the four digit code of the desired language then touch Enter For details refer to Language Co...

Страница 132: ...ut short at the right and left of the screen p When playing discs that do not have a pan scan system the disc is played back with Letter Box even if you select Panscan setting Confirm whether the disc package bears the 16 9 LB mark Setting the parental lock Some DVD Video discs let you use parental lock to set restrictions so that children cannot watch a violent and adult oriented scenes You can s...

Страница 133: ...ightly at the centre and the amount of enlargement increases hor izontally toward the ends of the picture en abling you to enjoy a 4 3 picture without sensing any disparity even on a wide screen Cinema cinema A picture is enlarged by the same proportion as Full or Zoom in the horizontal direction and by an intermediate proportion between Full and Zoom in the vertical direction ideal for a cinema s...

Страница 134: ...ile the gearstick is in the REVERSE R position Setting the video input You can switch the setting according to the connected component p Select Video to watch video of a con nected component as AV INPUT source Touch AV Input in System Settings menu Each touch of AV Input changes the set tings as follows Off No video component is connected Video External video component EXT Pioneer external unit co...

Страница 135: ...comes 1 3 p When you select All Mute is displayed and no audio adjustments are possible dur ing the sound is turned off p When you select 20dB or 10dB no audio adjustments except volume control are possible during the sound is attenu ated p Operation returns to normal when the cor respond action is ended p Even when a mute signal has been received from MUTE lead connected to the naviga tion unit n...

Страница 136: ...nection If you switch Rear SP setting to Sub W you can connect a rear speaker lead directly to a subwoofer without using an auxili ary amp Initially the navigation system is set for rear fullrange speaker connection When rear out put is connected to full range speakers when Rear SP setting is Full you can connect the RCA subwoofer output SUBWOOFER OUT PUT or NON FADING OUTPUT to a subwoofer In thi...

Страница 137: ... or to the TV system Colour system currently being received p TV SIG can be set only when the source is OFF Touch TV SIG in System Settings menu Each touch of TV SIG changes the settings as follows Auto Select this setting when you watch the channel in both PAL and SECAM sys tem PAL Select this setting when you watch the channel in PAL system only SECAM Select this setting when you watch the chann...

Страница 138: ...ing restric tions are applied to Rear display The Video image and sound are output only when AV INPUT has both video and sound The Video image and sound are output only when the appropriate setting on AV Input is Video Operating the picture adjustment CAUTION For safety reasons you cannot use some of these navigation functions while your vehicle is in mo tion To enable these functions you must sto...

Страница 139: ...racteristics you may not be able to adjust the screen at low temperatures 2 Touch or to adjust the desired item Each time you touch or increases or de creases the level of the desired item 3 Touch ESC to return to the previous screen Switching the backlight on or off By turning off the backlight of the LCD screen you can turn off the screen display and the voice guidance Press and hold V button Th...

Страница 140: ...920 Azerbaijani az 0126 Kashmiri ks 1119 Sundanese su 1921 Bashkir ba 0201 Kurdish ku 1121 Swahili sw 1923 Belorussian be 0205 Kirghiz ky 1125 Tamil ta 2001 Bulgarian bg 0207 Latin la 1201 Telugu te 2005 Bihari bh 0208 Lingala ln 1214 Tajik tg 2007 Bislama bi 0209 Laotian lo 1215 Thai th 2008 Bengali Bangla bn 0214 Lithusnian lt 1220 Tigrinya ti 2009 Tibetan bo 0215 Latvian Lettish lv 1222 Turkmen...

Страница 141: ...ation You can start voice operation any time even when the map screen is displayed or audio is operated Some operations are not available The basic steps of voice operation are as fol lows 1 Touch VOICE icon to activate voice op eration 2 Speak a command into the microphone after the beep 3 When the command is recognised the navigation system displays the response message on the screen and pronoun...

Страница 142: ...page or Pre vious page p If you say Back or touch Back the screen returns to the previous screen To cancel voice operation You can cancel voice operation features at any time by saying Cancel After you cancel voice operation the map is displayed p If no command is made in the next 6 sec onds or the recognition fails three times successively the voice recognition switches to standby mode To reactiv...

Страница 143: ...r the message the beep indicates that the system is ready to accept your voice command Say a command after this beep 3 Say Destination A message to prompt the next operation is given p If you say Back or touch Back the screen returns to the previous screen 4 Say Vicinity Search Say the corresponding commands for the function you want to operate Here the selec tion method of your destination is spe...

Страница 144: ...ilable Voice Commands This section describes the flow and available commands of each voice operation Depend ing on the selected language in Regional Settings the voice operation works as below Language in Regional Set tings The language for voice opera tion English Swedish Danish Nor wegian English Dutch Flemish Dutch Spanish Portuguese Spanish German German French French Italian Italian p When La...

Страница 145: ...English Swedish Danish Nor wegian UK United King dom Great Brit ain England Dutch Flemish NL Netherlands Spanish Portuguese E Spain Andor ra German A Austria D Germany French L Luxembourg F France Monaco Italian I Italy San Mari no Vatican City p For Category Name and Sub Category Name in Vicinity Search refer to Cate gory list for vicinity search and say the de sired category in that list p You c...

Страница 146: ...o Available Voice Commands on page 144 Search by entry on the address book Destination d Address Book d Registered location s pronunciation d Location Screen A Search the facilities in vicinity Destination d Vicinity Search d Category Name Sub Category Name d Location Screen B Displaying the destination history Destination d Destination History d Display the Destination History screen Setting the ...

Страница 147: ...metres Scale 200kilometres Scale 500kilometres Scale d Map screen will be changed to selected scale Notes These commands are available only when km mile setting is km This function is not available in vehicle dynamics mode Map Operation d Change Scale d XXXX mile s Scale 0 02miles Scale 0 05miles Scale 0 1miles Scale 0 25miles Scale 0 5miles Scale 0 75miles Scale 1mile Scale 2 5miles Scale 5miles ...

Страница 148: ...list on your route Erase the tracking Other Operation d Erase Tracks d Touch VOICE icon to delete the tracking Turning on or off the Overlay POI Other Operation d Display Overlay POI d Displaying the selected POI in Overlay POI Other Operation d Hide Overlay POI d Turn off Overlay POI Voice commands related to hands free phoning The following verbal commands can be used both in navigation screen a...

Страница 149: ...navailable source Give the following verbal commands after switching the correspond audio source Operation for Multi CD AV Operation d Disc 1 to Disc 12 d Selecting the disc for playback Operation for FM AV Operation d Preset 1 to Preset 6 d Switching to that preset station directly AV Operation d Change Band d Switching the band Operation for AM AV Operation d Preset 1 to Preset 6 d Switching to ...

Страница 150: ...st Note 2 AV Operation d Music Search d My Favorites d My Favorite 1 My Favorite 2 My Favorite 3 My Favorite 4 My Mix d Playback selected playlist AV Operation d Music Search d My Favorite 1 My Favorite 2 My Favorite 3 My Favorite 4 My Mix d Playback se lected playlist Note 2 AV Operation d Track Search d Track name d Playback the selected track Note 3 Note 2 This operation is available only when ...

Страница 151: ...ing commands can be vocalised Set As Destination If there is no route the system starts the route calculation If the route is already set touch VOICE icon to start route calculation Set As Waypoint Touch VOICE icon to start route calculation Display Map Displays the map of surroundings on that lo cation Location screen B The following commands can be vocalised Set As Destination Same as above Set ...

Страница 152: ...s Of Interest Business Listing Address Book Registered Points My Addresses Search By Address Book Destination History Search History Destination List Vicinity Search Vicinity Search Around Search In Vicinity Return Home Go Home Drive Home Waypoint Home Waypoint To Home Registered Home As Waypoint Call Home Phone Home Dial Home Display Home Show Home Display Destination Destination Map Show Destina...

Страница 153: ...d Interstate Avoid Ferry Avoid Ferries Skip Ferries Avoid Toll Road Avoid Tolls Avoid Pay Cancel Route Delete Route Cancel Guidance Route Profile Profile Cancel Waypoint Delete Waypoint Take Away Waypoint Next Guidance Following Guidance Guidance After This Traffic Information Traffic Information Traffic On Route List On Route List Route List Traffic On Route Call Dial Ring Dial Out Place A Call M...

Страница 154: ...ge To CD Switch To CD DVD Change To DVD Switch To DVD TV Change To TV Switch To TV AM Change To AM Switch To AM FM Change To FM Radio AV Input Video Input MCD CD Changer Music Library Change To Music Library Switch To Music Library Music Search Search My Music Search Music Album Search By Album Search Album Artist Search By Artist Search Artist Genre Search By Genre Search Genre Rock Pop Rock Pop ...

Страница 155: ...t Area Park and Ride Rent a Car Parking Category name Food Shops Supermarket Grocer Green Grocer Butcher Fish monger Bakery Wines and Spirits Food Shops Others Category name Shopping Shopping Centre Newsagents and Tobacconists Consumer Electronics Computers and Software CDs DVDs and Videos Cameras and Photography Book Shops Do It Yourself Kitchens and Bathrooms Furniture Carpets Textiles and Light...

Страница 156: ...E PROTON RENAULT RENAULT TRUCKS ROLLS ROYCE ROVER SAAB SCANIA SEAT SKODA SMART SSANGYONG SUBARU SU ZUKI TOYOTA VAUXHALL VOLKSWAGEN VOLVO VOLVO TRUCKS Car Dealer Others Category name Vehicle Repair Facility ADAC Repair ALFA ROMEO Repair AUDI Repair BMW Repair BOSCH Repair CHRYSLER Repair CI TROËN Repair FEU VERT Repair FIAT Repair FORD Repair HONDA Repair HYUNDAI Repair KIA Re pair LANCIA Repair MA...

Страница 157: ... ACC the motor sounds This system confirms whether a disc is loaded or not This is a normal operation The navigation does not boot up The power cable is not wired cor rectly Turn the system off and the check the wiring The hard disk drive is not running because the temperature is too low Wait until the inside of the vehicle warms up The hard disk drive is defective Consult your authorised Pioneer ...

Страница 158: ...eeding the limitation of the installation angle Confirm the installation angle The naviga tion system must be installed within the al lowed installation angle For details refer to Installation Manual and Installation Angle Setup Page 81 Indication of the position of your ve hicle is misaligned after a U turn or reversing Check whether or not the reverse gear signal input lead violet is connected p...

Страница 159: ...mal be cause the estimated time of arrival is affected by various factors such as traffic jams or shortcuts The estimated time of arrival is an ideal value calculated based on the value set for Aver age Speed and the actual driving speed The estimated time of arrival is only a reference value and does not guarantee arrival at that time The person on the other end of the phone call cannot hear the ...

Страница 160: ...vigation system is switched be tween the NTSC PAL and SECAM system according to image For some images the image format may not match that of the Rear Dis play Use a product e g AVD W7900 that has an NTSC PAL SECAM auto switch function for the Rear Display as well Manually switch between NTSC PAL and SECAM for Rear Display Nothing is displayed and the touch panel keys cannot be used The setting for...

Страница 161: ...sible Parental lock is on Turn parental lock off or change the level Page 132 Parental lock for DVD playback cannot be cancelled The code number is incorrect Input the correct code number Page 132 Playback is not with the audio language and subtitle language settings selected in DVD V Setup The DVD playing does not feature dialogue or subtitles in the lan guage selected in DVD V Setup Switching to...

Страница 162: ...e affected by vibration Direction of G sensor is not correct Please power off the system and check the installa tion Then please re boot the system and press OK Direction of G sensor is set incor rectly See the Installation Manual and set the direc tion of the navigation unit correctly Gyro Sensor is not working properly Please consult your dealer or Pioneer service cen tre Abnormal Gyrosensor out...

Страница 163: ... destination waypoint s or starting point are in an area where no road exists e g a mountain and the route calculation is impossible Set a destination and waypoint s on roads Reset the destination after you drive the ve hicle to any road Route to destination cannot be calculated The destination or waypoint s are in an isolated island etc without a ferry and the route calculation is im possible If ...

Страница 164: ...y on The mobile phone is paired con nected with another device Cancel the pairing connection and retry Rejection has been received from the mobile phone Operate the target phone and accept the con nection request from the navigation system Furthermore check the connection settings on your mobile phone The target mobile phone can not be found Check whether your mobile phone is turned off and whethe...

Страница 165: ... format can not be received with navigation system Select just a suitable item format and then retry Connect your mobile phone again and retry Calibration failed Please refer to the owner s manual The touch panel calibration has not been carried out with appropriate steps Please read the instruction of touch panel ca libration and retry Page 171 The HDD is not connected Failure of the built in har...

Страница 166: ...ndbrake Page 19 Search error The title number chapter number time or 10 key command that you enter in 10Key Search do not exist This message will appear when the DVD drive cannot accept that command Enter the available numbers or 10 key com mand or use another search method Hard disk drive Music Library Message When What to do See This CD cannot be recorded If you insert a CD which prohibits secon...

Страница 167: ...try Page 136 HDD is full This CD cannot be recorded There is no free space for recording in the hard disk drive Delete some tracks or playlists and try again if you want to record that CD Unable to select appropriate Track info due to multiple en tries in the database Some corresponding data is found in the Gracenote Database but the system cannot select one to append a title Enter the title manua...

Страница 168: ...f the audio function The system becomes the same state when the battery of the vehicle is removed or the yellow lead of the navigation system is disconnected Method 2 Restore Factory Settings Clears some items in Map menu and in Set tings menu For details refer to Restoring the Default Set ting on page 84 Method 3 Reset on start up Clears the setting values stored in the hard disk drive For detail...

Страница 169: ...nctions Method 1 Method 2 Method 3 Method 4 Map function View mode and scale setting on the map 1 1 Direction of the map 1 1 Last cursor position on the map screen 1 1 Route Setting Current route 1 1 Guidance state of the current route 1 1 Vehicle position information 1 1 Route conditions 1 1 1 Destination menu Auto fill in function for cities and streets 1 1 Point registered in Address Book 1 Sor...

Страница 170: ... Right and left gauge type Ad just Style 1 1 Audio Settings All items 1 System Settings Mute Set Clock DISP REC Mode 1 1 1 Other items 1 Audio functions Method 1 Method 2 Method 3 Method 4 Music Library LI BRARY Repeat Random settings 1 1 1 Track data 1 Playlist 1 Last playback position 1 DVD All settings 1 CD All settings 1 ROM MP3 All settings 1 FM Preset memory and the other settings 1 AM Prese...

Страница 171: ...arned data in the sensor 1 Turn the ignition switch off 2 Press RESET button 3 Start the engine After a few moments the start up screen comes on for a few seconds 4 Touch and hold MAP button while the start up screen is displayed Clear memory screen appears 5 Touch Clear user information from hard disk p This reset operation clears all music data recorded in the music library Note that the cleared...

Страница 172: ...uch panel adjustment screen appears 6 Gently touch the centre of mark dis played on the screen with the touch panel adjustment pen After you touch all marks the adjusted posi tion data is saved p Do not turn off the engine while saving the adjusted position data p Press V button to return to the previous ad justment position p To cancel the adjustment press MAP but ton 7 Press MAP button The adjus...

Страница 173: ...n your actual and calculated position may become bigger p The speed pulse data comes from the speed sensing circuit The location of this speed sensing circuit depends on your ve hicle model In some cases it is impossible to make a connection to it and in such a case we recommend that ND PG1 speed pulse generator sold separately be used How do GPS and dead reckoning work together For maximum accura...

Страница 174: ...g Large Errors Positioning errors are kept to a minimum by combining GPS Dead Reckoning and map matching However in some situations these functions may not work properly and the error may become bigger When the positioning by GPS is impossible If signals cannot be received from more than two GPS satellites GPS positioning does not take place In some driving conditions signals from GPS satellites m...

Страница 175: ...ata comes from the speed sensing circuit The location of this speed sensing circuit depends on your ve hicle model In some cases it is impossible to make a connection to it and in such a case we recommend that ND PG1 speed pulse generator sold separately be used Conditions Likely to Cause Noticeable Positioning Errors For various reasons such as the state of the road you are travelling on and the ...

Страница 176: ...p or similar road configura tion If you take a ferry If you are driving on a long straight road or a gently curving road If you are on a steep mountain road with many height changes If you enter or exit a multi storey car park or similar using a spiral ramp Appendix Engb 176 Appendix ...

Страница 177: ...block the GPS signals for a considerable period If you drive very slowly or in a start and stop manner as in a traffic jam If you join the road after driving around a large car park When you go round a roundabout When starting driving immediately after starting the engine If you insert the disc and turn your naviga tion system on while driving If you turn your navigation system on while driving Ap...

Страница 178: ... destination by applying certain built in rules to the map data This section provides some use ful information about how a route is set CAUTION When a route is calculated the route and voice guidance for the route is automatically set Also for day or time traffic regulations only informa tion about traffic regulations at the time when the route was calculated is shown One way streets and street cl...

Страница 179: ...your destina tion when your vehicle is on a ferry when driving on a road inside a facility when driving on a roundabout when driving on the routes are de scribed in Roads not used in calcula tions The system assumes the driver deviated either intentionally or inadvertently from the route and searches for another route intelligent rerouting Depending on the si tuation the system may search a new ro...

Страница 180: ...eneral CD standard it may not be pos sible to play the CD side with this naviga tion system Frequent loading and ejecting of a Dual Disc may result in scratches on the disc Serious scratches can lead to playback pro blems on this navigation system In some cases a DualDisc may become stuck in the disc loading slot and will not eject To prevent this we recommend you refrain from using DualDisc with ...

Страница 181: ... of playback may not coincide with the actual playback sequence However there also are some writing software that permit the setting of the playback order Some audio CDs contain tracks that merge into one another without a pause When these discs are converted to MP3 files and burned to a CD R CD RW CD ROM the files will be played back on this player with a short pause between each one regard less ...

Страница 182: ... using a folder that does not contain an MP3 file the folder itself will display but you will not be able to see any files in the folder MP3 files in up to 8 tiers of folders can be played back However there is a delay when starting playback on discs with numerous tiers For this reason we recommend creating discs with no more than 2 tiers It is possible to play back up to 253 folders on one disc A...

Страница 183: ...er Selection 64 Phone Menu Dial 70 Phone Book 73 Dial Favourites 71 73 Read Bus Card 72 Dialed Numbers 70 75 Received Calls 70 75 Phone Settings 67 Map menu Page Displayed Info Close Up View 42 City Map 42 Tracking Display 42 Show Mute Button 42 Show Speed Limit 42 Show Traffic Incident 42 Second Maneuver Arrow 42 Bluetooth Connected 42 Address Book Icon 42 3D Landmark 42 Short Cut Selection 44 Ov...

Страница 184: ...ts displayed on screen can be customised p Items marked with an asterisk cannot be removed from Shortcut menu For details refer to Selecting the Shortcut on page 44 Shortcut menu Page Destination 40 Route Options Route Condition 30 Avoid Toll Road 30 Avoid Ferry 30 Avoid Motorway 30 Time restrictions 30 Learning Route 30 Registration 55 Vicinity Search 50 Overlay POI 44 Volume 77 Phone Book 71 73 ...

Страница 185: ...oudness 130 HPF 130 Source Level 130 System Settings menu Page DVD V Setup 131 Wide Mode 133 Camera Input 133 AV Input 134 AUX Input 134 Mute Set 134 Mute Level 135 Guide Tel SP 135 Auto ANT 135 Clock DISP 136 REC Mode 136 Rear SP 136 Auto PI 137 FM Step 137 TV SIG 137 Appendix Engb 185 Appendix Appendix ...

Страница 186: ...er search Current location The present location of your vehicle your cur rent location is shown on the map by a red tri angle mark Default setting A factory setting which applies when you first switch on the system you can customise de fault settings to suit your own needs in the menu Destination A location you choose as the end point of your journey Dolby Digital Dolby Digital provides multi chan...

Страница 187: ...are regulations for the following two levels Level 1 The file name is in 8 3 format the name con sists of up to 8 characters half byte English capital letters half byte numerals and the _ sign with a file extension of three characters Level 2 The file name can have up to 31 characters in cluding the separation mark and a file ex tension Each folder contains less than 8 hierarchies Extended formats...

Страница 188: ...or iented scenes feature parental lock which pre vents children from viewing such scenes With this kind of disc if you set the unit s parental lock level playback of scenes inappropriate for children will be disabled or these scenes will be skipped Point of Interest POI Point Of Interest any of a range of locations stored in the data such as railway stations shops restaurants and amusement parks R...

Страница 189: ...ut by flexibly adjusting the bit rate according to the needs of audio compres sion it is possible to achieve compression priority sound quality Voice guidance The giving of directions by a recorded voice while in guidance mode Voice recognition The technology that allows the system to un derstand the driver s voice commands Way Point A location that you choose to visit before your destination a jo...

Страница 190: ...gs 168 Demo Mode 84 Destination History 60 Dialled number history 70 Direct scale key 39 Distance study 80 Dolby Digital 186 DTS 186 E Equaliser 126 Estimated time of arrival 37 External Unit 123 F Favourite location 54 Frame by frame playback 93 Front display 178 Front Display 9 G Genre group 107 GPS 172 Gracenote Database 88 104 105 107 116 Guidance point 36 H Handbrake interlock 19 Hands free p...

Страница 191: ...70 Region number 188 Roads without turn by turn instructions 38 Romeo 187 Route calculation condition 28 Route Calculation Conditions 29 Route confirmation screen 28 S Scroll mode 39 Second Maneuver Arrow 43 Simple hybrid mode 162 173 Simulated sound stage 128 Single session 83 Slow motion playback 93 Source 85 Speed Pulse 79 80 175 Speed pulse generator 173 175 Splash Screen 82 84 Steering Remote...

Страница 192: ...Voice Commands 144 Voice Help menu 142 Voice Operation 141 Volume 77 W Waypoint 36 Waypoints 32 Wide screen mode 133 Index Engb 192 ...

Страница 193: ...Box 1540 Long Beach California 90801 1540 U S A TEL 800 421 1404 PIONEER EUROPE NV Haven 1087 Keetberglaan 1 B 9120 Melsele Belgium TEL 0 3 570 05 11 Published by Pioneer Corporation Copyright 2008 by Pioneer Corporation All rights reserved Printed in Belgium CRB2629 B EW MAN HD3II SW EN KSKZX 08F00000 ...

Отзывы: