


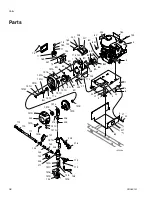


Repair
3A0441A
31
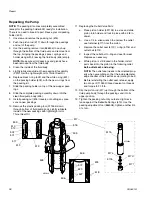
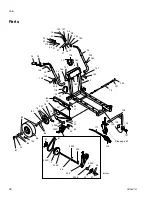
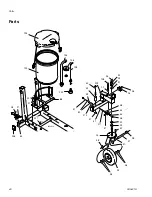
Drive Assembly
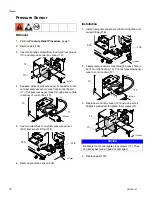
Removal
1.
Perform Pressure Relief Procedure, page 7.
2.
Remove Pail Bracket, page 21.
3.
Remove Drive Chain, page 30.
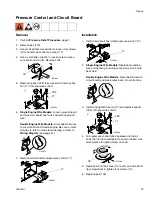
4.
Remove four screws (169) and washers and remove
clutch housing cover (130).
5.
Loosen screw on drive engage cable (14) from drive
assembly arm and remove spring (300B).
6.
Use allen wrench to loosen two set screws on bearing
(52) on each side of drive assembly (300A).
7.
Remove two nuts and bolts (53 and 54) on bearing shaft
collar flanges (52) on each side of drive assembly.
8.
Slide shaft collar flanges and slide bearings in and
remove drive assembly (300A).
9.
Slowly turn pulley wheel (72) by hand while pushing belt
(81) off of pulley to remove belt.
10. Slide one bearing (52) off drive assembly.
11. Remove retaining clip (300D) and remove pulley (72) from
drive assembly.
12. Slide drive assembly (300A) off drive shaft (56).
NOTE: Pulley wheel (72) is held into position with wood-
ruff key. Retain key for reinstallation.
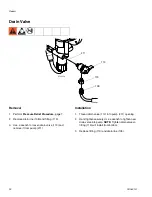
Installation
1.
Slide new drive assembly (300A) onto drive shaft (56).
2.
Install woodruff key (300F) onto drive shaft (56).
3.
Install pulley (72) onto drive shaft (56) and woodruff key
(300F) and install retaining clip (300D).
4.
Slide bearing (52) back onto shaft. Note the orientation
(do NOT install backwards).
5.
Slowly turn pulley wheel by hand while pushing belt (81)
onto large sprocket (72) to install belt.
6.
Replace drive assembly (300A) and slide shaft collars and
bearings (52) into frame.
7.
Tighten four nuts and bolts (53 and 54) on shaft collar
flanges on engine mounting bracket (1).
8.
Use rubber mallet to tap on small sprocket (55) until it
becomes aligned with drive chain sprocket (76). Hold a
straight-edge to both sprockets to make sure they are
properly aligned (see page 35).
9.
Use allen wrench to tighten two screws on bearings (52)
on each side of drive assembly.
10. Install drive engage cable (14) to drive assembly arm,
replace spring (300B), and tighten screw. Check cable
engagement and make adjustments if needed.
11. Replace clutch housing cover (130) and tighten four
screws (169) and washers.
12. Replace Drive Chain, page 30.
13. Replace Pail Bracket, page 21.
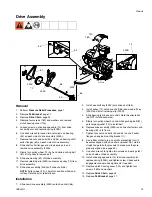
ti15317a
300D
72
300A
56
300F
52
53
54
81
52
130
169
14
300B
1
55
Содержание Brite Stripper 3000SP
Страница 46: ...Notes 46 3A0441A Notes ...
Страница 47: ...Notes 3A0441A 47 Notes ...


