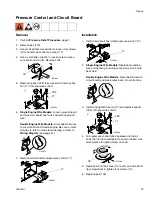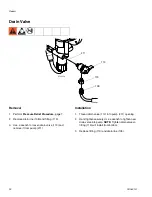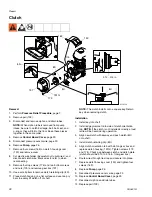
Repair
26
3A0441A
Repacking the Pump
NOTE: The packing kit comes completely assembled
(except for the packing holder 509) ready for installation.
There is no need to break it apart. Reuse your old packing
holder (509).
1.
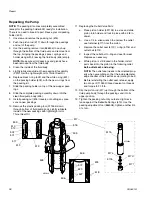
Unscrew and remove the packing nut (516).
2.
Push the piston rod (517) down through the packings
and out of the pump.
3.
Use the packing removal tool (866435) to push up
through the bottom of the fluid pump and remove from
the top, bringing the packings, spacer, springs and
holder along with it, leaving the fluid body (505) empty.
NOTE: Make sure all old packings and glands have
been removed from the fluid body.
4.
Clean the inside of the fluid body.
5.
Lightly lubricate outside of new packing kit assembly
(331210) with a light weight oil or Throat Seal Oil.
6.
Replace black o-ring (502) and the white o-ring (501)
on the packing holder (509), with the new o-rings from
the packing kit.
7.
Slide the packing holder on top of the new upper pack-
ings.
8.
Slide the complete packing assembly down into the
clean fluid pump body (505).
9.
Install packing nut (516) loosely, not putting any pres-
sure on new packings.
10. Remove the plastic packing tool (311465) down
through bottom of fluid pump body. Lightly lubricate
inside of the new packings with light weight oil or
Throat Seal Oil.
11. Replacing the Outlet Valve Parts:
a.
Place piston holder (331195) in a vise and slide
piston into holder and lock in place with a 3/8 in.
dowel.
b.
Use a 1/4 in. allen wrench to unscrew the outlet
seat retainer (517f) from the piston.
c.
Remove the outlet seat (517d), o-ring (517e) and
outlet ball (517c).
d.
Inspect the outlet ball, o-ring and seat for wear.
Replace as necessary.
e.
While piston is still locked in the holder, install
parts back into the piston in the following order:
ball, outlet seat, and o-ring.
NOTE: The outlet seat needs to be oriented prop-
erly when assembling so that the inside diameter
edge chamfer of the seat faces up (mating to ball).
f.
Before reinstalling the outlet seat retainer, apply
two drops of (113500) thread sealant on threads
and torque to 20 ft-lb.
12. Slip the piston rod (517) up through the bottom of the
fluid pump body, through the packings and into its
upper position.
13. Tighten the packing nut until you feel a slight resis-
tance against the Belleville Springs (513). Use the
packing adjustment tool (865008), tighten another 3/4
of a turn.
510
511
513
519
517
516
505
518
506
507
520
512
502
501
509
507
506
508
518
ti15382a
517a
517c
517e
517f
517d
ti15436a
Содержание Brite Stripper 3000SP
Страница 46: ...Notes 46 3A0441A Notes ...
Страница 47: ...Notes 3A0441A 47 Notes ...


