background image

46

  miroVIDEO DV 200


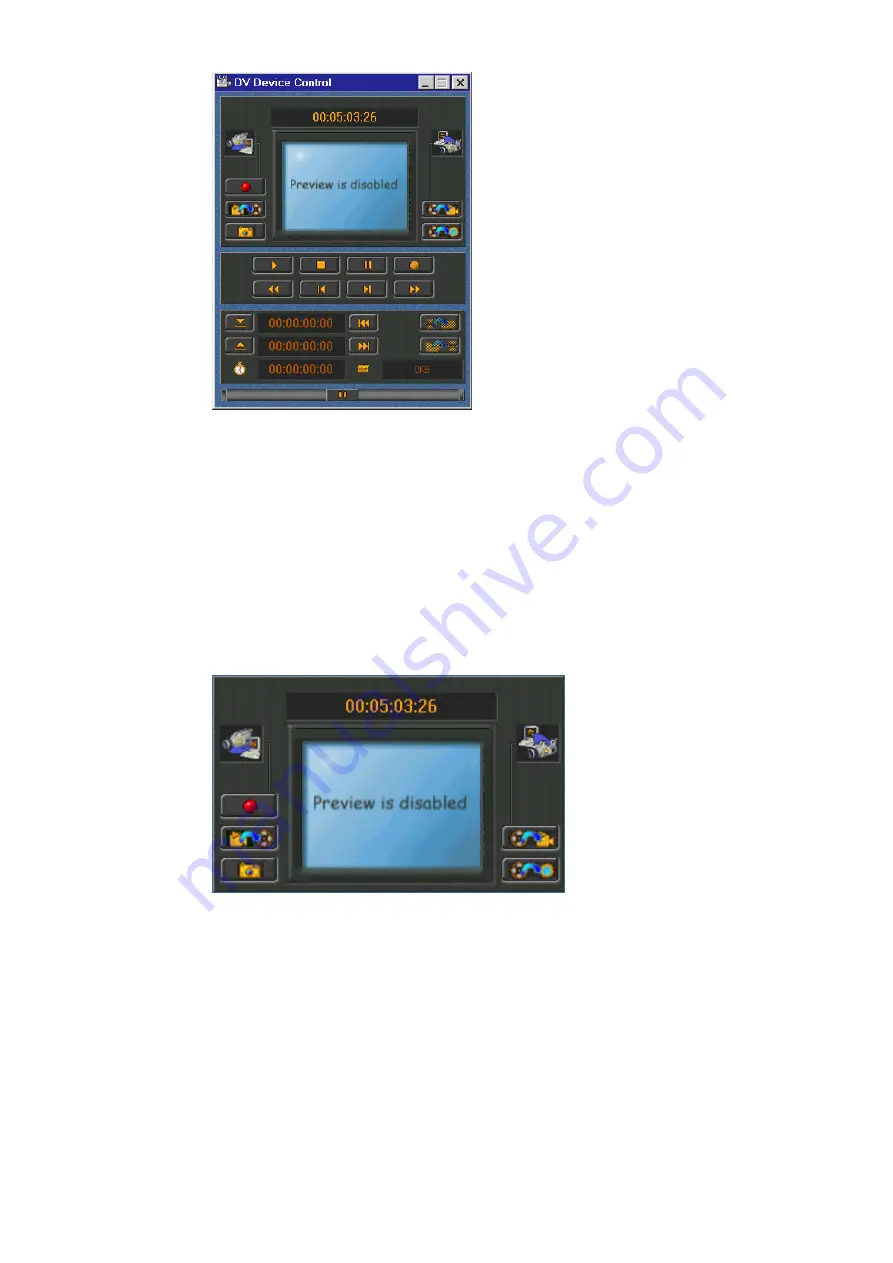
 Top section of the DV Device Controller

 The top section of the DV Device Controller displays a preview of the
current video and the current time code. The preview quality depends on the
overlay capabilites of your graphics board.
(for more information, see page 50.)

 This window also contains the buttons for capturing a bitmap (Snapshot),
saving digital video to hard disk (Capture), previewing DV AVI files on your
DV device and transferring saved files from hard disk to the DV video tape
(Print to tape).

Time code(top of DV Device Controller):
Displays the time code of the current video clip. The time code marks the
chronological position of a video frame and is given in the
hours:minutes:seconds:frames format. This time code is transferred by the
DV video device to the DV Device Controller.

Содержание miroVIDEO DV200

Страница 1: ...miroVIDEO DV200 USER S GUIDE...

Страница 2: ...OS are registered trademarks of Microsoft Corp All other brand and product names are trademarks or registered trademarks of their respective holders This manual is printed on chlorine free paper using...

Страница 3: ...E 9 INSTALLATION 10 INSTALLING THE SOFTWARE 12 INSTALLING DRIVERS FOR WINDOWS 95 13 INSTALLING THE DRIVERS FOR WINDOWS 98 15 INSTALLING THE SOFTWARE FOR WINDOWS 95 WINDOWS 98 16 INSTALLING SOFTWARE FO...

Страница 4: ...LLATION 62 PRESETS 62 CAPTURE VIDEO WITH ADOBE PREMIERE 5 1 64 DEVICE CONTROL WITH ADOBE PREMIERE 5 1 66 miroINSTANT VIDEO 5 0 72 TIPS TRICKS 81 HARDWARE 81 SOFTWARE 82 DV TAPE 82 TROUBLESHOOTING 83 T...

Страница 5: ...In the margins are subheadings to help you quickly find your way through this manual Important text passages are marked with the notepad and this format Numbers mark step by step instructions 1 Switch...

Страница 6: ...tic charge Divert any electrostatic charge before touching the components with your hands or any tools To do so touch the casing of your computer s Before opening the computer make sure that the power...

Страница 7: ...the art PCI bus mastering expansion board The board connects to the DV camcorder through the miroVIDEO DV200 1394 DV cable The board includes the following connectors s two external 6 pin 1394 connect...

Страница 8: ...transfer rate The DV format is fixed at a 5 1 compression ratio The data transfer rate needed to transfer real time from the DV camcorder is approximately 3 6 MB s The transfer rate of your hard disk...

Страница 9: ...ck to the camcorder Please refer the documentation that comes with your camcorder VCR If you want to playback to analog VCR s you can also playback your video back to analog tape using the miroVIDEO D...

Страница 10: ...the installation The system includes miroVIDEO DV200 board IEEE 1394 DV cable Adobe Premiere and documentation CD ROM with driver software miroVIDEO DVTools Presets and drivers for Adobe Premiere Use...

Страница 11: ...screen Install the miroVIDEO DV200 board Turn your computer and all peripherals off Remove the necessary cables Open the computer s housing Remove the slot cover Insert the board Reassemble the compu...

Страница 12: ...g in VTR mode Scan DV tape From the Tools menu select Scan DV tape Scan additional tapes if desired VIEWING CLIPS AND ADDING TRIMS QUICK START Open a Tape Gallery Double click a tape gallery name in t...

Страница 13: ...clip EDITING AVI FILES USING ADOBE PREMIERE QUICK START Start Adobe Premiere Click on the corresponding button on the right hand side in the Capture Gallery Select a Preset Select a suitable Preset f...

Страница 14: ...oard Turn on your DV equipment Switch your DV device on Select the desired mode either VTR or Camera mode Open the DV Device Controller To open the DV Device Controller click on the camera icon in the...

Страница 15: ...enter for example for Adobe Premiere 4 2LE e english win95 nt disk1 setup for Adobe Premiere 5 1LE e premiere setup If your CD ROM drive has a different drive designation change the path accordingly...

Страница 16: ...etal case of your computer 2 Switch off the devices and pull the power cord Switch off the computer and all peripheral devices Pull out the power cord and disconnect all necessary cables 3 Open the co...

Страница 17: ...oard Carefully insert the board into the PCI slot you selected by holding the board at the top and gently pushing both ends into the slot Press onto the upper edge of the board to make sure it is firm...

Страница 18: ...n the section Identifying the Windows 95 version page VI The complete installation consists of the following steps s Installing drivers for Windows 13 s Windows 95 Release August 95 as of page 13 or s...

Страница 19: ...y hardware manufacturer click OK In the New hardware found dialog box click the Driver from disk provided by hardware manufacturer option Click OK 3 Insert CD ROM Insert the installation CD ROM into t...

Страница 20: ...ted 2 Click Next Click on the Next button 3 Insert the CD ROM Insert the installation CD ROM into the CD ROM drive 4 Click Other Locations Click on the Other Locations button 5 Click Browse Click on t...

Страница 21: ...Select Display a list of all drivers in a specific location click Next Select the option Display a list of all drivers in a specific location so you can select the driver you want and click on Next In...

Страница 22: ...carried out If you have activated the German English or French Regional Settings and nevertheless want to change the language of the installation program click the button Back first and then select t...

Страница 23: ...s for Adobe Premiere 5 1 A set of Adobe Premiere 5 1 plug ins for playback device control and capture including miroINSTANT Video 5 0 s Plugins for Adobe Premiere 4 2 Adobe Premiere 4 2 plug in miroIN...

Страница 24: ...rd you use please refer to the Appendix on page VII 7 Select the directory to which you want to copy the Adobe Premiere Plug Ins and click Next By default the Adobe Premiere Plug Ins are located in th...

Страница 25: ...age specified via the Regional Settings Start Menu Settings Control Panel Regional Settings of the installed Windows version If you use other regional settings than English German or French you will h...

Страница 26: ...your computer if your system hard disk is very slow 5 If necessary change the hard disk directory If you wish to copy the files to another hard disk another directory click on the Browse button and d...

Страница 27: ...or Adobe Premiere which have been developed especially for the DV200 board and the PAL standard s Intro for miroINSTANT Video PAL PAL compatible intro files for your AVI movies the intro movies help y...

Страница 28: ...p where you want the DV200 software to be located default miroVIDEO DV200 Click on Next In the Start copying files window all components you have chosen will be listed 12 Click Next to start copying N...

Страница 29: ...elect the Run command 2 Insert the CD ROM from the DV200 package contents in your CD ROM 3 Enter Your CD ROM drive letter APP SETUP EXE Click OK 4 Proceed as described on page 19 as of step 2 UNINSTAL...

Страница 30: ...ACHING A DV CAMCORDER OR A DV VCR To connect your DV camcorder VCR to the miroVIDEO DV200 board use the IEEE 1394 DV cable included in the package IEEE 1394 DV cable To connect your DV camcorder VCR t...

Страница 31: ...ant to connect a TV set or video monitor to your board you can always use the Preview window provided with the miroVIDEO DVTools Video connections To attach a TV set video monitor to your DV camcorder...

Страница 32: ...s to the DV device Connect one end of the audio cables to the audio outputs of your camcorder VCR AUDIO OUT 2 Connect the audio cables to your monitor Connect the other end to the audio inputs of your...

Страница 33: ...gs please refer to the Changing the number of colors and the resolution section in the Appendix on page VII MAKING MOVIES In planning and capturing your movie use the miroVIDEO DVTools DVTools allows...

Страница 34: ...ure the camcorder is running in Camera mode Checking preferences in miroVIDEO DVTools Before using the miroVIDEO DVTools to capture your video footage it is advisable to check the preferences with reg...

Страница 35: ...re drive Under Trim point based capture select the hard drive and the directory where you want to save the video Please verify that enough storage space is available on this drive 5 Select the audio c...

Страница 36: ...ture and capture the video simultaneously For information on the Live Capture refer to page 53 The DV tape is then rewound to the beginning and the DVTools display a dialog box showing the progress of...

Страница 37: ...creen size a television set or video monitor must be connected to your DV camcorder or DV video recorder see p 24 There is also a preview window in the DV Device Controller that plays back your DV in...

Страница 38: ...ind or forward the tape to the position where the clip is located click on the eye button The DV device will take a while to find the start of the clip The DV Device Controller will appear You will kn...

Страница 39: ...e Gallery You can arrange the clips in the Capture Gallery in any order 4 Add trims Sometimes you may not want to use an entire clip but rather only part of a clip In that case you can edit the clip i...

Страница 40: ...ovie you can generate AVI files To generate AVI files from the clips proceed as follows 1 Open the Capture Gallery If you have not done so already open the Capture Gallery you want to capture To do so...

Страница 41: ...t the Optimized display for miroVIDEO DC30 option in the DV Configuration tool For more information on this tool please refer to page 50 To edit your AVI file s using Adobe Premiere proceed as follows...

Страница 42: ...ws 1 Check DV devices Make sure that your DV camcorder or DV recorder PAL requires a recorder is connected to your DV200 board and that is switched on and set to the VTR mode 2 Close all open applicat...

Страница 43: ...apture single frames from your video footage it is advisable to check the preferences with regard to your television standard and the frame size To check the preferences in the miroVIDEO DVTools proce...

Страница 44: ...the lens To capture a single frame proceed as follows 1 Connect DV equipment If you haven t already connect your DV camcorder or DV video recorder to the miroVIDEO DV200 board For instructions see the...

Страница 45: ...are drawn and in a second step all even lines 2 4 6 etc are drawn The sections consisting of either odd or even lines are called fields When watching TV the human eye cannot distinguish the odd and th...

Страница 46: ...portant workspace in the miroVIDEO DVTools is the Capture Gallery Here you can arrange the clips you want to capture check the running time and file size of a movie generate AVI files open Adobe Premi...

Страница 47: ...rking with tapes that have very large or just one scene recorded with no interuption for the entire tape Thumbnails Toggles between the Clip Gallery and an overview window If you enable Thumbnails you...

Страница 48: ...tape to the start of the clip Capture Scenes From Capture Gallery Use the Capture command to start capturing transferring the DV clips to the hard disk the clips you inserted in the Capture Gallery I...

Страница 49: ...The DV Explorer has the look and feel of the Windows Explorer and provides a clear overview over the DV tapes you have already scanned After you have scanned a DV tape the DVTools will prompt you to...

Страница 50: ...base For more information on scanning DV tapes please refer to the section Scanning a DV tape for clips on page 30 Capture scenes from Capture Gallery Use the Capture command to start capturing transf...

Страница 51: ...g on a name The buttons in the toolbar of the Tape Gallery let you open the Clip Info window display large posterframes or display thumbnails DV DEVICE CONTROLLER The DV Device Controller window allow...

Страница 52: ...tains the buttons for capturing a bitmap Snapshot saving digital video to hard disk Capture previewing DV AVI files on your DV device and transferring saved files from hard disk to the DV video tape P...

Страница 53: ...u create an AVI file from the current video clip You can only use this button after you set the in and out points for the clip boundaries like during tape scan If you did not scan the tape and you wan...

Страница 54: ...nts If you do not want to capture the entire clip but only a section of it you may want to define trim points in and out points It is only possible to add trim points if you scanned the tape A clip is...

Страница 55: ...e File size displays the file size in kilobytes the current section will have when being captured If no trim points were set the size of the whole clip will be displayed You may delete the trims you s...

Страница 56: ...he New button Set the in and out point Click on Apply If necessary define further video clips Click on Add in order to add the clips to the Capture Gallery The window Add clips to capture gallery supp...

Страница 57: ...be saved when clicking Close If you want to save the settings click Save Optimized Display for miroVIDEO DC 30 If you want to record the DV video clips you captured with the DV200 board back to an an...

Страница 58: ...no overlay or a distorted overlay appears it may be for the following reasons s The overlay does not work at the current display resolution If this is the case try out another resolution and select a...

Страница 59: ...lect this Project Preset if you use the PAL standard and you want to record the video files you captured and edited back to DV tape DV200 NTSC DC30 NTSC 720x480 Select this Project Preset if you use t...

Страница 60: ...ecomputation is required when building a movie The disadvantage of this setting is slight distortion on the computer screen e g circles are not depicted as circular DV200 DC30 PAL 4 3 768 x 576 Select...

Страница 61: ...roINSTANT Video which will scan through your project and create AVI files only for the areas where you applied effects or transitions This is depending on the complexity of your project up to twenty t...

Страница 62: ...ideo in Adobe Premiere just do the following 1 After you launched Adobe Premiere select a suitable Project Preset see p 53 2 Create an Adobe Premiere Project Open the AVI files you want to include in...

Страница 63: ...er the intro is over click on the Record button on your DV device Buttons and keyboard commands in miroINSTANT Video This button starts stops the video playback This slider allows you to scroll the mo...

Страница 64: ...f insufficient data rates 4 Start the preview by clicking OK You should see video on the camera s display or on a TV monitor that is hooked up to your camcorder Performance Optimization The playback o...

Страница 65: ...ings that come with your installation All clips used for a specific project must be stored using the video compression format supported by the selected project setting Clips that are recorded in a dif...

Страница 66: ...files using miroINSTANT Video that are not in MJEP format you must select a filter for each file Premiere will be forced to transcode this file Note that this is very time consuming Playback to a DV...

Страница 67: ...e Premiere 5 1 optimized driver software for your DV200 included This especially applies to the use of miroINSTANT Video as the Adobe Premiere 5 1 version of miroINSTANT Video is significantly differe...

Страница 68: ...location of the Adobe Premiere 5 1 directory on Custom installation or if the installer cannot find the Premiere 5 1 directory enter it from your earlier note See the ReadMe file for driver installat...

Страница 69: ...the New Project Settings window Pinnacle System strongly recommends not to change any further settings in the New Project Settings window 5 Click OK to finish the loading of the preset If you don t us...

Страница 70: ...ctions Before you are able to capture video you need to select the capture drive This is the drive to which your AVI files will be recorded It should be fast enough and offer enough free space for dig...

Страница 71: ...Capture Settings even if you do not want to change any settings This is required to make Adobe Premiere 5 1 switch to the DV200 capture module If you do not do this the capture module may not be utili...

Страница 72: ...e control 2 Then click the Options button By doing so you call up a dialog box in which you can define the settings needed to configure your system If you have established a correct connection to the...

Страница 73: ...video material especially when recording or when producing DV tapes Operating the device control The 1394 device control of the DV200 supports the following functions s Frame forward frame backwards...

Страница 74: ...V200 device control Please consult Adobe Premiere s technical support if you should find there are irregularities in video playback Under Premiere 5 1 the DV200 supports export of video data to tape 1...

Страница 75: ...the edit mode You may have to repeat the settings just defined because they are not stored General remarks You can use the following steps as a guideline for fine tuning the export to tape function s...

Страница 76: ...re roll Premiere 5 1 and time code Internally Adobe Premiere assigns frame numbers to your recorded clips instead of genuine time codes this applies to all versions of Adobe Premiere Frame numbers are...

Страница 77: ...topic in the Adobe Premiere 5 1 manual DV devices use a Drop Frame or DF time code NTSC only It cannot be set to a specific default i e new tapes always begin at 00 00 00 00 Nevertheless this is exac...

Страница 78: ...ges From Previous Versions section This section assumes that a DV device is properly connected to the DV200 and is powered on Several times the statement will be made that video will play through the...

Страница 79: ...Premiere 5 1 miroINSTANT Video must be selected as the Editing Mode in the General dialog menu Project command Settings and General This is set automatically when using a DV200 preset Open a new Adobe...

Страница 80: ...o print it to tape You can start the miroINSTANT Video 5 0 playback by hitting the Enter key after selecting the work area you want and activating the monitor or timeline window Hitting the ESC key or...

Страница 81: ...device through the DV port and may be recorded to tape The audio will not be sent to the computer sound card A crossed out speaker symbol indicates the audio will be played by Premiere Premiere will...

Страница 82: ...audio that haven t previously been rendered see the Adobe Premiere 5 1 manual for details on audio rendering and how to tell which parts have been rendered Audio playback during scrub will be heard t...

Страница 83: ...DV200 output signal will be continuous When you scrub or play parts of the timeline the output depends on the timeline content If you scrub through parts effects that have not been rendered by Adobe...

Страница 84: ...t audio device In this case with no guaranteed lip synchronization If Print to DV device is selected and the audio is not handled through miroINSTANT Video you will find that the audio is played using...

Страница 85: ...open the clip menu and select Video Field Options Set the correct options for the clip s desired speed see the Adobe Premiere 5 1 manual Processing Interlaced Video Fields page 162 Now set the work ar...

Страница 86: ...o call miroINSTANT Video 5 0 nor a special miroINSTANT Video play window Instead miroINSTANT Video 5 0 is now fully integrated into the Adobe Premiere 5 1 user interface Once selected it in Premiere s...

Страница 87: ...Before saving videos you should defragment the hard disk It is recommended that you use A V rated UW SCSI hard drives with the DV200 to ensure reliable video data transfers Hard drives that are not A...

Страница 88: ...then click on CDROM and double click your CD ROM drive Select Settings and under Options deactivate Auto insert notification Taskbar Switch the clock on the taskbar off To do this click the right mou...

Страница 89: ...ur computer s documentation or try another slot Some configuration options apply to a specific PCI bus slot therefore if you change these options be sure you are applying them to the slot in which the...

Страница 90: ...of tape the manufacturer of your DV device recommends Problem The scan process continues to be repeated Cause 1 There are drop outs on the DV tape This may be due to damaged tapes or on some tape sect...

Страница 91: ...is showing horizontal shifts in large bands Cause The effect of large horizontal shifts in the video played back from a DV tape is most likely the result of dirty video heads in the camcorder Solution...

Страница 92: ...5 a Microsoft DV CODEC is present in the system This decoder only supports the NTSC video standard and cannot playback PAL encoded DV material properly The display is blocky Rename the qdv dll in the...

Страница 93: ...E connections 2 external 1 internal Video format DV 720 x 480 YUV 4 1 1 30 fps NTSC 720 x 576 YUV 4 2 0 25 fps PAL Data rate Video 25 Mbit s Audio 1 5 Mbit s Compatibility IEEE 1394 Standard Sony Pana...

Страница 94: ...88 miroVIDEO DV 200 NOTES...

Страница 95: ...AL devices If you like to use your DV200 board to transfer DV video from your DV tape to your hard disk capturing and if you like to edit it on your PC connect a DV camcorder or a DV VCR to your DV200...

Страница 96: ...corders are equipped with a DV input It is not possible to connect more than one DV device to your DV200 board You can either connect a DV camcorder or a DV recorder to the DV200 device Connecting two...

Страница 97: ...ration is as follows instead of a DV camcorder you can also use a DV recorder Setup for recording DV video to hard disk using PAL devices and saving video back to an analog video tape audio output to...

Страница 98: ...ecord your DV video to hard disk and from there back to DV tape connect your devices as illustrated in the diagram below Setup with NTSC devices for recording DV video to hard disk and saving it back...

Страница 99: ...The system configuration looks as follows Setup with NTSC devices for recording DV video to the hard disk and playing it back to a conventional analog tape audio output to TV If you wish to record yo...

Страница 100: ...d the MS DOS Prompt 2 At the MS DOS Prompt window type ver and press Enter The installed Windows 95 version will be displayed The Windows 95 OSR 2 OEM Service Release 2 version has the version number...

Страница 101: ...R OF COLORS AND SCREEN RESOLUTION To use the DVTools you must set your graphics board to at least a 16 bit color resolution and a 800 x 600 resolution To change the number of colors and the resolution...

Страница 102: ...NTSC Bahamas NTSC Equatorial Guinea PAL Bahrain PAL Estonia SECAM Bangladesh PAL Ethiopia PAL Barbados NTSC Falkland Islands PAL Belarus SECAM Faroe Islands PAL Belgium PAL Fernando Po PAL Belize NTS...

Страница 103: ...Africa PAL Lithuania SECAM Spain PAL Luxemburg SECAM PAL Sri Lanka PAL Macao PAL St Kitts Nevis SECAM PAL Mazedonien PAL Sudan PAL Madagaskar SECAM Surinam NTSC Madeira PAL Swaziland PAL Malagasy SECA...

Страница 104: ...it color depth each pixel can be any one of 256 colors or scales of gray s 16 bit color depth each pixel can be any one of 65 536 colors s 24 bit color depth each pixel can be any one of 16 7 million...

Страница 105: ...separate video and audio insert editing and direct digital input and output based on IEEE 1394 for multiple video stream transfers and editing with no generation loss On DV tapes the video and audio d...

Страница 106: ...and personal computers adopt IEEE 1394 it is likely to become one of the most widely implemented IEEE bus standards All IEEE standards begin with a Project Authorization Request PAR The PAR for FireWi...

Страница 107: ...ts RAM components are volatile that is their content will be deleted after the computer has been switched off A database in Windows 95 in which all configuration data is stored Among other things the...

Страница 108: ...s with which you can generate special effects in images or selected parts of images for example mirror imaging rotation freely definable stretching tilting and distortion Abbreviation for Video Home S...

Страница 109: ...the laws of the Member States relating to electromagnetic compatibility Zur vollst ndigen Einhaltung dieser Richtlinie n wurden folgende Normen herangezogen To fully comply with this these directive...

Страница 110: ...XVI miroVIDEO DV 200 NOTES...

Страница 111: ...transfer rate 2 De fragmentation 2 4 De interlacing 39 Direct Draw Overlay Surface 52 Direct Draw Primary Surface 51 DirectX XI Display output on PC monitor 52 Drivers 1 DV XI DV buttons 44 DV casset...

Страница 112: ...ct Preset 35 Project Presets 1 53 Q Quick installation 5 R RAM 81 XIII Read ahead optimization 82 Registry XIII Resolution VII XIII RGB XIII S Safety iv Scanning DV Quick Start 6 Screen saver 82 SCSI...

Страница 113: ...ideo format 87 Video monitor 3 25 Video 8 XIV View menu 41 Viewing clips 31 Viewing clips Quick Start 6 VTR controls 47 W Windows 95 13 87 OEM Service Release 2 14 Windows 95 version VI Windows 98 15...

Страница 114: ...NOTES...

Отзывы: