


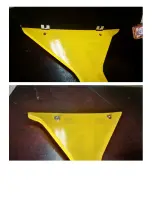

COWLING INSTALLATION:
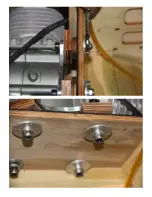
The cowling is installed with a single pre-installed bolt on the top half, from the inside of the fuselage
going forwards, and two additional bolts going through the cowling from the bottom.
With the cowl off, turn the model over, and place some small strips of masking tape in line with the two
bolt holes. Draw a straight line on the masking tape going over the holes, and mark/measure where the
hole is relative to the lines.
Install the cowling, tightening the top bolt. Place additional masking tape on the cowling, and with a
ruler continue the straight lines drawn previously.
Measure back to the marked point where the holes are, and then remove the cowl and drill out the two
necessary holes.
Re-install the cowl using the top and bottom bolts.
Содержание Pitts Challenger
Страница 1: ...Pitts Challenger 87 2 20m 100cc MANUAL...
Страница 7: ......
Страница 8: ......
Страница 9: ......
Страница 10: ......
Страница 11: ......
Страница 13: ......
Страница 14: ......
Страница 15: ......
Страница 17: ......
Страница 18: ......
Страница 19: ......
Страница 21: ......
Страница 22: ......
Страница 23: ......
Страница 24: ......
Страница 25: ......
Страница 26: ......
Страница 28: ......
Страница 29: ......
Страница 30: ......
Страница 32: ...the pushrods provided...
Страница 33: ......
Страница 34: ......
Страница 35: ......
Страница 37: ......
Страница 38: ......
Страница 39: ......
Страница 40: ......
Страница 41: ......
Страница 43: ......
Страница 44: ......
Страница 45: ......
Страница 47: ......
Страница 48: ......
Страница 49: ......
Страница 50: ......
Страница 51: ......
Страница 52: ......
Страница 54: ......
Страница 55: ......
Страница 56: ......
Страница 58: ......
Страница 60: ......
Страница 61: ...Note that the two laser cut holes are for the fuel and smoke tank vents...
Страница 63: ......
Страница 64: ......
Страница 66: ......
Страница 67: ......
Страница 68: ......
Страница 69: ......
Страница 71: ......
Страница 72: ......
Страница 74: ......
Страница 75: ......
Страница 76: ......
Страница 78: ......
Страница 80: ......
Страница 82: ......
Страница 83: ......
Страница 84: ...6 Secure the elevator tension wires as per picture below All this can be done in just a few minutes...