background image

27

     Set or change a PIN

    1

 Press 

  , select  

[Settings]

 , and then press 


OK

 .

    2

 Select 


[Preference Setup]

  >  

[Change 

PIN]

 , then press  

OK

 . 

    3

  Enter your PIN on the number buttons of 

the remote control, then press    .

    If you do not have a PIN or if you 

• 

have forgotten your PIN, enter 
‘ 

0000

 ’.

      4

  Enter a new PIN, then press    .

    5

  Enter the same PIN again to con rm.

    6

 Select 


[Con rm]

 , then press  

OK

 .

       Change the brightness of the display 
panel

    1

 Press 

  , select  

[Settings]

 , and then press 


OK

 .

    2

 Select 


[Preference Setup]

  >  

[Display 

Panel]

 , then press      .

    3

  Select the brightness of the display panel, 

then press  

OK

 .


• 

[100%]

  - Brightest


• 

[70%]

  - Medium 


• 

[40%]

  - Dimmest

         Enable auto standby

  To save energy, you can automatically switch 
the home theater to standby after 30 minutes 
of inactivity (for example, in pause or stop 
mode). 

    1

 Press 

  , select  

[Settings]

 , and then press 


OK

 .

    2

 Select 


[Preference Setup]

  >  

[Auto 

Standby]

 , then press      .

    3

  Select an option, then press  

OK

 .


• 

[On]

  - Enable auto standby.


• 

[Off]

  - Disable auto standby.

        Change preferences

    Select the menu language

    1

 Press 

  , select  

[Settings]

 , and then press 


OK

 .

    2

 Select 


[Preference Setup]

  >  

[OSD 

Language]

 , then press      .

    3

  Select the menu language, then press  

OK

 .

 Note

 If your home theater is connected through 


HDMI to an HDMI CEC compliant TV, it 
switches automatically to the menu language 
on the TV.

     Use parental control

  You can restrict access to discs that are 
recorded with ratings. When access to a disc 
is restricted, use your personal identi cation 
number (PIN) to play the disc. 

 Tip

 To play all discs irrespective of the rating, 


select a parental control level of ‘8’ for DVDs 
and Blu-ray discs. 

    1

 Press 

  , select  

[Settings]

 , and then press 


OK

 .

    2

 Select 


[Preference Setup]

  >  

[Parental 

Control]

 , then press      .

    3

  Enter your PIN or press ‘ 

0000

 ’ on the 

number buttons of the remote control. 

    4

 Press 

      to select a rating level from 1 to 

8, then press  

OK

 .

 Note

 Some discs are not recorded with ratings but 


display a rating on the label. You cannot use 
parental control on these discs.

English

EN

1_HTS8160B-61B_51_EN.indd   Sec1:27

7/8/2009   6:24:22 PM

Содержание HTS8160B

Страница 1: ...Register your product and get support at www philips com welcome HTS8160B HTS8161B EN User manual ...

Страница 2: ......

Страница 3: ...marks 2 2 Important 4 Safety 4 Product care 5 User Manual CD 6 3 Your home theater 7 Main unit 7 Remote control 8 4 Connect your home theater 10 Connectors 10 Connect to theTV subwoofer and power 11 Connect audio fromTV or other devices 12 Connect and install radio 14 Connect a USB device 15 Connect an MP3 player 15 Connect and install a Philips iPod dock 16 Connect to the internet 16 5 Use your h...

Страница 4: ...to DivX video This DivX Certi ed device must be registered in order to play DivX Video on Demand VOD content To generate the registration code locate the DivX VOD section in your device setup menu Go to vod divx com with this code to complete the registration process and learn more about DivX video 1 Notice Copyright This product incorporates copyright protection technology that is protected by me...

Страница 5: ...LASER PRODUCT Manufactured under license from Dolby Laboratories Dolby Pro Logic and the double D symbol are trademarks of Dolby Laboratories DVD Video is a trademark of DVD Format Logo Licensing Corporation Manufactured under license under U S Patent s 5 451 942 5 956 674 5 974 380 5 978 762 6 487 535 other U S and worldwide patents issued pending DTS is a registered trademark and the DTS logos S...

Страница 6: ...sc optical lens inside the disc compartment 2 Important Read and understand all instructions before you use your home theater If damage is caused by failure to follow instructions the warranty does not apply Safety Risk of electric shock or re Never expose the product to rain or water Never place liquid containers such as vases near the home theater If liquids are spilt on or into the home theater...

Страница 7: ...the home theater on a surface covered by a cloth or other material that can be pulled away Ensure that no part of the home theater hangs over the edge of the surface Never place the home theater on tall furniture such as a bookcase without anchoring both the furniture and home theater to the wall or on a suitable support Place the home theater where it cannot be pushed pulled over or knocked down ...

Страница 8: ... Manual in the language of your choice Disposal of your old product and batteries Your product is designed and manufactured with high quality materials and components which can be recycled and reused When this crossed out wheeled bin symbol is attached to a product it means that the product is covered by the European Directive 2002 96 EC Please inform yourself about the local separate collection s...

Страница 9: ...rchase and welcome to Philips To fully bene t from the support that Philips offers register your home theater at www philips com welcome Main unit a Display panel Display the current status of the home theater or disc information b IR sensor Detect signals from the remote control Point the remote control directly at the sensor c Standby On Power indicator Switch the home theater on power indicator...

Страница 10: ...O Switch to FM radio AUDIO SOURCE Select an audio input USB iPod DOCK Select Philips iPod Dock or a USB storage device d Color buttons Blu ray discs only Select a task or option e Home menu Access the home menu f OPTIONS Access options for the current activity or selection g Navigation buttons Navigate menus h OK Con rm an entry or selection i INFO Display information about what is playing j Playb...

Страница 11: ...rom the home theater r BONUS VIEW Blu ray discs only Enable or disable the Bonus View Picture In Picture feature s AUDIO SYNC Synchronize audio with video Use with t AUDIO In video mode toggle between audio languages In radio mode toggle between stereo and mono u Volume Increase or decrease volume v AMBISOUND Select an Ambisound mode w BACK Return to a previous menu screen x TOP MENU Access the ma...

Страница 12: ...n the subwoofer speakers e a b d f g h i c 4 Connect your home theater This section helps you connect your home theater to aTV and other devices It supplements examples provided in the Quick Start For a comprehensive interactive guide see www connectivityguide philips com Note Refer to the type plate at the back or bottom of the product for identi cation and supply ratings Before you make or chang...

Страница 13: ...REEN BLUE RED COMPONENT VIDEO IN Pr Pb Y Subwoofer connectors a TO MAIN UNIT Connect to the TO SUBWOOFER connector on the main unit b MAINS Connect to the power supply c AUDIO IN AUX 2 AUX3 Connect to analog audio output on an analog device d FM ANTENNA FM 75 Connect for FM radio signal Connect to theTV subwoofer and power Connect to the TV Connect your home theater directly to a TV through one of...

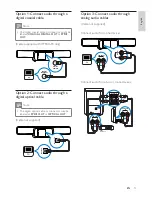
Страница 14: ...r to play audio from yourTV or other devices such as a cable box Choose from the following connectors Tip Press AUDIO SOURCE repeatedly to select the audio output of your connection Option 3 Connect to the TV through composite video CVBS Note The composite video cable or connector might be labeled AV IN VIDEO IN COMPOSITE or BASEBAND Cable not supplied Connect the subwoofer VIDEO OUT YELLOW VIDEO ...

Страница 15: ...IO OUT L R GAME Option 1 Connect audio through a digital coaxial cable Note The digital coaxial cable or connector might be labeled COAXIAL DIGITAL OUT or SPDIF OUT Cable supplied with HTS8161B only Option 2 Connect audio through a digital optical cable Note The digital optical cable or connector may be labeled as SPDIF OUT or OPTICAL OUT Cable not supplied COAXIAL DIGITAL OUT DIGITAL AUDIO IN OPT...

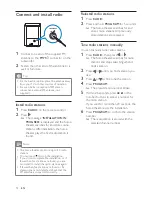
Страница 16: ...nnect and install radio 1 Connect one end of the supplied FM antenna to the FM75 connector on the subwoofer 2 Fasten the other end of the antenna to a wall or furniture Tip For the best reception place the antenna away from your TV or other sources of radiation For even better reception of FM stereo connect an external FM antenna not supplied Install radio stations 1 Press RADIO on the remote cont...

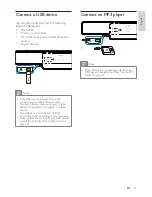
Страница 17: ...Memory card reader Hard disk drive with an external power source Digital camera Note If the USB device does not t into the connector use a USB extension cable The home theater does not support digital cameras that need a PC program to display photos The USB device must be FAT or DOS formatted and Mass Storage Class compliant More information on how to play USB devices is available see Play from a ...

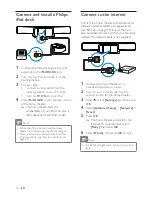
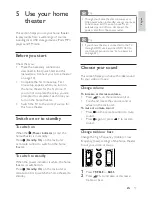
Страница 18: ...ress OK 6 Select Finish then press OK to exit Note Use a RJ45 straight cable Do not use a cross cable LAN BROADBAND Connect and install a Philips iPod dock 1 Connect the iPod docking station not supplied to the iPod DOCK jack 2 Turn on your iPod and dock it on the docking station 3 To view video connect a video cable from the docking station to your TV then turn on TV ON on your iPod 4 Press iPod ...

Страница 19: ...r BASS 2 Press to increase or decrease treble or bass 5 Use your home theater This section helps you use your home theater to play media from a wide range of sources including discs USB storage devices iPods MP3 players and FM radio Before you start Check that you Make the necessary connections described in the Quick Start and this manual see Connect your home theater on page 10 Complete the rst t...

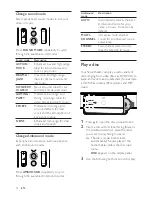
Страница 20: ...isc main menu DISC appears on the display panel 3 Use the following buttons to control play Change sound mode Select prede ned sound modes to suit your video or music Press SOUND MODE repeatedly to cycle through the available sound modes Sound mode Description ACTION ROCK Enhanced low and high range Ideal for action movies and rock or pop music DRAMA JAZZ Clear mid and high range Ideal for drama m...

Страница 21: ... that the home theater is connected to the internet and that network access is properly setup see Connect to the internet on page 16 Button Action TOP MENU Access the main menu of a video disc Navigation buttons Navigate menus OK Con rm an entry or selection Start or resume play Pause play Stop play Skip to the previous or next track chapter or le Fast backward or fast forward Press repeatedly to ...

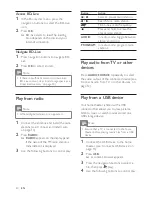
Страница 22: ... theater see Connect a USB device on page 15 2 Press USB A content browser appears 3 Press the navigation buttons to select a le then press play 4 Use the following buttons to control play Access BD Live 1 In the Blu ray disc menu press the navigation buttons to select the BD Live icon 2 Press OK BD Live starts to load The loading time depends on the disc and your internet connection Navigate BD L...

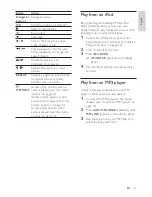
Страница 23: ...ess AUDIO SOURCE repeatedly until MP3 LINK appears on the display panel 3 Use the buttons on your MP3 player to select and play audio les Button Action Navigation buttons Navigate menus OK Con rm an entry or selection Start or resume play Pause play Stop play Skip to the previous or next track chapter or le Fast backward or fast forward Press repeatedly to change the search speed Rotate the pictur...

Страница 24: ...atures Several advanced features are available for video or pictures play from a disc USB device or iPod Use video options Access several useful features while viewing video Some video options are not available for some video sources 1 During video play press OPTIONS The video options menu appears 2 Press the navigation buttons and OK to select and adjust Audio Language Change the audio language o...

Страница 25: ...uttons and OK to select and adjust Repeat Select or turn off repeat mode Repeat A B Loop two points within a track Press OK to start the loop and OK again to end the loop Press OK to exit the loop Shuf e Play audio tracks in random order Play musical slideshow Play music and pictures simultaneously to create musical slideshow The les must be stored in the same disc or USB device 1 Select a music t...

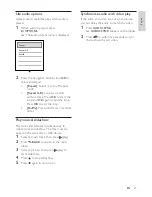
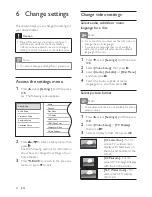
Страница 26: ...top and bottom of the screen 4 3 Panscan For 4 3 screenTV full height display with the trimmed sides 16 9 Widescreen For wide screen TV display ratio 16 9 6 Change settings This section helps you to change the settings of your home theater Caution Many of the settings are already con gured with the best value for the home theater Unless you have a speci c reason to change a setting it is best to l...

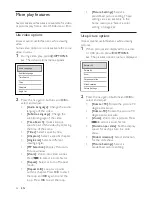
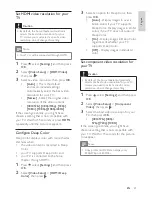
Страница 27: ... 480p 576p or 480i 576i Set HDMI video resolution for your TV Caution By default the home theater automatically selects the best video resolution for your TV Unless you must select a speci c video resolution do not change this setting Note Your TV must be connected through HDMI 1 Press select Settings and then press OK 2 Select Video Setup HDMI Video then press 3 Select a video resolution then pre...

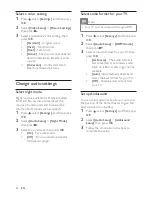
Страница 28: ...nd Setup then press OK 3 Follow the on screen instructions to complete the setup Select a color setting 1 Press select Settings and then press OK 2 Select Video Setup Picture Settings then press 3 Select a prede ned color setting then press OK Standard Original colors Vivid Vibrant colors Cool Soft colors Action Sharp colors that enhance detail in dark areas Ideal for action movies Animation Contr...

Страница 29: ... option then press OK On Enable auto standby Off Disable auto standby Change preferences Select the menu language 1 Press select Settings and then press OK 2 Select Preference Setup OSD Language then press 3 Select the menu language then press OK Note If your home theater is connected through HDMI to an HDMI CEC compliant TV it switches automatically to the menu language on the TV Use parental con...

Страница 30: ...and the home theater are turned on If there is a disc in the home theater the disc plays and the TV switches to the correct channel 1 Press select Settings and then press OK 2 Select EasyLink Setup One Touch Play then press 3 Select an option then press OK On Enable one touch play Off Disable one touch play Turn the content menu on or off You can choose to skip or display the content menu for VCD ...

Страница 31: ...r Recorder Enable one touch standby When you press and hold Standby for at least three seconds the connected HDMI CEC devices switch to standby Note When one touch standby is turned off the home theater cannot be switched to standby by a remote control from the TV or other devices 1 Select EasyLink Setup One Touch Standby then press 2 Select an option then press OK On Enable one touch standby Off ...

Страница 32: ... you to download and buy video content from DivX content partners Your home theater has a DivX VOD registration code Before you can buy video content you must register your home theater on www divx com using the registration code When you buy video content for your home theater you can play it on this home theater only 1 Press select Settings and then press OK 2 Select Advanced Setup DivX VOD Code...

Страница 33: ...e software update is in progress because you might damage the home theater 7 Update software To check for new updates compare the current software version of your home theater with the latest software version if available on the Philips web site Check software version 1 Press select Settings and then press OK 2 Select Advanced Setup Version Info then press OK The software version is displayed Upda...

Страница 34: ...NSERT 8 Wall mount the home theater 1 Position the supplied bracket on the wall drill the screw holes and insert the rubber wall plugs not supplied into the holes If you mount the home theater below a TV leave at least 4 inches between the TV and the bracket Note For secure mounting use screws that are at least one inch long 2 Secure the bracket onto the wall with the appropriate xtures not suppli...

Страница 35: ...ld FM 23 5 dB USB Compatibility Hi Speed USB 2 0 Class support UMS USB Mass Storage Class File system FAT12 FAT16 FAT32 Maximum memory support 160GB 9 Product specifications Note Speci cation and design are subject to change without notice Region code Country Europe United Kingdom DVD All 2 Blu ray B Country Russia DVD All 5 Blu ray C File Format Audio mp3 wma wav Video avi divx mp4 mkv mov qt wmv...

Страница 36: ... Speaker driver 51 mm 2 full range speaker Frequency response 180 Hz 20 kHz Left Right surround speakers Speaker impedance 6 ohm Speaker driver 51 mm 2 full range speaker Frequency response 180 Hz 20 kHz Powerbox Subwoofer Power supply 220 240 V 50 Hz Power consumption 135 W Standby power consumption Low Power 0 3 W System Bass Re ex System Impedance 4 ohm Speaker drivers 165 mm 6 5 woofer Frequen...

Страница 37: ...roubleshooting Warning Risk of electric shock Never remove the casing of the product To keep the warranty valid never try to repair the product yourself If you have problems using this product check the following points before you request service If you still have a problem register your product and get support at www philips com welcome If you contact Philips you will be asked for the model and s...

Страница 38: ...e connected device is not HDCP compliant or is only DVI compatible you cannot transmit sound through an HDMI connection Use an analog or digital audio connection Make sure that the HDMI Audio setting is turned on Play Distorted sound or echo Ensure that the TV volume is muted or set to minimum if you are playing audio through the home theater DivX video les cannot be played Ensure that the DivX le...

Страница 39: ...oubleshooting 36 energy saving 27 environment 6 27 F le formats 33 FM antenna 14 11 Index A Ambisound 26 18 ampli er 33 audio bass 17 connect audio from TV 12 20 connection 12 format for TV 26 language 24 map from connected devices 29 synchronize with video 23 treble 17 troubleshooting 35 volume 17 auto standby 27 B BD Live Blu ray 19 change settings 30 connection 16 memory full 30 Blu ray 19 Bonu...

Страница 40: ...home theater 7 remote control 8 repeat 22 resolution component video resolution 25 HDMI video resolution 25 restore factory settings 30 rotate pictures 22 H HDMI CEC see Easylink 28 Home menu 24 I internet BD Live 19 Bonus View 19 connect 16 software update 31 iPod connect 16 play 21 L language audio 22 menu 27 on discs 24 subtitle 22 laser speci cation 33 M menu content menu on discs 28 language ...

Страница 41: ... 27 picture 26 preferences 27 restore factory settings 30 sleep timer 28 slideshow 23 22 software update 31 version 31 sound Ambisound 18 audio format for TV 26 mode 18 night mode 26 treble and bass 17 troubleshooting 35 volume 17 speci cations 33 standby auto standby 27 one touch standby 29 sleep timer 28 switch to 17 subtitle language 22 language on discs 24 subwoofer 12 synchronize audio and vi...

Страница 42: ...40 EN ...

Страница 43: ...й номер Дата продажи ПРОДАВЕЦ Название фирмы Телефон фирмы Адрес и E mail БЫТОВАЯ ЭЛЕКТРОНИКА ПЕЧАТЬ ФИРМЫ ПРОДАВЦА Изделие получил в исправном состоянии С условиями гарантии ознакомлен и согласен Внимание Гарантийный талон недействителен без печати продавца ...

Страница 44: ...мений сохраняйте в течение срока службы документы прилагаемые к товару при его продаже данный гарантийный талон товарный и кассовый чеки накладные инструкцию по эксплуатации на любом носителе и иные документы Гарантийное обслуживание не распространяется на изделия недостатки которых возникли вследствие 1 Нарушения Потребителем правил эксплуатации хранения или транспортировки товара 2 Действий трет...

Страница 45: ......

Страница 46: ... 2009 Koninklijke Philips Electronics N V All rights reserved sgpjy_0928 51_Eng ...

Отзывы: