background image

LEGEND

®

  INSTALLATION  MANUAL

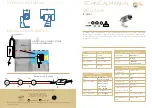
C.  Cleaning the Sand & Silt Bag

Carefully unlock the debris bag from the vacuum tube. Use
your thumb to push the "U" shaped snap lock closure upward
until it snaps open. Make sure to swing it away from the
opening. Open the bag and remove debris.
To close, push the middle of bag  inward, as shown, and
bring the edges together to make them stack like an
accordion. Swing the "U" shaped snap lock closure back
to the closing position.
Gently push on top of the "U" shaped snap lock closure to
make sure it snaps into place. Reattach the clip onto the
feed hose.
Your debris bag is ready to be reinstalled onto your cleaner.
If you have a lot of debris in your pool, especially after a
storm, you can run your Legend

®

 in two shorter cycles per

day and empty the debris bag between cycles.
Reconnect the debris bag to the vacuum tube. Do NOT
over turn.
A Helpful Hint: It is easier to empty the debris bag when it
is dry.  A second bag may be used while the full debris bag
is drying.
It's best to empty the debris bag when it becomes half full.
The Legend

®

 will have better performance if the bag is not

overloaded.

D.  Periodic Maintenance

The following parts are wear items that should be checked, maintained or replaced as needed.
Wear items are considered any working or moving part(s) being worn due to the use of the cleaner.
Wear items are not covered under warranty.

1.  Wall Fitting Screen

Inside the wall fitting is a filter screen that acts as a
secondary filter. This screen is to keep debris that is
passed by the pool filter out of the Legend

®

Running the

Cleaner without the filter screen can damage the Legend

®

and will void the warranty.
A continuous plugged or dirty screen is a sign of problems
in your pool filtration system and you need to contact
your local Pool Professional.
To clean the filter screen, pull the screen out from inside
the Wall Fitting and rinse thoroughly and push back inside
the Wall Fitting.
Whenever cleaning, back-washing or repairing the filter,
remove the Wall Fitting and flush out the dedicated line before using the Legend

®

.

"U" SHAPED SNAP LOCK

CLOSURE

CLIP

PUSH DOWN TO
SNAP TOGETHER

CLEANER BAG

OPEN

OPEN

Push middle of
the bag inward
for closure.

OPEN

CLOSE

CLEANER BAG

"U" SHAPED
SNAP LOCK

CLOSURE

OPEN

OPEN

[English]


15

Содержание Legend LL505G

Страница 1: ...ner IMPORTANT SAFETYINSTRUCTIONS READAND FOLLOWALLINSTRUCTIONS SAVE THESE INSTRUCTIONS English 2 Rainbow Pool Products PO Box 2388 Mansfield Qld 4122 Telephone STD 61 7 3849 5385 Facsimile STD 61 7 38...

Страница 2: ...805 553 5000 Pentair Water Australia s 0RQDVK ULYH s DQGHQRQJ 6RXWK s 9LFWRULD XVWUDOLD Trademarks and Disclaimers Legend and Pentair Water Pool and Spa are trademarks and or registered trademarks of...

Страница 3: ...attempting to clean out pool cleaner head LEGEND INSTALLATION MANUAL Important Notice Attention Installer This guide contains important information about the installation operation and safe use of thi...

Страница 4: ...amageisfound haveaqualifiedpoolprofessionalmakeallthenecessaryrepairs Also if your vinyl liner is brittle or has stones wrinkles roots or metal corrosion in contact with the underside of the liner or...

Страница 5: ...used to remove plaster dust in new pools 5 Always remove the Legend before swimmers enter the pool 6 Always handle the Legend with care Do not let children or pets play with the unit it is not a toy...

Страница 6: ...Checking Operation 13 G FineTuning the Legend 13 1 Thrust Jet Adjustment 13 2 Sweep Hose Adjustment 13 3 Checking Wheel RPM 14 III Operation Periodic Maintenance 14 A Connecting Disconnecting the Leg...

Страница 7: ...For pool owners with plumbing and mechanical experience installation instructions are included in this manual Please put safety first Be sure to take your Legend out of your pool and store it careful...

Страница 8: ...line please contact our Technical Support Department at 1 800 831 7133 USA or Herentals Belgium 32 0 14 25 99 11 C Booster Pump Installation If you already have a 3 4 horsepower booster pump installed...

Страница 9: ...rger pools see 14 on Page 12 for instructions on Adding Additional Feeder Hose 1 Take Feeder Hose out of box it will be approximately 30 feet 9 meters long Before installing the unit you should lay th...

Страница 10: ...TER WHITE OR GREY HOSE SECTION 10 FOOT 3 METER WHITE OR GREY HOSE SECTION 10 FOOT 3 METER SOFT HOSE BACK UP VALVE REMOVE EXCESS MATERIAL FROM HOSE ON EITHER SIDE OF MARKED SWIVEL AS DESCRIBED IN STEPS...

Страница 11: ...75 cm soft hose 6 Half of this measured length is to be cut equally from 10 ft 3 m white hard hoses next to the Marked Swivel Example Half of 6 ft 180 cm 3 ft 90 cm each If you are cutting more than 2...

Страница 12: ...l fitting is securely locked into place 12 Lower your complete Legend assembly into your pool carefully It should look like the Figure right 13 Go back to your equipment and turn filter pump on first...

Страница 13: ...m The insert will be set from the factory with the larger 3 8 0 9525 cm hole over the opening of the jet The larger hole is used for the Legend cleaner If you change the insert to the smaller 1 4 0 63...

Страница 14: ...below 28 then call your local Pool Professional or contact our Technical Support Department at 1 800 831 7133 USA or Herentals Belgium 32 0 14 25 99 11 If the RPM is more than 32 at the Wall Fitting...

Страница 15: ...becomes half full The Legend will have better performance if the bag is not overloaded D Periodic Maintenance The following parts are wear items that should be checked maintained or replaced as needed...

Страница 16: ...ves twigs acorns etc This bag can be helpful especially after a storm A Helpful Hint To prolong the life of bags remove the cleaner from pool before adding chemicals 5 Sweep Hose The Sweep Hose is pro...

Страница 17: ...can be installed to the end of the sweep hose Part for Hose Weight is EH09C 2 Leaf Bag See previous page 3 New Legend Suction CupTires Designed to climb in problem areas fiberglass tile and smooth sur...

Страница 18: ...ten for water in the float 1 Determine if the Back Up Valve is cycling Hold the valve out of the water and the jet should come on for approx 30 seconds and shut off for approx 3 minutes and 30 seconds...

Страница 19: ...t Grey 1 16 G L EH07 EH07 Sweep Hose Hose Sleeve 4 16 LLH07PM LLH07PM Sweep Hose Hose Sleeve Grey 4 17 G L EU15 EU15 Coarse Mesh Bag Optional not shown 1 17 EU15G EU15G Coarse Mesh Bag Grey Collar Opt...

Страница 20: ...PM Wall Fitting Grey 1 41 E25 E25 Pressure Relief Valve White 1 41 LL25PM LL25PM Pressure Relief Valve Grey 1 42 G L E24 E24 Screen Wall Fitting 1 43 G L E23 E23 Quick Disconnect Adapter 1 43 LL23PM L...

Страница 21: ...ATION MANUAL 53 33 3 10 52 2 32 27 29 28 33 27 27 28 44 34 31 29 33 48 32 10 18 17 32 14 15 12 16 11 13 49 9 6 1 28 26 50 5 8 6 20 4 51 32 48 19 50 21 22 23 33 26 25 7 47 24 34 31 54 LEGEND EXPLODED V...

Отзывы: