


GRL-PCIE5-CEM-RXA User Guide and MOI
Rev7.0
© Granite River Labs 2022 Version 7.0, June 2022. Updated 06.29.2022
Page 15 of 123
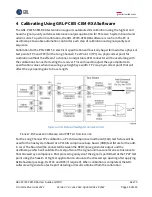
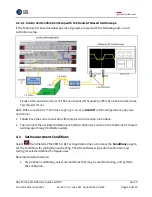
3
Setting Up GRL-PCIE5-CEM-RXA Automation Software
This section provides the procedures to start up and pre-configure the GRL-PCIE5-CEM-RXA
automation software before running tests. It also helps users familiarize themselves with the basic
operation of the software
.
Note: The GRL software installer will automatically create shortcuts in the Desktop and Start Menu
when installing the software.
To start using the GRL software, follow the procedures in the following sections.
3.1
Download GRL-PCIE5-CEM-RXA Software
Download and install the GRL software as follows:
1.
If the GRL software is
to be installed on a PC (where it is referred to as ‘controller PC’), install
VISA (Virtual Instrument Software Architecture) on to the PC where GRL-PCIE5-CEM-RXA is to
be used (see Section 2.2).
2.
Download the software ZIP file package from the Granite River Labs support site.
3.
The ZIP file contains:
•
PCIECEMGen5_AN_PatternFilesInstallationxxxxxxxxxSetup.exe
–
Run this on the
Anritsu MP1900A BERT Signal Quality Analyzer to install the pattern setup files.
•
PCIECEMGen5_AN_RxTestApplicationxxxxxxxxxSetup.exe
–
Run this on the PC or on
the oscilloscope to install the application.
•
PCIECEMGen5_AN_RxTestScopeSetupFilesInstallationxxxxxxxxxSetup.exe
–
Run this
on the oscilloscope to install the scope setup files.
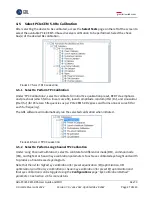
3.2
Launch and Set Up Software
1.
Once the software is installed, open the GRL folder from the Windows Start menu. Click on
GRL
–
Automated Test Solutions
within the GRL folder to launch the GRL software
framework.
F
IGURE
1.
S
ELECT AND
L
AUNCH
GRL
F
RAMEWORK


