background image

User Guide


100


 Mobile Payment Acceptance User Guide 


3.


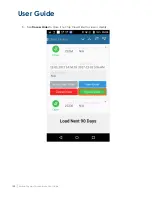
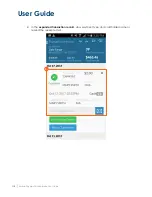
Tap Process Order to close it out; tap View Order to view or modify. 


Содержание TSYS A920

Страница 1: ...User Guide mPOS A920 Mobile Payment Acceptance User Guide ...

Страница 2: ...on in whole or in part be disclosed or disseminated to any third party without the express written permission of TSYS Copyright Trademark 2017 Total System Services Inc all rights reserved worldwide Total System Services Inc and TSYS are federally registered service marks of Total System Services Inc in the United States Total System Services Inc and its affiliates own a number of service marks th...

Страница 3: ...ion 30 Help 31 Products Categories Discounts and Customers 32 Viewing Products 32 Add a Product 33 Remove a Product 35 Categories 40 Discounts 44 Manage Customer Information 50 Add New Customer 51 Remove Customer Information 58 Transactions 61 Add a Customer to a Transaction 62 Begin a Transaction 63 Discounts 73 Processing a Payment 80 Tips and Signature 88 Approved Transaction 89 ...

Страница 4: ... 104 Process a Return from the Transaction History 108 Back Office Merchant Center 117 Log Into Merchant Center 117 Creating User Profiles in Merchant Center 119 Creating and Managing Products In Merchant Center 122 Product Categories 123 Tax Rates 125 Add a New Product 130 Discounts 134 Modifiers 138 Variations 141 Manage Product Options 146 Importing Products 150 ...

Страница 5: ...tance User Guide Introduction Mobile Payment Acceptance MPA is an easy to use application on your A920 device that provides reliable secure and portable transaction processing as well as other useful features for managing your business ...

Страница 6: ...ss you will create a password for future login as well as a personal identification number PIN for quick access In order to activate your merchant account you will need the email address associated with your account which contains your merchant account information as well as your truncated 12 digit Merchant ID and 14 digit Device ID numbers Your non truncated Merchant ID will be provided to you du...

Страница 7: ...e email You can contact Customer Support at 600 654 9256 to request another one 2 If the device shows a red icon and Device is not connected to a network tap the link to start or set up the Wi Fi connection 3 If you have already activated your account tap Already have a password Login here 4 Otherwise tap Continue to activate your account and sign in for the first time 1 2 3 4 ...

Страница 8: ...User Guide Mobile Payment Acceptance User Guide 7 Haven t received your welcome email If you did not receive a welcome e mail please contact Customer Support at 800 654 9256 to request another one ...

Страница 9: ...User Guide 8 Mobile Payment Acceptance User Guide Not connected to the internet If the device is not connected to the internet 1 Tap the Device is not connected to the internet icon ...

Страница 10: ...User Guide Mobile Payment Acceptance User Guide 9 2 Connect to your Wi Fi network ...

Страница 11: ...nding on the device you are using If you have one device this is 01 if you have 2 devices this is 02 and so on 3 Enter and re enter a New Password Be sure to record this password for future use Note The password must contain eight to sixteen characters and consist of at least one number from 0 to 9 at least one uppercase and one lowercase letter from A to Z and at least one special character _ You...

Страница 12: ...User Guide Mobile Payment Acceptance User Guide 11 4 Move the slider to indicate that you agree with the Terms and Conditions 5 Tap Next 1 2 3 5 4 ...

Страница 13: ...User Guide 12 Mobile Payment Acceptance User Guide 6 Tap each security question prompt and select a question 7 Enter answers for each of the four security questions 8 Tap Next 6 7 8 ...

Страница 14: ...pad to create your new PIN and tap Next Re enter your PIN to confirm it Record this PIN for future use as it can be used to quickly log into the application after it times out when the device is turned off or when the application is closed and reopened 10 Tap Next 9 10 ...

Страница 15: ...User Guide 14 Mobile Payment Acceptance User Guide 11 A dialog box displays Tap Continue to run a test transaction to complete the device setup 11 ...

Страница 16: ...User Guide Mobile Payment Acceptance User Guide 15 12 Initiate a test transaction by inserting a card swiping a card or selecting manual entry ...

Страница 17: ...User Guide 16 Mobile Payment Acceptance User Guide 13 A confirmation screen displays showing that the test transaction has been approved The setup process is now complete ...

Страница 18: ...and create a PIN you normally only need to enter the PIN to access the application If you tap the forgot PIN button and see the message Admin PIN Cannot be Reset you will need to clear all application data for Payments 3 0 through Device Settings and Log back in to the application ...

Страница 19: ...User Guide 18 Mobile Payment Acceptance User Guide Login to Your Account If you have already activated tap the Already have a password Login Here link to log in ...

Страница 20: ...er Guide 19 A login screen displays Enter your login information 1 Enter your TA in the Username field 2 Enter your Password 3 Enter the Device ID This is your 12 digit merchant number followed by the two digit device ID 4 Tap Login 1 2 3 4 ...

Страница 21: ... customer s transaction Forced Return Force a refund for a customer for a specific amount Open Orders View search or cancel open orders History Transaction History Filter and search transaction history view individual transactions initiate returns from the transaction details in transaction history Customers Add view search and edit customer records Settings Transactions View add and modify tax ra...

Страница 22: ... View add and modify tax rate tip settings signature requirements and invoice numbers enable or disable auto processing of offline transactions For more info see Offline Payments Section of this User Guide Account View processing summary account summary and the current application version Change your password and sign out of the application from here Help View support information Sign Out Sign out...

Страница 23: ...oose the transaction settings that best fit your business needs You can access and change settings from the Main Menu Transaction Settings The Transactions option under Settings gives you access to the following functions Create or edit a tax rate Enable and edit the tip feature Set requirements for a signature Add invoice numbers to your transactions Settings Page ...

Страница 24: ...x rates can be created in both Merchant Center and MPA for more information on creating global taxes see the Back Office Merchant Center section in this guide Once you have added a tax rate you can apply it to the products in your product list Up to 20 tax rates can be applied to a product at one time Note that tax rates can be added edited and turned on or off but they cannot be deleted To create...

Страница 25: ...Tap Save Once a tax has been created you can tap it to make changes or tap the slider on the right to make it active or inactive You can apply active taxes to products from the Products page 4 3 Tap to edit a tax rate Tap to make a tax active or inactive ...

Страница 26: ...u may set four tip options A Custom option is available to allow your customers to set their own desired tip amount or percentage Select four tip options to display to your customers When the Tip feature is turned on your receipt will always include a signature line regardless of any signature limit setting Settings Page Tap to enable the Tip feature Tap to edit tip options ...

Страница 27: ...User Guide 26 Mobile Payment Acceptance User Guide Tip Settings Choose four tip options Tap to save your tip options ...

Страница 28: ...a signature This amount may be overwritten by the processor chipped card or if you have enabled tips If you do not set a limit the application will not require a signature unless the setting is overwritten Requiring a signature for higher dollar transactions will help limit your financial risk Settings Page Tap to enable the Signature option Tap to edit signature amount ...

Страница 29: ...User Guide 28 Mobile Payment Acceptance User Guide Signature Settings Tap to Set Required Signature save to your tip options Tap the slider to change the signature requirement amount ...

Страница 30: ...may choose Simply turn on the Invoice Number feature under Transaction Settings and you will begin seeing a field for invoice numbers every time you process a transaction The invoice number is user defined If a number isn t entered the transaction ID will be used as a default Settings Page Tap to enable invoice numbers for transactions ...

Страница 31: ...0 days the amount still pending settlement some basic account information like your username and the current application version you have installed on your device You can also change your password or sign out of the application from this screen Account Page Pending transactions that have not yet settled Settled transactions Account information Tap to sign out of MPA Tap to change your password ...

Страница 32: ... Guide 31 Help If you need help you can access the Help page from the Main Menu The Help page provides you with customer service contact information a brief explanation of how to process a credit card and a link to the privacy policy Help Page ...

Страница 33: ...e and helps you keep your inventory updated and organized You can access the Products page any time from the Main Menu The Products page is equipped with filter and search features so you can find products easier You can also sort each column in ascending or descending order 1 Tap Create Product to create a new product 2 Tap the down arrow to sort products 3 Tap the magnifying glass to filer and s...

Страница 34: ...can if a UPC is not attached to a product and you try to scan it the application will tell you the product does not exist Additionally if you do not wish to track quantity for a product such as a service or membership do not modify the quantity this will treat the supply of that product as infinite All the information will be saved to your product list Note that product variations and modifiers ca...

Страница 35: ...ent Acceptance User Guide 2 Enter the appropriate product information and assign available taxes discounts and categories Product name price and Code SKU fields Tap Save to create the product and return to the Products page 2 3 ...

Страница 36: ...s to inactive so it is no longer visible in your product list but remains on an inactive list You can make the product available for sale again at any time by changing its status back to active Products can also be permanently deleted Change the Status of or Delete a Product To deactivate a product from your product list 1 Tap the product you wish to modify ...

Страница 37: ...User Guide 36 Mobile Payment Acceptance User Guide 2 Tap Product Details ...

Страница 38: ...User Guide Mobile Payment Acceptance User Guide 37 3 Tap the Active Product slider to make a product active or inactive 4 Tap Save 4 3 ...

Страница 39: ...User Guide 38 Mobile Payment Acceptance User Guide 5 Tap Product Details ...

Страница 40: ...User Guide Mobile Payment Acceptance User Guide 39 6 Tap Delete and confirm your decision to permanently remove the product ...

Страница 41: ... you can choose not to assign a category at all However products viewed in the Register are organized by category so if no category is assigned it will only appear under the All Products category You can create and modify categories from the Categories page which is accessible from the Main Menu Create a New Category To create a new category from the Categories page 1 Tap Create Product Category ...

Страница 42: ...User Guide Mobile Payment Acceptance User Guide 41 2 Enter a category name and description 3 Tap Save Product categories become active by default 3 2 ...

Страница 43: ...User Guide 42 Mobile Payment Acceptance User Guide Modify an Existing Category To modify an existing category from the Category page 1 Tap the category you wish to modify ...

Страница 44: ...escription fields as needed 3 Tap the slider to activate or deactivate the product category 4 Tap Save Note Disabling an active category will cause it to no longer display in the register Any products that are assigned to that category will still display under the All Products category 4 3 2 ...

Страница 45: ...s to products in your product list or multiple individual and cart level discounts to an order Discounts can be for a dollar amount or a percentage and you can make discounts active or inactive similar to products in your inventory You can create and modify discounts from the Discounts page which is accessible from the Main Menu Create a Discount To create a discount 1 Tap Create Discount ...

Страница 46: ...scount can be limited to products or transactions or made available to both A stackable discount can be added to a product or transaction along with other discounts Making a discount non stackable means that it cannot be combined with any other discount 3 Tap Save If you have not entered the appropriate information you may not be able to proceed 2 3 ...

Страница 47: ...iscount to a Product When discount is added to a product in the Products page every time that product is added to a transaction that discount will automatically be applied To add single discounts to products from the Products page 1 Tap the product you wish to modify ...

Страница 48: ...User Guide Mobile Payment Acceptance User Guide 47 2 Tap Product Details ...

Страница 49: ...User Guide 48 Mobile Payment Acceptance User Guide 3 Tap the on Discounts to view active and inactive discounts ...

Страница 50: ...nt you wish to activate 5 Tap Save The active discount will now automatically be applied when the product is added to an order Note Only one discount can be active at a time when modifying items on the Products page You can still add additional discounts to single products or to the entire cart during a transaction which is described in the Transactions section of this guide 4 3 ...

Страница 51: ...formation from the Customers page which is accessible from the Main Menu The Customers page provides a list of all the customers you have entered along with their information This page is equipped with a search option and a filter to view active and inactive customers You can also sort customers in ascending or descending order Customers Page Create a new customer Sort customers Filter and search ...

Страница 52: ...stomer You can add a customer using the Create New Customer button or by duplicating an existing customer s profile and changing the necessary information Create a New Customer To add a new customer using the Create New Customer button 1 Tap Create New Customer 1 ...

Страница 53: ...ter all available customer information including name address and business information The minimum required information for a new customer is a first and last name If you provide an email address it will be used for the email receipt feature 3 Tap Save 3 2 ...

Страница 54: ...User Guide Mobile Payment Acceptance User Guide 53 Duplicate a Customer To add a new customer by duplicating an existing customer s profile 1 Tap the customer s profile you wish to use as a template 1 ...

Страница 55: ...User Guide 54 Mobile Payment Acceptance User Guide 2 Tap Customer Details 2 ...

Страница 56: ...User Guide Mobile Payment Acceptance User Guide 55 3 Tap Duplicate Customer The duplicate customer will appear 3 ...

Страница 57: ...User Guide 56 Mobile Payment Acceptance User Guide 4 Tap the newly created duplicate profile 5 Tap Customer Details 4 5 ...

Страница 58: ...User Guide Mobile Payment Acceptance User Guide 57 6 Edit the customer information as needed 7 Tap Save 6 7 ...

Страница 59: ...ils screen so their information no longer shows on your active customer list You can reactivate the customer s information at any time by turning on the visibility again Customer Information Page You can also permanently remove a customer from your customer list Removed customers will not show up in reports Activate or deactivate a customer ...

Страница 60: ...User Guide Mobile Payment Acceptance User Guide 59 Remove a Customer To remove a customer from your customer list 1 Tap Customer Details for the customer you wish to remove 1 ...

Страница 61: ...User Guide 60 Mobile Payment Acceptance User Guide 2 Tap Remove Follow the prompt and confirm or cancel your decision to complete the process 2 ...

Страница 62: ...e makes it easy to perform a transaction The Register which is used to start a transaction is the default home screen so you can start a transaction as soon as you are logged in Due to screen display optimization the Register and Cart screens are displayed on separate screens Register Page ...

Страница 63: ...User Guide 62 Mobile Payment Acceptance User Guide Add a Customer to a Transaction 1 If you would like to add a customer your transaction tap Customer section of the cart page 1 1 ...

Страница 64: ... To begin a transaction you can add products to an order in several different ways Manually enter the price and a temporary product name using the Quick Sale button Add a product from your product list using the Products button or if your device allows the Scan Product button Add a new product not currently in your product list along with the necessary tax and product information using the Create ...

Страница 65: ...on the number pad 3 Tap Add to add the amount to the order 4 Tap the Cart Subtotal in the top right to display the Cart screen 5 Tap Process Order Note You can add or remove items to an order as well as temporary product names If you leave the Enter Product Name field blank it will display as MISC Products entered this way are not stored in your product inventory 1 2 3 4 5 ...

Страница 66: ...ble products however products with variations and modifiers can only be added and modified from Merchant Center See Module 2 Merchant Center for Merchants for more information on variations and modifiers Adding a Simple Product to a Transaction To begin a transaction by adding a product without modifiers or variations from your product list 1 Tap Products 2 Select the desired product from your pro...

Страница 67: ... to a Transaction To begin a transaction by adding a product with modifiers or variations from your product list 1 Tap Products 2 Select the desired product from your product list 3 The Product Options window will open automatically for any Product with a Modifier or Variation 1 2 ...

Страница 68: ...User Guide Mobile Payment Acceptance User Guide 67 4 Select the desired Product Variations from the dropdown that displays Note If a product has variations you MUST select a variation to continue ...

Страница 69: ...User Guide 68 Mobile Payment Acceptance User Guide 5 Select any desired Product Modifiers by tapping them to select or unselect them Modifiers show as red when they are currently selected 6 Tap Save 5 6 ...

Страница 70: ...User Guide Mobile Payment Acceptance User Guide 69 7 Tap the Cart Subtotal in the top right to display the Cart screen 8 Tap Process Order 5 6 ...

Страница 71: ...User Guide 70 Mobile Payment Acceptance User Guide Begin a Transaction by Creating a Product To begin a transaction by creating a product 1 Tap Products 2 Tap the Create Product button 2 1 ...

Страница 72: ...e Payment Acceptance User Guide 71 3 Enter the appropriate product information and assign available taxes discounts and categories 4 Tap Save to save the new product to your product list and return to the Register 3 4 ...

Страница 73: ...Payment Acceptance User Guide 5 Tap Products 6 Select the newly created product from your product list to add it to your order 7 Tap the Cart Subtotal in the top right to display the Cart screen 8 Tap Process Order 5 6 7 8 ...

Страница 74: ...Mobile Payment Acceptance User Guide 73 Discounts Add a Discount to an Entire Order To add one or more discounts to an entire order during a transaction 1 Add one or more products to your order 2 Tap Discounts 2 3 ...

Страница 75: ...User Guide 74 Mobile Payment Acceptance User Guide 3 Tap the discount you wish to apply ...

Страница 76: ...nts by repeating this process Once you are satisfied with your selections proceed as you would with a regular transaction Note Individual discounts may only be applied once to an order or a product however the same discount may be applied twice if it is applied to an individual product and the entire order ...

Страница 77: ...obile Payment Acceptance User Guide Add Multiple Discounts to a Single Product To add multiple discounts to a single product during a transaction 1 Add a product to your order 2 Tap the product you wish to discount 2 ...

Страница 78: ...User Guide Mobile Payment Acceptance User Guide 77 3 Tap Enter Discount to manually add a discount amount OR 4 Tap Select Discounts and then tap a discount to apply a pre defined discount 3 4 ...

Страница 79: ...User Guide 78 Mobile Payment Acceptance User Guide 5 Tap Add Discounts if you wish to apply additional discounts OR 6 Tap Done to return to the Register 5 6 ...

Страница 80: ...bile Payment Acceptance User Guide 79 7 Review the applied discounts and add additional discounts by repeating this process Once you are satisfied with your selections proceed as you would with a regular transaction ...

Страница 81: ...finish processing an order you must process a payment At this stage in the transaction you can review the order total select a payment method or cancel the order There are three ways you can process a payment Integrated card reader Manually enter card information Enter a cash transaction ...

Страница 82: ...e Mobile Payment Acceptance User Guide 81 Card Reader 1 The customer can dip or tap their chip card tap their NFC enabled wireless device or swipe a non EMV card This automatically begins processing the payment ...

Страница 83: ...User Guide 82 Mobile Payment Acceptance User Guide Manual Card Entry To process an order using manual card entry 1 Tap Manual Card Entry 1 ...

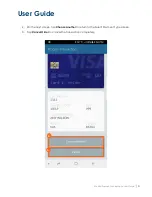
Страница 84: ...uide Mobile Payment Acceptance User Guide 83 2 Enter the card information in the available fields If you enter incorrect information you may not be able to proceed until you correct it 3 Tap Process Order 3 2 ...

Страница 85: ...creen will display SUCCESSFUL or DECLINED If you see NO CONNECTION you may not be connected to a network If the transaction was successful you will be prompted to hand the device to the customer to complete the transaction If the transaction was declined you can still choose another method of payment or cancel the order ...

Страница 86: ...User Guide Mobile Payment Acceptance User Guide 85 Cash Transaction To process a cash transaction 1 Tap Cash Payment ...

Страница 87: ...User Guide 86 Mobile Payment Acceptance User Guide 2 Enter the cash amount using the number pad 3 Tap Process 2 3 ...

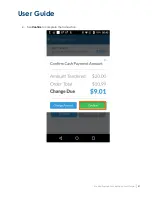
Страница 88: ...User Guide Mobile Payment Acceptance User Guide 87 4 Tap Confirm to complete the transaction ...

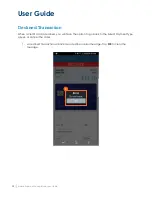
Страница 89: ...amount 2 If the customer selects Other a keypad displays to enter the tip amount 3 The customer taps SAVE before confirming the transaction total for an EMV transaction and after credit card approval for non EMV transaction The signature is captured after the transaction is approved In some circumstances it is on the same screen as the tip selection 1 3 2 ...

Страница 90: ...and would like to provide the customer with a printed receipt 2 Enter an email address to send the customer their receipt electronically If you added a customer while in the register their email address will be pre populated If you enter a new email address the application will ask if you would like to save that customer 3 Tap Done to return to the register 3 1 2 ...

Страница 91: ...r Guide Declined Transaction When a credit card is declined you will have the option to go back to the Select Payment Type screen or cancel the order 1 A declined transaction will include a decline or error message Tap OK to clear the message 1 ...

Страница 92: ...User Guide Mobile Payment Acceptance User Guide 91 2 On the next screen tap Choose Another to return to the Select Payment Type screen 3 Tap Cancel Order to cancel the transaction completely 3 2 ...

Страница 93: ...in Menu Once you obtain the authorization code provided by voice authorization you can enter the authorized amount and proceed as you would with a regular transaction Note Forced Authorizations are only valid if received via the Voice Authorization phone number To process a transaction using the Forced Authorization Only feature 1 Enter the authorized amount using the number pad 2 Tap Next 1 2 ...

Страница 94: ...User Guide Mobile Payment Acceptance User Guide 93 3 Enter the credit card information as you would with a manual card transaction 4 Tap Process Order 3 4 3 ...

Страница 95: ...ayment Acceptance User Guide 5 Enter the 5 or 6 digit Authorization code obtained from the Issuer or Voice Authorization Center 6 Tap Authorize and follow any and all additional steps in order to complete the transaction 5 6 ...

Страница 96: ...y be given the option to accept a partially authorized transaction 1 If a payment is authorized for less than the full transaction amount you will receive a message with the Balance due amount 2 To accept the amount that was approved tap Submit Additional Payment 3 If either you or the customer chooses not to proceed with the purchase tap Cancel Transaction and the authorization will be voided 3 2...

Страница 97: ...ptance User Guide 4 If you choose to submit an additional payment a new transaction will open with the balance due already added to the Register Simply complete this transaction as you would any other to collect the remaining balance 4 ...

Страница 98: ...open tabs for same day processing Once an order has been saved you can view modify cancel or process the transaction from the Open Orders page which is accessible from the Main Menu Generate and Save an Order To generate and save an order for future processing 2 From the Register add products to an order as you would with a regular transaction 3 Tap Save Order 2 ...

Страница 99: ...User Guide 98 Mobile Payment Acceptance User Guide 4 Add any pertinent order details including customer name pick up date pick up time and notes 5 Tap Save Order 3 4 ...

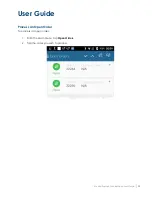
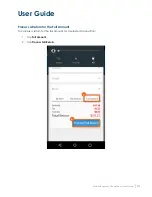
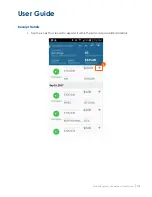
Страница 100: ...User Guide Mobile Payment Acceptance User Guide 99 Process an Open Order To process an open order 1 From the Main Menu tap Open Orders 2 Tap the order you wish to process ...

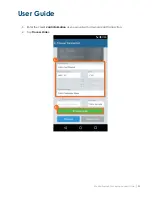
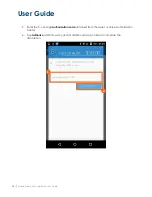
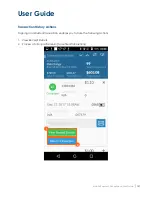
Страница 101: ...User Guide 100 Mobile Payment Acceptance User Guide 3 Tap Process Order to close it out tap View Order to view or modify ...

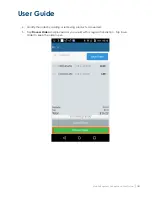
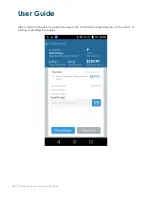
Страница 102: ... Mobile Payment Acceptance User Guide 101 4 Modify the order by adding or removing products as needed 5 Tap Process Order and proceed as you would with a regular transaction Tap Save Order to keep the order open ...

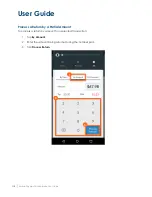
Страница 103: ...ion has settled or a full or partial reversal void if a transaction has not yet settled You can force a return for a specified amount or process returns using transaction history To force a return 1 From the Main Menu tap Force Return 2 Enter the amount you wish to return using the number pad 3 Select a customer or create a new customer 4 Tap Return 3 2 4 ...

Страница 104: ...User Guide Mobile Payment Acceptance User Guide 103 5 Swipe the card that will be refunded using an available payment device or tap Manual Card Entry to proceed as you would with a regular transaction ...

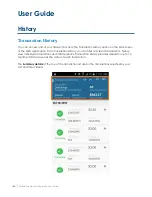
Страница 105: ...nu of the MPA application From Transaction History you can filter and search transaction history view individual transactions and initiate returns Transaction History provides details for up to 13 months of data as well as the status of each transaction The Summary details at the top of the transaction list are for the transactions selected by your sort and filter criteria ...

Страница 106: ...User Guide Mobile Payment Acceptance User Guide 105 Sorting Transactions You can Sort by Date Customer Price and Payment Type ...

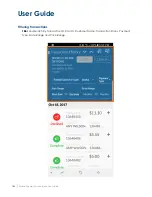
Страница 107: ...User Guide 106 Mobile Payment Acceptance User Guide Filtering Transactions Filter and Search by Transaction ID Card Customer Name Transaction Status Payment Type Date Range and Price Range ...

Страница 108: ...yment Acceptance User Guide 107 Transaction History Actions Tapping an individual transaction enables you to take the following actions 1 View Receipt Details 2 Process a full or partial return for settled transactions 1 2 ...

Страница 109: ... you process a partial return the remaining balance can still be returned however you will no longer be able to return the full original amount Locate a Transaction To bring up an order for a return using transaction history 1 From the Main Menu tap Transaction History 2 Tap the Search icon 3 Search for a transaction using the Transaction ID or another piece of identifying information 4 Tap Filter...

Страница 110: ...p the transaction you wish to view Process a Return by Item To process a return by item for a selected transaction 1 Tap By Item this option is selected by default 2 Tap the and buttons to modify the number of items being returned 3 Tap Process Return 1 2 3 ...

Страница 111: ... Payment Acceptance User Guide Process a Return by a Partial Amount To process a return by amount for a selected transaction 1 Tap By Amount 2 Enter the amount being returned using the number pad 3 Tap Process Return 1 2 3 ...

Страница 112: ...ser Guide Mobile Payment Acceptance User Guide 111 Process a Return for the Full Amount To process a return for the full amount for a selected transaction 1 Tap Full Amount 2 Tap Process Full Return 1 2 ...

Страница 113: ...User Guide 112 Mobile Payment Acceptance User Guide After a return has been successfully processed the Confirmation page will give you the option of printing or emailing the receipt ...

Страница 114: ...User Guide Mobile Payment Acceptance User Guide 113 Receipt Details 1 Tap the next to a record to expand it within the list and view additional details 1 ...

Страница 115: ...User Guide 114 Mobile Payment Acceptance User Guide 2 In the expanded transaction record view payment type and cardholder name or resend the receipt email 2 ...

Страница 116: ...User Guide Mobile Payment Acceptance User Guide 115 3 Tap View Receipt Details to view the remaining transaction details 3 ...

Страница 117: ...User Guide 116 Mobile Payment Acceptance User Guide Receipt Details 1 View additional transaction details on the View Receipt Details screen 2 Email the transaction receipt 2 1 ...

Страница 118: ...your business control employee access to Mobile Payment Acceptance features upload or create your product database and track customers Log Into Merchant Center 1 From the TransIT Portal https merchantcenter transit pass com enter your TA Number in the Username field Note The TA number was sent in the Transit welcome email If you do not have your welcome email contact Customer Support at 600 654 92...

Страница 119: ...User Guide 118 Mobile Payment Acceptance User Guide 3 Enter your password and click Next ...

Страница 120: ...user profile Supervisor and Operator These two roles are assigned default permissions but they can be customized on an individual basis to suit your business needs Both roles can be granted similar permissions however the Operator role cannot be given access to certain reports such as customer data In order to create a new user profile you will need the TA Number and password associated with your ...

Страница 121: ...User Guide 120 Mobile Payment Acceptance User Guide 2 Click Admin to expand the dropdown menu 3 Select Manage Users 4 Click Add ...

Страница 122: ...stomize the user profile by selecting or deselecting permissions from the tabbed menus on the right 8 Click Submit to complete the user profile creation process You can also use the Manage Users page to delete or modify existing user profiles Deleting a user profile can be useful when making personnel changes or preventing a security breach in case of lost or stolen login information Modifying use...

Страница 123: ...It is recommended that you set up categories and taxes first because otherwise they will not be available when adding a product Discounts modifiers and variations can be set up later because they can only be added to existing products Most product related functions in Merchant Center are performed on the Products page however discounts and taxes can only be accessed from the Admin menu If you pref...

Страница 124: ...tegories page you can add new categories or view and manage existing ones You can access the Product Categories page from the Products page which is accessible from the Main Menu Product Categories Page Adding Product Categories To add a new category from the Product Categories page complete the following steps 1 Click the Add Product Category button This will bring up the Product Category page Us...

Страница 125: ...ce you have created a product category you cannot delete it however you can deactivate it so it does not appear in your default Product Categories list To deactivate a product category from the Product Categories page complete the following steps 1 Click the desired Product Category Name in the Product Category List If necessary use the Search function to narrow the number of available choices Use...

Страница 126: ...uct you must first create it in Merchant Center There are two types of tax rates individual taxes which must be assigned to each product and global taxes which are applied to all products by default Global taxes can only be created in Merchant Center Note that tax rates can be added edited and turned on or off but they cannot be deleted and that only twenty tax rates can be applied to a product at...

Страница 127: ...x Rates page under the Admin section of the Main Menu and complete the following steps 1 Click the Add Tax button This will open the Tax Rate page 2 Type a name in the Tax Rate Name field 3 Enter the desired tax rate in the Tax Rate field 4 Click Save Your tax rate will now be available to be assigned to a product ...

Страница 128: ...ates page select the checkbox next to the tax you wish to deactivate This will open a prompt to edit or deactivate the tax 2 Click the Deactivate button to change the status to Inactive Alternatively you can deactivate a tax from the Tax Rate page by completing the following steps 1 Access the Tax Rate page for the tax you wish to deactivate by clicking the Tax Rate Name in the Tax Rate List 2 Sel...

Страница 129: ...dividual tax and complete the following steps 1 Type a name in the Tax Rate Name field 2 Enter the desired tax rate in the Tax Rate field 3 Select the Apply to All Products checkbox This will open a confirmation dialog box 4 Click Yes to confirm your decision 5 Click Save Your tax rate will now be applied to all products in your inventory ...

Страница 130: ...ts complete the following steps 1 From the Tax Rate page for the desired tax click Remove from All Products This will open a confirmation dialog box 2 Click Yes to confirm your decision 3 Click Save Your tax rate will now be removed from all products in your inventory Note Removing a global tax will not deactivate it ...

Страница 131: ...ode and Price however you can also add a description quantity and other information In order to add Tax Rates and Product Categories to a product they must already have been created If you plan on using a barcode scanner be sure to enter a UPC for all items you wish to scan if a UPC is not attached to a product you will not be able to scan it Product Page for a New Product Inventory Options Produc...

Страница 132: ...e Products page 1 Click Add Product 2 Enter the product information in the appropriate fields At a minimum you must provide a Product Name a unique Product Code and a Price 3 If you wish to assign one or more categories to this product click Product Categories This will open the Product Categories page ...

Страница 133: ...oduct Categories from the list of Available Product Categories 5 Click the Right Arrow button to move the selection to the Selected Product Categories list 6 Click Back 7 If you wish to assign one or more tax rates to this product click Tax Rates This will open the Tax Rates page ...

Страница 134: ... button to move the selection to the Selected Tax Rates list 10 Click Back 11 If you are tracking inventory for this item select Yes from the Track Inventory dropdown and assign a quantity Note If you do not wish to track quantity for a product as would be the case for a service or membership do not modify the quantity this will treat the supply of that product as infinite 12 Click Save Your produ...

Страница 135: ...nformation on transactions in MPA see Module 3 Mobile Payment Acceptance Similar to other product information you can make discounts active or inactive but they cannot be deleted You can create and modify discounts from the Discounts page which is accessible from the Main Menu Discounts Page Adding New Discounts To add a new discount complete the following steps 1 From the Discounts page click Add...

Страница 136: ...pply as an amount or as a percentage from the Type dropdown menu 4 Type a value in the Value field 5 Select whether you wish the discount to be applicable to products transactions or both from the Apply Discount To dropdown menu 6 Select whether you would like the discount to be stackable with other discounts from the Stackable menu 7 Click Save ...

Страница 137: ...omplete the following steps 1 From the Discounts page select the checkbox next to the discount you wish to deactivate This will open a prompt to edit or deactivate the discount 2 Click the Deactivate button to change the status to Inactive Alternatively you can deactivate a discount from the Discount page by completing the following steps 1 Access the Discount page for the discount you wish to dea...

Страница 138: ...discount reasons for use with manual discounts Discount reasons can be managed from the Discount Reasons tab which is accessible from the Discounts page Discount Reasons Page To add a discount reason complete the following steps 1 From the Discount Reasons page click Add Discount Reason 2 Type a discount reason name in the Discount Reason Name field 3 Click Save Discount Reason List Add Discount R...

Страница 139: ... for an extra cost For example a latte sold from a local coffee shop might include three shots of espresso in its base price but the shop could also offer an additional shot for an additional charge As with other product options modifiers must be set up before they can be added to a product You can access the Modifiers page from the Products page which is accessible from the Main Menu Modifiers Pa...

Страница 140: ...rice field 4 Click Save Your modifier can now be added to products in your inventory Deactivating Modifiers There are two methods to deactivate a modifier Deactivating a modifier will prevent it from being added to existing products For the first method of deactivating a modifier complete the following steps 1 From the Modifiers page select the checkbox next to the modifier you wish to deactivate ...

Страница 141: ...vely you can deactivate a modifier from the Modifier page using the following steps 1 Access the Modifier page for the modifier you wish to deactivate by clicking the Modifier Name in the Modifier List 2 Select Inactive from the Status dropdown menu 3 Click Save ...

Страница 142: ...duct Options You can create up to three variants per product with up to seven values each Each combination will create a unique variation that can be independently managed For information on how to add variations to a product see the following section on Managing Product Options Adding Variations To add variations to a product complete the following steps 1 Access the product options for the produ...

Страница 143: ...ch value with a comma After you enter the first value the Variations page will expand to include the Manage Variations section 5 Add status tracking quantity and upcharge information for your variations as needed Click Save at any point during this process to save your changes 6 Click Done to return to the Product page 7 Click Save to complete this process Click to save your progress ...

Страница 144: ...in the Product List This will open the Product page 2 Under Product Options click Variations This will open the Variations page Note that the Manage Variations section is available because variations already exist for this product 3 Modify status tracking quantity and upcharge information for your variations as needed Click Save at any point during this process to save your changes 4 Click Done to...

Страница 145: ...ollowing steps 1 Access the product options for the product you wish to modify from the Products page by clicking the Product Name in the Product List This will open the Product page 2 Under Product Options click Variations This will open the Variations page Note that the Manage Variations section is available because variations already exist for this product ...

Страница 146: ...User Guide 145 3 Click the Remove Variant icon for any variations you wish to remove A confirmation dialog box will appear Click Yes to confirm your decision 4 Click Done to return to the Product page 5 Click Save to complete this process ...

Страница 147: ...se additional options by clicking the product in the Product List on the Products page When modifying an existing product all product information except Product Code can be changed as needed Note Product variations and modifiers can only be created and modified in Merchant Center but they can only be used during transactions in Mobile Payment Acceptance Product Page for an Existing Product Product...

Страница 148: ... to an individual product in the Product Options complete the following steps 1 From the Products page select the product you wish to manage from the Product List If necessary use the Search function to narrow the number of available choices 2 Select the discount you wish to assign from the Discount dropdown menu Note You can only assign discounts that have already been created 3 Click Save The as...

Страница 149: ...following steps 1 From the Products page select the product you wish to manage from the Product List If necessary use the Search function to narrow the number of available choices 2 Click the Modifiers button This will open the Modifiers page for the chosen product Note You will only be able to assign modifiers that have already been created in Merchant Center ...

Страница 150: ...le Modifiers field to the Included Modifiers field 4 Click and drag all modifiers you want to include as add ons from the Available Modifiers field to the Additional Modifiers field 5 Click Back to return to the Product page 6 Click Save to complete this process The assigned modifiers will be available when the product is added to an order ...

Страница 151: ... download a template file and enter the product data as needed When you have finished entering products into the template you can upload the file to Merchant Center Detailed instructions for importing products are available using the Import Product Instructions link on the screen Import Products Page Upload the selected file Access and download instructions on importing products Browse for a file ...

Отзывы: