


10
PAW5502-V, PAW5504-V, PAW5506-V
7. USO DEL SISTEMA
Dopo aver eff ettuato tutte le connessioni, rispettando le indicazioni
riportate nel capitolo relativo del manuale, una volta chiusa la porta
dell’armadio il display si illumina e visualizza il pannello del Menu
MUSIC, dal quale è possibile accedere alla schermata principale di
selezione menu premendo il tasto ‘Main menu’.
Se il sistema è al primo utilizzo, o sono state apportate modifi che alla
confi gurazione, procedere con le indicazioni riportate nella sezione
CONFIGURAZIONE DELL’IMPIANTO; se invece la procedura di
inizializzazione è già stata completata, continuare con le indicazioni
di utilizzo riportate nelle sezioni successive.
•
Per il normale utilizzo
di diff usione sonora musicale e annunci
microfonici gli utenti possono limitarsi ai menu
MUSIC
e
AUDIO
SETTING
.
•
Per la gestione in condizione di guasto/emergenza
e la confi gu-
razione utilizzando funzioni avanzate, consultare i successivi Menu
INSPECTION
,
OPERATOR
e
CONFIGURATION
.
• Per l’invio di messaggi d’emergenza consultare la sezione
EMERGENZA MANUALE
.
7.
USING THE SYSTEM
After making all the connections, observing the indications provided in
the relevant chapter, and once the door of the cabinet has been closed,
the display lights up and shows the panel of the MUSIC Menu, from
which it is possible, by pressing the ‘Main Menu’ key, to access the main
screen for selecting the menus.
If the system is being used for the fi rst time, or if changes have
been made to its confi guration, proceed as indicated in the
CONFIGURATION OF THE SYSTEM section. If, on the other hand, the
initialisation procedure has already been completed, continue with
the indications for use as provided below.
•
For normal use
for broadcasting music and microphone
announcements, users may limit their activities to the MUSIC and
AUDIO SETTING menus.
•
For management in faulty/emergency conditions
and for confi gu-
ration using advanced functions, see the INSPECTION, OPERATOR
and CONFIGURATION menus below.
• For sending emergency messages, see the
MANUAL EMERGENCY
section.
7.1 CONFIGURAZIONE
DELL’IMPIANTO
Le operazioni di confi gurazione devono essere eff ettuate da personale
qualifi cato ed adeguatamente addestrato a tale scopo.
A)
PASSWORD
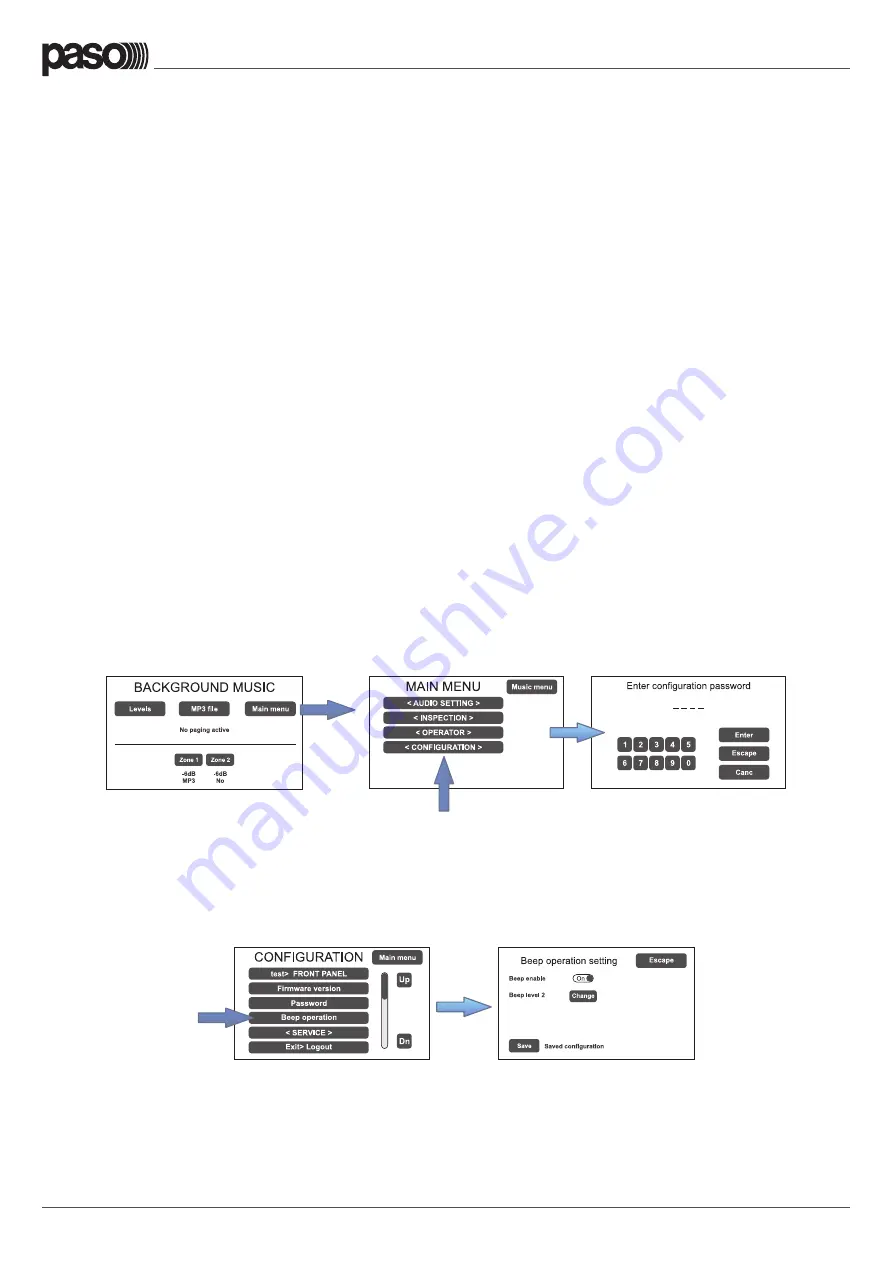
Dal MUSIC MENU passare al MAIN MENU e selezionare la voce <
CONFIGURATION >: se la restrizione d’accesso con password è abilitata,
apparirà la schermata ‘Enter confi guration password’. Digitare il codice
a 4 cifre della password e confermare premendo ‘Enter’ (per default di
fabbrica, la password è 3333.
7.1 CONFIGURATION OF THE SYSTEM
Confi guration activities may be carried out only by qualifi ed personnel,
suitably trained for this purpose.
A)
PASSWORD
From the MUSIC MENU, go to the MAIN MENU and select <
CONFIGURATION >. If access only with a password is enabled, ‘Enter
confi guration password’ will appear on the screen. Enter the 4-digit
code of the password and confi rm by pressing ‘Enter’ (the factory
default password is 3333.
B)
SILENZIAMENTO BEEP
Durante la procedura di inizializzazione, è possibile che si verifi chino
condizioni di guasto, causate dalle diff erenze tra la confi gurazione
dell’impianto collegato ed i valori impostati di default. Per silenziare
temporaneamente il tono di segnalazione acustica (beep) scorrere
verso il basso il menu CONFIGURATION e selezionare la voce ‘Beep
operation’.
B)
MUTING THE BEEP
During the initialisation process, it is possible that faults may be
detected due to diff erences between the confi guration of the system
being connected and the values set by default. To mute the acoustic
signal (beep) temporarily, browse down through the CONFIGURATION
menu and select the item ‘Beep operation’.
Nella schermata ‘Beep operation setting’, spostare la slider della
voce Beep enable in posizione ‘Off ’. Premere su ‘Save’ per salvare
l’impostazione.
!
IMPORTANTE Per conformità alle normative, prima di mettere
in funzionamento normale l’apparecchio è necessario abilitare la
segnalazione acustica riportando ‘Beep enable’ in posizione ‘On’.
In the ‘Beep operation setting’ window, move the ‘Beep enable’
slider to ‘Off ’. Press ‘Save’ to save this setting.
!
N.B.: In order to comply with regulations, before returning the
equipment to its normal operation it is necessary to enable the acou-
stic signalling by returning the ‘Beep enable’ slider to its ‘On’ position.


