


(17) When the Frequencies page is first selected there will be one default frequency shown. If this
frequency is required leave it as it is; if not, click in the frequency box and change the
frequency to that required.
Note …
Enter frequencies in ICAO format. The software recognizes the frequency and
appropriate channel spacing (Width). There is no need to manually enter the channel
spacing. The ICAO format is illustrated on page 27.
(18) If the frequency is required to be included in the Priority list, key in Y in the priority column. If
not required, ensure the column reads No.
(19) If the frequency is required to be included in a Scan group, enter the scan group number
(between 1 and 15) in the scan group column. If the frequency is to be included in more than
one scan group, enter the group numbers, separating each with a comma. Note that up to 15
frequencies can be included in each scan group.
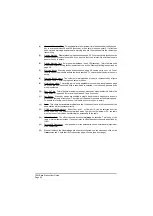
(20) The Tx inhibit facility must now be set for the frequency. This facility determines when the
radio can transmit. Three options are allowed:
q
Never. Key in N. This means the inhibit function is never enabled. The transmitter can be
keyed at any time, including at times when the channel is busy.
q
Busy. Key in B. This means the inhibit function is enabled when the channel is busy. The
transmitter can however be keyed at all other times.
q
Always. Key in A. This means the inhibit function is always enabled. The channel is
therefore ‘receive only’ and the transmitter can never be keyed.
(21) If the Channel String option was selected from the General page, descriptive text (maximum
of 16 characters) can be keyed into the Identity column.
(22) One frequency channel entry is now complete. Further channels can be entered in the same
way by clicking on the Add channel box. To delete any entered channel, highlight the
frequency and click on the Delete channel box. When all the required frequency channels
have been entered, click on the ‘Verify and sort the table’ box. Any errors made when
compiling the frequencies page are automatically identified to the user.
T6M Base Station User Guide
Page 43
Frequencies Page
Содержание T6M
Страница 1: ...T6M Base Station User Guide Handbook Part Number 31 360T6MBS...
Страница 12: ...Intentionally Blank T6M Base Station User Guide Page 12...
Страница 16: ...Intentionally Blank T6M Base Station User Guide Page 16...
Страница 48: ...Intentionally Blank T6M Base Station User Guide Page 48...
Страница 56: ...Intentionally Blank T6M Base Station User Guide Page 56...
Страница 58: ...Intentionally Blank T6M Base Station User Guide Page 58...
Страница 59: ...BT6MBS 01 Front and Rear Layout Figure 1...
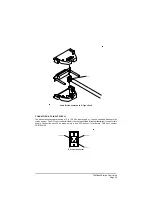
Страница 60: ...BT6MBS 13 Rack Mounted Version Figure 2...
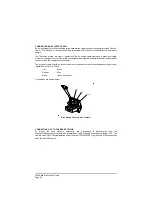
Страница 61: ...GA10642 Iss 1 Key to Front Panel Controls Figure 3 For description of controls see text in chapter 3...
Страница 62: ...BT6MBS 11 External Connection Diagram Figure 4...
Страница 63: ...BT6MBS 10 Enclosure Securing Detail Figure 5...
Страница 64: ...Base Station Block Diagram Figure 6 GA10547 Iss 3...
Страница 65: ...Base Station Interconnection Diagram Figure 7 GA10548 Iss 3...
Страница 66: ...Base Station Layout Diagram Figure 8 GA10719 Iss 1...
Страница 69: ...Interface PCB Layout Diagram Figure 11 GA10751 Iss 1...
Страница 70: ...BT6MBS 12 1 Cable Termination at the N Type Connector Figure 12...