


44
eFlow
®
rapid
- 03/12
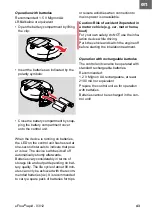
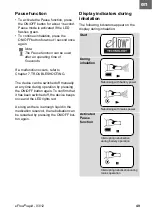
Assembling the nebuliser
handset
• To open the medication reservoir (
5
)
and aerosol chamber (
5a
), gently raise
the locking clip on the reservoir.
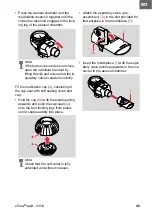
• Grasp the engaging hook on the side of
the aerosol head (
3
) - do not touch the
membrane in the middle - and insert the
two metal connectors in the slots on the
medication reservoir:
• Place the inspiratory valve (
6
) flat
against the rim of the aerosol
chamber (
5a
):
Note:
Check the parts of your nebuliser
handset before every application.
Replace all broken, misshapen and
heavily discoloured parts. Please also
follow the instructions for assembly
given below. Damaged parts and in-
correctly assembled nebuliser hand-
sets can impair the function of the
nebuliser handset and thus also affect
the treatment.
Note:
The medication reservoir and
aerosol chamber are already pre-
assembled and must not be sepa-
rated at the hinged joint (danger of
breakage).
5
5a
Note:
The aerosol head must snap into
place. Please ensure that the aero-
sol head is fitted the right way
round.
Note:
Ensure that the valve is inserted in
the right direction! The inspiratory
valve must lie flat against the aero-
sol chamber and both valve wings
must be flush.
3
6
5a
Содержание eflowrapid 178G1005
Страница 1: ...Gebrauchsanweisung Instructions for Use nebuliser system...
Страница 6: ...2 eFlow rapid 03 12...
Страница 38: ...34 eFlow rapid 03 12...
Страница 70: ...66 eFlow rapid 03 12...
Страница 102: ...98 eFlow rapid 03 12...
Страница 134: ...130 eFlow rapid 03 12...
Страница 166: ...162 eFlow rapid 03 12...
Страница 198: ...194 eFlow rapid 03 12...
Страница 230: ...226 eFlow rapid 03 12...
Страница 262: ...258 eFlow rapid 03 12...
Страница 294: ...290 eFlow rapid 03 12...
Страница 329: ......