62
3.7 What Mode Detect Does
In the Mode Detect menu, you decide which of several actions are automatic or manual, and what
types of messages will appear on the screen.
The Panther must know what type of source picture
it is displaying: SXGA, UXGA, and others for com-
puter sources; NTSC, PAL, SECAM for video sources.
This is the mode, the type of source picture the Pan-
ther will use. If the mode does not match the actual
source picture, the image will be very distorted or
may not display at all.
To choose the mode automatically
• Press Auto Setup on the remote.
• In the Source Select menu, select Find Mode and
press
ENTER
.
• Set Auto Detect on in the Mode Detect menu.
Whenever the resolution changes, Find Mode
starts and settles on the new one.
To choose the mode manually, select Mode in the
Source Select menu and press +/– until the right
mode appears.
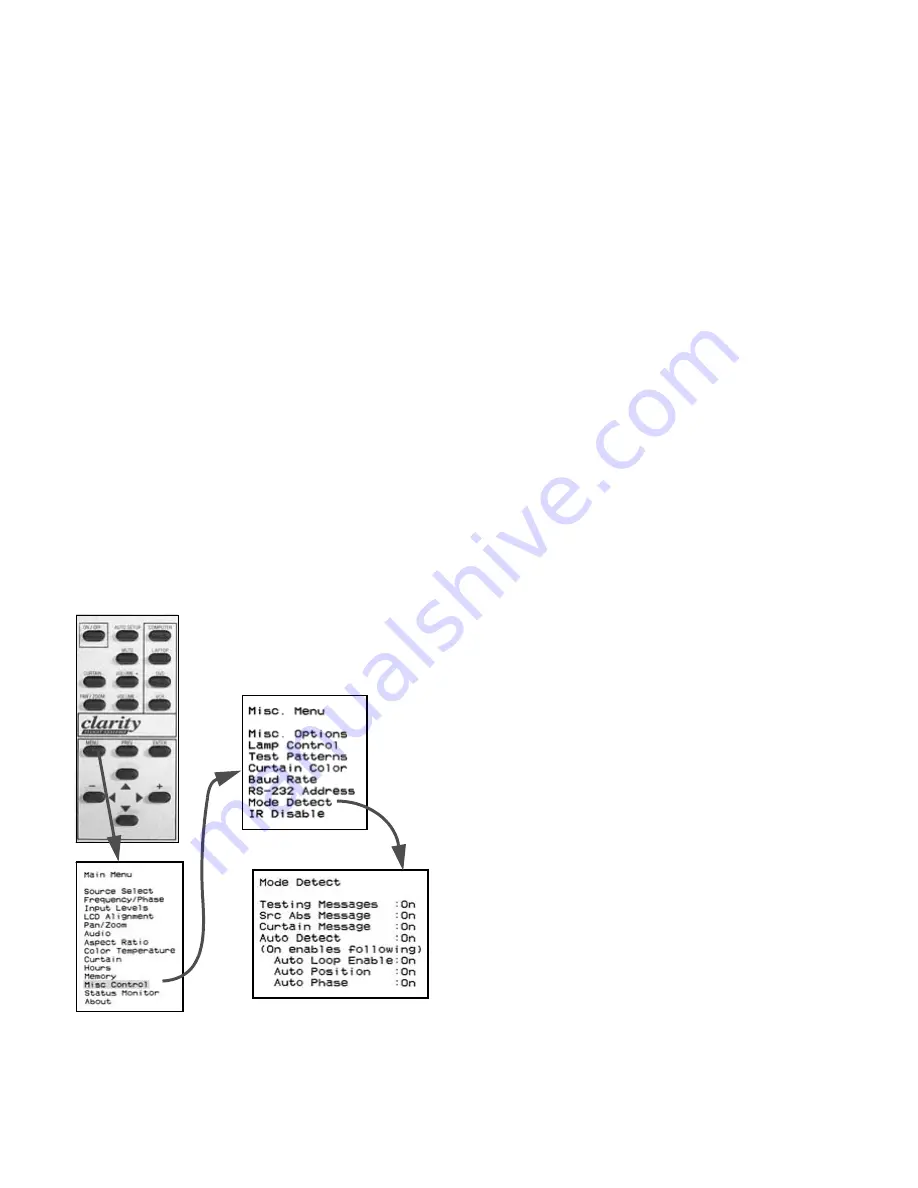
To open the Mode Detect menu, press
MENU
> Misc
Control > Mode Detect.
Auto Detect On
When the source mode changes, for instance from
UXGA to XGA, the Mode Detect process starts. If the
Panther is successful in finding the mode, then
• if Auto Phase is On, phase is automatically set;
• if Auto Position in on, the pixel in the upper left
corner of the picture is put in the upper left corner
of the LCD.
If Auto Loop Enable is On, and the Panther cannot
find the mode on the first try, it will keep testing and
testing until it is successful.
Auto Detect Off
The items below Auto Detect are grayed out when
Auto Detect is off. If the mode changes, the Panther
does not look for a new mode. However, when you
press
AUTO
SETUP
or select and start Find Mode, Auto
Detect goes through the mode search process once.
If Freq/Phase or Position are On, these automatic
systems will occur, even though they are grayed out in
the Mode Detect menu. However,
AUTO
SETUP
and
Find Mode make it happen only once, even if Auto
Loop Enable is On.
Messages
If Testing Messages is on, a message appears let-
ting you know what is happening during Auto Detect:
• Testing H/V (separate H & V sync)
• Testing CMP (composite sync)
• Testing SOG (sync on green).
If Src Abs Message is on, a sign saying, ‘Source
Absent’ appears on the screen whenever there is no
source on the selected connector. This message turns
off after 30 seconds.
When Curtain Message is on, a Curtain sign
appears whenever you turn on the User Curtain. This
message covers up either of the other messages.
Lack of a valid source will also turn on the source
absent Curtain. The default color is black, but you
can change this in the Curtain menu. (See “Curtain
and Its Colors” on page 86.)
Содержание PN-6730-UXP
Страница 1: ...Panther PN 6730 UXP PN 6740 UXP Guide User ...
Страница 2: ......
Страница 3: ...i PN 6730 UXP PN 6740 UXP Panther 67 Display Unit User s Guide 070 0097 01 5 February 2003 ...
Страница 6: ...iv ...
Страница 9: ...vii ...
Страница 10: ...viii ...
Страница 11: ...1 1 About the Panther 1 1 Questions About the Panther 2 1 2 Your Personal Safety Is Important 4 ...
Страница 15: ...5 ...
Страница 16: ...6 ...
Страница 23: ...13 ...
Страница 25: ...15 AC Master switch AC power in ...
Страница 37: ...27 ...
Страница 42: ...32 ...
Страница 61: ...51 ...
Страница 63: ...53 ...
Страница 67: ...57 ...
Страница 79: ...69 ...
Страница 81: ...71 ...
Страница 82: ...72 ...
Страница 85: ...75 ...
Страница 87: ...77 Volume buttons are beneath the panel Volume up Volume down ...
Страница 91: ...81 ...
Страница 93: ...83 ...
Страница 95: ...85 ...
Страница 97: ...87 Turns on or off the User curtain immediately without showing a menu ...
Страница 99: ...89 ...
Страница 100: ...90 ...
Страница 103: ...93 ...
Страница 113: ...103 ...
Страница 121: ...111 ...
Страница 127: ...117 Arrow points to the serial number Serial number sticker showing location of the serial number ...
Страница 128: ...118 ...
Страница 135: ...125 ...
Страница 138: ...128 ...
Страница 142: ...132 Pan Zoomfor details see page 56 In the Pan Zoom menu use ENTER to move the cursor Audiofor details see page 40 ...
Страница 143: ...133 Aspect Ratiofor details see page 56 Color Temperaturefor details see page 52 ...
Страница 145: ...135 Savefor details see page 66 Recallfor details see page 68 Delete for details see page 70 ...
Страница 146: ...136 Misc Controlfor details see page 84 ...
Страница 147: ...137 Status Monitorfor details see page 80 ...
Страница 149: ...139 ...
Страница 153: ...143 ...
Страница 157: ...147 ...
Страница 159: ...149 ...
Страница 163: ...153 ...
Страница 164: ...154 ...
Страница 174: ...164 ...
Страница 175: ...165 ...


