


34
Front Oil Seal Replacement Procedure
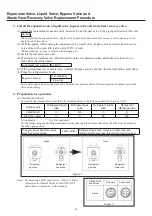
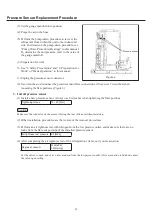
6. Install the front cover oil seal (Figure 3)
(1) Coat around the lip part of the new seal with a
small amount of engine oil.
(2) Insert the new seal partially by hand.
(3) Use a pipe of suitable diameter to carefully press
in the oil seal until its foremost surface is even
with the foremost surface of the front cover while
making sure the oil seal enters uniformly and is not
slanted.
Reference
The oil seal outer diameter is 110 mm.
7. Install the crank pulley.
(1) Set cylinder no. 1 at the top dead centre, and install
the pulley so that the mark (orange) at the top of the
crank pulley is aligned with the timing pin on the
front cover.
Bolt (width across
À
at)
12 [mm]
Tightening torque
19.6 [N·m]
Caution
The pitch is different only for the hole marked with a
.
Reference
Use a ratchet or the like in the crank pulley hole (Figure
4) to turn the crank pulley.
* Do not use any other part to forcibly turn the pulley.
8. Install the compressor drive belt.
For details on the procedure for installing the compressor
drive belt, see “Compressor Replacement Procedure” in this
manual.
9. Preparation for operation
(1) Turn on the power supply circuit breaker for the
outdoor unit.
(2) Open the main gas valve, starting the fuel supply.
(3) Set the STOP SW (S001) from STOP to NORM.
(Figure 5)
Figure
.3
Figure
.4
Front cover timing pin
Cast mark
Cross-section
Crank pulley top mark (orange)
Figure
.5
GHP̲Main̲Parts̲Replacement.indd 34
2012/07/31 17:54:28


