63
Compressor Replacement Procedure
5. Install the compressor
Before installing the compressor, pour the same amount of new refrigeration oil inside the new compressor as the
amount of refrigeration oil that is in the removed compressor.
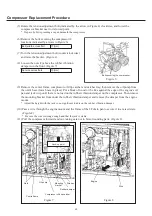
(1) Set the compressor under the engine, turn the tension adjustment bolt (Figure 4) clockwise, lower the
bracket and tighten the bolts securing the compressor (4 bolts). (Figure 6)
Bolt (width across
À
at)
17 [mm]
Tightening torque
37.3 - 44.1 [N·m]
(2) Temporarily position the rubber vibration damper on the engine mount and then, after installing the
mounting bracket on the unit base, mount the vibration damper on the mounting bracket. (Figure 7)
* Screw in the bolts and nuts
¿
nger-tight until the jack is lowered.
(3) Remove the wire holding up the engine and then carefully and slowly lower the engine.
(4) Tighten each of the bolts/nuts in the order of
c
unit base and mounting bracket
ĺ
d
mounting bracket
and vibration damper
ĺ
e
vibration damper and engine mount.
* Once the unit base and mounting bracket bolts are tightened, gently rock the engine itself a number of times
and make sure there is no signi
¿
cant strain on the vibration damper before fastening the vibration damper to
the mounting bracket.
c
Unit base and mounting bracket
Bolt (width across
À
at)
6 [mm]
Tightening torque
26 to 29.5 [N·m]
d
Mounting bracket and vibration damper
Bolt (width across
À
at)
17 [mm]
Tightening torque
14 to 19 [N·m]
e
Vibration damper and engine mount
Nut size across
À
ats
19 [mm]
Tightening torque
25 to30 [N·m]
(5) Install the center frame, compressor oil drip catcher, drip tray and oil pump. (Figure 7)
(6) Rotate the tension adjustment bolt (indicated by the arrow in Figure 4) anticlockwise, and raise the
compressor.
Bolt (width across
À
at)
19 [mm]
(7) Tighten the bolts (
~
ེ
) indicated by arrows in Figure 5.
Bolt (width across
À
at)
10 [mm]
Tightening torque
11.8 to 14.7 [N·m]
GHP̲Main̲Parts̲Replacement.indd 63
2012/07/31 17:54:39

