background image

39

RQT8672

After performing steps 1–3 (

38)

§

 Multiple editing is possible.

After performing steps 1–5 (

38)

§

 Multiple editing is possible.

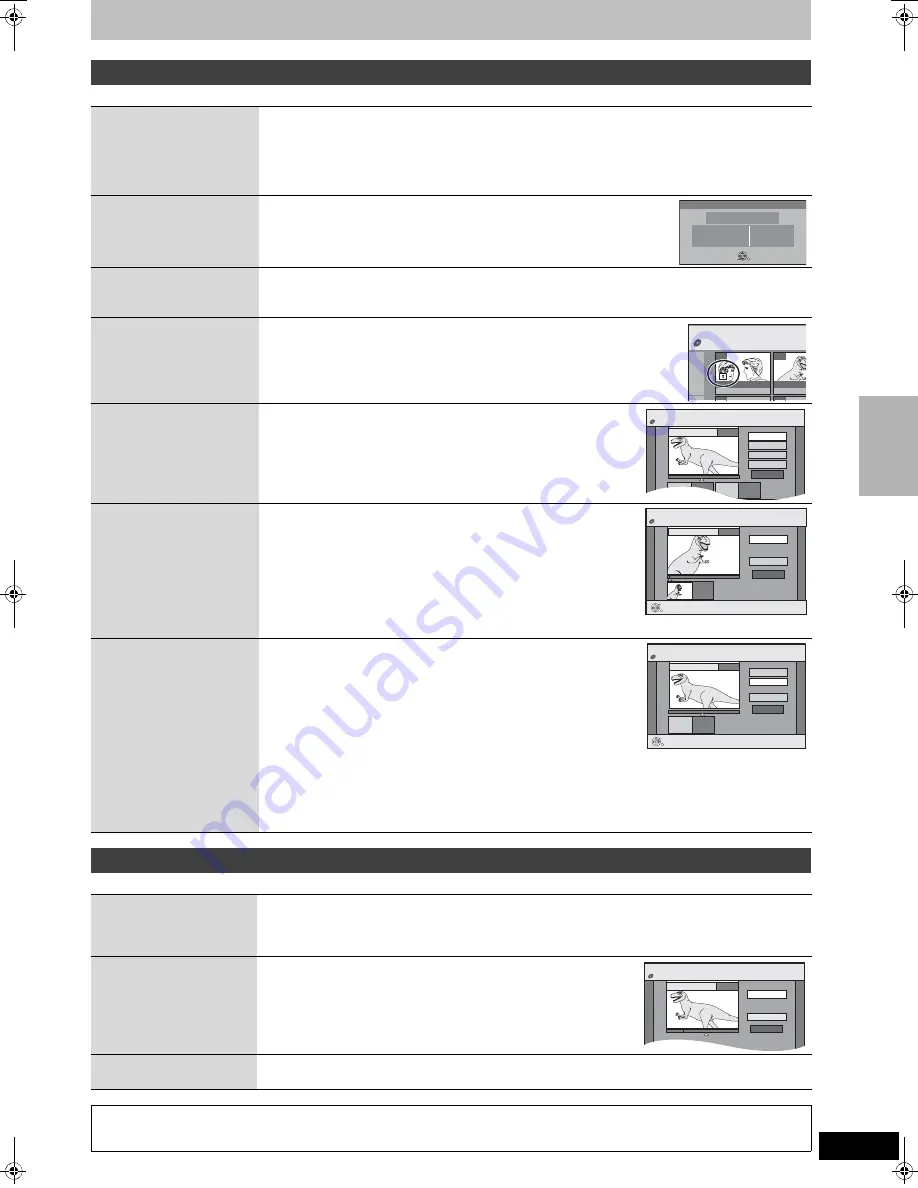
Title operations

Delete

§

[RAM] [-R] [-R]DL]


[-RW‹V›]

[+R]


[+R]DL]


[+RW]

Press [

2

,

1

] to select “Delete” and press [ENTER].

Once deleted, the recorded contents are lost and cannot be restored.

 Make certain before 

proceeding.

[-R] [-R]DL]


[+R]


[+R]DL] 

The available recording time on a disc does not increase when you delete titles.

[-RW‹V›]


[+RW]

 Available recording space on a disc increases only when the last recorded title is 

deleted. It does not increase if other titles are deleted.

Properties

[RAM] [-R] [-R]DL]


[-RW‹V›]

[+R]


[+R]DL]


[+RW]


[-RW‹VR›]

Information (e.g. time and date) is shown.

Press [ENTER] to exit the screen.

Enter Name

[RAM] [-R] [-R]DL]


[-RW‹V›]

[+R]


[+R]DL]


[+RW]

You can give names to recorded titles.

43, Entering text

Set up Protection

§

Cancel Protection

§

[RAM] [+R]


[+R]DL]


[+RW]

If set, this will protect the title from accidental deletion.

Press [

2

,

1

] to select “Yes” and press [ENTER].

The lock symbol appears when the title is protected.

When the title is protected, some items cannot be accessed. Release 
the protection to access the inaccessible items.

Partial Delete

[RAM]

(

below, “For your 

reference”)

You can remove unnecessary part of the recording.

1

Press [ENTER] at the start point and end point of the 
section you want to delete.

2

Press [

3

,

4

] to select “Exit” and press [ENTER].

Select “Next” and press [ENTER] to delete other sections.

3

Press [

2

,

1

] to select “Delete” and press [ENTER].

Change Thumbnail

[RAM] [-R] [-R]DL]


[-RW‹V›]

[+R]


[+R]DL]


[+RW]

(

below, “For your 

reference”)

You can change the image to be shown as the thumbnail picture in 
the Title View.

1

Press [

1

] (PLAY) to start play.

2

Press [ENTER] when the image you want to use as a 
thumbnail is shown.

To change the thumbnail

Restart play and press [

3

,

4

] to select “Change”, then press 

[ENTER] at the point you want to use as the thumbnail.

3

Press [

3

,

4

] to select “Exit” and press [ENTER].

Divide Title

[RAM]

(

below, “For your 

reference”)

You can divide a title into two. 

1

Press [ENTER] at the point you want to divide the title.

2

Press [

3

,

4

] to select “Exit” and press [ENTER].

3

Press [

2

,

1

] to select “Divide” and press [ENTER].

To confirm the division point

Press [

3

,

4

] to select “Preview” and press [ENTER]. (The unit 

plays 10 seconds before and after the division point.)

To change the division point

Restart play and press [

3

,

4

] to select “Divide”, then press [ENTER] at the point you want to divide.

[Note]

The divided titles retain the title name and CPRM property (

65) of the original title.

Video and audio just before and after the dividing point may momentarily be cut out. Carry out 
the title division after checking it with “Preview” (

 above).

Properties

No.

Name

Date

26

BBC1

11/10/2006

Time

Rec time

12:19

0:30 (SP)

MON

Dinosaur

ENTER

RETURN

DIRECT NAVIGATOR

Title Vie

BBC1 10/10 FRI 

BBC1 11/10

07

0

8

- - -

- - -

      DVD-RAM

DIRECT NAVIGATOR

Partial Delete

Start

Next

Exit

0:43.21

PLAY

0

8

End

- -:- -.- -

- -:- -.- -

Start

End

      DVD-RAM

DIRECT NAVIGATOR Change Thumbnail

Change

Exit

0:00.00

- -:- -.- -

Change

;

0

8

ENTER

RETURN

Start play and select the image

of a thumbnail.

      DVD-RAM

DIRECT NAVIGATOR

Divide Title

Preview

Exit

0:43.21

PLAY

0

8

Divide

- -:- -.- -

Divide

ENTER

RETURN

      DVD-RAM

Chapter operations

Delete Chapter

§

[RAM]

Press [

2

,

1

] to select “Delete” and press [ENTER].

Once deleted, the recorded contents are lost and cannot be restored.

 Make certain before proceeding.

To delete only the chapter dividing point use “Combine Chapters” (

below). The recorded contents are not 

deleted.

Create Chapter

[RAM]

(

below, “For your 

reference”)

Select the point where you want to start a new chapter while 
viewing the title.

1

Press [ENTER] at the point you want to divide.

Repeat this step to divide at other points.

2

Press [

3

,

4

] to select “Exit” and press [ENTER]. 

Combine Chapters

[RAM]

Press [

2

,

1

] to select “Combine” and press [ENTER].

The selected chapter and following chapter are combined.

For your reference

Use search or Time Slip (

31), to find the desired point.

To skip to the start or end of a title, press [

:

] (start) or [

9

] (end).

DIRECT NAVIGATOR

Create Chapter

Create

Exit

0:43.21

PLAY

0

8

      DVD-RAM

Ed

it

in

g

 t

it

les

/c

h

a

p

ter

s

RT70-30.book  Page 39  Thursday, April 13, 2006  1:45 PM

Содержание SC-RT30

Страница 1: ...rating or adjusting this product please read the instructions completely Please keep this manual for future reference These operating instructions are applicable to the following system About descriptions in these operating instructions These operating instructions are applicable to models SC RT30 and SC RT70 Unless otherwise indicated illustrations in these operating instructions are of SC RT30 R...

Страница 2: ...ns below Illustrations may differ from actual AC mains plug 1 Open the fuse cover with a screwdriver 2 Replace the fuse and close or attach the fuse cover CAUTION IF THE FITTED MOULDED PLUG IS UNSUITABLE FOR THE SOCKET OUTLET IN YOUR HOME THEN THE FUSE SHOULD BE REMOVED AND THE PLUG CUT OFF AND DISPOSED OF SAFELY THERE IS A DANGER OF SEVERE ELECTRICAL SHOCK IF THE CUT OFF PLUG IS INSERTED INTO ANY...

Страница 3: ... 36 Deleting titles 37 Using DELETE Navigator to delete titles 37 Deleting titles during play 37 Editing titles chapters 38 Editing titles chapters and playing chapters 38 Title operations 39 Chapter operations 39 Creating editing and playing playlists 40 Creating playlists 40 Editing and playing playlists chapters 41 Playlist operations 41 Chapter operations 41 Copying from a video cassette recor...

Страница 4: ...ge alkaline or manganese batteries Do not use batteries if the covering has been peeled off Mishandling of batteries can cause electrolyte leakage which can damage items the fluid contacts and may cause a fire Remove the batteries if the remote control is not going to be used for a long period of time Store in a cool dark place Use Accessories 1 Remote control RT30 EUR7662Y20 RT70 EUR7662YA0 2 Bat...

Страница 5: ...DEO Plus VIDEO Plus A 9 8 7 6 5 4 3 2 1 U T S R Q P O N M L K J I H G F E D C B 1 Turn the unit on 2 Select the source DVD FM AM AUX F MUSICP 3 Select channels and title numbers etc Enter numbers 4 Cancel 5 Basic operations for recording and play 6 Skip the specified time 31 7 Selection 3 4 2 1 Enter Frame by frame 2 1 31 8 Show Direct Navigator Top menu 30 32 38 9 Show sub menu 38 Show on screen ...

Страница 6: ...ayer discs To record onto the second layer you must first close the first layer using the Close First Layer item in DVD Management 45 You will no longer be able to record to the first layer after you do this 22 When playing a title recorded on both layers video and audio may momentarily cut out when the unit is switching layers 2 You may not be able to use R recorded on this unit in another Panaso...

Страница 7: ...hese instructions DVD V DVD A RW VR Logo Instructions High quality movie and music discs High fidelity music discs DVD RW recorded on another DVD Recorder 1 You can play programmes that allow One time only recording if they have been recorded to a CPRM compatible disc By formatting 44 the disc you can record to it in DVD Video format It may be necessary to finalize the disc on the equipment used f...

Страница 8: ...wall mount refer to page 17 1 Attach the stand to the base 1Thread the speaker cable through the base For quicker threading loosely fold the cable in half do not crease pass the folded portion through the hole and then pull the rest of the cable through the base 2Attach the stand to the base while gently pulling on the end of the speaker cable 2 Secure the stand to the base 2 Front and 2 Surround ...

Страница 9: ...ush To prevent the speaker from falling over thread the string not included from the wall to the speaker as shown and tie tightly Rear of the speaker Screw eye not included Wall Approx 150 mm String not included STEP 1 Front and surround speaker assembly RT70 Preparation Attach screw eyes not included to secure the speakers to the wall diagram right You will need to obtain the appropriate screw ey...

Страница 10: ...or proper ventilation and to maintain good airflow around this unit position it with enough space on all sides Do not block the ventilation holes of this unit Do not set anything on top of this unit Subwoofer Place to the right or left of the television on the floor so that it won t cause vibration Leave about 30 cm from the television Center speaker Vibration caused by the center speaker can disr...

Страница 11: ...on 2 1 4 5 6 SURROUND Lch SURROUND Lch 1 2 Insert the speaker cables into the terminals in accordance with the stickers you just attached and the diagram below Speaker cable sticker Insert the wire fully Blue _ White Insert the wire fully _ White Blue Attach the speaker cable stickers included to speaker cables to make connection easier Caution Blue White Be careful not to cross short circuit or r...

Страница 12: ...ng the unit to a Q Link compatible television 57 You can enjoy high quality viewing by connecting the unit to an RGB compatible television Required setting AV1 Output in the Setup menu 51 2 RF coaxial leads black Included parts to be used This unit 1 RF coaxial lead grey 3 TV AV1 EXT AV2 VHF UHF RF IN AV 3 1 1 2 Television s rear panel RF coaxial lead included black Fully wired 21 pin Scart lead F...

Страница 13: ...rrestrial programmes Refer to Recording from a satellite digital terrestrial receiver 29 Connecting a terminal other than the 21 pin Scart terminal 15 3 TV AV1 EXT AV2 VHF UHF RF IN AV RF IN RF OUT AV OUT 4 3 5 2 1 To the aerial RF coaxial lead included black Fully wired 21 pin Scart lead For Q Link functions not included Satellite Digital terrestrial receiver s rear panel RF coaxial lead included...

Страница 14: ... RF OUT AV OUT 5 4 3 2 1 To the aerial RF coaxial lead included black Fully wired 21 pin Scart lead For Q Link functions not included VCR s rear panel RF coaxial lead included grey RF coaxial lead included black Fully wired 21 pin Scart lead For External Link function not included Television s rear panel Back of this unit Connect the unit directly to the television Video signals fed through video ...

Страница 15: ...er interlace or progressive output 65 and provide a purer picture than the S VIDEO OUT terminal Connect to terminals of the same colour If you have a regular television CRT cathode ray tube Use component output with progressive Off Factory setting 51 even if it is progressive compatible because progressive output can cause some flickering This is the same for multi system televisions using PAL mod...

Страница 16: ...nt Also do not use cords for other equipment with this unit Included parts to be used AM loop aerial FM indoor aerial AC mains lead 4 5 Push up Insert the aerialcables fully Black White Red Loosen the terminal with a Phillips head screwdriver Tighten the terminal screw again Back of this unit Adhesive tape Click FM indoor aerial Affix this end of the aerial where reception is best Use FM outdoor a...

Страница 17: ... and the distance between screws as shown in the diagram The stands must be able to support over 10 kg The stands must be stable even if the speakers are in a high position Attaching to a wall RT70 Preparation for the front and surround speakers 1 Removing the speaker cable from the stand 2 Attach the cover plate to the speaker The speakers are shipped with the cover plate attached 3 Connect the s...

Страница 18: ...number 7 Press 2 1 to select Yes and press ENTER The cursor moves to Name 8 Press 1 9 Press 3 4 to select a letter and then press 1 to move to next character Repeat this to enter the name 10 Press ENTER to store the name 11 Press 4 and 1 and then repeat steps 9 10 to enter and store House No and Postcode 12 Press RETURN The Owner ID settings screen disappears To abort Auto Setup Press RETURN If th...

Страница 19: ... will appear in the Name column 4 Press 3 4 to select the channel or AV input that is to be used for recording from the satellite station 5 Press ENTER 6 Press 3 4 to select the programme that you have just set and press to delete it from the timer recording list It is no longer needed Repeat the steps above until you have set dummy timer recordings for each of the satellite stations that you will...

Страница 20: ...t Setup and press ENTER 4 Press 3 4 to select Connection and press 1 5 Press 3 4 to select AV1 Output and press ENTER 6 Press 3 4 to select Video with component or S Video with component and press ENTER Set according to the signal and terminal of the connected TV 7 Press 3 4 to select Progressive and press ENTER 8 Press 3 4 to select On and press ENTER Output becomes progressive Note When connecte...

Страница 21: ...he following indicator appears on the unit s display e g Display Press and hold ENTER and the indicated number button at the same time for more than 2 seconds Note Executing Shipping Condition in the Setup menu returns this unit code to DVD 1 Change the remote control code to 1 step 7 To return to the previous screen Press RETURN To exit the screen Press RETURN several times Television operation e...

Страница 22: ...cessary to finalize DVD R etc on this unit after recording or copying titles to them You can then play them as a commercially sold DVD Video However the discs become play only and you can no longer record or copy You can record and copy again if you format DVD RW RW To enable play on other DVD equipment please use Create Top Menu in DVD Management menu 45 Recording to DVD R DL and R DL R DL R DL D...

Страница 23: ...y menu select select Disc Name 44 or Auto Play Select 45 in DVD Management before finalizing When opening the tray without disc finalization Press OPEN CLOSE on this unit Recording modes and approximate recording times Recording Mode DVD RAM DVD R DVD RW R RW 4 7GB 4 7 GB 9 4 GB Double sided 1 XP High picture quality recording 1 h 2 h 1h SP Standard recording 2 h 4 h 2h LP Long recording 4 h 8 h 4...

Страница 24: ... the channel or recording mode while paused however the recording will then be as a separate title You can record while the unit is in standby for timer recording but once the time for the timer recording to begin is reached any recording taking place will stop and the timer recording will begin RAM You can change the audio being received by pressing AUDIO during recording This does not affect the...

Страница 25: ...T NAVIGATOR during recording 2 Press 3 4 2 1 to select a title and press ENTER To stop play Press To exit the Direct Navigator screen Press DIRECT NAVIGATOR To stop recording 1 Press to stop playing 2 Press DIRECT NAVIGATOR to exit screen 3 Press To stop timer recording 1 Press to stop playing 2 Press DIRECT NAVIGATOR to exit screen 3 Press 4 Press 2 1 to select Stop Recording and press ENTER You ...

Страница 26: ...not set timer recording Press 3 4 to select desired programme position After you have entered the information of a TV station it is kept in the unit s memory You can also press REC MODE to change the recording mode To enter programme name Press 2 1 to select Programme Name and press ENTER 43 4 Press ENTER The settings are stored and the programme goes to timer recording standby The timer icon is d...

Страница 27: ...ng or when playing If the unit is turned on when timer recording begins it remains turned on after recording finishes It does not turn off automatically You can turn the unit off during timer recording If the unit is not put in the timer recording standby mode at the last 10 minutes before the programmed timer recording starting time the F flashes on the unit s display In this case insert a record...

Страница 28: ... to each other RAM To divide the titles go to Divide Title 39 Check change or delete a programme Making timer recordings on the television e g of digital broadcasts Timer Recording RETURN ENTER Press ENTER to store new programme Mode Stop Start No Date Name Drive space SP OK 20 00 19 00 BBC1 15 7TUE 01 NewTimer Programme 1 58 SP Remain 12 53 00 15 7 TUE Icons F Timer recording standby is activated...

Страница 29: ...tivated To cancel the external control Press EXT LINK to stop recording or to cancel linked timer recording standby In order to prevent accidental operation press EXT LINK to cancel the setting after recording is finished Note EXT LINK will function even when the unit is in standby mode if the DVD drive is selected In the following situations EXT LINK will not function FM AM or F MUSICP is selecte...

Страница 30: ...ect the title and press ENTER You can also select titles with the numbered buttons To show other pages Press 3 4 2 1 to select Previous or Next and press ENTER You can also press 9 to show other pages 6 Adjust the volume with _ j VOLUME To exit the screen Press DIRECT NAVIGATOR To change the sound quality 48 Direct Navigator screen icons Note RAM R R DL RW V R R DL RW The unit stops playing a disc...

Страница 31: ...aver is displayed on the television you can cancel PBC Elapsed play time appears on the unit s display Quick View RAM Press and hold 1 PLAY a1 3 Play speed is quicker than normal Press again to return to normal speed Slow motion RAM R R DL RW V R R DL RW DVD V DVD A Motion picture parts only RW VR VCD While paused press 6 or 5 The speed increases up to 5 steps Press 1 PLAY to restart play VCD Forw...

Страница 32: ...s is cleared when you turn the unit off or remove the disc To display the previous or next still picture during play JPEG Press 2 1 To return to the previous screen Press RETURN To exit the screen Press DIRECT NAVIGATOR Selecting file type to play To select file type 9 DIRECT NAVIGATOR SUB MENU STATUS RETURN THEATER 3 4 2 1 ENTER DVD FUNCTIONS Numbered buttons Play mode is set to MP3 To play anoth...

Страница 33: ...ne by one with constant interval While the JPEG Menu is displayed 1 Press 3 4 2 1 to select Folder and press SUB MENU 2 Press 3 4 to select Start Slide Show and press ENTER To change the slide interval 1 In step 2 above press 3 4 to select Slide Interval and press ENTER 2 Press 2 1 to select the desired interval and press ENTER You can select a slide interval between 0 30 sec Rotate While playing ...

Страница 34: ...However depending on how you create the disc writing software play may not be in the order you numbered the folders When the highest level folders are DCIM folders they are displayed first on the tree Regarding MP3 and still pictures Playable discs DVD R CD R RW File format MP3 Files must have the extension mp3 or MP3 Maximum number of folders groups 300 including the root folder Maximum number of...

Страница 35: ...undtrack number 1 2 Subtitle DVD V DVD A Turn the subtitle on off and select the language below Language RAM R R DL RW V R R DL RW RW VR Only discs that contain subtitle on off information Subtitle on off information cannot be recorded using this unit VCD SVCD Turn the subtitle on off and select the subtitle number 1 4 Audio channel RAM RW VR VCD 30 Changing audio during play Angle DVD V DVD A Cha...

Страница 36: ... content is distorted as shown in the illustration to the right then select Auto When the tray is opened the setting will return to Auto When the output signal is NTSC Auto1 normal Auto2 Video Automatically detects the film and video content and appropriately converts it In addition to Auto1 automatically detects film contents with different frame rates and appropriately converts it Select when us...

Страница 37: ...l times 1 During playback of the title you want to delete Press DELETE 2 Press 2 1 to select Delete and press ENTER VIDEO Plus DVD 9 FUNCTIONS DELETE RETURN THEATER 3 4 2 1 ENTER The last recorded title Theavailable space The available disc space increases if any of these is deleted Title 1 Title 2 The available disc space does not increase if these are deleted When deleted the available disc spac...

Страница 38: ...it Step 5 To show other pages Multiple editing above 5 Press SUB MENU then press 3 4 to select the operation and press ENTER You can go back to Title View To return to the previous screen Press RETURN To exit the screen Press DIRECT NAVIGATOR Title Chapter Programmes are recorded as a single title consisting of one chapter RAM You can divide a title into multiple chapters Each section between the ...

Страница 39: ...our reference You can divide a title into two 1Press ENTER at the point you want to divide the title 2Press 3 4 to select Exit and press ENTER 3Press 2 1 to select Divide and press ENTER To confirm the division point Press 3 4 to select Preview and press ENTER The unit plays 10 seconds before and after the division point To change the division point Restart play and press 3 4 to select Divide then...

Страница 40: ...s Repeat steps 5 7 to add other chapters 8 Press RETURN All the selected scenes become the playlist To return to the previous screen Press RETURN To exit the screen Press RETURN several times You can arrange the chapters 38 to create a playlist Editing playlists doesn t modify the recorded data Playlists are not recorded separately so this doesn t use much capacity You cannot create or edit playli...

Страница 41: ...ies Edit Chapter View Delete Refer to Playlist operations right Playlists Chapter View Previous Next 01 BBC1 11 10 SUN 0 30 001 002 Page 01 01 Select ENTER RETURN SUB MENU S 0 19 36 0 10 24 DVD RAM Move Chapter Create Chapter Combine Chapters Delete Chapter Playlist View Add Chapter Refer to Chapter operations right Playlist operations Delete RAM Press 2 1 to select Delete and press ENTER Once del...

Страница 42: ...utomatic recording To stop recording Press The confirmation screen appears Press ENTER Note Only one piece of DV equipment e g digital video camcorder can be connected to the unit via the DV IN terminal It is not possible to operate the unit from the connected DV equipment The DV IN terminal on this unit is for use with DV equipment only It cannot be connected to a computer etc The DV equipment na...

Страница 43: ...r Name 1 2 3 4 5 A B C a D E F d G H I N O g J K L j M m 6 7 8 9 0 b c i j e f l h i fl k l O N n _ o Space Set Delete P Q R S p T U V t W X Y Z w q r s u v x y z π Top Menu Preview ENTER RETURN 1 2 3 4 5 6 7 8 9 0 Add to List List Names SELECT Name field shows the text you have entered R R DL RW V R R DL RW If you enter a long name only part of it is shown in the Top Menu after finalization 45 Whe...

Страница 44: ...ll playlists also being deleted Delete does not work if one or more titles are protected RAM RW V RW RW VR R R DL New disc only Note After performing steps 1 3 left 4 Press 3 4 to select Format Disc and press ENTER 5 Press 2 1 to select Yes and press ENTER 6 Press 2 1 to select Start and press ENTER A message appears when formatting is finished Note Do not disconnect the AC mains lead while format...

Страница 45: ...nu can take a few minutes 7 Press ENTER Recording or editing on the disc may delete the menu In that case create the menu again R DL R DL DVD R DL and R DL discs have two layers of recording surface on one side This unit does not offer seamless recording on two layers Recording stops when space on the first layer become full You must close the first layer to start recording on the second layer Clo...

Страница 46: ... hold ENTER and RETURN simultaneously until X HOLD disappears RETURN ENTER THEATER DVD VIDEO Plus The radio Preparation Turn off TV while using radio since noise may occur Press THEATER to switch the remote control to operate this unit 1 Press FM AM to select the FM or AM 2 Press 6 or 5 to select the frequency of the required station e g Display TUNED Displayed when a radio station is tuned ST Dis...

Страница 47: ...it of display is MHz for FM radio and kHz for AM radio when the selector is in FM AM mode 1 Press FM AM to select the FM or AM 2 Press the numbered buttons or W X CH to select the channel e g 2 0 2 12 1 2 e g Display Note If there is nearby electrical interference during auto tuning the frequency may come to a halt without locating a channel Turn off the power of the nearby electrical equipment Us...

Страница 48: ... punch to rock CLEAR Clarifies higher sounds SOFT For background music MANUAL Adjust the bass and treble with manual equalizer BASS Press 2 3 4 j6 to i6 in 2 units TREBLE Press 1 3 4 j6 to i6 in 2 units To check the current setting press SFC EQ The set level for BASS and TREBLE remains intact Even after the unit is turned off Center Focus Available with Multi channel sound Discs where the dialogue...

Страница 49: ...he button Settings can be confirmed on the display or the television screen SUB WOOFER 1 SUB WOOFER 2 SUB WOOFER 3 SUB WOOFER 4 The setting you make is retained This cannot be set when headphones are connected Adjust the level of the speakers so they are the same apparent level as the front speakers where you would normally be sitting and listening Preparation Press DVD to select the DVD drive Tur...

Страница 50: ...rd screen is shown Do not forget your password 8 No Limit All DVD Video can be played 1 to 7 Prohibits play of DVD Video with corresponding ratings recorded on them 0 Lock All Prohibits play of all DVD Video Unlock Recorder Change Password Change Level Temporary Unlock DVD Audio Video mode Playback Select On to play DVD Video content on some DVD Audio On The setting returns to Off when you change ...

Страница 51: ... not want to have the unit show the grey background when tuner reception is weak On Off FL Display Changes the brightness of the unit s display Bright Dim Connec tion TV Aspect 20 4 3 Letterbox Progressive 20 This setting is fixed with Off if you set AV1 Output to RGB 1 without component or RGB 2 without component below On Off TV System 54 PAL NTSC AV1 Output Selects the output from the AV1 termin...

Страница 52: ...while test signal is being output Center 6 dB to 6 dB Surround L R 6 dB to 6 dB To stop test signal Press RETURN To return to the previous screen Press RETURN To exit the screen Press RETURN several times Tabs Menus Options Boxed items are the factory presets Others Remote Control 21 DVD 1 DVD 2 DVD 3 Clock 55 Owner ID 18 In order to prevent another person from using this unit if it is stolen you ...

Страница 53: ...5 5 CH5 28 6 7 8 9 10 11 12 13 14 15 16 17 18 19 20 ENTER RETURN SELECT A C B To change detailed station settings Pos To change the programme position in which the TV stations are assigned Press 3 4 or numbered buttons to select the number of the desired programme position and press ENTER Name To enter or change the name of a TV station Press 3 4 2 1 to enter station name and press ENTER If the st...

Страница 54: ... several times Automatic setting TV System Change this setting if you connect an NTSC television or to record NTSC video from another source 1 While stopped Press FUNCTIONS 2 Press 3 4 to select To Others and press ENTER 3 Press 3 4 to select Setup and press ENTER 4 Press 3 4 to select Connection and press 1 5 Press 3 4 to select TV System and press ENTER 6 Press 3 4 to select the TV system and pr...

Страница 55: ... 6565 Afrikaans 6570 Albanian 8381 Ameharic 6577 Arabic 6582 Armenian 7289 Assamese 6583 Aymara 6589 Azerbaijani 6590 Bashkir 6665 Basque 6985 Bengali Bangla 6678 Bhutani 6890 Bihari 6672 Breton 6682 Bulgarian 6671 Burmese 7789 Byelorussian 6669 Cambodian 7577 Catalan 6765 Chinese 9072 Corsican 6779 Croatian 7282 Czech 6783 Danish 6865 Dutch 7876 English 6978 Esperanto 6979 Estonian 6984 Faroese 7...

Страница 56: ... _ j VOLUME Audio output becomes 2 channel only Multi channel audio is down mixed 65 Note When headphones are connected only Equalizer EQ can be used to change the sound quality 48 Avoid listening for prolonged periods of time to prevent hearing damage The Music Port allows you to connect and enjoy music from an external device e g MP3 player through your home theater system Preparation To avoid d...

Страница 57: ...s not covered in these instructions occurs disconnect the AC mains lead and contact your dealer or an authorized service center Electric shock or damage to the unit can occur if the unit is repaired disassembled or reconstructed by unqualified persons Extend operating life by disconnecting the unit from the power source if it is not to be used for a long time TV DVD Auto On When you press the foll...

Страница 58: ...ble due to a disc problem Use a new disc The unit s TV System setting differs from the TV system used by the disc Change the TV System in the Setup menu 54 NoERAS Deleting an item may be unavailable due to a disc problem Use a new disc PLEASE WAIT PLEASE and WAIT are alternately displayed Displayed when the unit is started This is not a malfunction The unit is carrying out its recovery process You...

Страница 59: ...fer to the disc s jacket for more information Cover Can a DVD Video that does not have a region number be played The DVD Video region number indicates the disc conforms to a standard You cannot play discs that do not have a region number Please tell me about DVD R DVD R DL DVD RW R R DL and RW compatibility with this unit This unit records and plays DVD R DVD R DL DVD RW DVD Video format R R DL an...

Страница 60: ...em is caused by the editing method or material used on DVD Video but should be corrected if you use interlace output 36 There is no apparent change in picture quality when adjusted with the Picture menu in the on screen menus The effect is less perceivable with some types of video The images from this unit do not appear on the television Make sure that the television is connected to the AV1 termin...

Страница 61: ... speakers through excessive volume or power Using the unit in a hot environment without proper ventilation The factory settings for the H Bass and Subwoofer levels are optimized for 5 1 channel movie playback If the bass seems too heavy during 2 channel disc playback etc change the settings When using headphones you cannot set anything other than Equalizer EQ If the audio is distorted when F MUSIC...

Страница 62: ...t does not respond The selector has been set to FM AM AUX or F MUSICP Press DVD to select DVD as the source Cannot record You haven t inserted a disc or the disc you inserted cannot be recorded on Insert a disc the unit can record onto The disc is unformatted Format the disc RAM RW V R R DL RW The write protect tab on the cartridge is set to PROTECT or the disc is protected with DVD Management Som...

Страница 63: ...de You cannot play discs during DV automatic recording 24 64 6 7 50 Audio and video momentarily pause This occurs between playlist chapters This occurs as scenes change during Quick View DVD Video is not played You have set a ratings level to limit DVD Video play Change this setting 50 Alternative soundtrack and subtitles cannot be selected The languages are not recorded on the disc You may have t...

Страница 64: ...oth and then wipe dry You tried formatting a disc that is not compatible with this unit below 6 7 Cannot create chapters Cannot mark the start point or the end point during Partial Delete operation The unit writes the chapter division information to the disc when you turn it off or remove the disc The information is not written if there is an interruption to the power before this These operations ...

Страница 65: ... formatted Formatting deletes irrevocably all contents Frames and fields Frames refer to the single images that constitute the video you see on your television Each frame consists of two fields A frame still shows two fields so there may be some blurring but picture quality is generally better A field still shows less picture information so it may be rougher but there is no blurring JPEG Joint Pho...

Страница 66: ...ED DVD RW Revision 2 0 Ver 1 X 6X SPEED DVD RW Revision 3 0 R Ver 1 0 Ver 1 1 Ver 1 2 Ver 1 3 for DL Ver 1 0 RW Ver 1 1 Ver 1 2 4X SPEED Recording time Maximum 8 hours using 4 7 GB disc XP Approx 1 hour SP Approx 2 hours LP Approx 4 hours EP Approx 6 hours 8 hours Playable discs DVD RAM DVD Video Recording format DVD R DVD Video format MP3 JPEG DVD R DL Dual Layer DVD Video format DVD RW DVD Video...

Страница 67: ...0 dB W 1 m Frequency range 32 Hz to 220 Hz j16 dB 38 Hz to 180 Hz j10 dB Dimensions WtHtD 183 mmk396 mmk267 mm Mass Approx 4 kg RT70 Front speakers SB FS71 Type 2 way 2 speaker system Bass ref Woofer Tweeter 6 5 cm CONE 6 cm CONE type Impedance Input power IEC 4 90 W Max Output sound pressure 81 dB W 1 m Frequency range 82 Hz to 30 kHz j16 dB 95 Hz to 25 kHz j10 dB Dimensions WtHtD 252 mmk1123 mmk...

Страница 68: ... control code 21 Repeat Play 35 Resetting channel setting 53 Resume play function 31 RGB 51 65 Setup menu 50 Shipping Condition 52 Simultaneous rec and play 25 Sound Field Control SFC 48 Soundtrack 35 Speaker delay time 52 Speaker level adjustments 49 52 Status messages 36 Subtitle 35 Subwoofer level 49 Surround Enhancer 48 Teletext 24 Thumbnail 39 TIFF 32 34 65 Time Slip 31 Timer recording 26 Tra...

Отзывы: