background image

10

RQ

TX02

27

Getting S

tarted

[Note]

If you have various sound sources (such as Blu-ray player, DVD recorder, VCR, etc.), connect them to the available 

inputs on the TV and the TV output should then be connected to the AUX or OPTICAL IN terminal of this unit.

Conserving power

This unit consumes a small amount of power, even when it 

is in standby mode (approx. 0.2 W). To save power when 

the unit is not to be used for a long time, unplug it from the 

household AC mains socket.

You will need to reset some memory items after plugging in 

this unit.

[Note]

The included AC mains lead is for use with this unit only. 

Do not use it with other equipment. Also, do not use cords 

for other equipment with this unit.

Do not:

mix old and new batteries.

use different types at the same time.

take apart or short circuit.

attempt to recharge alkaline or manganese batteries.

use batteries if the covering has been peeled off.

Mishandling of batteries can cause electrolyte leakage 

which can severely damage the remote control.
Remove the batteries if the remote control is not going to be 

used for a long period of time. Store in a cool, dark place.

Aim at the remote control signal sensor (

B

39), avoiding 

obstacles, at a maximum range of 7 m directly in front of the unit.

3

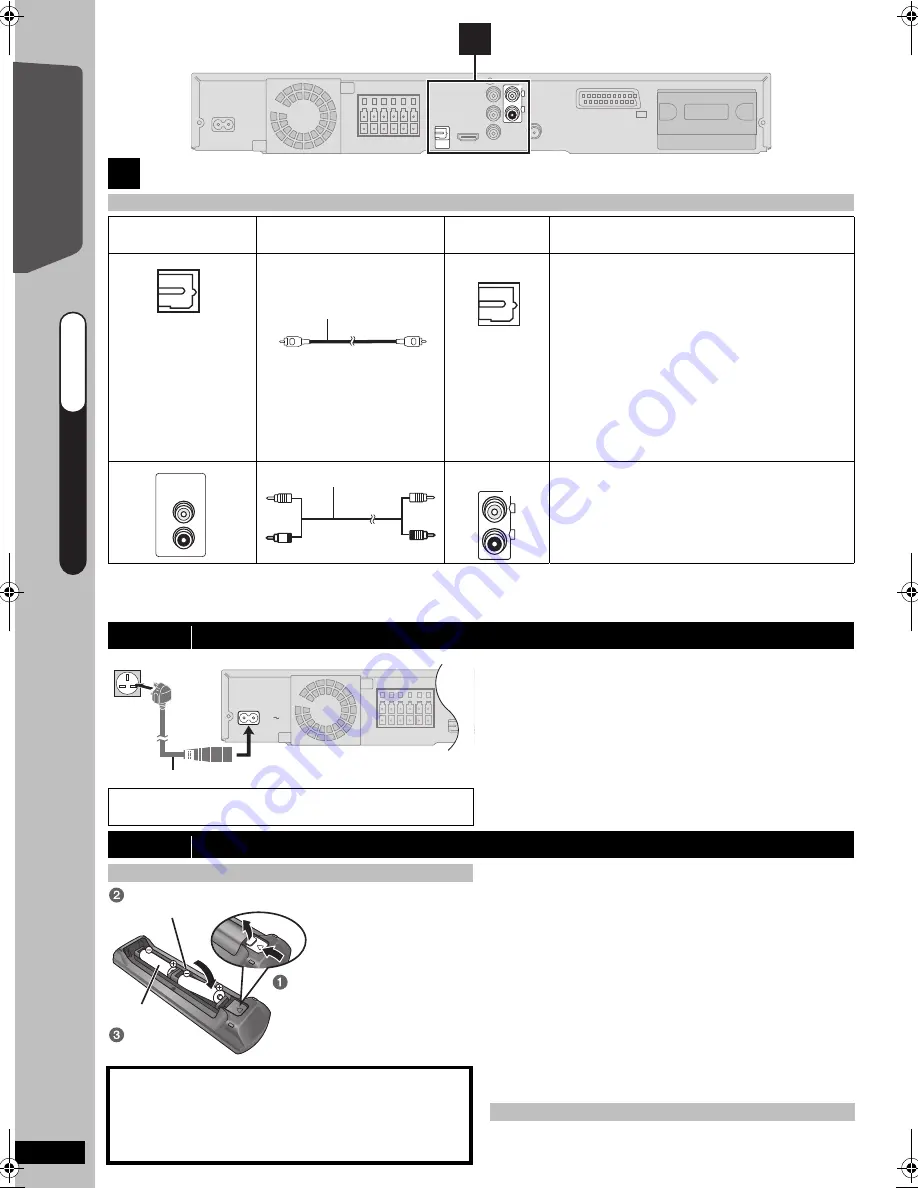
Audio and video connections (continued)

Other audio connections

TV or external 

equipment terminal

Cable required

(not included)

This unit 

terminal

Features

Do not bend sharply 

when connecting.

[\OPTICAL\IN\\]

This is the preferred connection for best sound 

and true surround sound.
This unit can decode the surround signals 

received from your TV, cable or satellite STB. 

Refer to the operating instructions for the TV, 

cable or satellite STB for the settings 

necessary to output its audio from the digital 

audio output to your home theater system. 

Only Dolby Digital and PCM can be played with 

this connection.

After making this connection, make settings 

to suit the type of audio from your digital 

equipment (

B

14).

[\\\\\\AUX\\\\\\\\]

This connection enables you to play audio from 

your TV, STB or VCR through your home 

theater system (

B

14, Selecting the source by 

the remote control).

step 4

AC mains lead connection

Y

P

B

P

R

COMPONENT

VIDEO OUT

AV OUT

L

R

AUX

OPTICAL

IN

AV

AV

3

This unit

OPTICAL OUT

Optical digital audio cable

OPTICAL 

IN

AUDIO

OUT

L

R

Audio cable

L

R

AUX

BE 

S

URE TO READ THE CAUTION FOR THE 

AC MAIN

S

 LEAD ON PAGE 4 BEFORE CONNECTION.

AC IN

This unit

To household mains socket

AC mains lead

 (included)

step 5

Preparing the remote control

Batteries

CAUTION

Danger of explosion if battery is incorrectly replaced. 

Replace only with the same or equivalent type 

recommended by the manufacturer.

Dispose of used batteries according to the 

manufacturer’s instructions.

R6/LR6, AA

Insert so the poles (

 and 

) match those in the remote

control.

Press in and lift up.

Replace the 
cover.

Use alkaline or manganese batteries.

Do not heat or expose to flame.

Do not leave the battery(ies) in an automobile exposed 

to direct sunlight for a long period of time with doors and 

windows closed.

Use

Q

UICK ST

AR

T GUIDE

Q

U

IC

K

 S

TA

R

T

 G

U

ID

E

Q

UICK ST

AR

T GUIDE

step 4-5

RQTX0227-B_eng.book  Page 10  Wednesday, December 17, 2008  11:28 AM

Содержание SC-PT870

Страница 1: ...fety please read these instructions carefully Before connecting operating or adjusting this product please read the instructions completely Please keep this manual for future reference Note EB on the packaging indicates the United Kingdom The illustrations shown may differ from your unit Region number The player plays DVD Video marked with labels containing the region number 2 or ALL Example 2 ALL...

Страница 2: ...ACED ON THE APPARATUS USE ONLY THE RECOMMENDED ACCESSORIES DO NOT REMOVE THE COVER OR BACK THERE ARE NO USER SERVICEABLE PARTS INSIDE REFER SERVICING TO QUALIFIED SERVICE PERSONNEL CAUTION DO NOT INSTALL OR PLACE THIS UNIT IN A BOOKCASE BUILT IN CABINET OR IN ANOTHER CONFINED SPACE ENSURE THE UNIT IS WELL VENTILATED TO PREVENT RISK OF ELECTRIC SHOCK OR FIRE HAZARD DUE TO OVERHEATING ENSURE THAT CU...

Страница 3: ...es of play 18 Repeat play 18 Program and Random play 18 Using navigation menus 19 Playing data discs 19 Playing RAM and DVD R RW DVD VR discs 19 Using on screen menus 20 Other Operations Using the VIERA Link HDAVI ControlTM 22 One touch play 22 Auto input switching 22 Power off link 22 Speaker control 23 VIERA Link Control only with TV s remote control for HDAVI Control 2 or later 23 Operating oth...

Страница 4: ...d the following text carefully This appliance is supplied with a moulded three pin mains plug for your safety and convenience A 5 ampere fuse is fitted in this plug Should the fuse need to be replaced please ensure that the replacement fuse has a rating of 5 ampere and that it is approved by ASTA or BSI to BS1362 Check for the ASTA mark Ï or the BSI mark Ì on the body of the fuse If the plug conta...

Страница 5: ...y unqualified persons Extend operating life by disconnecting the unit from the power source if it is not to be used for a long time Placement Voltage AC mains lead protection Foreign matter Service Information for Users on Collection and Disposal of Old Equipment and used Batteries These symbols on the products packaging and or accompanying documents mean that used electrical and electronic produc...

Страница 6: ...2 Stands with cable 4 Stands with cable PT570 2 Bases PT870 4 Bases PT570 8 Screws PT870 16 Screws Make sure you have all the indicated components before starting assembly setup and connection Keep the screws out of reach of children to prevent swallowing For optional wall mount refer to page 30 1 2 2 1 Slide into the groove Press into the groove Tighten securely Tighten securely Insert the wire f...

Страница 7: ...following cases to avoid damage When playing distorted sound When the speakers are reverberating due to a record player noise from FM broadcasts or continuous signals from an oscillator test disc or electronic instrument When adjusting the sound quality When turning the unit on or off step 2 Installation 60 60 Subwoofer Front speakers Center speaker This unit Surround speakers e g PT570 To allow f...

Страница 8: ...EEN CENTER PURPLE SUBWOOFER Insert the wire fully taking care not to insert beyond the wire insulation White Blue DO NOT This unit BLUE SURROUND L Be careful not to cross short circuit or reverse the polarity of the speaker wires as doing so may damage the speakers Push e g Surround speaker L Speaker cable sticker included e g PT570 2 Radio antenna connections Using an indoor antenna FM ANT 75 Adh...

Страница 9: ...manufacturer if you have another brand of TV Connect to terminals of the same colour This connection provides a much purer picture than the SCART AV terminal When making this connection select VIDEO YPbPr or S VIDEO YPbPr in VIDEO OUT SCART in VIDEO menu If RGB 1 NO OUTPUT or RGB 2 NO OUTPUT is selected no signal is output from the component video terminals B 27 To enjoy progressive video Connect ...

Страница 10: ...TICAL IN This is the preferred connection for best sound and true surround sound This unit can decode the surround signals received from your TV cable or satellite STB Refer to the operating instructions for the TV cable or satellite STB for the settings necessary to output its audio from the digital audio output to your home theater system Only Dolby Digital and PCM can be played with this connec...

Страница 11: ... output level automatically Auto speaker setup The speaker level settings can be optimized to accommodate your room s listening conditions so that you can enjoy the ideal surround sound experience Place the Auto speaker setup microphone at actual seating position At ear level when seated The test signal is output from each speaker Note Auto speaker setup can be activated through Smart setup only s...

Страница 12: ...ceive into the channels in ascending order 1 2 3 4 5 6 7 8 0 9 SEARCH SEARCH OK EXT IN RADIO F U N C T I O N S 10 MENU SKIP SKIP SEARCH Numbered buttons FUNCTIONS RADIO OK PLAY MODE MENU PLAYMODE SELECTOR TUNE MEMORY TUNE MODE FM MODE EXT IN RADIO MENU PLAY LIST OK Confirming the preset channels 1 Select FM This unit Press SELECTOR 2 Select the channel To select a 2 digit number e g 12 S10 B 1 B 2...

Страница 13: ...s from the START menu When the on screen control panel appears e g DVD V when Playback Disc is selected from the START menu You can operate the playback with the indicated controls Continued on next page Presetting stations manually 1 While listening to the radio broadcast Press OK 2 While the frequency is flashing on the display Press the numbered buttons to select a channel To select a 2 digit n...

Страница 14: ...L IN terminal B right TV will appear beside AUX or D IN indicating the TV audio setting for VIERA Link HDAVI Control B 22 USB B 24 iPod B 24 DVD iPod USB EXT IN RADIO START SETUP DVD USB iPod SETUP START RADIO EXT IN DVD EXT IN RADIO iPod USB Making settings for digital audio input 1 While in D IN mode Press SETUP to select MAIN SAP DRC or PCM FIX 2 While the selected mode is displayed Press 3 4 t...

Страница 15: ...e unit automatically selects the most suitable setting according to the type of playback source SUB W 1 SUB W 2 SUB W 3 SUB W 4 J The setting you make is retained and recalled every time you play the same type of source Center Focus Effective when playing audio containing center channel sound or when ÎPLII lights in this unit display You can make the sound of the center speaker seem like it is com...

Страница 16: ...igital video format created by DivX Inc This is an official DivX Certified device that plays DivX video If you are experiencing problems refer to troubleshooting B 34 to 36 Using this unit VOLUME VOLUME TUNE SELECTOR TUNE 3 4 5 VOLUME OPEN CLOSE 2 1 SELECTOR MEMORY Stop Start play Turn s r VOLUME to adjust the volume Select DVD CD Turn on the unit Press to skip Press and hold to search during play...

Страница 17: ...RCH OK DVD T O P M E N U 10 4 6 0 8 6 1 4 PLAY LIST MENU FL DISPLAY 1 2 5 SLOW SEARCH STOP OK RETURN MENU PLAYLIST FLDISPLAY TOPMENU DIRECT NAVIGATOR Numbered buttons VOL PAUSE SKIP PLAY STOP PAUSE SKIP SKIP SEARCH SLOW SEARCH OK On screen item select Enter number DVD VR DVD V VCD CD e g To select 12 S10 B 1 B 2 VCD with playback control Press STOP to cancel the PBC function and then press the num...

Страница 18: ...ogram Press 1 several times to select CLEAR ALL and then press OK The whole program is also cleared when the disc tray is opened the unit is turned off or another source is selected Repeat play During play Select an item to be repeated e g DVD V TITLE CHAP OFF b To cancel select OFF Program and Random play DVD V VCD CD WMA MP3 JPEG MPEG4 DivX While stopped Select the play mode Program and random p...

Страница 19: ...s RETURN Maximum 28 characters for file folder name STOP RETURN SKIP SKIP PLAY OK T O P M E N U 4 6 0 8 6 1 4 PLAY LIST MENU SKIP OK RETURN MENU PLAY LIST TOP MENU DIRECT NAVIGATOR PLAY OK PLAYBACK MENU WMA MP3 JPEG MPEG4 DivX AUDIO PICTURE VIDEO OK DATA DISC ROOT OK RETURN Perfume My favorite1 My favorite2 My favorite3 Underwater Fantasy planet Starpersons1 Starpersons2 Group Folder Content File ...

Страница 20: ...ions for details Signal type data LPCM PPCM ÎD DTS MP3 MPEG Signal type kHz Sampling frequency bit ch Number of channels DivX It may take some time for play to start if you change the audio on a DivX video disc PLAY SPEED DVD VR DVD V To change play speed from k0 6 to k1 4 in 0 1 unit steps Press 1 PLAY to return to normal play After you change the speed Dolby Pro Logic II has no effect Audio outp...

Страница 21: ...ropriately converts it Select if the video content is distorted when using AUTO1 or AUTO2 SOURCE SELECT DivX When you select AUTO the constructing method of the DivX contents is automatically distinguished and output If the picture is distorted select INTERLACE or PROGRESSIVE depending on which constructing method was used when the contents were recorded to disc AUTO INTERLACE PROGRESSIVE Menu 3 A...

Страница 22: ...You can turn on this unit and the TV and start playing the disc with a single press of a button Note Playback may not be immediately displayed on the TV If you miss the beginning portion of playback press or 6 to go back to where playback started When you switch the TV input to TV tuner mode this unit will automatically switch to AUX or D IN For IPOD mode this works only in iPod music mode or when...

Страница 23: ...ng a button on the TV s remote control e g OPTION This works only during DVD CD or USB playback and resume modes or while iPod music playback screen is displayed on the TV If the TV has automatically switched to the HDMI input mode for this unit B 22 Auto input switching The TV will automatically switch to TV tuner mode when you press EXIT button on the TV s remote control you press EXIT or RETURN...

Страница 24: ... AV terminal on this unit and select VIDEO YPbPr from VIDEO OUT SCART in VIDEO menu B 27 Operate the iPod menu to make the appropriate photo video output settings for your TV Refer to operating instructions of your iPod To display the picture turn on the TV and select the appropriate video input mode Before connecting disconnecting the iPod turn this unit off or reduce the volume of this unit to i...

Страница 25: ...ideo 30GB iPod nano 1st generation 1GB 2GB 4GB iPod 4th generation color display 40GB 60GB iPod 4th generation color display 20GB 30GB iPod 4th generation 40GB iPod 4th generation 20GB iPod mini 4GB 6GB Compatibility depends on the software version of your iPod Select IPOD The iPod automatically switches to this unit s display mode Music menu appears on the TV Select the menu Each time you press t...

Страница 26: ...e audio language ENGLISH FRENCH SPANISH GERMAN ITALIAN SWEDISH DUTCH POLISH ORIGINAL 1 OTHER 2 SUBTITLE Choose the subtitle language AUTO 3 ENGLISH FRENCH SPANISH GERMAN ITALIAN SWEDISH DUTCH POLISH OTHER 2 RETURN OK SETUP RETURN SETUP OK CHSELECT SETUP SET MAIN DISC VIDEO AUDIO DISPLAY HDMI OTHERS EXIT SETUP RETURN Menu OK SET RETURN DISC EXIT SETUP SETTING STATE AUDIO SUBTITLE MENUS RATINGS PASS...

Страница 27: ...AUTO FIELD The picture is not blurred but picture quality is lower FRAME Overall quality is high but the picture may appear blurred VIDEO OUT I P Select PROGRESSIVE only if connecting to a progressive output compatible TV INTERLACE PROGRESSIVE A message screen will appear Follow the on screen instructions AUDIO menu DYNAMIC RANGE ON Adjusts for clarity even when the volume is low Convenient for la...

Страница 28: ...OLOUR SPACE in Menu 4 HDMI is set to RGB B 21 STANDARD ENHANCED When the black and white images are not distinct VIERA Link ON The VIERA Link HDAVI Control function is available B 22 OFF POWER OFF LINK Select the desired power off link setting of this unit for VIERA Link operation B 22 This works depending on the settings of the connected VIERA Link HDAVI Control compatible equipment VIDEO AUDIO W...

Страница 29: ...splay subtitles text recorded onto the DivX video disc on this unit Depending on the methods used to create the file the following functions may not work or the subtitles may not be displayed correctly 1 During play select SUBTITLE in Menu 1 B 20 2 Press 3 4 to select TEXT ON and press OK DivX video files that do not display TEXT ON do not contain subtitles text Subtitles text cannot be displayed ...

Страница 30: ...orporates copyright protection technology that is protected by U S patents and other intellectual property rights Use of this copyright protection technology must be authorized by Macrovision and is intended for home and other limited viewing uses only unless otherwise authorized by Macrovision Reverse engineering or disassembly is prohibited HDMI the HDMI logo and High Definition Multimedia Inter...

Страница 31: ...ntional connections it transmits uncompressed digital video and audio signals on a single cable This unit supports high definition video output 720p 1080i 1080p from the HDMI AV OUT terminal To enjoy high definition video a high definition compatible TV is required I P B MPEG 2 the video compression standard adopted for use with DVD Video codes frames using these 3 picture types I Intra coded pict...

Страница 32: ... DVCD and SVCD that do not conform to IEC62107 This unit can play PAL and NTSC but your TV must match the system used on the disc PAL discs cannot be correctly viewed on an NTSC TV This unit can convert NTSC signals to PAL 60 for viewing on a PAL TV B 26 NTSC DISC OUT in VIDEO menu Do not attach labels or stickers to discs This may cause disc warping rendering it unusable Do not write on the label...

Страница 33: ...ampling frequency and compression rate DVD RAM DVD R RW 11 02 12 22 05 24 kHz 8 to 160 kbps 44 1 and 48 kHz 32 to 320 kbps CD R RW 8 11 02 12 16 22 05 24 kHz 8 to 160 kbps 32 44 1 and 48 kHz 32 to 320 kbps JPEG DVD RAM DVD R RW CD R RW JPG jpg JPEG jpeg JPEG files taken on a digital camera that conform to DCF Standard Design rule for Camera File system Version 1 0 are displayed Files that have bee...

Страница 34: ...t 2 seconds B 38 LOADING The iPod is not ready Wait for this display to disappear Disconnect the iPod and then reconnect it firmly B 24 NO MIC The Auto speaker setup microphone is not inserted Check whether the Auto speaker setup microphone is plugged in properly into the SETUP MIC jack NOISY Excessive ambient noise in the room Perform the setup again and keep quiet during the Auto speaker setup N...

Страница 35: ...ferent video systems Use a multi system or PAL TV The system used on the disc does not match your TV PAL discs cannot be correctly viewed on an NTSC TV This unit can convert NTSC signals to PAL 60 for viewing on a PAL TV NTSC DISC OUT in VIDEO menu B 26 Ensure that the unit is connected directly to the TV and is not connected through a VCR B 9 Mobile telephone chargers can cause some disturbance I...

Страница 36: ...X VOD content that was purchased with a different registration code You cannot play the content on this unit B 29 RENTAL EXPIRED DivX The DivX VOD content has zero remaining plays You cannot play it B 29 No Video Depending on the connected iPod video menu may not be available on the TV Select iPod menu iPod LCD mode B 25 and operate video playback from your iPod menu Specifications HDMI or progres...

Страница 37: ...put power IEC Output sound pressure Frequency range Dimensions WtHtD Mass 125 W 8 Max 79 dB W 1 0 m 80 Hz to 25 kHz j16 dB 90 Hz to 22 kHz j10 dB 100 mmk530 mmk78 mm 0 92 kg Full assembly with stand base Dimensions WtHtD max Dimensions WtHtD min Mass 255 mmk1020 mmk255 mm 255 mmk550 mmk255 mm 2 3 kg Surround speakers SB HS470 Type Speaker unit s 1 way 1 speaker system Bass reflex Impedance 3 Full ...

Страница 38: ... a disc top menu or program list B 17 19 9 Select or confirm menu items Frame by frame B 17 Show a disc menu or play list B 17 19 Show setup menu or select speaker channel B 15 26 Turn Whisper mode Surround on off B 15 TV operations Aim the remote control at the Panasonic TV and press the button Í Turn the TV on off AV Change the TV s video input mode r s Adjust the TV volume This may not work pro...

Страница 39: ...stations B 12 16 6Connect iPod B 24 7Connect Auto speaker setup microphone B 11 8Connect USB device B 24 9The indicator lights when there is surround sound effect B 14 Remote control signal sensor Select the source DVD CD USB FM AV AUX D IN IPOD TV will appear beside AUX or D IN indicating the TV audio setting for VIERA Link HDAVI Control B 22 Skip or slow search play Select the radio stations B 1...

Страница 40: ...oration Web Site http panasonic net Pursuant to at the directive 2004 108 EC article 9 2 Panasonic Testing Centre Panasonic Marketing Europe GmbH Winsbergring 15 22525 Hamburg Germany RQTX0227 1B F1208ZA1128 p EU Pb ...

Отзывы: