REC
ORDING
25
RQT
7
0
6
2
(Unit
l
hrs)
Depending on the content being recorded, the recording times may
become shorter than indicated.
FR (Flexible Recording Mode)
The unit automatically selects a recording rate between XP and EP
that will enable the recordings to fit in the available recording time on
the disc with the best possible recording quality.
≥
You can set for timer programme recording (
➡
page 26).
≥
All the recording modes from XP to EP appear in the
display.
The unit calculates a recording rate that enables the recording to fit
in the time you set (within the remaining time on the disc) and with
the best possible picture quality.
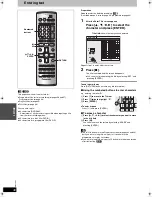
1
While stopped
Press [F.Rec].
2
Press [
2
,
1
] to select “Hour” and
“Min.” and press [
3
,
4
] to set the
recording time.
You can also set the recording time with the numbered
buttons.
3
Press [
3
,
4
,
2
,
1
] to select “Start”
and press [ENTER].
Recording starts.
To show the remaining time
Press [STATUS].
[Note]
It may not be possible to record to the end of the programme if the
remaining time doesn’t allow.
For your reference
≥
Recording time is reduced if you repeatedly pause recording.
≥
The recording mode automatically becomes FR mode.
Pictures being recorded are unaffected.
1
Switch [HOME THEATER, TV] to “TV”.
2
Press [AV] to change the television’s input mode to “TV”.
3
Press [
W
X
CH] to change channels.
You can also select the channel with the numbered buttons.
This is a simple way of specifying a time to stop recording when you
are in a hurry or before you go to bed.
[Main\unit\only]
During recording
Press [
¥
REC] on the main unit to select
the recording time.
Each time you press the button:
30
"#
60
"#
90
"#
120
"#
180
"#
240
^""""""
Counter (cancel)
,""""""}
To show the remaining time
Press [STATUS].
To cancel
During recording, press [
¥
REC] until the counter appears.
Recording continues.
For your reference
≥
This does not work during timer recordings (
➡
page 26) or while
using Flexible Recording (
➡
left).
≥
Recording stops and the set time is cleared if you press [
∫
].
≥
The set time is cleared if you change the recording mode or
channel while recording is paused.
This function allows you to immediately start recording the same
programme that you are viewing on the TV.
The programme position selected on the unit automatically changes
to that of the TV programme that you are viewing on the TV. When
you stop the recording, the unit automatically switches back to the
previously selected programme position.
Conditions for correct operation of the Direct TV Recording
function:
≥
Your TV must be equipped with the [Q Link] (
➡
page 66) function.
≥
The unit must be connected to the TV via a fully wired 21-pin Scart
cable.
Preparation
≥
Press [DVD] to select “DVD/CD” as the source.
≥
Insert a disc.
Press [
¥
DIRECT TV REC].
Recording of the TV programme that you are viewing starts.
To stop recording.
Press [
∫
].
[Note]
≥
In some cases, it may not be possible to change the programme
position on the TV during Direct TV Recording.
Recording modes and approximate
recording times in hours
Disc
DVD-RAM
DVD-R
(4.7 GB)
Mode
Single-sided
(4.7 GB)
Double-sided
(9.4 GB)
XP (High quality)
1
2
1
SP (Normal)
2
4
2
LP (Long play)
4
8
4
EP (Extra long play)
6
12
6
Recording the best quality pictures
within the set amount of time—Flexible
Recording
Watching the television while recording
XP SP LP EP
FLEXIBLE RECORDING
Start
Cancel.
Recording in FR mode
ENTER
SELECT
RETURN
Set rec. time
2 Hour 15 Min.
Maximum rec. time
1 Hour 00 Min.
Specify a time to stop recording
To immediately record the same TV
programme that you are viewing on the
TV (Direct TV Recording)
e.g.,
7062en.book 25 ページ 2003年8月27日 水曜日 午後2時56分

