background image

RQT9383

6

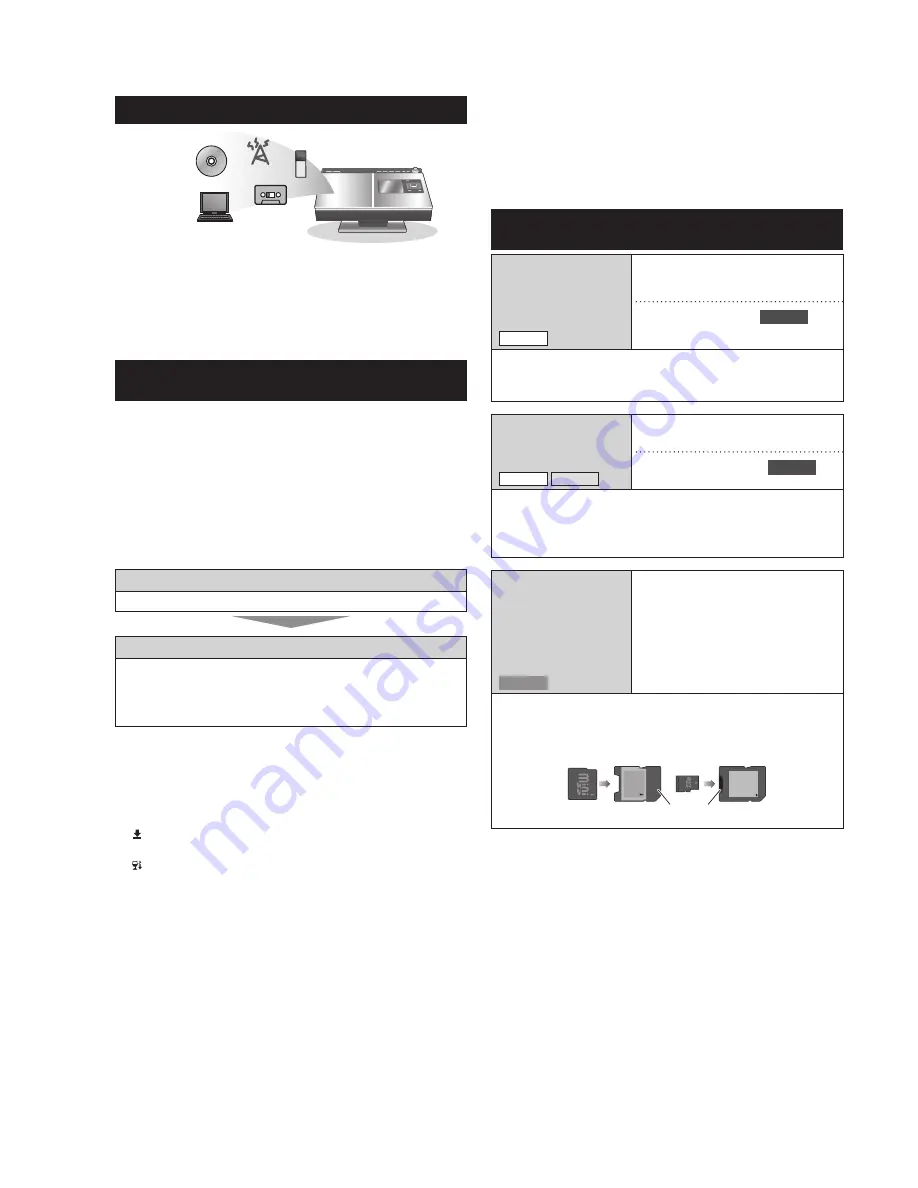
What you can do on this unit

You can listen to the variety of audio sources such as music 
CDs by saving them on the HDD!

  You can search music data on the HDD using Track 

Selection Menu!

  You can automatically obtain track titles from CD Database!

  You can play and recharge an iPod by connecting to this 

unit!

Recording mechanism/Music Shuf

fl

 e 

registration mechanism

On this unit, recording is always performed in LPCM format in 
whatever recording mode (

 pages 25, 26) and then the data 

is converted to AAC format.

Recording in LPCM format:

  Audio signals are recorded 

without being compressed.

Converted to AAC format:

  Audio signals are compressed.

Music Shuffle registration and AAC conversion are done at the 
same time.
This series of operations on this unit is referred to as “Convert/
Analyse”.

Recording

HDD data: 

LPCM

 data is produced.

Convert/Analyse

Approx. 2 minutes after the unit is turned off, Convert/
Analyse from 

LPCM

 to 

AAC

 begins.

  The current status appears on the display.

  The display disappears when Convert/Analyse is complete.

  In LPCM recording mode, Convert/Analyse is performed for 

Music Shuf

fl

 e.

  In AAC recording mode, LPCM data is deleted after 

conversion and the available HDD space increases.

  Tracks for which Convert/Analyse has not 

fi

 nished yet are 

marked on the track list display.


: AAC conversion and track analysis for Music Shuf

fl

 e 

have not 

fi

 nished yet.


: Track analysis for Music Shuf

fl

 e has not 

fi

 nished yet.

 About Convert/Analyse

  Convert/Analyse is performed in standby mode:

  Approx. 2 minutes after the unit is turned off, Convert/

Analyse begins. “D” is displayed during Convert/Analyse. 
Convert/Analyse is complete when “D” disappears.

  Do not pull out the AC mains lead during Convert/Analyse.
  Be sure to pull out the AC mains lead within 2 minutes after 

the unit is turned off, or after Convert/Analyse operation 

fi

 nishes (“D” on the display disappears).

  You can turn the unit on even during Convert/Analyse.

  Playback is available even if Convert/Analyse is not 

complete.

  Note that the playback sound quality after Convert/Analyse 

operation may differ from the one immediately after 
recording in AAC mode.

  For Convert/Analyse operation It will take 1/3 time of 

the length of recorded data.

  For example, it will take approx. 20 minutes for Convert/

Analyse operation when a 60-minute CD is recorded.

 • 


For WMA/MP3/AAC (MPEG4) data imported from a PC, 
the process time will become shorter since only “Analyse” 
operation is performed.

Discs and SD memory cards usable on 

this unit

CD

 Commercially 

available music 
CDs

CD-DA

Playback

Recording to 

HDD

 *

1

  Music CDs can be played back.

  Playback and recording of irregular discs such as a copy 

controlled CD are not guaranteed.

CD-R/CD-RW

 Discs made on a 

PC, etc.

CD-DA


WMA/MP3

Playback

Recording to 

HDD

  CD-R and CD-RW discs that have been recorded in 

either CD-DA, WMA or MP3 format and that have been 
session-closed or 

fi

 nalised*

2

 at the end of recording can 

be played back.

SD/SDHC/

miniSD/

microSD/

miniSDHC/

microSDHC

SD

Playback of JPEG 

image data

  The special adaptor is necessary for miniSD card, 

microSD card, miniSDHC card and microSDHC card.

miniSD card
miniSDHC card

microSD card
microSDHC card

Adaptor

*

1

  This means the hard disk. This mark is indicated at the 

usable functions descriptions.

*

2

  Finalise: Processing data so it can be played on playback 

compatible devices.

  In this manual:

 • 


CD (music CD), CD-R and CD-RW are collectively 
referred to as “CD” or “disc”. 

 • 


SD card, SDHC card, miniSD card, microSD card, 
miniSDHC card and microSDHC card are collectively 
referred to as “SD” or “SD memory card”.

  SCMS (Serial Copy Management System) restricts digital 

recordings from music CDs to HDD. The digital recording 
from CDs under this restriction to HDD is not available due 
to copyright protection.

  See “Handling the HDD (hard disk)” (

 page 29) as well.

Read this page 

fi

 rst

Содержание SC-HC7

Страница 1: ...ng the timer 18 Connecting to network 19 Changing the settings for this unit checking information 23 Selecting functions Sub menu function list 24 Troubleshooting guide 27 Handling the HDD hard disk 29 Specifications Maintenance 30 Set Quick Start Mode to operate immediately after the unit is turned on page 23 Supplied Accessories Please check and identify the supplied accessories Use numbers indi...

Страница 2: ...away from direct sunlight high temperatures high humidity and excessive vibration These conditions can damage the cabinet and other components thereby shortening the unit s service life Do not place heavy items on the unit Voltage Do not use high voltage power sources This can overload the unit and cause a fire Do not use a DC power source Check the source carefully when setting the unit up on a s...

Страница 3: ...the end of the antenna using a tape at the least noisy position Keep the antenna as far away as possible from the AC mains lead and speaker cords 2 Connecting AM loop antenna Receive broadcast signals page 12 after connection and place the antenna at the least noisy position 1 2 3 Use a Phillips head screwdriver etc White Black Red Click Stand the antenna up on its base Use a screwdriver of 15 cm ...

Страница 4: ...to FM AM 12 CD Play Pause 8 9 Listening to an external device Bluetooth mounted device 12 17 5 Stop Demo Mode 8 9 13 17 23 6 Adjusting the volume 9 13 7 Recording from CD to HDD 9 8 Selecting an item to confirm 10 Skipping a track 9 Switching channels 12 9 Returning to the previous screen 10 Track selection menu display 10 11 Remote control signal sensor 12 Display below 13 AUX external input term...

Страница 5: ...Use a manganese dry battery or an alkali dry battery Insert so the poles and match those in the remote control Do not heat or expose to flame Do not leave the batteries in an automobile exposed to direct sunlight for a long period of time with doors and windows closed 8 Playback mode display Repeat playback Random playback Playing back small portion of highlight parts successively iPod only Playin...

Страница 6: ...r after Convert Analyse operation finishes D on the display disappears You can turn the unit on even during Convert Analyse Playback is available even if Convert Analyse is not complete Note that the playback sound quality after Convert Analyse operation may differ from the one immediately after recording in AAC mode For Convert Analyse operation It will take 1 3 time of the length of recorded dat...

Страница 7: ...W that can be played back on this unit Maximum of 399 folders and 1000 tracks are guaranteed for playback If multiple folders in deep hierarchy are present all folders and files may not necessarily be recognised To specify the playback order name your folders and files as below However playback may not be performed in exactly the same as the specified order root 001 group 001 track wma 002 track w...

Страница 8: ...o be obtained page 15 Entering track name album name and artist name automatically If more than one title are found as the result of Gracenote Database search Press e r to select the title and press OK If all candidates do not match select Not applicable To obtain the latest CD title Network connection page 19 is necessary You can access the latest Gracenote server via Internet to obtain the CD ti...

Страница 9: ...d Recording is possible The sound of recording source is not heard during High Speed Recording The same title as that of CD is given The playback area differs depending on the Play Area setting page 10 Common operations for CD and HDD Main unit Remote control Stop Pause Press again to resume Skip Operate on the 1 track display screen Adjusting the volume 4 Volume up 3 Volume down 0 minimum to 50 m...

Страница 10: ...Searching the track on HDD to listen Preparation Press q h HDD g stop to switch the selector Searching track by the artist name 1 1 Press SELECT TRACKS while playing stopped 1 2 Press e r to select Search for Track and press OK 1 3 Press e r to select Artist and press OK 2 Press e r u i to select the artist and press OK 3 Press e r to select the album and press OK 4 Press e r to select the track a...

Страница 11: ...s are automatically sorted However some tracks may not be applicable to any of the impressions Music Shuffle registration and AAC conversion page 6 are done at the same time Accordingly tracks immediate after recording are not included in Music Shuffle For WMA MP3 AAC MPEG4 tracks imported from a PC the track analysis for Music Shuffle is performed when the unit is turned off If you want to know t...

Страница 12: ...ng press and hold u i until the frequency starts to run RDS broadcasting The unit can display the text data transmitted by the radio data system RDS available in some areas The text data name of a broadcasting station and program type are displayed PTY displays NEWS VARIED FINANCE COUNTRY AFFAIRS POP M CHILDREN NATIONAL INFO ROCK M SOCIAL A OLDIES SPORT M O R M RELIGION FOLK M EDUCATE LIGHT M PHON...

Страница 13: ... cancelled Auto Power Off Mode Demo Mode and screen saver do not work during the slideshow This unit contains the sample picture data for slideshow When the SD is not inserted or pictures for the slideshow are not present in the SD the slideshow of contained sample pictures starts Changing the sound quality sound field Using the favourite sound quality effect Preset equalizer 1 Press EQ 2 Press e ...

Страница 14: ...CD REC on this unit To stop playback press g stop To confirm the recording status press q h CD To stop recording press q h CD press g stop twice Recording from a radio external device Preparation Recording from the radio 1 Connect FM indoor antenna and AM loop antenna page 3 2 Set the recording mode page 25 Recording from the external device 1 Connect the external device 2 Set the recording mode p...

Страница 15: ...aracters Press DELETE to delete the character and enter the correct character Entering symbols Press 10 SYMBOLS Press e r u i to select the symbol and press OK means blank Press t y to change the page Entering special characters Press CHARACTER Press e r u i to select the symbol and press OK Press t y to change the page Changing the remote control mode Perform this when malfunction occurs on this ...

Страница 16: ...e However when the unit is in Power save Mode in standby mode you cannot recharge the iPod Set Quick Start mode page 23 You can check on the iPod screen whether recharging is complete or not Note Disconnect the iPod after recharging is complete when you will not use it for a long period of time Even if the battery is discharged naturally after recharging it won t be recharged again It may take tim...

Страница 17: ...the following items Bluetooth version Bluetooth standard Ver 1 1 or 1 2 Bluetooth profile Advanced Audio Distribution Profile A2DP Audio Video Remote Control Profile AVRCP Connecting SH FX570 1 Connect the cable Option port terminal SH FX570 optional Option port cable 2 Make the setting To use the wireless audio kit set the device registration bearing network connection etc For details refer to th...

Страница 18: ...3 and press OK 4 Press e r to select Detail Setting and press OK 5 1 Press e r to select Day and press OK 5 2 Press e r to select the day s press u i to add the check mark and press OK 6 1 Press e r to select Time and press OK 6 2 Press u i to select the item press e r to adjust time and press OK You can also use the number buttons to enter the time 7 1 Press e r to select Update Source Volume and...

Страница 19: ...g to automatically assign IP address The normal setting is Enable so you do not need to change the setting Internet connection from this unit may not be possible depending on the security setting for the router etc Refer to the instruction manual of the router as well Settings on this unit If the DHCP server function for the router is set to Enable you can use this unit with the default setting Ch...

Страница 20: ...rs to change my files Take a note of the characters for Share name 3 Select OK Connect this unit directly to the computer To import page 21 back up page 22 or restore page 22 data you can also connect this unit directly to the computer with the LAN cross cable In this case you need to change the settings on this unit and computer PC To LAN over 100BASE T terminal LAN cross cable commercially avail...

Страница 21: ... Move or copy the folder containing WMA MP3 AAC MPEG4 to the shared document folder This unit operation 2 1 Press SETUP while stopped 2 2 Select Import from PC on the Network tab and confirm 3 Select PC Name to confirm 4 Enter the PC name to confirm Enter the PC name confirmed on page 20 English character number and symbol up to 15 characters Not case sensitive 5 Repeat steps 3 to 4 to enter other...

Страница 22: ...e Mode is adopted for Power Off Mode setting until backup operation is complete When backup starts the timer setting is disabled Set the timer again to use it In the second and subsequent back up operations only changed added recording data since the last operation will be backed up difference backup Restoring backup data When restoring the data the HDD is reset to the default setting at the time ...

Страница 23: ...o confirm 6 Enter the number using the number button to confirm Checking the system information of this unit Preparation 1 Press SETUP to enter the setting menu 2 Press u i to select System tab Viewing the system software information Select System Software Info to confirm For the latest version of information visit the following homepage http panasonic jp support global cs audio Updating this unit...

Страница 24: ...lect Combine Tracks to confirm Combining destination setting display Confirmation display Compressing LPCM data size Compress LPCM Track You can increase available HDD space by converting tracks recorded in LPCM format to AAC format Select Compress LPCM Track to confirm Confirmation display Confirmation display Convert to AAC XP Convert to AAC SP Convert to AAC LP selection display Immediate Conve...

Страница 25: ...ording Mode to confirm LPCM AAC XP AAC SP AAC LP selection display When the selector is CD WMA MP3 Viewing WMA MP3 disc information Disc Info Select Disc Info to confirm The volume label number of folders and total number of tracks are displayed Viewing CD information Show Track Info Select Show Track Info to confirm The track length artist name album name and track name etc Selecting the recordin...

Страница 26: ...track mark at the desired position Auto Sync Only when recording from an external device or Bluetooth mounted device The unit detects a silent zone between tracks and automatically divides the track Recording starts automatically when a connected device is played back Recording is paused when silence continues more than about 2 seconds When audio is detected again the recording resumes Manual The ...

Страница 27: ...es Then turn the unit on again to obtain the titles You made the setting to use only the internal CD Database Set to Yes on the setting menu CD Database Setting 23 Wrong network settings Make the settings following the instructions of your provider or telephone carrier To establish the connection authentication of the router itself you may need to enter the connection account connection user name ...

Страница 28: ...tion The data is being backed up or restored or the recording data is being moved Backing up or restoring data or moving recording data may take some time Press 8 on the unit approx 10 seconds and restart the unit Tracks cannot be divided combined This track cannot be divided combined is displayed You are trying to Divide Combine tracks recorded in AAC format or WMA MP3 tracks imported from the co...

Страница 29: ...g the unit Perform Erase all tracks in HDD page 15 to erase all recording data and playlist information before disposal transfer Also change the setting contents on the setting menu if necessary Note that Panasonic assumes absolutely no liability for any damage and lost earning in case of change loss modification or leakage of user information Caution Installation Do not cover the cooling fan and ...

Страница 30: ...Tweeter Passive radiator 3 way 3 speaker system passive radiator type 5 cm 2 cone type 2 5 cm balance dome type 8 cm 2 Impedance 6 Ω Input power IEC 40 W MAX Magnetic shield design No Playback frequency range 60 Hz to 25 kHz 16 dB 75 Hz to 22 kHz 10 dB Dimensions W x H x D 96 mm 207 mm 178 mm Mass Approx 1 2 kg pc GENERAL Power supply AC 220 to 240 V 50 Hz Power consumption 22 W Dimensions W x H x...

Страница 31: ... the accuracy of any Gracenote Data from in the Gracenote Servers Gracenote reserves the right to delete data from the Gracenote Servers or to change data categories for any cause that Gracenote deems sufficient No warranty is made that the Gracenote Software or Gracenote Servers are error free or that functioning of Gracenote Software or Gracenote Servers will be uninterrupted Gracenote is not ob...

Страница 32: ...d WARNING TO REDUCE THE RISK OF FIRE ELECTRIC SHOCK OR PRODUCT DAMAGE DO NOT EXPOSE THIS APPARATUS TO RAIN MOISTURE DRIPPING OR SPLASHING AND THAT NO OBJECTS FILLED WITH LIQUIDS SUCH AS VASES SHALL BE PLACED ON THE APPARATUS USE ONLY THE RECOMMENDED ACCESSORIES DO NOT REMOVE THE COVER OR BACK THERE ARE NO USER SERVICEABLE PARTS INSIDE REFER SERVICING TO QUALIFIED SERVICE PERSONNEL CAUTION DO NOT I...

Отзывы: