ADJ - 12
1. 7. Color luminance adjustment
1. 7. 1. Necessary equipment
* Same as "1. 6. 1."
1. 7. 2. Preparation
* Same as "1. 6. 2."
1. 7. 3. Start up equipments
* Same as "1. 6. 3."
1. 7. 4. Adjustment
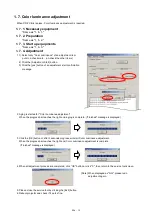
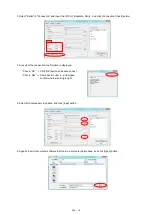
1. 1) Select only "Color Luminance" of an adjustment item
puts in a check mark. (un-check the other items)
2) Click the [Adjustment Start] button.
3) Click the [yes] button of an adjustment start confirmation
message.
2. Aging is started for "Color Luminance adjustment".
When the progress bar reaches the right end, aging is complete. ("Finished" message is displayed)
3. Click the [OK] button or after 3 seconds progress, will start Color Luminance adjustment.
When the progress bar reaches the right end, Color Luminance adjustment is complete.
("Finished" message is displayed)
4. When all adjustment process are completed, click "OK" button or click "X", then return to the service tool screen.
[Note] When displayed as "NG", please redo
adjustment again.
5. Please close the service tool by clicking the [Exit] button.
6. Reboot projector and check if it works fine.
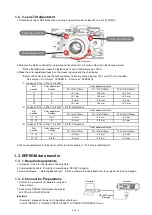
When
PD
-PCB is replace, Color luminance adjustment is required.
①
②
③
Содержание PT-RZ470 Series
Страница 6: ...6 2 Specifications...
Страница 7: ...7...
Страница 9: ...INF 2 1 The name of each part 1 1 Projector body 1 2 Control panel...
Страница 10: ...INF 3 1 3 Connecting terminals 1 4 Remote control...
Страница 11: ...INF 4 2 OSD Menu Navigation...
Страница 12: ...INF 5...
Страница 13: ...INF 6...
Страница 26: ...INF 19 5 Select Log SYSTEM and click Get button 6 Log is displayed...
Страница 84: ......


