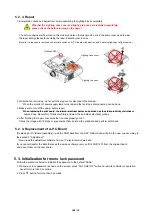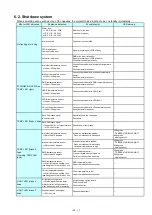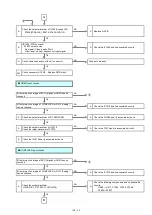
INF - 10
4. External control
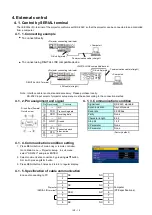
4. 1. Control by SERIAL terminal
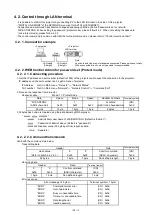
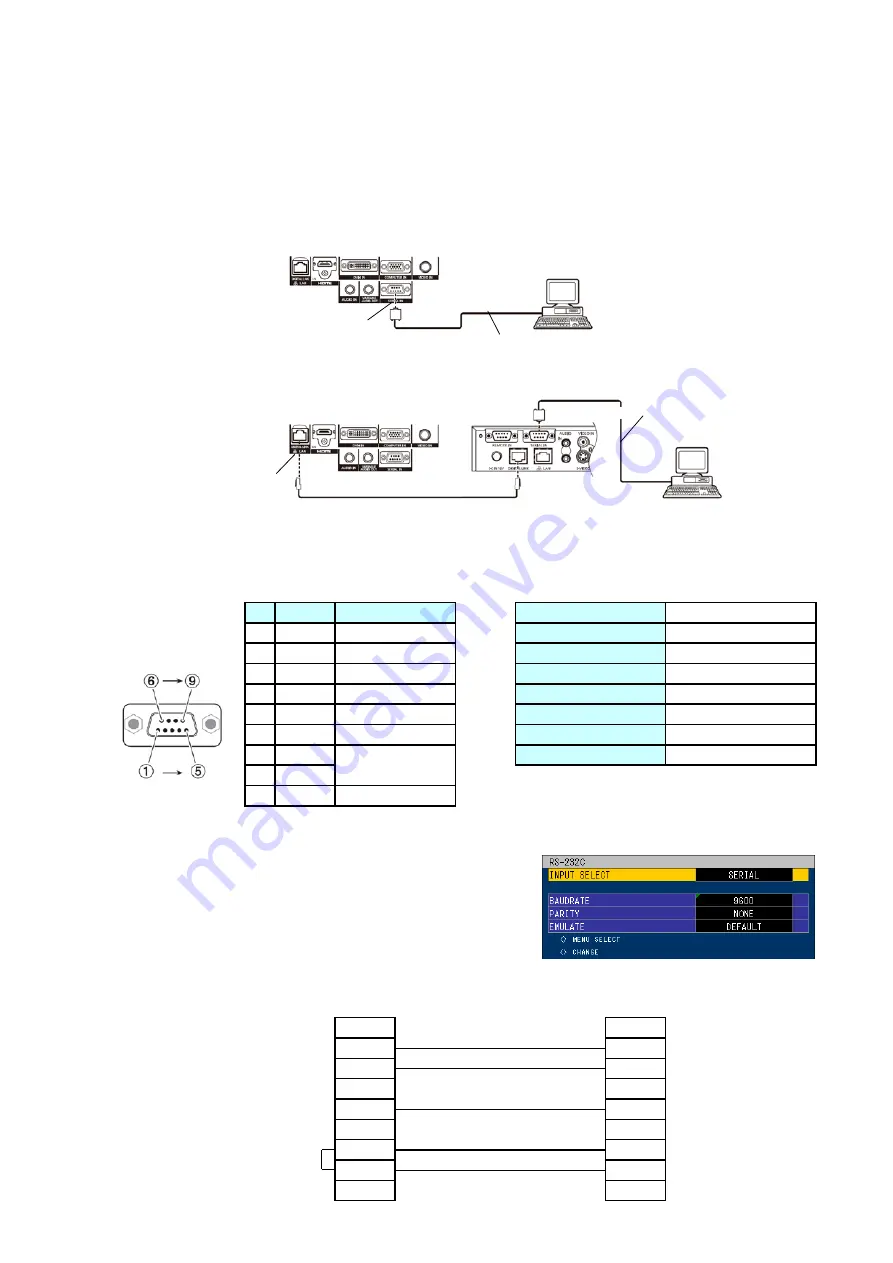
4. 1. 1. Connecting example
●
To connect directly
●
To connect using DIGITAL LINK compatible device
4. 1. 2. Pin assignment and signal
4. 1. 3. Communication condition
Pin
①
②
③
④
⑤
⑥
⑦
⑧
(Factory default)
⑨
4. 1. 4. Communication condition setting
1.
Press MENU button of main body or remote controller.
Go to Main menu
→
Projector setup. In sub menu,
select "RS-232C" and press ENTER.
2.
Select communication condition by pressing
▲
▼
button.
Set it with pressing
◀
▶
button.
3.
Press MENU button 3 times and return to regular display.
4. 1. 5. Specification of cable communication
In case of connecting to PC
NC
NC
NC
NC
DSR
NC
NC
NC
The <SERIAL IN> terminal of the projector conforms with RS-232C so that the projector can be connected to and controlled
from a computer.
9
9
Projector
(SERIAL IN terminal)
Computer
(DTE specifications)
-
NC
CTS
Connected each
other inside
RTS
-
NC
2
3
4
5
6
Signal name
Contents
-
NC
TXD
Transmitting data
-
NC
GND
Ground
RXD
Receiving data
Signal level
RS-232C standard
Synchronization
Asynchronous
Baud rate
9 600 bps
Parity
None
Character length
8 bit
1
2
3
4
5
6
7
8
Note : Interface cable is not a standard accessory. Please purchase locally.
RS-232C input select of projector setup menu must be set according to the connection method.
Stop bit
1 bit
X Parameter
None
S Parameter
None
1
7
8
D
-
sub
9
pin(Female)
Outside view
<Computer>
D-Sub 9p (male)
<Projector connecting terminals>
Communication cable (straight)
<Computer>
D-Sub 9p (male)
<Projector connecting terminals>
Communication cable (straight)
LAN cable (straight)
DEGITAL LINK Terminal
<DIGITAL LINK compatible device>
Содержание PT-RZ470 Series
Страница 6: ...6 2 Specifications...
Страница 7: ...7...
Страница 9: ...INF 2 1 The name of each part 1 1 Projector body 1 2 Control panel...
Страница 10: ...INF 3 1 3 Connecting terminals 1 4 Remote control...
Страница 11: ...INF 4 2 OSD Menu Navigation...
Страница 12: ...INF 5...
Страница 13: ...INF 6...
Страница 26: ...INF 19 5 Select Log SYSTEM and click Get button 6 Log is displayed...
Страница 84: ......


