12
4. DISASSEMBLY /ASSEMBLY
METHOD FOR MECHANISM
4-1. DISASSEMBLY OF MECHANISM
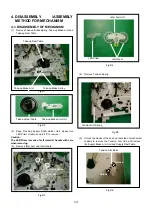
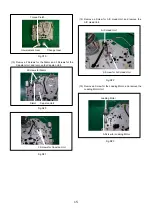
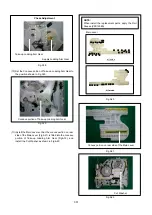
(1) Remove Take-up Brake Spring, Take-up Brake Arm and
Take-up Reel Table.
Fig.D1
Fig.D2
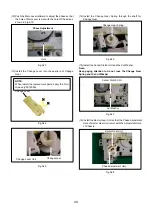
(2) Keep Pressing Supply Shaft Holder Unit, slowly turn
LED Prism clockwise up to 45° to remove.
Caution:
The LED Prism is made of soft material, handle with care
when removing.
(3) Remove Idler Arm and Idler Gears.
Fig.D3
Fig.D4
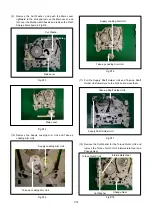
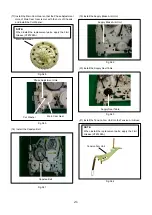
(4) Remove Tension Spring
Fig.D5
(5) Unlock the Hooks of the boss on rear side of mechanism
chassis to remove the Tension Arm Unit, and remove
the Supply Brake Arm Unit and Supply Reel Table.
Fig.D6
Take-up Brake Spring
Take-up Brake Arm
Take-up Reel Table
Take-up Brake Arm Unit
Take-up Reel Table
LED Prism
Idler Arm Unit
Idler Gear
Tension Arm Spring
Turn clockwise
up to 45°.
1
2
Tension Arm Boss
Unlock
Unlock
Содержание NV-HV61GN
Страница 20: ...3 1 2 DETAIL OF DISASSEMBLY METHOD 1 REMOVAL OF THE TOP PANEL Remove 2 Screws A Remove 2 Screws B Fig D2 20 ...
Страница 21: ...2 REMOVAL OF THE BACK PANEL Remove 2 Screws C Remove Screw D Unlock 4 Tabs E Fig D3 21 ...
Страница 29: ...10 2 CASING PARTS SECTION 29 ...
Страница 30: ...10 3 PACKING PARTS SECTION 30 ...
Страница 31: ...11 REPLACEMENT PARTS LIST 31 ...
Страница 41: ...C4537 ECJ2VC1H560G CHIP CAPACITOR 41 ...
Страница 44: ...D2002 B0AAED000003 DIODE 44 ...
Страница 47: ...Q1152 2SC3311ASA TRANSISTOR 47 ...
Страница 49: ...R1502 ERJ3GEYJ273V CHIP RESISTOR 49 ...
Страница 54: ...W519 ERJ3GEY0R00V CHIP JUMPER 54 ...
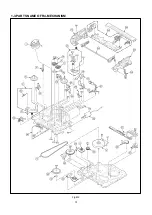
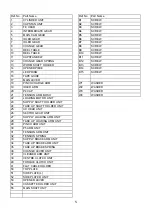
Страница 109: ...4 1 3 PARTS NAME OF R4 MECHANISM Fig M2 ...
Страница 139: ...34 ...

