background image

8

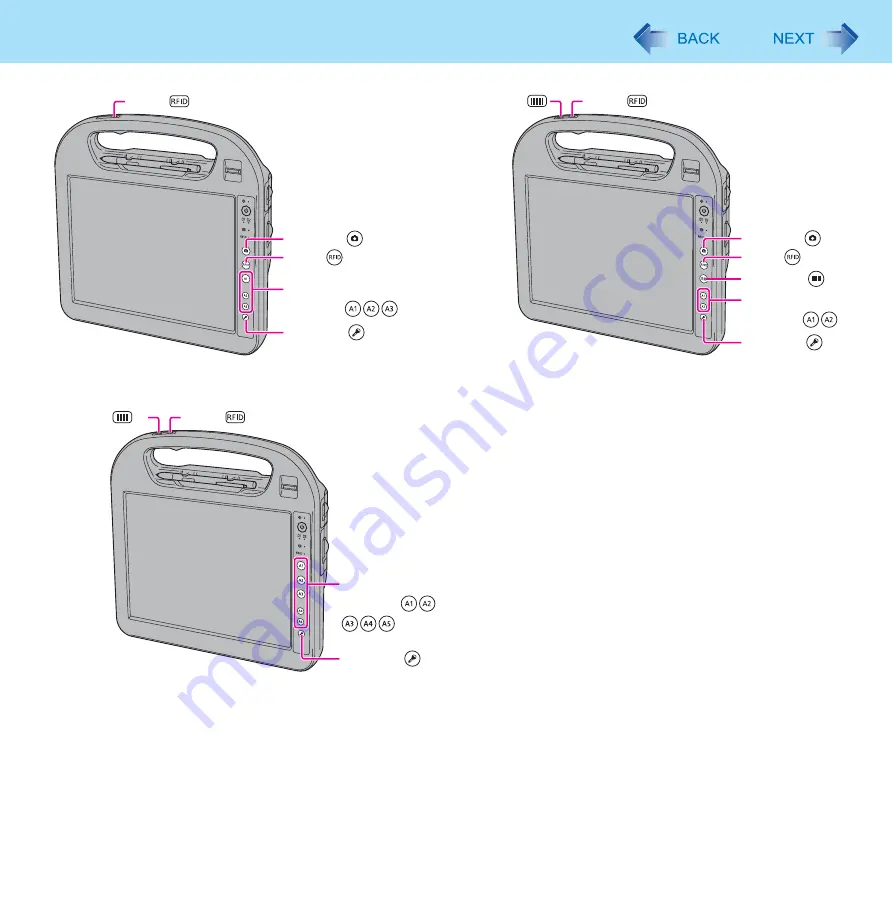
Hardware Buttons

*1

Only for Field model with Barcode Reader

*2

Only for Field model with RFID Reader

<Healthcare model without Barcode Reader>

<Healthcare model with Barcode Reader>

<Field model>

RFID

Application 
Buttons

RFID

Camera

Security

Barcode

RFID

Application 
Buttons

Barcode

RFID

Camera

Security

Barcode     

RFID      

Application 
Buttons

Security     

*1

*2

Содержание CF-H1 Series

Страница 1: ...Reference Manual Personal Computer Model No CF H1 Series We recommend that this Reference Manual be printed 1 ...

Страница 2: ...y result in minor or moderate injury Useful and helpful information Click Touch the screen with the digitizer pen or finger Right click Touch and hold with the digitizer pen You can also perform Right click by pressing and holding the button of the digitizer pen and then tapping the object Start All Programs Click Start and then click All Programs Only when connected to Cradle and keyboard Press E...

Страница 3: ...and click OK If high frequency sound occurs while using the computer A standard user needs to enter an administrator password and click OK Set USB selective suspend setting to Enabled A Click Start Control Panel System and Security Power Options B Click Change plan settings of the current power plan C In Change settings for the plan click Change advanced power settings D In Advanced settings doubl...

Страница 4: ...he object When not using the digitizer pen You can perform Right click with either of operation below z Touch and hold with the digitizer pen NOTE z The operation by touching the screen does not work in the Setup Utility z When inputting on the Command Prompt screen apply the keyboard input mode to Tablet PC Input Panel You can not input correctly with the Writing Pad z Touch the screen with the d...

Страница 5: ...f the digitizer pen clean z Is your finger clean z Do not touch the screen outside of the LCD display area The input area is defined by the LCD display screen Touching the screen outside of the display area may result malfunc tions or damage to the screen z Do not apply excessive force to the screen Do not lift the computer while holding the LCD screen or allow the screen to be twisted Do not plac...

Страница 6: ...iping off foreign particles and dust wash the soft cloth refer to the following to remove the foreign particles and dust from the soft cloth When the soft cloth becomes dirty wash it with neutral detergent Do not use bleach or a fabric conditioner softener or carry out sterilization by boiling If the LCD gets wet wipe the surface lightly with the soft cloth While wiping the LCD display the compute...

Страница 7: ...n included Use your finger or other objects z Perform the calibration for the orientation to be used 1 Run Tablet PC Settings Click Start Control Panel Hardware and Sound Tablet PC Settings 2 Click Calibrate 3 Select Touch input 4 Using your finger or other object touch of the 4 target one by one 5 Click Yes ...

Страница 8: ...r Field model with RFID Reader Healthcare model without Barcode Reader Healthcare model with Barcode Reader Field model RFID Application Buttons RFID Camera Security Barcode RFID Application Buttons Barcode RFID Camera Security Barcode RFID Application Buttons Security 1 2 ...

Страница 9: ...layed z The Hardware buttons may not work immediately after Windows is started up or the Windows logon screen or the Welcome screen is displayed z The Hardware buttons may not work after time zone is changed In this case restart the computer Button Function 3 Camera Button Take still pictures Î page 43 3 4 RFID Reader Button Read the data from RFID tags Î page 52 5 6 Barcode Reader Button Read the...

Страница 10: ...sonic boot screen is displayed You can configure the button to function as buttons F1 to F12 while you start up the computer 1 Start up the Setup Utility Î page 83 2 Select Main 3 Select SAS Button and press Enter 4 Press Ï Ð to select the desired button F1 to F12 and press Enter 5 Press F10 and then select Yes and press Enter NOTE z When the computer has started up the Security button functions a...

Страница 11: ...text select either the Software Keyboard or Tablet PC Input Panel 1 Log on to Windows as an administrator 2 Click Start and input c util pnotif setup exe in Search programs and files and press Enter Follow the on screen instructions 3 Click Start and input c util meiskb setup exe in Search programs and files and press Enter Follow the on screen instructions 4 Add a check mark for Yes I want to res...

Страница 12: ...B Moves the software keyboard to a corner of the screen C One tap Works as shortcut key Ctrl C etc Two taps Works as the key D Works as a right click Same function as the key E Switches between QWERTY keyboard and numeric keypad NOTE z You cannot use Ctrl Alt Del on the software after logging on Use button instead of Ctrl Alt Del z You cannot use the software keyboard when the Command Prompt scree...

Страница 13: ...hen you change the input mode This may not work on some applications z Always On Top The software keyboard appears on the top z Transparent The software keyboard appears semi transparent z Big Size Medium Size Small Size Select the size of the software keyboard z Ten key Big Ten key Medium ten key Small Select the size of the numeric keypad z Change Size Automatically Big Medium The size changes a...

Страница 14: ...ontrol Panel Clock Language and Region Regional and Language Options Formats Customize this format Currency Currency symbol z After changing the currency symbol click A and then change the size of the numeric keypad so that the selected currency symbol is shown z You can input the unit by using C B C ...

Страница 15: ...rts up 1 You can change the setting of application button Î page 18 2 To check to see or change the setting of application buttons use the Applica tion Button Setting function Î page 18 2 Make the operation Battery B You can check the remaining battery charge and battery operating time Battery operating time is for reference The operation time may increase and or decrease by the state of the compu...

Страница 16: ...registered application by using Advanced menu Î below Advanced H You can select Advanced only if you logged on to Windows as an administrator Advanced Settings menu is displayed You can change the following settings After making settings in Advanced Settings click OK to exit Advanced Settings Cleaning Reminder I You can regularly display the message to remind cleaning Some of following conditions ...

Страница 17: ...played on Panasonic Dashboard screen A Click any button B Select the action from Action You can select Display Switch Cleaning Utility Loupe Utility Reference Manual or Launch Application To restore the default setting click Restore Default When you select Launch Application input the label to Label box and select a file you wish to execute z You can also select files with extensions pdf jpeg wma ...

Страница 18: ...pplica tion Button Setting You can also start up Application Button Setting Utility form Panasonic Dashboard Î page 15 2 Make the settings You can register the execute files of the applications NOTE z Only for Healthcare model with Barcode Reader Button A3 is not displayed Application Buttons Application Buttons Healthcare model without Barcode Reader Field model ...

Страница 19: ...ned to application buttons A1 A2 and A3 respectively on models that include these functions These actions cannot be changed For the remaining application buttons you can select none Dashboard Display Switch Right Click Cleaning Utility Loupe Utility Reference Manual or Launch an Application To restore the default setting click Restore Default When you select Launch an Application input the label i...

Страница 20: ...ht click then click Exit Panasonic Hand Writing and then restart Panasonic Hand Writing z Panasonic Hand Writing may not work properly if another application software is active In this case close the applica tion software and try handwriting again 1 Click on the notification area and double click Alternatively you can click Start All Programs Panasonic Panasonic Hand Writing NOTE z Select the imag...

Страница 21: ...r of the display rotation Î page 22 NOTE z Alternatively you can rotate the display by the following procedure Click start Control Panel Appearance and Personalization Display Change display settings z While the display is rotated Do not use the Extended Desktop The touchscreen or digitizer may not work properly Do not set the resolution larger than that of the internal LCD The computer s performa...

Страница 22: ... to Win dows as an administrator B When a check mark for Allow all users to use setting dialog is added each user can choose the original order C When a check mark for This setting affects all users is added the order which you chose is set to all users To use the same setting for all users remove the check mark for Allow all users to use setting dialog and add the check mark for This setting affe...

Страница 23: ...in the Setup Utility is not requested at resuming You can use the Windows password for security in sleep or hibernation In the default setting you are requested to enter the Windows password when the computer resumes z Do not enter sleep or hibernation in the conditions below otherwise the data or file may be corrupted sleep or hibernation may not work or malfunction may occur in the computer or t...

Страница 24: ...Change what the power buttons do z While the computer is entering sleep or hibernation do not touch the computer For example do not Touch the screen hardware buttons or power switch Use an external mouse or other peripheral devices Connect or disconnect the AC adaptor Set to or remove from the Cradle Wait until the power indicator blinks green sleep or goes off hibernation z It may take 1 or 2 min...

Страница 25: ...tch Use an external mouse or other peripheral devices Connect or disconnect the AC adaptor Shut down or restart Windows Enter sleep or hibernation Wait approximately 1 minute Set to or remove from the Cradle z If the computer enters sleep while a USB keyboard or mouse is connected via Cradle touching the USB keyboard keys or mouse will resume the computer NOTE z After resuming from sleep or hibern...

Страница 26: ...Save changes z The setting for hibernation may change unexpectedly when you change the setting for sleep Confirm that the time to enter hibernation is 1 080 minutes default setting or longer below Hibernation 1 After the step 2 of Sleep setting above click Change advanced power settings 2 Double click Sleep and double click Hibernate after 3 Click the item and select the setting 4 Click OK Changin...

Страница 27: ...uch as reducing the time entered in the Turn off the display setting z Reduce LCD brightness by using Panasonic Dashboard Reducing internal LCD brightness will reduce power consumption z Turn off the computer when it is not in use You can also turn off only the wireless LAN wireless WAN only for model with wireless WAN or Bluetooth power z Disconnect external devices USB devices external mice etc ...

Страница 28: ...n Confirm New Password and press Enter 6 In Setup Notice press Enter 7 Press F10 and then select Yes and press Enter CAUTION z Do not forget your password If you forget your Supervisor Password you will not be able to use your computer Con tact Panasonic Technical Support z When running the Setup Utility do not leave and go away from your computer even for a short time since other people may set o...

Страница 29: ...when the hard disk is returned to the original computer 1 Select Enabled in Hard Disk Lock in the Security menu of the Setup Utility Î page 88 CAUTION z For the data being read written on the original computer the Setup Utility settings must be the same as when the hard disk was removed z You cannot use the hard disk lock function without setting the Supervisor Password Set the Supervisor Password...

Страница 30: ...attery cover with the battery pack already inserted You can check the battery level by blinking times Except for the operations stated above In high temperature mode the battery pack is discharging the power to 80 1 of normal temperature mode Î page 33 Do not remove the battery pack since the power is not supplied even if you connect the AC adaptor in this status If remove the battery pack the com...

Страница 31: ...0 5 second The battery cover is open If you remove the battery pack in this case the power supply is cut off and the computer is shut down Close the battery cover immediately Blinking orange The battery cannot be charged temporarily due to the following reasons Its internal temperature is out of the acceptable range The power supply is not enough because software applications or peripheral devices...

Страница 32: ...attery indicator remains red The indicator lights orange and the display shows 99 for a long time Low battery warning appears soon after a short time of use This can occur when the computer is in sleep for a long time without power supply from the AC adaptor z The battery display may not be the same as that of notification area This is not a malfunction Checking the Remaining Battery Charge Normal...

Страница 33: ...er switching from Normal Temperature to High Temperature or vice versa the remaining battery capacity will not be displayed correctly until the battery pack is completely discharged or fully charged z In the Auto mode Once the computer has automatically switched from the normal temperature mode to the high temperature mode the computer will not switch back to the normal temperature mode until the ...

Страница 34: ...the battery level is low z The computer enters hibernation Charge the battery Connect the AC adaptor or replace the battery to start up the computer z Connect the AC adaptor immediately If you do not have the AC adaptor close the application and turn off the computer then confirm that the power indicator is off z If you have a fully charged spare battery turn off the computer replace the battery a...

Страница 35: ...ws click Yes The battery recalibration starts After the battery pack is fully charged discharging starts When the discharging is completed the power goes off automatically After the battery recalibration is finished normal charging starts NOTE z The temperature range should be 10 C to 30 C 50 F to 86 F z The battery recalibration may take a long time due to the large battery capacity This is not a...

Страница 36: ...ith your computer Checking the battery pack that can be replaced removed Remove replace the battery pack under the right conditions according to the chart below because if the computer is mistak enly shut down this may cause data to be lost and the computer to malfunction Replacing the Battery Pack When the com puter is ON or in Sleep Hibernation When the AC adaptor is not connected Only one batte...

Страница 37: ...dicator Î page 31 2 Pull the tab to remove the battery pack 3 Insert the new battery pack until it securely fits the connec tor 4 Close the battery cover A Close the battery cover B Slide the battery cover until it clicks CAUTION z Make sure the battery cover is securely locked otherwise the battery pack may fall when you carry the computer 1 2 1 2 ...

Страница 38: ...ion area and click More power options 2 Click Create a power plan click the Plan name box and input the name of power plan 3 Click Next 4 Change the settings and click Create z To change the settings or to make more detailed settings above Changing the Power Plan Setting 1 Click or on the notification area and click More power options 2 Click the power plan other than the power plan to be deleted ...

Страница 39: ...ect Place the card in very hot location for a long time Remove the card immediately after inserting it To insert the card 1 Open the cover A Slide the cover to the direction of the arrow B Open the cover 2 Insert the Smart Card to the slot A with the contact part B facing upward z Insert the card until it securely fits into the slot Inserting Removing the Smart Card 1 2 A B ...

Страница 40: ...ard To remove the card 1 Open the cover 2 Press the eject button C so the card comes out of the slot 3 Draw the card straight out NOTE z When a Smart Card is inserted RFID reading time Î page 52 becomes longer C ...

Страница 41: ...ove the USB device NOTE z You may need to install the driver for the USB device Follow the on screen instructions or refer to the instruction man ual of the USB device z You may need to install the driver again when connecting the device to another port z If the computer enters sleep while a USB keyboard or mouse is connected to the computer touching the USB key board keys or mouse will not resume...

Страница 42: ...umption increases Remove the USB device when it is not in use espe cially when operating by battery power To deactivate USB ports You can deactivate USB ports on the Cradle Select Disabled in Cradle USB Port of the Advanced menu of the Setup Utility Î page 86 ...

Страница 43: ...w window is displayed 3 Healthcare model Press the Camera button A to take a picture Field model with Camera Press the application button A1 A to take a picture A picture is displayed in the window z Save the picture A Click Save and specify the destination to save and file name then click OK z Copy the picture to clipboard A Click Copy to Clipboard z Delete the picture A Click Delete and then cli...

Страница 44: ...rch programs and files and press Enter Follow the on screen instructions Start up the Panasonic Camera Utility to take pictures and videos 1 Click Start All Programs Panasonic Panasonic Camera Utility NOTE z If you use this utility and other multi media software at the same time an error may occur Close all multi media software including this utility and restart this utility z If an error message ...

Страница 45: ...Light Zoom In Take Photo Functions to an Application Button z The light turns off automatically after a certain period of time Click Control Camera Light Settings to set your lighting duration preferences z To maximize battery and LED life it is not recommended to keep the light on for a long period of time Taking Pictures Switch the Light On and Off See below Take Photo Î page 46 Burst Shooting Î...

Страница 46: ... the camera image as a picture 1 Adjust the direction of camera zoom See above picture quality Î page 47 etc 2 Click or click Photos Take photo z While taking photos the icon changes to indicating the photo is being captured z You can assign the Take Photo function to an application button Î page 51 Assigning the Light Zoom In Take Photo Functions to an Application Button NOTE z You can view pictu...

Страница 47: ...referred settings and click OK z When the following boxes are checked Box A only Select to save or cancel after the photo is taken Save and delete icons will appear after the photo is taken Photo will be saved using default name date time Box B only Name the taken photo Photo can be named and saved using the windows File Name box that appears after photo is taken Photo can be deleted by selecting ...

Страница 48: ...deo 1 Click or click Video Start Recording While recording the icon changes to 2 Click or click Video Stop Recording NOTE z You cannot zoom or display the date time stamp while recording z When the distance between the camera and subject is too close the image may be out of focus z If you specify an externally connected storage device as the save destination the camera software may operate slowly ...

Страница 49: ...e Name box that appears after stopping the video Video can be deleted by selecting cancel Boxes A and B Select to save or cancel after the video is recorded Name the recorded video Save and delete icons will appear after the video is taken Video can be named after save icon is selected using the windows File Name box Setting Audio You need to connect an audio device to the compute via the Cradle S...

Страница 50: ...solution for the Image 1 Click Settings Video Format z Color Space Compression Set the compressed data format for the image z Output Size Set the image resolution NOTE z Make sure the image resolution is within the range of the display resolution of this computer Refer to Specifications Display Method in OPERATING INSTRUCTIONS z If you set Output Size the Frame Rate is automatically determined z T...

Страница 51: ...am parameter box shutter When assigning the Name function Î page 47 In the Program location box c program files panasonic panasonic camera utility pcam exe In the Program parameter box shutter_name 3 Click OK NOTE z When the Panasonic Camera Utility is not running and if you press the but tons to which these functions are assigned the Panasonic Camera Utility is activated z If you operate the Util...

Страница 52: ...ication tags NOTE z RFID Reader is typically used with specialized applications For further information ask the system administrator 1 Aim the RFID Reader A at the center of RFID tag 2 Press the RFID button B The application which supports the RFID authentication is run or read data is displayed B A A B ...

Страница 53: ... time becomes longer To prevent unintended operation If you press the RFID button on the handle accidentally the computer may operate in a manner that you do not intend You can set the RFID button so that it does not function Select Disabled in Handle Button of the Main menu of the Setup Utility Î page 85 ...

Страница 54: ... Barcode Reader A at the barcode 2 Press one of the Barcode Reader buttons B The LED lights red to indicate the reading position To prevent unintended operation If you press the Barcode Reader button on the handle accidentally the computer may operate in a manner that you do not intend You can set the Barcode Reader buttons so that they do not function Select Disabled in Handle Button of the Main ...

Страница 55: ... away when reading a larger barcode and closer in when reading a smaller barcode or a thinner barcode z Perform reading so that the entire symbol falls within the center of the red LED light z The reader can still read a barcode even if the barcode is not in the center of the red LED light However if a part of the barcode lies outside the LED light the barcode cannot be read Make sure the entire b...

Страница 56: ...et Trigger Mode to Software to set the computer to the software mode or Hardware to set the computer to the hardware mode 6 Press Enter 7 Press F10 and then select Yes and press Enter If the computer is set to undesired mode If you execute Load Default Values and then Save Values and Reboot in the Exit menu of the Setup Utility for example the computer may be set to a mode that does not match your...

Страница 57: ...failed Please end the barcode related application and then retry appears Exit the running barcode related application program and click Retry If the problem still persists restart the computer z If Initialization failed appears restart the computer If the reading window is dirty gently wipe the reading window with a cloth or a cotton swab moistened with water Do not allow materials that can easily...

Страница 58: ...Programs Intel MCA Platform Driver 2 Right click MCA Configuration Editor and click Run as admin 3 In the MCA Configuration Editor screen select the desired item read the explanation that appears and change the setting as required NOTE z If changing settings results in undesired operation reset them to the previous ones Using MCA Configuration Editor Explanation ...

Страница 59: ...u can slide your finger from both sides z When the fingerprint sensor does not enroll or authenticate your fingerprint properly You slid your finger too fast or too slow Your finger was soiled or it has a scar on the surface Your finger was wet or extremely dry Your fingerprint does not have sufficient data for personal identification For further information refer to Fingerprint Reader Î page 105 ...

Страница 60: ... Module to increase the secu rity level of your computer To access the online manual This manual describes Step 2 3 and the initial part of Step 4 For further information refer to the UPEK Protector Suite QL Help menu z Click Start All Programs Protector Suite QL Help Overview Recommended Installation Procedure Performed by the Computer Administrator Step 1 Performed by each user Step 4 User Finge...

Страница 61: ...or such an interaction 1 TPM Installation Refer to the Installation manual of Trusted Platform Module TPM z Click Start input c util drivers tpm readme pdf in Start search and press Enter 2 Fingerprint Utility Installation A Log on to Windows as an Administrator B Close all other programs C Click Start input c util drivers fngprint autorun exe in Start Search and press Enter D Click Next Installat...

Страница 62: ...of the available fingerprints appears in the display Enrollment to the hard disk All enrolled fingerprints are stored on the hard disk Hardware protection of the user data is not possible but multiple users can enroll their fingerprints z When the Finish screen appears read the description carefully z User Enrollment wizard starts Follow the on screen instructions NOTE z Enroll at least 2 fingers ...

Страница 63: ...er to the Cradle and connect an external keyboard to the Cradle 1 Register the Supervisor Password You have to register the Supervisor Password to proceed to the next step If you have already registered the Supervisor Password you can skip this step and move on to step 2 If you have not done this have enrolled your fingerprint using Protector Suite QL and have already made Power on Security effect...

Страница 64: ...ion data Back up this file periodically in a safe location such as removable disk to avoid data loss resulting from some accidents We recommend you to store the file in a removable disk or network drive because the benefit of Fingerprint authentication security can be reduced if you keep the file in the internal hard disk drive The backup password described below is necessary for bypassing the Fin...

Страница 65: ...eated on the fly using java script Web forms which looks as one form e g login field password field but internally created with 2 independent forms There can be auto submit problems with web forms which do not have Submit button All forms that you cannot submit with Enter will be entered by Password Bank but not submitted z Password Bank 1 limitations The following Windows applications cannot be s...

Страница 66: ...thorized access NOTE z The data enrolled in the fingerprint sensor is not image data You cannot restore fingerprint image data from the data enrolled in the fingerprint sensor 1 Disable Power on Security Performed by the Computer Administrator A Click Start All Programs Protector Suite QL Control Center The Fingerprint Control Center screen appears B Click Settings and click Power on Security C Re...

Страница 67: ...ick Start All Programs Protector Suite QL Control Center B Click Settings and click Power on Security C Select the fingerprint and click Remove Surely remove all of the fingerprints 3 Uninstall Protector Suite Performed by the Computer Administrator A Log on to Windows as an Administrator B Close all programs C Click Start Control Panel Uninstall a program D Double click Protector Suite and select...

Страница 68: ... cancel fingerprint dialog and you will be prompted for a password If you do not use Advanced Security enter your Windows log on password Otherwise enter your Advanced Security backup password CAUTION z If you used Advanced Security without a backup password There is no way to backup your data If biometrics authorization does not work there is no way to backup your data C Deleting the passport Use...

Страница 69: ...ion 2 Connect the AC adaptor to the DC IN jack on the Cradle 3 Insert the computer to the Cradle from the top facing the LCD panel to your side CAUTION z Hot or warm docking undocking is not possible with the Cradle z If connector contacts become dirty brush off the dirt Wipe off the water if attached Contact failure may occur To deactivate USB ports You can deactivate USB ports on the Cradle Sele...

Страница 70: ...ver for ultra mobile We recommend you to switch the output destination by pressing A1 button z When you use the external display only set the suitable number of colors resolution or refresh rate separately from when you use the internal LCD only or when you use the simultaneous display When you switch the display from the internal LCD to the external display the resolution of the external display ...

Страница 71: ...lay by using one of following steps Do not use other method Using application button 1 Healthcare model Press A1 button 1 Field model Press the application button to which Display Switch is assigned 2 Each time you press the button Internal LCD Simultaneous display External display 1 You can change the setting of application buttons Î page 18 2 To check to see or change the setting of application ...

Страница 72: ...turn the display to notebook only Follow the steps below A Right click the desktop and click Graphics Options B Click Output To Notebook C Right click the desktop and click Graphics Options D Click Output To Extended Desktop and click Monitor Notebook the external display will be set to primary device or Notebook Monitor the internal LCD will be set to primary device z To switch to the Extended De...

Страница 73: ... z Do not use sleep or hibernation function 2 Connect the AC adaptor to the DC IN jack A on the Cradle 3 Set the computer to the Cradle 4 Connect the LAN port B and the network sys tem server HUB etc by using a LAN cable 5 Turn on the computer Connecting LAN B A ...

Страница 74: ...ility allows you to enable or disable wireless devices from a pop up menu in the notification area In the default setting all wireless devices are enabled The Wireless Switch Utility icon The icon appears when click on the notification area It shows the status of wireless devices Indicates that the wireless devices are enabled Indicates that the wireless devices are off Indicates that the wireless...

Страница 75: ...N connection when a LAN cable is connected to the Cradle and your computer is set to the Cradle You need to install the Wireless Connection Disable Utility to use this function Installing the utility 1 Log on to Windows as an administrator 2 Click Start and input c util wdisable setup exe in Search programs and files and press Enter Follow the on screen instructions 3 Follow the on screen instruct...

Страница 76: ...tatuses the utility does not monitor the LAN port status the Wireless Switch Utility has not been started or LAN is disabled in the device manager Menu Right clicking the utility icon in the notification area opens a menu as follows Clicking the menu item causes the following utility action Monitoring LAN Cable ON Enables the Wireless Connection Disable Utility to monitor the LAN port and disables...

Страница 77: ...s used near by z To use wireless LAN set Wireless LAN to Enabled default in the Advanced Wireless Configuration menu of the Setup Utility Î page 86 Before using a wireless LAN turn the wireless LAN communication on Turning on off the wireless LAN communication 1 Click or on the notification area and click Open Network and Sharing Center 2 Click Change adaptor settings 3 Right click Wireless Networ...

Страница 78: ...ed to the wireless LAN setting is complete 5 Click Close NOTE z The settings depend on the network environment For further information ask the system administrator or the person in charge of the network z If you use the stealth type wireless LAN access point which restricts automatic detection of the wireless LAN access point take the following procedure If you do not perform the procedure below y...

Страница 79: ...ected to an IEEE802 11b g access point the connec tion will be temporarily interrupted z You can also change the IEEE802 11a setting in Device Manager A Click Start Computer System properties Device Manager z A standard user needs to enter an administrator password B Double click Network adapters and double click Intel R WiFi Link 5100 AGN C Click Advanced and then select Wireless Mode in Property...

Страница 80: ...t Bluetooth to Enabled default in the Advanced Wireless Configuration menu of the Setup Utility Î page 86 z The transmission rate will be lower when a microwave oven is used near by To turn on off Bluetooth Î page 74 Disabling Enabling Wireless Communication To check the Bluetooth communication status Î page 74 To check the wireless communication status To access the online manual 1 Click Start Al...

Страница 81: ...e loupe window click the Hide button B Alternatively you can click any part out of the loupe window or press and hold Alt and right click z To change the loupe window size drag the bottom right corner C The size range you can enlarge shrink depends on the screen s resolution NOTE z The magnified text or image in the loupe window is fixed at the moment that the part is magnified e g at the moment y...

Страница 82: ... or Left click to use in combination with the key s selected in step B above z When using the keyboard A Click Keyboard B Click the text box and then press the key used for the shortcut e g Alt Z Ctrl Alt Z etc NOTE When using shortcut function set the computer to the Cradle and connect an external keyboard to the Cradle Window shape Select the shape of the loupe window Autorun You can turn on off...

Страница 83: ...rd is displayed input your password When you start the Setup Utility with Supervisor Password z You can make the settings of all items of the Setup Utility When you start the Setup Utility with User Password z Note the following In the Advanced and Boot menus you cannot make the settings of all items In the Security menu you can change only the User Password when User Password Protection is set to...

Страница 84: ... Language English Japanese Product Information Computer information cannot be changed Model No Serial No System Information Processor Type Processor Speed Memory Size Available Memory Hard Disk BIOS Information BIOS Embedded Controller Accumulative Operating Time Access Level ...

Страница 85: ...tart up process When an external display is not con nected the information appears on the internal LCD even though the External Monitor is selected External Monitor Internal LCD Battery Charging Indicator When set to Flashing the battery charging indicator flashes at relatively long intervals while the battery is being charged On Continuous Flashing Environment Normal Temperature High Temperature ...

Страница 86: ...cute Disable Bit Capability Disabled Enabled Hyper Threading Technology Disabled Enabled Intel R Virtualization Technology Disabled Enabled Peripheral Configuration Legacy USB Support Disabled Enabled Cradle USB Port Disabled Enabled Camera Disabled Enabled XWireless Configuration Enter the sub menu 1 XSerial Port Configuration Used to configure the GPS and Barcode Reader Enter the sub menu 2 Wire...

Страница 87: ...ions with the original boot device that existed before at the position When you select Disabled in the following menu the disabled Boot Option is ignored and the boot device in the next Boot Option operates USB Floppy Disk 3 Hard Disk LAN 4 USB Hard Disk USB CD DVD Drive Disabled 3 It is recommended to use the Panasonic USB floppy disk drive optional CF VFDU03U 4 Only when connected to CF VEBH11AU...

Страница 88: ...nu Boot Prompt Configuration Setup Utility Prompt When Setup Utility Prompt is set to Disabled the message Press F2 for Setup 5 is not dis played on Panasonic boot screen However F2 F12 6 and Del will work even if the message is not displayed Disabled Enabled Password on Boot Disabled Enabled 7 Set Supervisor Password Enter the sub menu Hard Disk Lock Can be changed only when Set Supervisor Passwo...

Страница 89: ...he system without saving the changes Save Options Save Current Values Save the changes for all Setup options Load Previous Values Load previous values for all Setup options Load Default Values Load default values for all Setup options Boot Override Device Information To select a boot device which operates only in the next boot ing ...

Страница 90: ... the Cradle z CPU Systems check CPU z RAM XXX MB check Memory z HDD XXX GB check Hard Disk z Video check Video Controller z Sound 1 z Wireless LAN z Wireless WAN 2 z Bluetooth z GPS 3 z Touchscreen 1 When the diagnostic utility is running a loud beep will sound The beep will not sound if mute is using Windows 2 Only for model with wireless WAN 3 Only for model with GPS z When the video diagnostic ...

Страница 91: ...n on or restart the computer and press F2 or Del while Panasonic boot screen is dis played The Setup Utility starts up z If the password is requested enter the Supervisor Password z If you are using the computer after changing the settings from the status at the time of purchase we recommend that you make a note of the settings that are changed 3 Press F9 At the confirmation message select Yes and...

Страница 92: ... Not running diagnostic check Alternating blue and yellow Currently running diagnostic check The interval of the alternating colors differs depending on the type of diagnostic check currently running During memory diagnostic check the display may freeze for a long period of time Wait until the process is complete Green No problems discovered Red Problems discovered NOTE z Using the following proce...

Страница 93: ...ich hardware component is displayed as red and contact Panasonic Technical Support If the display is green and the message Check Result TEST PASSED is displayed the computer s hardware is operating normally Continue using the computer as it is If the computer still does not operate properly reinstall the software OPERATING INSTRUCTIONS Reinstalling Software 7 After the diagnostic check is complete...

Страница 94: ...complete NOTE z This function does not work when you turn on the computer for the first time or just after you reinstall Windows Start and shut down Windows 7 and then you can use the function z Connect the AC adaptor and do not remove it until restoration is complete 1 Turn on the computer and when Panasonic boot screen disappears press and hold F8 z If Enter Password is displayed during the foll...

Страница 95: ... off the computer and connect the CD DVD drive to the USB Port B Turn on the computer and press F2 or Del while Panasonic boot screen is displayed The Setup Utility starts up If the password is requested enter the Supervisor Password C Write down all of the contents of the Setup Utility and press F9 At the confirmation message select Yes and press Enter D Press F10 At the confirmation message sele...

Страница 96: ...nd mouse to the Cradle z Remove all peripherals except for the CD DVD drive the keyboard and mouse z Connect the AC adaptor and do not remove it until hard disk data erase is complete 1 Turn off the computer and connect the CD DVD drive to the USB port on the Cradle 2 Turn on the computer and press and hold F2 or Del while Panasonic boot screen is dis played The Setup Utility starts up z If the pa...

Страница 97: ...isplayed during the following procedures input the Supervisor Password or the User Password 7 Click Erase the whole data on the Hard Disk for security and click Next 8 At the confirmation message click YES 9 Click Continue 10 Click Continue again 11 Click YES Erasing the hard disk data starts 12 After erasing is completed remove the Product Recovery DVD ROM and click OK ...

Страница 98: ...e settings to the default values and then change the settings as necessary z If the problem persists the internal clock battery may need to be replaced Contact Panasonic Technical Support System CMOS Checksum Error Invalid Year System date restored to 01 01 2009 The date and time settings are not correct z Start the Setup Utility and set the correct date and time z If the problem persists the inte...

Страница 99: ...gging Spanish c windows support es migwiz c windows support es tools c windows support es logging Swedish c windows support sv migwiz c windows support sv tools c windows support sv logging Turkish c windows support tr migwiz c windows support tr tools c windows support tr logging Arabic c windows support ar migwiz c windows support ar tools c windows support ar logging Bulgarian c windows support...

Страница 100: ...razilian c windows support xc migwiz c windows support xc tools c windows support xc logging Romanian c windows support ro migwiz c windows support ro tools c windows support ro logging Serbian c windows support st migwiz c windows support st tools c windows support st logging Slovak c windows support sk migwiz c windows support sk tools c windows support sk logging Slovenian c windows support sl ...

Страница 101: ...sleep or hibernation automatically z Disconnect peripheral devices z If you connect to a network using wireless LAN function perform access point settings Î page 78 z If you do not use wireless LAN function turn off wireless LAN function Î page 77 If you use wireless LAN function refer to To enter sleep or hibernation Î page 24 to enter sleep on hibernation z Check that the software which constant...

Страница 102: ... and symbols z Use the character map Click Start All Programs Accessories Sys tem Tools Character Map Network Cannot connect to network z Set LAN Î page 73 Cannot check the computer s MAC address z Follow the steps below A Click Start All Programs Accessories Command Prompt B Input getmac fo list v and press Enter z Insert a space between fo and list and between list and v C Wireless LAN s MAC add...

Страница 103: ...set to Enabled Î page 86 Wireless switch Wireless Switch Utility Confirm that Wireless LAN is ON Î page 74 z This computer uses channels 1 through 11 1 when using IEEE802 11b g Check the channel being used by the access point 1 In the case of wireless communications the frequency band being used can be divided into segments so that different communications can be conducted on each band seg ment A ...

Страница 104: ...ent This item may be unavailable for some types of devices USB floppy disk drive does not work as a boot drive z Depending on the floppy disk drive you are using the computer may not boot properly The performance is confirmed by Panasonic USB floppy disk drive optional CF VFDU03U when the computer boots from the floppy disk z Set Legacy USB Support to Enabled in the Advanced menu of the Setup Util...

Страница 105: ...e 59 and Finger print Tutorial Click Start All Programs Protector Suite QL Fingerprint Tutorial z The sensor enrolls or authenticates no fingerprint or performs authentication poorly despite the correct way of finger sliding when your finger is in any of the conditions stated below Rough skin or injured finger with a cut or a skin inflammation Extremely dry Soiled with mud or oil Fingerprint has b...

Страница 106: ...puter by using your Windows log on password To access File Safe File Safe can be always accessed by using the File Safe backup password Other functions Replace Repair the sensor then follow the instructions in section Replacing sensor Î page 107 Some limited functions e g deleting passport is available without a func tional sensor In case of deleted operation it is necessary to cancel the fin gerp...

Страница 107: ...rent fingerprint In this case we recommend either to wait until your finger is usable again e g the injury heals or to delete the pass port Use Delete wizard and then reenroll new fingerprints Please note that in the latter case all your stored secret data passwords File Safe encryption keys will be lost To perform the delete operation it is neces sary to cancel the fingerprint verification operat...

Страница 108: ...y using Protector Suite QL If you acciden tally uninstalled Protector Suite QL you have to reinstall it If passport data was not removed during uninstallation everything will work automatically including File Safe If the passport data was removed during uninstallation the File Safe will recognize that the installation was changed and will offer to use the backup password instead Accessing File Saf...

Страница 109: ...ings again Note that the processing speed depends on the application software so this procedure may not make Windows faster z If you installed a resident software after purchase turn off the residence z Some moving files become slow if Aero turns off Disable the popup menu and Input Panel Tab A Open the Input Panel and click Tools Options Opening B Remove the check mark of Show the Input Panel tab...

Страница 110: ...le then operate by using the external keyboard z If the external keyboard and the Cradle are not available as an emergency countermeasure you can use the buttons that function as keys on the key board as shown below 2 Can be changed using SAS Button in the Main menu of the Setup Utility Others Healthcare model with Bar code Reader Healthcare model without Barcode Reader Field model Keyboard Enter ...

Страница 111: ...assword z As long as it is activated the PC Information Viewer will appear in front of all other screens z Depending on your network environment it may take sometime to start up PC Information Viewer z When you log on to Windows using a guest account some information may be announced as not found 1 Click Start All Programs Panasonic PC Information Viewer PC Information Viewer 2 Select the item to ...

Страница 112: ...nnecting the computer and keyboard to the Cradle you can save a copy of the screen as an image file by using the keyboard The default key combination to copy is Ctrl Alt F7 You can change it in the following proce dure A Log on to Windows as an administrator B Click Start All Programs Panasonic PC Information Viewer C Right click Screen Copy and click Properties Shortcut D Move the cursor to Short...

Страница 113: ...oration of the United States and or other countries Intel Core and PROSet are either registered trademarks or trademarks of Intel Corporation Adobe the Adobe logo and Adobe Reader are either registered trademarks or trademarks of Adobe Systems Incorpo rated in the United States and or other countries Bluetooth is a trademark owned by Bluetooth SIG Inc U S A and licensed to Panasonic Corporation Na...

Отзывы: