background image

Chapter 4

Working with Applications

42

In this example, three menus are available: Record, Edit, and Options. The Record 
menu is selected and shows the selection.

Graffiti 2 menu commands

Most menu commands have an equivalent Graffiti 2 Command stroke, which is 
similar to the keyboard shortcuts used to execute commands on computers. The 
command letters appear to the right of the command names. 

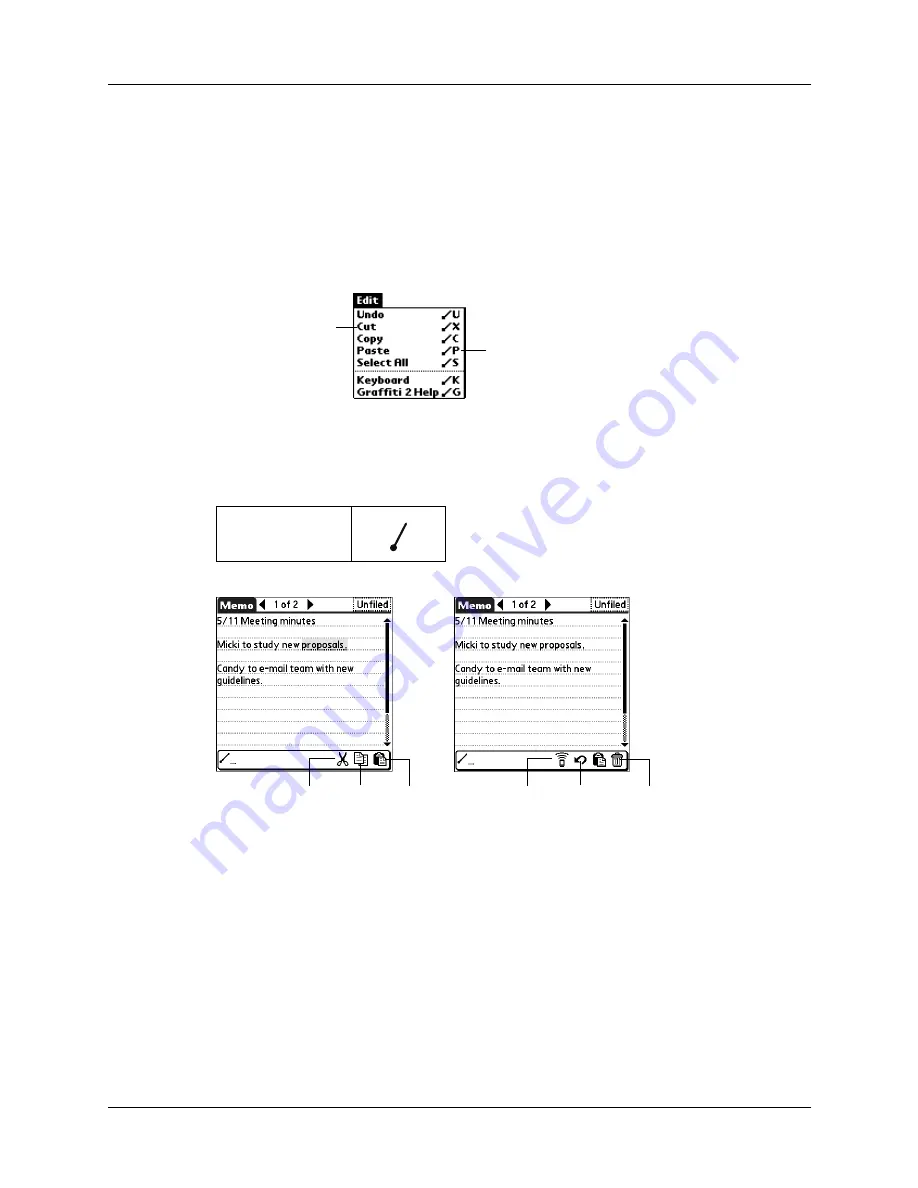
When you draw the Command stroke anywhere in the Graffiti 2 input area, the 
Command toolbar appears below the Graffiti 2 input area to indicate that you are 
in Command mode. The Command toolbar covers the status bar.

The Command toolbar displays context-sensitive menu commands for the active 
screen. For example, if text is selected, the menu icons displayed may be Undo, 
Cut, Copy, and Paste. Tap an icon to select the command, or immediately write 
the corresponding command letter for an appropriate command in the Graffiti 2 
writing area.

For example, to select Paste from the Edit menu, draw the Command stroke, 
followed by the letter 

p

.

Command mode is active only for a short time, so you must tap an icon or write 
the command letter immediately to select the menu command. 

Command


Command letters

Menu commands

Cut

Undo

Copy

Paste

Beam

Delete

Содержание T3

Страница 1: ...Handbook for the Palm Tungsten T3 Handheld TM TM...

Страница 2: ...resulting from the use of this handbook Palm assumes no responsibility for any loss or claims by third parties which may arise through the use of this software Palm Inc assumes no responsibility for...

Страница 3: ...ngratulations 4 Additional software 5 Performing a daily HotSync operation 5 Chapter 2 Exploring Your Handheld 7 Opening and closing your handheld 7 Locating front panel controls 8 Locating top and si...

Страница 4: ...computer 33 Importing data from a Mac computer 34 Using a portable keyboard 35 Chapter 4 Working with Applications 37 Opening applications 37 Opening expansion card applications 38 Switching between...

Страница 5: ...Setting Day View display options 65 Scheduling an event 66 Scheduling repeating or continuous events 69 Setting an alarm for an event 69 Setting an event location 71 Rescheduling an event 71 Using cat...

Страница 6: ...e Call History list 96 Chapter 9 Using Expense 97 Adding expense items 97 Changing the date of an Expense item 98 Entering receipt details 98 Customizing the Currency pick list 99 Changing the default...

Страница 7: ...ating photos 123 Viewing photo information 123 Creating an album 124 Filing photos in albums 124 Copying photos 125 Renaming or deleting an album 126 Beaming photos 126 Deleting photos 127 Working wit...

Страница 8: ...unts 148 Account and connection types 149 Network e mail account prerequisites 149 Creating an e mail account 152 Editing e mail accounts 160 Deleting an e mail account 160 Selecting a different servi...

Страница 9: ...4 Options menus 235 Chapter 18 Using Palm Web Pro 237 What Web Pro looks like 238 Getting help in Web Pro 238 Disconnecting from and connecting to the Internet 238 Browsing the web on your handheld 23...

Страница 10: ...display views 252 Changing link colors 252 Changing how images are downloaded 253 Changing your start and home page 253 Enabling or disabling autofill 254 Enabling or disabling cookies 255 Enabling o...

Страница 11: ...g a modem HotSync operation 287 Conducting Bluetooth HotSync operations 287 Preparing your computer for a Bluetooth HotSync operation 287 Preparing your handheld for a Bluetooth HotSync operation 289...

Страница 12: ...323 Disabling Call Waiting 324 Using a calling card 324 Connecting to your service 325 LAN access points 326 Accessing the Internet with a Bluetooth phone or LAN access point 326 Adding detailed infor...

Страница 13: ...eset 351 Appendix B Frequently Asked Questions 355 Software installation problems 356 Operating problems 357 Tapping and writing problems 359 Application problems 359 HotSync problems 361 Beaming and...

Страница 14: ...Contents xiv...

Страница 15: ...entium class computer One of the following operating systems Windows NT 4 0 Workstation and SP6 or later requires a serial cradle cable sold separately and administrator rights to install Palm Desktop...

Страница 16: ...separately and compatible with Mac OS 9 only Internet access requirements The requirements for Internet access are as follows Any one of the following A Bluetooth mobile phone An IR enabled mobile ph...

Страница 17: ...dle NOTE Your adapter may connect to the back of the USB connector not to the cradle itself d Plug the adapter into a working electric outlet Step 2 Charge your handheld a Place your handheld in the c...

Страница 18: ...help go to the Help menu in Palm Desktop software Mac The electronic Palm Desktop Software for the Macintosh User s Guide To access this guide open the Palm folder and then open the Documentation fol...

Страница 19: ...protects your data Place your handheld in the cradle and press the HotSync button Tip You can also perform a HotSync operation using Bluetooth communication For more information see Performing a Blue...

Страница 20: ...Chapter 1 Setting Up Your Palm Tungsten T3 Handheld 6...

Страница 21: ...d in communication while you are away from your desk Opening and closing your handheld When your handheld is open you can access additional controls on the front and back panels You can use your handh...

Страница 22: ...buttons Calendar Contacts Tasks and Note Pad See Buttons Preferences in Chapter 21 for details on reassigning these buttons to activate any application on your handheld Input area Customize this area...

Страница 23: ...n alert and also indicates the battery charging status when your handheld is in the cradle cable Power button The button turns your handheld on or off Expansion card slot The slot accepts Secure Digit...

Страница 24: ...es and to perform HotSync operations See Beaming data in Chapter 3 and see Conducting IR HotSync operations in Chapter 20 for more information Reset button Resets your handheld Under normal use you sh...

Страница 25: ...e information between your handheld and your computer using HotSync technology The universal connector also connects peripheral hardware devices to your handheld such battery pack HotSync cable or por...

Страница 26: ...software and data on your handheld To insert a card 1 Insert the card into the expansion slot with the label side facing the display 2 Push lightly against the card with your thumb To remove a card 1...

Страница 27: ...lus for tapping or for making strokes on the handheld screen Never use an actual pen pencil or other sharp object to write on the handheld screen because this will scratch the screen With your handhel...

Страница 28: ...tus bar Use the status bar for quick access to many functions For more information see Using the status bar in the next section Command buttons Tap a button to perform a command Command buttons appear...

Страница 29: ...g the navigator When you work with most applications the navigator on the front panel of your handheld makes it easy for you to navigate among and select your entries You can use the navigator to perf...

Страница 30: ...or next record This feature is not available in Contacts 3 Press Select in the center of the navigator to return to the list screen To navigate in dialog boxes While a pick list is open press Up or Do...

Страница 31: ...volume and screen brightness See Changing system information later in this chapter for more information Alert Tap to display the Attention Manager dialog box See Receiving alerts in Chapter 4 Bluetoo...

Страница 32: ...he Bluetooth preferences see Bluetooth Preferences in Chapter 21 Tap anywhere outside of the dialog box to close it Input area Tap to toggle between showing and hiding the input area Tap and hold to d...

Страница 33: ...ch way the screen rotates in landscape mode by choosing right or left handed rotation See Handedness Preferences in Chapter 21 Tap to open Bluetooth dialog box Tap to connect to your network Tap to op...

Страница 34: ...Chapter 2 Exploring Your Handheld 20...

Страница 35: ...enter text or numbers on your handheld TIP Full screen Writing enables you to use Graffiti 2 writing when the keyboard is open which makes it easy to switch between these two methods of entering data...

Страница 36: ...lication 1 Tap on an editable text field 2 Tap the Menu icon 3 Select Graffiti 2 Help from the Edit menu To access Graffiti 2 information from Quick Tour 1 Tap the Home icon 2 Tap the Quick Tour icon...

Страница 37: ...te character strokes in the Graffiti 2 input area for your handheld to recognize them You can write letters or characters in the following areas Left side of the screen letters or characters that are...

Страница 38: ...ting button on the status bar Graffiti 2 character set Graffiti 2 alphabet Tap here to turn on and off Draw numerals on the right side Draw letters on the left side Draw capital or uppercase letters i...

Страница 39: ...writing 25 Graffiti 2 numbers O P Q R S T U V W X Y Z Draw numbers on the 123 writing area Number Strokes Number Strokes 0 1 2 3 4 5 6 7 8 9 Draw letters on the abc and ABC writing area Letter Stroke...

Страница 40: ...r ABC writing area Mark Stroke Mark Stroke Period Ampersand Comma Carriage return Apostrophe At Space Straight quotes Question Tab Exclamation Draw these marks on the 123 writing area Mark Stroke Mark...

Страница 41: ...ift is active an up arrow symbol appears in the lower right corner of the handheld screen If you accidentally activate Punctuation Shift another Punctuation Shift stroke will cancel it NOTE Drawing tw...

Страница 42: ...ter and to make the character appear more quickly After the arrow disappears the symbol appears Graffiti 2 Gestures Draw gestures on the abc or ABC writing area Gesture Stroke Gesture Stroke Cut Paste...

Страница 43: ...ndheld behind the small dark shield The IR port supports the IrCOMM implementation of the standards for infrared communication established by the Infrared Data Association IrDA This means that you can...

Страница 44: ...operations in Chapter 20 for more details To select a business card 1 Create a Contacts record that contains the information you want on your business card 2 Tap the Menu icon 3 Tap Record and then ta...

Страница 45: ...enu icon 3 Tap App and then tap Beam 4 Tap the Beam From pick list 5 Select either Handheld or Card 6 Tap the application you want to transfer Some applications are copy protected and cannot be beamed...

Страница 46: ...r SMS communication to send information to and receive information from other devices To use your handheld for e mail communication you need to perform a HotSync operation with your computer by using...

Страница 47: ...ts and Memos only Tab delimited tab tsv txt Contacts and Memos only CSV Lotus Organizer 2 x 97 Mapping Contacts only vCal vcs Calendar only vCard vcf Contacts only Calendar archive dba Contacts archiv...

Страница 48: ...eature enables you to import Contacts and Memos information such as a company phone list to your handheld from a separate external file on your Windows computer You can configure the File Link feature...

Страница 49: ...9 Click OK 10 To add the imported data to your handheld perform a HotSync operation See Palm Desktop online Help for more information on importing and exporting data Using a portable keyboard You can...

Страница 50: ...Chapter 3 Entering Data on Your Handheld 36...

Страница 51: ...ening applications You can use the Home screen to open any application installed on your handheld or on expansion card You can also open Calendar Contacts Tasks Note Pad and Voice Memo with the applic...

Страница 52: ...n switches to the card and displays its contents and the pick list in the upper right corner of the screen displays the name of the card Switching between applications When working with any applicatio...

Страница 53: ...ap Done To display applications by category 1 Tap the Home icon 2 Do one of the following Tap the Home icon repeatedly to cycle through all your categories Tap the pick list in the upper right corner...

Страница 54: ...Handheld in the Copy from pick list the Copy To pick list appears only if there are multiple cards available 6 Tap an application to copy 7 Tap Copy 8 Tap Done NOTE If you view your applications on th...

Страница 55: ...me you want to copy an application only you must select the Copy Applications Only check box Using menus Menus on your handheld are easy to use Once you have mastered them in one application you can u...

Страница 56: ...put area to indicate that you are in Command mode The Command toolbar covers the status bar The Command toolbar displays context sensitive menu commands for the active screen For example if text is se...

Страница 57: ...application in which you want to create a record 2 Tap New 3 In Calendar only Select start and end times for your appointment and tap OK 4 Enter text for the record 5 Optional Tap Details to select at...

Страница 58: ...g the stylus Otherwise a quick tap or stroke may be interpreted as a Graffiti 2 character Deleting records To delete a record 1 Select the record you want to delete 2 Tap the Menu icon 3 Select the De...

Страница 59: ...ere is no archive option 4 Tap OK or in Expense tap Purge If you chose to save a copy of the purged records your handheld transfers them to an archive file on your desktop the next time you perform a...

Страница 60: ...rent category To display a category of records 1 Tap the category pick list in the upper right corner of the list screen 2 In the Calendar Day Week and Month views the pick list can be shown or hidden...

Страница 61: ...t Categories dialog box opens 3 Select the category that you want to rename and then tap Rename 4 Enter the new name for the category and then tap OK 5 Tap OK TIP You can group the records within two...

Страница 62: ...otes As your handheld searches for the text you can tap Stop at any time You may want to do this if the entry you want appears before your handheld finishes the search To continue the search after you...

Страница 63: ...t entry that starts with those two letters For example selecting s scrolls to Sands and selecting sm scrolls further to Smith If you sort the list by company name the Quick Look Up feature scrolls to...

Страница 64: ...record can be in Calendar Tasks Memos SMS or any other application that takes advantage of this feature 2 Tap the Menu icon 3 Select Options and then select Phone Lookup 4 Begin to spell the last name...

Страница 65: ...oice memo or memo to a new location in the list To make the list appear in Palm Desktop software as you manually sorted it on your handheld open the application in Palm Desktop software and click Sort...

Страница 66: ...t on the navigator to open the note and then press Select on the navigator again to close the note To delete a note 1 Tap the Note icon 2 Tap Delete 3 Tap Yes Choosing fonts In many applications you c...

Страница 67: ...eld When you use certain application settings your handheld can alert you to any of the following An appointment set in Calendar A note created in Note Pad A voice memo created in Voice Memo An alarm...

Страница 68: ...ions This section explains how to install and remove applications and other files on your handheld or on an expansion card and how to remove Palm Desktop software from your computer Installing files a...

Страница 69: ...even install compatible files directly from a Zip file Depending on the file type Palm Quick Install determines whether to install the files on your handheld or on an expansion card You can use any of...

Страница 70: ...be installed Expansion cards may also hold files that are not Palm application files To drag and drop applications or files onto the Palm Quick Install window 1 Copy or download the application s or f...

Страница 71: ...lication s or file s you want to install onto your computer 2 Double click the Palm Quick Install icon on the Windows desktop 3 In the User drop down list select the name that corresponds to your hand...

Страница 72: ...k Install Palm Quick Install displays a confirmation dialog box that shows whether the files will be installed on your handheld or on an expansion card 4 Click OK The selected files are placed in the...

Страница 73: ...or download the application you want to install into the Add on folder in your Palm folder 2 Double click the HotSync Manager icon in the Palm folder 3 From the HotSync menu select Install Handheld F...

Страница 74: ...otSync operation were not installed This can happen if the file type was not recognized during the HotSync operation Expansion cards may hold applications that use files other than the Palm applicatio...

Страница 75: ...longer synchronize with your computer If you want to synchronize data with another personal information manager PIM you need to have Palm Desktop software installed NOTE You may need to modify the st...

Страница 76: ...on CD ROM into the CD ROM drive on your computer 2 Double click the Software Installation CD ROM icon on your desktop 3 Double click the Palm Desktop Installer icon 4 From the Easy Install screen sele...

Страница 77: ...you when they happen NOTE Certain tasks are common among several handheld applications For more information see Chapter 4 Working with Applications To open Calendar Press the Calendar application butt...

Страница 78: ...he start and stop times for the calendar screens see Option menu Preferences later in this chapter Agenda View button Tap an appointment to go to event in Day View Tap a task to go to item in Tasks If...

Страница 79: ...lendar screens see Option menu Preferences later in this chapter Day View button Tap to view repeating Event Details dialog box Tap to view alarm Event Details dialog box Tap to view note Tap to view...

Страница 80: ...og box Make sure that no event is selected and then on the number side of the Graffiti 2 input area write a number for the start time of the event 4 Do one of the following Tap the time columns on the...

Страница 81: ...4 hours To schedule an event for another day 1 Select the date you want for the event by doing one of the following Tap the day of the week that you want in the date bar at the top of the screen If ne...

Страница 82: ...reate a new untimed event by making sure no event is selected and then writing letters in the Graffiti 2 input area 4 Enter a description of the event 5 Tap a blank area on the screen to deselect the...

Страница 83: ...inuous event tap the End on pick list and tap Choose Date Use the date picker to select an end date 7 Tap OK After you schedule a repeating or continuous event the Repeat icon appears at the far right...

Страница 84: ...u of the pending alarm and the reminder message appears again five minutes later Tap Go To to open Calendar Calendar will open and display the event associated with the alarm Alarm for untimed events...

Страница 85: ...ime tap the Time box and then tap a new time 4 To change the date tap the Date box and then tap a new date 5 Tap OK Using categories Categories are a way to group similar events so that they can be vi...

Страница 86: ...eek View 1 Tap the Week View button 2 Tap the navigation controls to move forward or backward a week at a time or tap on a column to display details of an event The Week View also shows untimed events...

Страница 87: ...references settings If you have an event before or after this time span a bar appears at the top or bottom of that day s column Use the onscreen scroll arrows to scroll to the event or press Up and Do...

Страница 88: ...that day in the Day View Tap the Input Area icon on the status bar to hide the input area so that you can view the previous and next months Setting Month View display options You can customize the Mo...

Страница 89: ...could schedule events that overlap an event that starts before a previous event finishes An event conflict time overlap appears in the Week View as overlapping bars The first event created appears as...

Страница 90: ...Date Range the Date Range dialog box opens you can set a start and end range using the Set Date dialog box 6 Tap Beam To receive a beamed category of events Perform on of the following in the Receive...

Страница 91: ...to send the selected event to another device The options available depend on the software installed on your handheld Start End Time Defines the start and end times for Calendar screens If the time slo...

Страница 92: ...Chapter 5 Using Calendar 78...

Страница 93: ...available storage space and a summary of its contents To review Card Information 1 Tap the Home icon 2 Tap the Card Info icon Renaming a card You can assign a name to each expansion card that appears...

Страница 94: ...can install applications to an expansion card after performing an initial HotSync operation See Installing files and add on applications in Chapter 4 for information For optimal performance we recomm...

Страница 95: ...fo help 81 Using Card Info help Card Info help is available to explain Card Info features To access Card Info help 1 Tap the Home icon 2 Tap the Card Info icon 3 Tap the Menu icon 4 Select Help from t...

Страница 96: ...Chapter 6 Using Card Info 82...

Страница 97: ...andheld Contacts opens to display the list of all your records TIP Press the Contacts application button repeatedly to cycle through the categories in which you have records Pressing and holding the a...

Страница 98: ...eld automatically capitalizes the first letter of each field You do not have to use the Graffiti 2 capital stroke to capitalize the first letter of the name Title Company City and State Text appears f...

Страница 99: ...o scroll to the year you want and then tap to select the birth month and date or tap Today to select the current date as the birthday TIP If you do not select a year the current year is displayed Tap...

Страница 100: ...Contact Edit screen 2 Select the field you want displayed The fields appear in a preset order on the Contact Edit screen NOTE Each field type can be displayed a certain number of times on the Contact...

Страница 101: ...r phone numbers and e mail addresses Select a new label For IM accounts Select the IM service you want to use or select IM if you do not want to specify a service You must set up an IM account with a...

Страница 102: ...Making connections from Contacts You can use the contacts in your Contacts list to launch applications that perform tasks such as dialing a phone number or creating an e mail or SMS message Some of t...

Страница 103: ...iates the related task For example if you tap a phone number Quick Connect sends the selected phone number to your mobile phone To use Quick Connect from the Contacts list 1 Highlight the contact to w...

Страница 104: ...act and initiate a related task by tapping it with the stylus By default Tap to Connect is not enabled To enable Tap to Connect 1 From the Contacts list tap the Menu icon 2 Select Option and then sele...

Страница 105: ...ts list screen or the Contacts Edit screen Record menus Duplicate Contact Makes a copy of the current record and displays the copy in Contacts Edit so you can make changes to the copied record The cop...

Страница 106: ...ry you selected If you deselect it Contacts displays the All category Rename Custom Fields These custom fields appear at the end of the Contacts Edit screen Rename them to identify the kind of informa...

Страница 107: ...bile Communications GSM phone in order to use Palm Dialer To open Palm Dialer 1 Tap the Home icon 2 Tap the Palm Dialer icon Configuring phone preferences and connecting to your mobile phone You need...

Страница 108: ...uickly redial the most recently dialed number from the Dialer screen To redial the most recently dialed number 1 Tap Dial when the numeric display is empty 2 Tap Dial again Tap and hold the 0 key to a...

Страница 109: ...rs on the speed dial button 5 Tap Done To dial a speed dial entry 1 Tap Speed 2 Tap one of the speed dial buttons The number is dialed and added to the Call History list You are now ready to communica...

Страница 110: ...t You can dial a number using the Call History list of 11 of the most recently dialed numbers To dial a number from the Call History list 1 Tap History 2 Tap an entry from the list 3 Tap Dial The numb...

Страница 111: ...E Certain tasks are common among several handheld applications For more information see Chapter 4 Working with Applications To open Expense 1 Tap the Home icon 2 Select the Expense icon Adding expense...

Страница 112: ...es see Attaching notes in Chapter 4 Changing the date of an Expense item You can change the date associated with any Expense item To change the date of an Expense item 1 Tap the Expense item you want...

Страница 113: ...is prepaid such as airline tickets supplied by your company you can choose Prepaid to place your expense in the appropriate company paid cell of your printed expense report Currency Enables you to cho...

Страница 114: ...Currency pick list 5 Tap the currency symbol that you want to appear in Expense 6 Tap OK Defining a custom currency symbol If the currency you want to use is not in the list of countries you can creat...

Страница 115: ...help for details This feature is not available on Mac computers Add modify and delete your Expense data Organize your Expense data by category amount date type or notes View Expense data in various fo...

Страница 116: ...letter of an expense type For example if you write the letter T it enters the Taxi expense type Writing T and then E enters Telephone which is the first expense type beginning with the letters TE To...

Страница 117: ...th Applications To open Memos 1 Tap the Home icon 2 Select the Memos icon Creating memos This section describes how to create a memo Each memo you create can be up to approximately 32KB in size To cre...

Страница 118: ...here in this book are described here See Using menus in Chapter 4 for information about selecting menu commands The Record and Options menus differ depending on whether you re displaying the Memo list...

Страница 119: ...Press the Note Pad application button on the front panel of your handheld Note Pad opens to display the list of all your records TIP Press the Note Pad application button repeatedly to cycle through t...

Страница 120: ...e the time you created the note appears as the note title This makes it easy to locate and review your notes To review a note 1 In the Note Pad list select the note title TIP You can also select revie...

Страница 121: ...et Alarm dialog box reappears 6 Tap the Time box 7 Tap the hour and minute columns to select the time you want the alarm to occur 8 Tap OK 9 When the alarm goes off and the reminder message appears on...

Страница 122: ...n the selected category to another device The options available depend on the software installed on your handheld Send Note Opens a dialog box where you can choose how you want to send the selected no...

Страница 123: ...n A wire based link that connects your handheld to a mobile phone with a physical cable Serial cables and mobile phones that are enabled with infrared or Bluetooth technology are sold separately What...

Страница 124: ...with your handheld Setting up a phone connection The instructions in this section assume that you have already installed the desktop software that came with your handheld and that you have performed...

Страница 125: ...pick list options vary based on the phone model 9 Tap Next 10 If you selected Infrared or Cable in step 8 skip to Configuring network service settings for your phone later in this chapter If you selec...

Страница 126: ...xchange between two Bluetooth devices that have formed a connection with each another The passkey is stored on both devices and you must enter the same passkey on both your handheld and phone If Phone...

Страница 127: ...to use your handheld to connect to the Internet and to send and receive e mail you must configure network service settings for your phone To configure a GPRS high speed wireless data service connecti...

Страница 128: ...tapping Yes in step 11 of the To configure Bluetooth settings for your phone connection procedure tap Next on the Network Service Setup screen If you do not see the Network Service Setup screen tap t...

Страница 129: ...handheld See Bluetooth Preferences in Chapter 21 for instructions 2 From the Windows Start menu select Programs select Palm Desktop and then click Phone Link Updater 3 Follow the instructions on the s...

Страница 130: ...g on the type of link you configured infrared cable or Bluetooth refer to the appropriate set of instructions in this section By default your handheld disconnects automatically when the connection is...

Страница 131: ...eld and your mobile phone 2 Activate Bluetooth on your handheld and phone 3 Make sure your phone is within 10 meters approximately 30 feet of your handheld 4 Launch the application that requires the p...

Страница 132: ...Chapter 12 Using Phone Link 118...

Страница 133: ...the Home icon 2 Tap the Photos icon Viewing photos You can use Palm Photos to transfer photos from your computer or receive photos beamed from another device and then view the photos on your handheld...

Страница 134: ...ress Select on the navigator to insert the highlight press Up Down Right or Left to highlight a specific photo and then press Select to view the photo 4 Tap anywhere on the screen to return to Thumbna...

Страница 135: ...screen to return to List view Sorting photos in List view In List view you can sort photos in ascending or descending order by name or date To sort photos in List view 1 Tap a column heading to sort...

Страница 136: ...how 1 Tap the Album pick list in the upper right corner and then select the album you want to view 2 Tap Slide Show To adjust the delay between photos during a slide show 1 Tap the Menu icon 2 Select...

Страница 137: ...g photo information The Photo Details dialog box enables you to view information about a photo and to change the photo name assign it to an album add a note about the photo and delete a photo To revie...

Страница 138: ...the upper right corner 2 Select Edit Albums 3 Tap New 4 Enter a title for the album 5 Tap OK and then tap Done Filing photos in albums You can organize the photos on your handheld by filing them into...

Страница 139: ...sion card When you copy a photo from an expansion card to your handheld a number is appended to the photo name If a photo was originally larger than the display area on your handheld 320 x 320 pixels...

Страница 140: ...Tap the Album pick list in the upper right corner 2 Select Edit Albums 3 Select the album you want to delete and then tap Delete 4 When the confirmation dialog box appears tap Delete 5 Tap Done Beami...

Страница 141: ...nt to delete An X appears next to the photo s you select 4 Tap Delete 5 When the confirmation dialog box appears tap Delete Working with photos on your computer After you perform a HotSync operation t...

Страница 142: ...For information on working with photos on your Mac computer open the Palm folder open the Documentation folder and double click the Photo and Audio Readme file Using Palm Photos menus Palm Photos menu...

Страница 143: ...messages in order for you to use SMS To open SMS 1 Tap the Home icon 2 Tap the pick list in the upper right corner of the screen 3 Tap Main 4 Tap the SMS icon Configuring phone preferences and connec...

Страница 144: ...ws Press Select again to view the selected message Press Up or Down to scroll to the previous or next message Press Left to remove the selection highlight To navigate in message screens Press Up or Do...

Страница 145: ...messages in your Outbox and retrieve all the new messages from your mobile phone at the same time To send and receive messages at the same time 1 Connect to your phone See Setting up a phone connectio...

Страница 146: ...ur phone Outbox Stores messages waiting to be sent Trash Stores messages you deleted You can restore deleted messages to their original category Archive Files messages you want to keep Draft Stores me...

Страница 147: ...raw data Working with draft messages When you create a message you can save it as a draft message To place a message in the Draft category 1 Create or open the message you want to store in the Draft...

Страница 148: ...o a message 1 Create or edit the message where you want to add your signature 2 From the New or Edit Message view tap the Menu icon 3 Tap Options and then tap Add signature Send Sends the message now...

Страница 149: ...e menu may be different depending on which application you re sending data from For example tap Send from the Note menu in Note Pad 4 If necessary tap SMS to send the data using SMS rather than Blueto...

Страница 150: ...e of the following sounds Alarm Alert Bird Concerto Phone Sci fi and Wake up NOTE When a new message triggers an alert sound tap anywhere on your handheld screen to stop the sound Confirm Deleted Mess...

Страница 151: ...ines whether you receive receipt confirmation notices To receive receipt confirmation notices select Requested Warn Over Determines whether you receive a warning when multipart messages exceed the spe...

Страница 152: ...n the Outbox Check Retrieves all messages stored on the phone Empty Trash Permanently removes all messages in the Trash category from your handheld Archive Moves the current message to the Archive cat...

Страница 153: ...among several handheld applications For more information see Chapter 4 Working with Applications To open Tasks Press the Tasks application button on the front panel of your handheld Tasks opens to dis...

Страница 154: ...priority 1 items at the top If you have a number of items in your list changing an item s priority setting may move its position in the list To set the priority of a task 1 Tap the Priority number on...

Страница 155: ...d a task to a category see Categorizing records in Chapter 4 Setting a due date You can set a due date that displays with the task To set a due date for a task 1 In the Details dialog box tap the Due...

Страница 156: ...Tap the Alarm check box 5 Select the 5 and then enter any number from 0 to 99 inclusive as the number of days 6 Enter or select the time 7 Tap OK An alarm icon appears next to the task in the Tasks li...

Страница 157: ...he task repeats every other month 8 To specify an end date for the repeating task tap the End on pick list and then tap Choose Date Use the date picker to select an end date 9 If you selected Week or...

Страница 158: ...e the date picker to select an end date 9 Tap OK After you schedule a repeating task the Repeat icon appears next to the task in the Tasks list Display options You can choose what tasks you want to vi...

Страница 159: ...lect Preferences from the Options menu All Displays a list of all tasks Date When Date is selected the Date filter pick list appears in the upper right corner below the title bar Select from the follo...

Страница 160: ...e still in the memory of your handheld You can purge completed items to remove them from memory Record Completion Date Replaces the due date with the actual date when you complete check the task If yo...

Страница 161: ...s e mail connectivity Enhanced use of color fonts styles and user selected display options Basic Hypertext Markup Language HTML formatting display for e mail messages received in HTML format Increased...

Страница 162: ...ade your e mail database for use with the VersaMail 2 6 application To upgrade an existing e mail database for use with the VersaMail application 1 Perform a HotSync operation with a user profile that...

Страница 163: ...ry sold separately External modem sled sold separately Infrared IR port on the handheld to IR port on a mobile phone Direct connection to a mobile phone by means of a physical cable HotSync cradle con...

Страница 164: ...you need for connecting to your ISP or mail server NOTE Information about your e mail account is available from the e mail provider Depending on the type of e mail service you have you may be able to...

Страница 165: ...ng server settings when you set up your corporate e mail account With a corporate e mail account you can access the following types of mail servers among others Microsoft Exchange Lotus Domino Sun iPl...

Страница 166: ...TE The auto get mail with notification feature in the VersaMail application may not work with a particular VPN connection Also you cannot use scheduled sending retry of e mail with accounts that use a...

Страница 167: ...ng the account username and password In the next part of the VersaMail Account Setup you enter the username and password for this account The VersaMail 2 6 application provides strong128 bit AES encry...

Страница 168: ...the account you are accessing as well as enter the names of the outgoing and incoming mail servers To enter mail server settings 1 If you chose a preconfigured service from the Mail Services pick list...

Страница 169: ...VersaMail application tap Done This takes you to the Inbox of the account you set up See Getting sending and managing e mail later in this chapter for information on getting and sending e mail If you...

Страница 170: ...mail ONLY Delete messages on server To delete messages on your provider s mail server when they are deleted in the VersaMail application select the Delete messages on the server when they are deleted...

Страница 171: ...tachments Because downloading large messages can consume handheld resources the VersaMail application displays the size of and asks if you want to continue downloading any message that exceeds your ma...

Страница 172: ...to messages check box and then enter the text of the signature This signature is attached to all your outgoing e mail 2 Tap Next BCC Select the BCC check box to send a blind copy of any e mail messag...

Страница 173: ...on your desktop Port Number The default is 25 the port number most SMTP servers use If you are not sure about the correct port number check with your mail server administrator Authentication Select th...

Страница 174: ...rocedures in Creating an e mail account earlier in this chapter and change the entries you want to edit on the appropriate screens Deleting an e mail account When you delete an account in the VersaMai...

Страница 175: ...on uses this service for sending and receiving messages for all e mail accounts you set up See Chapter 12 for information on setting up the default service for your handheld However for any given e ma...

Страница 176: ...ndheld When you reopen the application the e mail account you selected Earthlink in this example continues to connect using the new connection Modem in this example until you either select a new servi...

Страница 177: ...he Server Settings screen tap Details 7 Tap the Options pick list and then select Advanced Outgoing 8 Select the My server requires authentication ESMTP check box if the outgoing server SMTP requires...

Страница 178: ...organized You can manage the messages in your e mail accounts by moving messages between folders deleting old e mail messages individually or in groups and marking messages as read or unread Getting e...

Страница 179: ...l If you have e mail stored in your Outbox tap Get Send 2 In the Get Mail Options dialog box tap Subjects Only to download subjects only or tap Messages to download entire messages TIP You can deactiv...

Страница 180: ...ieving mail using a VPN connection you may be asked to enter the username and password you use to log in to the VPN If so enter the username and password See VPNs earlier in this chapter for more info...

Страница 181: ...ou must be in range of a network access point for the auto get to work Scheduling auto get mail When setting up a schedule you select the interval for retrieving mail the start and end times for retri...

Страница 182: ...e Resource issues with auto get mail later in this chapter for information on setting the interval Start Time Tap the Start Time box tap to enter the start time hour and minute and tap to enter AM or...

Страница 183: ...handheld alert you when a new message arrives in your account The beep or alert sound your hear is called a notification Your handheld also notifies you of a new message s arrival by blinking an indic...

Страница 184: ...on your handheld it appears on the Notify Sound pick list 6 To receive notifications of successful auto get mail and automatic send retries only deselect the Notify me of Auto Get and Send failures ch...

Страница 185: ...or Off To change whether or not the handheld indicator light blinks when you receive new e mail tap the Alarm LED pick list and then select On or Off To change whether or not the handheld vibrates wh...

Страница 186: ...fication appears on the Reminders screen tap the notification to go to the Inbox of that account or launch the VersaMail application and go to that account Once you view a message in the Inbox it is r...

Страница 187: ...t would display the number of messages retrieved after the successful retrieval Reminders screen notifications are specific for each account For example if auto get fails for one account but succeeds...

Страница 188: ...and thus need to recharge the battery more frequently Increasedmonthly charges If your e mail service provider is a wireless provider such as Cingular or T Mobile that charges a fee for data transacti...

Страница 189: ...elect to close the message If you chose to get messages by subjects only tap the More button to view the body of the e mail message plus any attachments up to the maximum message size you select If th...

Страница 190: ...ic image See Working with URLs later in this chapter for more information When you set the VersaMail application to receive e mail messages as HTML any messages sent as plain text will be displayed as...

Страница 191: ...Tap the folder you want to view Managing display options in the folder s list view You can customize the way in which messages appear in the list view of your mail folders The options you choose apply...

Страница 192: ...e the sort order 1 Tap Display 2 Tap the Sort by pick list and then select the column name 3 Tap Descend or Ascend to change the sort order 4 Tap OK To select a one line or two line view 1 Tap Display...

Страница 193: ...ding on whether you choose a one line or a two line view NOTE If you select Date the Date column displays the message time for any messages received today that is any message received after 12 01 A M...

Страница 194: ...en select the font style you want 6 Tap OK To select colors for read and unread mail 1 Tap Display 2 Tap the Unread pick list and then tap the color you want to use to display unread messages 3 Tap th...

Страница 195: ...e column divider to change the width of the column 3 Tap OK You can also change the font within an individual message This change affects the the font of all messages you compose To change the font of...

Страница 196: ...then select the font style you want 7 Tap OK Moving e mail between folders You can move one or more e mail messages between folders To move one e mail message 1 Tap the folders pick list in the upper...

Страница 197: ...o go to the Move To option and then press Select to select this option Alternately tap the icon to the left of the message and then tap Move To from the pop up menu The folders pick list appears 3 Pre...

Страница 198: ...each message icon TIP To select a group of adjacent messages drag the stylus to the left of the message icons A checkmark appears next to each selected message 3 Do either of the following Tap the Me...

Страница 199: ...htly between POP and IMAP e mail accounts as described in the following procedure To create and edit e mail folders 1 Tap the folders pick list in the upper right corner of the screen and then tap Edi...

Страница 200: ...accounts only select the check box if you also want to delete the folder on the server and then tap OK For POP accounts the folder will be deleted immediately and you will not see a confirmation scre...

Страница 201: ...age by entering the complete address To enter the address 1 On the New Message screen tap or navigate to the To field and enter the address and then tap Done For multiple recipients type a semicolon a...

Страница 202: ...perly addressed If you want to edit an e mail address that is longer than the line provided on the New Message screen tap the To field and edit the address 2 To send copies tap cc or bcc and then ente...

Страница 203: ...ing to address a message 1 On the New Message screen tap in the To field 2 Start entering the person s name such as Joe Smith Once the name is recognized from your Contacts list the name and e mail ad...

Страница 204: ...s and then tap Preferences 2 Tap Advanced 3 Tap the Enable Smart Addressing check box if it is not selected A checkmark means it is turned on 4 Tap OK Composing and sending e mail After you enter your...

Страница 205: ...out of range or the application cannot connect to the mail server you can choose to have the application move the message to the Outbox and continue to try to send the message at 30 minute intervals a...

Страница 206: ...try has failed NOTE You can choose to disable notifications for send retry failures See Setting notification options earlier in this chapter for instructions NOTE A broken envelope icon appears next t...

Страница 207: ...atic send retry See the next section Outbox icons in the VersaMail applications for icons that indicate messages awaiting the next automatic send retry as well as messages in the locked and error stat...

Страница 208: ...the Attach Signature check box to select it 4 Enter your signature information and then tap OK Forwarding e mail You can quickly forward e mail messages from any folder other than the Outbox folder To...

Страница 209: ...ext describing the forwarded message 7 Tap Send to send the message or tap Outbox to store it in the Outbox NOTE Forwarded messages are always sent as text only even if you received the original messa...

Страница 210: ...if you received the original message in HTML format To reply to an e mail message from the folders list 1 On the message screen tap the folder name in the upper left corner to open the message menu a...

Страница 211: ...Send to send the message now or tap Outbox to send it later NOTE Replies are always sent as text only even if you received the original message in HTML format Working with URLs You can tap a URL in a...

Страница 212: ...he attachment automatically opens in the appropriate application The types of attached files you can download and work with include the following HTML URLs and e mail addresses appear as blue underlin...

Страница 213: ...r desktop Microsoft Excel xls Automatically opens in the Sheets To Go application on your handheld You can view and edit the spreadsheet in the same way that you could using the Excel application on y...

Страница 214: ...ceeds your maximum message size you see a message showing that the message and or attachments were too large and asking if you would like to continue downloading them For example if the maximum messag...

Страница 215: ...her use the default viewer shown or select a viewer from the list For example if you have two photo viewing applications on your handheld and you select a photo attachment on the list the Viewer pick...

Страница 216: ...tap the message title If the message plus attachments exceeds the maximum message size the More button appears on the Message screen In the case of multiple attachments if some of the attachments wer...

Страница 217: ...tap No Follow the procedure for viewing an attachment presented earlier in this chapter To continue downloading all messages tap Yes When downloading is complete the Attachments dialog box appears sh...

Страница 218: ...files from the various handheld applications such as a Calendar appointment vcs ics tasks in the Tasks application vcs ics or text memos txt NOTE The maximum size message you can send is 60KB for the...

Страница 219: ...ypes that reside on your handheld that you are able to attach to an e mail message All files of the selected type appear in the Type box For example if you select Appointments vCal iCal tap Calendar t...

Страница 220: ...ed an expansion card and have saved files to the card you can attach files from the card to an e mail message you are sending The types of files you can attach from an expansion card include the follo...

Страница 221: ...rticular file type or select All Files to view all files on the card 5 Tap the file that you want to attach and then tap Add The selected file appears in the Attachments box 6 Repeat steps 6 and 7 for...

Страница 222: ...der When you delete a message it is placed in the Trash folder See Emptying the trash later in this chapter To delete messages on the server when you empty the trash on your handheld you can select th...

Страница 223: ...hen you empty the trash You can empty the trash manually or set the preference to automatically empty the trash By default the trash auto empties all deleted e mail older than one week See Emptying th...

Страница 224: ...number of days To empty the trash 1 Tap the Menu icon and then select Empty Trash from the Message menu NOTE If Auto Empty Mail from Trash is selected in VersaMail Preferences a message asks if you wa...

Страница 225: ...nd then select how often you want the e mail messages automatically emptied from the trash Immediately Older Than 1 Day Older Than 3 Days Older Than 1 Week Older Than 1 Month 4 Tap OK Marking messages...

Страница 226: ...ad or Mark Unread 4 For IMAP accounts only Tap Handheld to mark the messages as read or unread on your handheld Tap Both to mark the messages on both the handheld and the server If you tap Both this s...

Страница 227: ...1 Tap the Menu icon tap Options and then select Preferences 2 Select preferences Get Enables you to retrieve the subject only or the entire message Ask Every Time Displays a dialog box for choosing su...

Страница 228: ...ecord If you tap Add to Contacts from the body of an e mail message and a record already exists for the recipient name you are prompted either to update the e mail address for the recipient or to crea...

Страница 229: ...e many popular e mail applications called clients such as Microsoft Outlook Eudora Lotus Notes Outlook Express or any other e mail clients that use MAPI Configuring account settings in HotSync Manager...

Страница 230: ...nd account settings Next you must configure each e mail account s general synchronization settings For example if you created an Earthlink e mail account on the handheld and want to synchronize that w...

Страница 231: ...ayed in the Setup Notes box See the following table for additional setup information for each client TIP If your e mail application is compatible with Extended MAPI try Microsoft Exchange 5 0 or later...

Страница 232: ...net Options 3 Click the Programs tab 4 Select Microsoft Outlook as the default e mail program 5 Click OK NOTE Make sure your username and password are set up correctly within Microsoft Outlook Microso...

Страница 233: ...your desktop make sure that it is the path found in the notes ini file Eudora 5 0 or later If you are using Eudora as your e mail application you must set up MAPI in Eudora To set up MAPI in Eudora 1...

Страница 234: ...APOP on your handheld If you want to synchronize e mail for an account that requires ESMTP authentication for example Yahoo accounts require ESMTP authentication you must select the option to use ESM...

Страница 235: ...you want to synchronize e mail for an account that requires ESMTP authentication for example Yahoo accounts require ESMTP authentication you must select the option to use ESMTP on your handheld See Ad...

Страница 236: ...peration For other values the conduit synchronizes e mail for today and the number of days preceding today For example if you enter a value of 2 e mail is synchronized for today and yesterday but if y...

Страница 237: ...chose Microsoft Outlook Microsoft Exchange Lotus Notes or Direct IMAP as your mail client click Folder Synchronization Options Set folder synchronization options as follows a Click the name of the fo...

Страница 238: ...for this account Account information screens Two screens in the Palm VersaMail HotSync Conduit provide summary information on your accounts The Account Overview screen indicates whether the account is...

Страница 239: ...click Handheld Settings Palm VersaMail HotSync Conduit shortcuts You can use the icons in the toolbar to perform certain tasks quickly such as saving account configuration settings Icon Action Save ac...

Страница 240: ...ing the subject words Current Software Project only those same messages are synchronized between your desktop and your handheld Be sure to turn mail filters off if you want to synchronize all messages...

Страница 241: ...a Microsoft Outlook and a Microsoft Outlook Express account you must have Microsoft Outlook set as the default e mail client on the desktop The maximum number of accounts you can synchronize are as fo...

Страница 242: ...SSL for sending and receiving e mail messages The Palm VersaMail HotSync Conduit supports SSL when synchronizing with an e mail account only if that account uses one of the following desktop e mail a...

Страница 243: ...ly on your handheld Use your voice memos with alarms as reminder messages and share your voice memos with other people To open Voice Memo Press the Voice Memo application button on the side panel of y...

Страница 244: ...rs approximately 1 foot of your mouth while recording A tone sounds to indicate that recording has started 2 Face your handheld and begin speaking 3 Release the Voice Memo application button to stop r...

Страница 245: ...sed NOTE If you use other applications on your handheld while pausing the recording press and release the Voice Memo application button to resume recording later 6 Tap Record A tone sounds to indicate...

Страница 246: ...ansion card Additionally you cannot mark voice memos private or attach alarms to voice memos that are stored on an expansion card NOTE Palm works with developers of third party add on applications to...

Страница 247: ...t on the navigator to listen to the next or previous voice memo 3 Tap Done To adjust the volume 1 In the V Memo screen tap the Speaker icon 2 Drag the slider or press Up or Down on the navigator to ad...

Страница 248: ...u want the alarm to occur 8 Optional Tap the Auto play check box to automatically play the voice memo when the alarm goes off 9 Tap OK Using Voice Memo menus Voice Memo features that are not explained...

Страница 249: ...the alarm sound the deletion confirmation setting and whether to automatically store voice memos on an expansion card if one is present Security Displays the Change Security dialog box where you set...

Страница 250: ...Chapter 17 Using Voice Memo 236...

Страница 251: ...Pro 1 Tap the Home icon 2 Select All in the Category pick list in the upper right corner of the screen 3 Tap the Web Pro icon Web Pro may take a moment to load the first page IMPORTANT If you are in...

Страница 252: ...menu bar For information about menus see see Using menus in Chapter 4 Getting help in Web Pro Help is available in the following locations Tap the Menu icon and select Web Pro help in the Options menu...

Страница 253: ...owse the web in several ways Visit a web page by entering its URL Visit another web page by tapping a link Go back to the pages you have already visited by using the Back and Forward icons Visiting a...

Страница 254: ...letes the URL for you For more information on autofill see Enabling or disabling autofill Viewing different parts of a web page If the web page is larger than your screen you can tap and drag the styl...

Страница 255: ...just visited To go back to the last web page you visited Tap the Back icon To go back to an earlier page Tap the Back icon until you return to the page you want The list of visited pages which is limi...

Страница 256: ...F files with Web Pro Popular file types that Web Pro can download when native support is present on your handheld include applications prc and databases pdb for Palm OS software as well as documents d...

Страница 257: ...nge the page name or category 5 Tap Save Viewing and editing a saved page on the handheld When you open a saved page remember that you re seeing a copy of the actual page To open a saved page 1 Open t...

Страница 258: ...1 Open the menus 2 Select View Saved Pages from the Page menu 3 Tap the name of the saved page you want to delete 4 Tap Delete A confirmation dialog box appears 5 Tap OK 6 Tap Done Viewing files on an...

Страница 259: ...sh the page To refresh a page Tap the Refresh icon You can also view old content instead of accessing the Internet See Controlling how Web Pro accesses the Internet Viewing information about a web pag...

Страница 260: ...opy text select the text and use the options from the Edit menu For more information about the edit functions see Editing records in Chapter 4 When editing note the following None of the Edit options...

Страница 261: ...outbox Use your e mail application such as VersaMail to send the e mail message You are returned to Web Pro and to the web page you were viewing Beaming a URL You can share your favorite web pages wit...

Страница 262: ...ou stopped In the same way you can bookmark a web page for later reference A bookmark in Web Pro doesn t store the actual page instead it stores a reference to the page s URL Adding a bookmark If you...

Страница 263: ...it the name and URL of a bookmark and change its category To edit information about a bookmark 1 Do one of the following Tap the Bookmark icon and then tap Bookmarks Tap the Menu icon and then select...

Страница 264: ...rough the pages you recently visited one page at a time can be tedious Instead you can use the History list to view a list of the pages you visited and go directly to any page in that list The History...

Страница 265: ...nd Forward icons in the Web Pro action bar If you want to save the location or content of a web page indefinitely create a bookmark or a saved page for that page before clearing the History list For m...

Страница 266: ...a charges are reduced For more information on using a proxy server see Changing the proxy server later in this chapter To change display views 1 Open the menus 2 Select Options and then tap one of the...

Страница 267: ...mages pick list 4 Tap OK Changing your start and home page You can select the start page you want Web Pro to open to when you first open the browser You can also change your home page to any web addre...

Страница 268: ...lect a URL 6 Tap OK Enabling or disabling autofill Filling out an order form or application on the web usually requires entering several pieces of information your name address phone number and so on...

Страница 269: ...kie stores only the information you provide while visiting the web site By default Web Pro saves the cookies it receives You can tell it not to accept cookies You can also periodically delete cookies...

Страница 270: ...to remove the checkmark To enable JavaScript tap to select it 5 Tap OK Changing the size and content of the cache The cache in Web Pro consists of web pages that are stored so you can view them again...

Страница 271: ...ce your access costs To change connection settings 1 Tap the Menu icon 2 Select Preferences from the Options menu 3 Tap General 4 Tap the check box next to the following options to enable or disable t...

Страница 272: ...s by downloading web pages faster Your handheld comes with the proxy server turned on You can turn the proxy server off or configure some other proxy server NOTE Normal view of the web pages is only a...

Страница 273: ...ox do one of the following To not use a proxy server tap to remove the checkmark To use a proxy server tap to select it If you want to use a proxy server other than the default Palm hosted proxy serve...

Страница 274: ...Chapter 18 Using Palm Web Pro 260...

Страница 275: ...corner of the Graffiti 2 input area and then tapping Go to Clock or when your handheld is off you can press Select on the navigator and then tap Go to Clock Viewing the time There are several ways fo...

Страница 276: ...he Date Time Preferences screen Similarly if you change the settings in the Date Time Preferences screen those settings become your system date and time and also appear under the primary location in W...

Страница 277: ...nt date 6 Tap Done To set the time 1 Tap Set Date Time 2 Tap the Set Time box 3 Tap the up or down arrow to change the hour 4 Tap each number of the minute and then tap an arrow to change the minutes...

Страница 278: ...locations display the date and time in two locations other than the primary location To select a secondary locations 1 Tap the pick list next to the secondary location 2 Tap the location you want to...

Страница 279: ...y the location name 7 Optional Tap the Time Zone box and select a time zone 8 Tap OK 9 Tap Done To set Daylight Saving options 1 From the Edit Location dialog box tap the This location observes Daylig...

Страница 280: ...odify a location 1 Tap a Location pick list 2 Select Edit List 3 Select the location you want to modify 4 Tap Edit 5 Adjust the settings See Adding a location earlier in this chapter for details 6 Tap...

Страница 281: ...ears in the Reminder bar and the alarm time appears on the screen Tap Go To to open World Clock and to dismiss the alarm Using World Clock menus World Clock features that are not explained elsewhere i...

Страница 282: ...Chapter 19 Using World Clock 268...

Страница 283: ...on Indirect methods include using a modem or network HotSync technology Selecting HotSync setup options You can choose when HotSync Manager will run If necessary you can adjust the local and modem Hot...

Страница 284: ...ur handheld With this option the HotSync Manager synchronizes data even when Palm Desktop software is not running Available only when the Palm Desktop software is running Starts HotSync Manager and mo...

Страница 285: ...on HotSync Enabled Disabled Activates the transport monitor and prepares your Mac computer to synchronize with your handheld By default the transport monitor is enabled to listen on USB and PalmConnec...

Страница 286: ...working 4 Close the HotSync Software Setup window Customizing HotSync application settings For each application you can define a set of options that determines how records are handled during synchroni...

Страница 287: ...ion settings on a Windows computer 1 Click the HotSync icon in the Windows system tray lower right corner of the taskbar You can also click the HotSync command on the Palm Desktop software menu bar 2...

Страница 288: ...operations 7 Click OK 8 Close the Conduit Settings window Conducting cradle cable HotSync operations The simplest way to synchronize data is to perform a direct HotSync operation by seating your hand...

Страница 289: ...ing start it On the Windows desktop click Start and then select Programs Navigate to the Palm Desktop software program group and select HotSync Manager Alternatively you can start the Palm Desktop sof...

Страница 290: ...eration the Palm Desktop software does the following Adds a username to your handheld Creates a folder for the username in the Users folder inside the Palm folder For example if you entered Jane Garci...

Страница 291: ...ith a modem The following steps assume that you have already installed Palm Desktop software See Step 4 Run Palm Setup Wizard in Chapter 1 if you have not installed this software To perform a local Ho...

Страница 292: ...n IR port and that supports the IrCOMM implementation of the Infrared Data Association IrDA standards This is especially useful if you travel with an infrared enabled laptop You simply enable infrared...

Страница 293: ...an IR HotSync operation If you do not have an Infrared option on the HotSync Manager menu complete the following steps a Make sure that Local Serial is selected on the menu b From the HotSync Manager...

Страница 294: ...Performing an IR HotSync operation After you complete the steps to prepare for performing an IR HotSync operation it s easy to perform the actual operation To perform an IR HotSync operation 1 Tap the...

Страница 295: ...puter 1 If necessary connect the cradle cable to the port of the computer you use for HotSync operations 2 Click the HotSync Manager icon in the Windows system tray 3 Select Setup and then click Local...

Страница 296: ...kind of modem connection you want to make See Connection Preferences in Chapter 21 for more information Preparing your computer for a modem HotSync operation Be sure to perform these steps before you...

Страница 297: ...c Controls tab and enable the Transport Monitor if it is not already enabled Serial Port Identifies the port for the modem If you are unsure of the port assignment look at the Modem Properties in the...

Страница 298: ...are a few steps you must perform to prepare your handheld for a modem HotSync operation To prepare your handheld for a modem HotSync operation 1 Tap the Home icon 2 Select the HotSync icon 3 Tap Mode...

Страница 299: ...ns later in this chapter 6 Enter the telephone number to access the modem connected to your computer 7 If necessary enter a dial prefix such as 9 to access an outside line and then tap the Dial Prefix...

Страница 300: ...conduit settings see the MS Outlook conduit help in HotSync Manager Follow these steps to access MS Outlook conduit help Click the HotSync icon in the Windows system tray Select Custom Select one of...

Страница 301: ...on 10 1 2 or later with the Apple Bluetooth software you can use Bluetooth technology to perform wireless HotSync operations NOTE Go to the web site www palm com support for additional information on...

Страница 302: ...k OK To prepare your Mac computer for a Bluetooth HotSync operation 1 Double click the HotSync Manager icon in the Palm folder 2 In the HotSync Controls tab select Enabled 3 Click the Connection Setti...

Страница 303: ...for details 2 Create a connection with your computer See Creating Bluetooth connections in Chapter 21 for details 3 Tap the Home icon 4 Select the HotSync icon 5 Tap the pick list in the center of the...

Страница 304: ...ailable only on Windows computers You must perform the first HotSync operation by using a local direct connection or infrared communication After that you can perform a network HotSync operation Conne...

Страница 305: ...ur handheld in the cradle cable and perform a HotSync operation The HotSync operation records network information about your computer on your handheld With this information your handheld can locate yo...

Страница 306: ...r 21 for information on creating a network or Bluetooth connection 8 Tap Service and select a service 9 Tap Done 10 Tap the Menu icon 11 From the Options menu select Conduit Setup For instructions see...

Страница 307: ...for changes to the external file when you perform a HotSync operation With File Link you can import data stored in any of the following formats Comma separated csv Memos archive mpa Contacts archive...

Страница 308: ...eir individual data file NOTE The handhelds that are synchronized with a user profile must be either new ones that have never been synchronized or handhelds that have had their usernames and data remo...

Страница 309: ...ync menu select Conduit Settings 9 Select the conduit settings for the profile For details see Customizing HotSync application settings earlier in this chapter Performing the first HotSync operation w...

Страница 310: ...ssign a username to the handheld To use a profile for a first time HotSync operation on a Mac computer 1 Connect the new handheld to the HotSync cradle cable 2 Press the HotSync button on the cradle c...

Страница 311: ...Select alternate strokes for selected Graffiti 2 characters Keylock Prevent your handheld from turning on accidentally Power Set these features auto shutoff interval Stay on in cradle Beam receive Pow...

Страница 312: ...Bluetooth Preferences You can connect your handheld with Bluetooth devices such as Mobile phones Computers Buttons Assign an application to the Favorites icon Reassign various applications to the fol...

Страница 313: ...other Bluetooth devices You must turn on Bluetooth communication to use any of the Bluetooth communication features Keep in mind that when Bluetooth communication is on your battery drains more quickl...

Страница 314: ...es You can use the Discoverable and Bluetooth settings to achieve three discovery states on your handheld The following is a description of setting combinations and the resulting discovery states Blue...

Страница 315: ...Tap Done Allowing Wakeup When your handheld is off the Allow Wakeup setting determines whether your handheld wakes up when you receive a connection request from another Bluetooth device that knows yo...

Страница 316: ...during specific hours 1 From the Communications Preferences list select Bluetooth 2 Tap the Allow Wakeup pick list 3 Select Scheduled 4 Tap the hours box 5 Tap the From box select the start time and t...

Страница 317: ...t a recognized passkey attempts to communicate with your handheld it goes through the discovery and authentication process and you can choose to accept or reject the communication To add a trusted dev...

Страница 318: ...phones also require you to put the phone into a mode where it can accept a key exchange for bonding in a trusted pair See the documentation included with your phone for information 7 Tap OK 8 Tap Done...

Страница 319: ...nates the extra step of retrieving a name remotely Disabling this feature is useful only if the name of a remote device has changed because it forces your handheld to retrieve the new device name To d...

Страница 320: ...Buttons Preferences The Buttons Preferences screen enables you to assign a frequently used application to the Favorite icon and to associate various applications with the buttons on the front and sid...

Страница 321: ...Graffiti 2 Help To change the pen preferences 1 From the Personal Preferences list select Buttons 2 Tap Pen 3 Tap the pick list and select one of the following settings for the full screen pen stroke...

Страница 322: ...e various color selections until you find the one you want to use 3 Tap Done Connection Preferences The Connection Preferences screen enables you to define the settings used to connect your handheld t...

Страница 323: ...en your handheld and a Bluetooth computer or laptop PC to Cradle Cable A local HotSync connection the direct connection between your handheld and your desktop computer Your handheld is connected by it...

Страница 324: ...hone connection 1 From the Communications Preferences list select Connection 2 Select the IR to GSM Phone connection 3 Tap Edit 4 Tap Details 5 Tap the Speed pick list and select the appropriate speed...

Страница 325: ...d wireless data networks provide an always on network connectivity and high speed wireless data transmission To connect to a high speed wireless data network you must have a GSM mobile phone the corre...

Страница 326: ...nformation on how to prepare it to accept a Bluetooth connection The documentation might refer to a Bluetooth connection as a Bluetooth pairing or a Bluetooth link 7 Tap the Device box The discovery p...

Страница 327: ...included with your handheld To create a connection with a non GSM phone 1 From the Communications Preferences list select Connection 2 Tap New 3 Enter a name for the connection 4 Tap the Connect to p...

Страница 328: ...ocation in the World Clock application and are used by all the applications on your handheld To set the location 1 From the General Preferences list select Date Time 2 Tap the Location pick list and s...

Страница 329: ...he arrows to change them 5 Tap OK 6 Tap Done To set the time zone and daylight saving time 1 From the General Preferences list select Date Time 2 Tap the Location pick list 3 Select Edit List 4 Select...

Страница 330: ...e the Formats Preferences screen to set the country default and the display format of the dates times and numbers on your handheld Country default The country default sets date time week start day and...

Страница 331: ...want the first day of the week to be Sunday or Monday This setting controls the Day Week and Month views in Calendar and all other aspects of your handheld that display a calendar 5 Tap the Numbers pi...

Страница 332: ...tion 1 From the Personal Preferences list select Handedness 2 Tap Left Handed or Right Handed 3 Tap Done Keylock Preferences Use the Keylock Preferences screen to prevent your handheld from turning on...

Страница 333: ...ns that enable your handheld to communicate with remote devices After you configure both the Connection and Network Preferences you can establish a PPP Point to Point Protocol connection with your ISP...

Страница 334: ...se Phone Link erases the current settings when it creates the new settings To add a new network service profile 1 From the Communications Preferences list select Network 2 Tap New An Untitled network...

Страница 335: ...entifies the password you use to log in to your server or ISP Your entry in this field determines whether your handheld prompts you to enter a password each time you log into your network If you do no...

Страница 336: ...ter for information about creating and configuring connection settings To select a connection 1 From the Communications Preferences list select Network 2 Tap the Connection pick list 3 Select the conn...

Страница 337: ...5 Tap Done Entering a prefix A prefix is a number that you dial before the telephone number to access an outside line For example many offices require that you first dial 9 to dial a number outside t...

Страница 338: ...hone company assigns a code to disable Call Waiting Contact your local telephone company for the code that is appropriate for you 5 Tap OK 6 Tap Done Using a calling card The Use calling card field en...

Страница 339: ...n and Network Preferences establishing a connection to your ISP or your company s network dial in server is easy To establish a connection 1 From the Communications Preferences list select Network 2 T...

Страница 340: ...these services to connect to the Internet when you are within range of the high speed wireless data network You can also configure Internet access with a GSM phone or high speed wireless data network...

Страница 341: ...or LAN access point connection when you created it 5 If you selected a Bluetooth phone connection in step 4 tap Phone and enter the dial up connection number for your ISP and then tap OK See Adding t...

Страница 342: ...t coverage you will lose your network connection with no notice If your network connection drops unexpectedly check your phone to see if a high speed wireless data network is active and available for...

Страница 343: ...e the Details dialog box to add more information to a selected network service profile To add connection details 1 From the Communications Preferences list select Network 2 Tap the service field 3 Tap...

Страница 344: ...a primary and secondary DNS 1 Tap the Query DNS check box to deselect it 2 Tap the space to the left of the first period in the Primary DNS field and then enter the first section of the IP address Eac...

Страница 345: ...odem or network connection The script is generally prepared by the system administrator and distributed to users who need it It automates the events that must take place to establish a connection betw...

Страница 346: ...ter on your handheld This command takes two arguments separated by a vertical bar on the input line Send Transmits specific characters to the TCP IP server to which you are connecting Send CR Transmit...

Страница 347: ...a login script after it terminates Created with the use of a development environment that supports Palm OS software such as Metrowerks CodeWarrior for Palm Platform For additional information on crea...

Страница 348: ...or your system administrator pinpoint where the login procedure communication fails and why To view the Network Log 1 From the Network Preferences screen tap the Menu icon 2 Select Options and then se...

Страница 349: ...right side of the screen If you assign a password using Security Preferences the information on the Owner Preferences screen cannot be changed In this case an Unlock button appears at the bottom of t...

Страница 350: ...onfirm that the selected driver works properly with your phone 5 Tap Done Power Preferences The Power Preferences screen enables you to set power consumption options Auto off after Your handheld has a...

Страница 351: ...le 4 Tap Done Beam Receive You can choose to turn off the Beam Receive feature This prohibits anyone from beaming information to your handheld It also results in a slight saving of battery power By de...

Страница 352: ...as private so that the information appears as gray bars Hide all records that you mark as private so that they do not appear on any screen You can mask and hide private records with or without a passw...

Страница 353: ...eral Preferences list select Security 2 Tap the Password box 3 Enter the current password 4 Tap OK 5 Do one of the following To change the password and hint enter the new password and hint and tap OK...

Страница 354: ...ock when you turn it off 1 From the General Preferences list select Security 2 Tap the Auto Lock Handheld box enter your password and then tap OK 3 Select On power off 4 Tap OK and then tap Done To se...

Страница 355: ...r handheld will present the hint you entered to help you remember the password If you still cannot remember the password you must perform a hard reset to resume using your handheld Performing a hard r...

Страница 356: ...next time you perform a HotSync operation but it does not restore the password To delete a forgotten password 1 From the General Preferences list select Security 2 Tap the Password box 3 Tap Lost Pas...

Страница 357: ...de Private Records 3 Tap OK to confirm that you want to hide private records 4 Tap Done To mask all private records 1 From the General Preferences list select Security 2 Tap the Current Privacy pick l...

Страница 358: ...password the Show Private Records dialog box appears Go to step 2 2 Enter your password and then tap OK To make a record private 1 Display the entry that you want to make private 2 Tap Details 3 Tap...

Страница 359: ...tCut characters TIP You may want to add a space character after the last word in your ShortCut text This way a space automatically follows the ShortCut text 5 Tap OK To use a ShortCut draw the ShortCu...

Страница 360: ...set To select a profile 1 From the General Preferences list select Sound Alerts 2 Tap the Custom Silent or All Off profile box TIP You can also press Right or Left on the navigator to select a profile...

Страница 361: ...The Game Sound setting works only with games that are programmed to respond to this setting Older games typically do not respond to this setting Alarm LED and Alarm Vibrate settings You can set alarms...

Страница 362: ...Chapter 21 Setting Preferences for Your Handheld 348 3 Tap the Alarm LED pick list and select On or Off 4 Tap the Alarm Vibrate pick list and select On or Off 5 Tap Done...

Страница 363: ...and should not be exposed to rain or moisture Under extreme conditions water may enter the circuitry through the front panel buttons In general treat your handheld as you would a pocket calculator or...

Страница 364: ...ndheld in the cradle cable to recharge the unit This helps prevent accidental data loss If the battery drains to the point where your handheld does not operate it stores your data safely for about a w...

Страница 365: ...t button inside the hole on the back panel of your handheld Performing a hard reset With a hard reset all records and entries stored in your handheld are erased Never perform a hard reset unless a sof...

Страница 366: ...t the appropriate username from the list 4 Select an application in the Conduit list 5 Click Change 6 Select Desktop overwrites handheld for each conduit Changing the HotSync setting from the default...

Страница 367: ...n Thereafter the HotSync Actions revert to their default settings To use a new setting on an ongoing basis click Make Default Thereafter whatever you selected as the default setting is used for HotSyn...

Страница 368: ...Appendix A Maintaining Your Handheld 354...

Страница 369: ...tion CD The Palm Knowledge Library accessible at www palm com support The most recent Palm Tungsten T3 handheld HelpNotes on your regional web site If you are still having problems contact Technical S...

Страница 370: ...s Run ScanDisk or another disk verification tool on your computer Install the latest Windows software updates to your computer If you are upgrading from an older Palm handheld or non Palm branded hand...

Страница 371: ...ns and files on a Windows computer in Chapter 4 When I add a Zip file to Quick Install no files appear in the Quick Install list Unzip the file with a file compression utility such as WinZip and then...

Страница 372: ...or three minutes Check the Auto off after setting on the Power Preferences screen See Power Preferences in Chapter 21 My handheld is not making any sounds Check the System Alarm and Game Sound settin...

Страница 373: ...ll screen Writing on For more information on Full screen Writing see Using Full screen Writing in Chapter 3 Write Graffiti 2 strokes for lowercase letters in the left side strokes for capital letters...

Страница 374: ...y View For more information see Spotting event conflicts in Chapter 5 My vCard or vCal e mail attachment isn t forwarding correctly Palm Desktop software provides several features that interact with e...

Страница 375: ...HotSync cradle cable On a Mac computer try these steps 1 Make sure HotSync Manager is enabled If it is not double click the HotSync Manager icon in the Palm folder and enable HotSync Manager on the H...

Страница 376: ...you need to rebuild the HotSync Manager registry entries Information on rebuilding the registry entries go to www palm com support and search the Palm Knowledge Library for error 8009 I tried to do a...

Страница 377: ...alog box On a Mac computer try each step in turn Make sure HotSync Manager is enabled on the HotSync Controls tab in the HotSync Software Setup window If you are using the optional serial cradle cable...

Страница 378: ...me you perform a HotSync operation Be aware that synchronizing more than one handheld with the same username causes unpredictable results and potentially loss of your personal information If you are s...

Страница 379: ...ences in Chapter 21 for details When I try to perform a HotSync operation using Bluetooth and a wireless LAN access point it connects but nothing happens Make sure that Network is selected on the HotS...

Страница 380: ...On your handheld be sure the HotSync application is set to Local with the option IR to PC Handheld Be sure the IR port of your handheld is aligned directly opposite to and within a few inches of the...

Страница 381: ...ving a 30KB application you must have at least 60KB free Perform a soft reset See Performing a soft reset in Appendix A for more information I cannot send data to another Bluetooth device Make sure th...

Страница 382: ...is selected in the Connection Preferences screen and the Phone Preferences screen If you are using a Bluetooth connection make sure that your phone is equipped with Bluetooth technology that Bluetooth...

Страница 383: ...nt with your wireless service provider Some wireless service providers require you to be on their network to use your e mail account If this is the case be sure to use your provider s network as the c...

Страница 384: ...may be turning on accidentally You can prevent your handheld from accidentally turning on by setting the Keylock feature See Keylock Preferences in Chapter 21 Problem Solution I forgot the password an...

Страница 385: ...pter 4 After you have deleted the application try to replicate the operation that created the error If removing the application solves your problem contact the application developer for a solution Fin...

Страница 386: ...efore re installing the third party applications If your handheld no longer has problems install the third party applications one application at a time using the following procedure To re install thir...

Страница 387: ...he actual error message or state you are experiencing The steps you take to reproduce the problem The version of handheld software you are using and available memory To find version and memory informa...

Страница 388: ...Appendix B Frequently Asked Questions 374...

Страница 389: ...to radio or television reception which can be determined by turning the equipment off and on the user is encouraged to try to correct the interference by one or more of the following measures Reorien...

Страница 390: ...s a small electrical data transmission under electrical transmission law Therefore you do not need a license from a government agency to operate this product This product has been certified as conform...

Страница 391: ...E marked The product fulfills the essential requirements of the harmonized standards shown above Manufacturers Name Palm Solutions Group Manufacturers Location 400 North McCarthy Blvd Milpitas CA 9503...

Страница 392: ...hinery Battery Warning Do not mutilate puncture or dispose of batteries in fire The batteries can burst or explode releasing hazardous chemicals Discard used batteries according to the manufacturer s...

Страница 393: ...POP adding to an account 163 and synchronization 220 requirement 150 Application buttons 8 37 63 83 105 139 306 Applications beaming 29 31 Calendar 63 Card Info 79 categories 39 Contacts 83 Dialer 93...

Страница 394: ...250 Brightness control Pen preferences 307 status bar 18 Broken envelope icon 172 192 Browsing files on a card 244 Browsing the web 239 241 Business card for beaming 30 Buttons preferences 306 307 C...

Страница 395: ...ing applications 361 for synchronizing applications Mac 274 shortcuts 225 SSL and 228 for synchronizing applications 273 352 synchronizing multiple accounts 227 Conflicting events 75 Connecting servic...

Страница 396: ...ces 314 315 Day Calendar view 66 Day View display options 65 displaying 65 events spanning midnight 67 Daylight Saving options 265 settings 264 DBA Calendar archive file 33 Decimal point 317 Default c...

Страница 397: ...on 177 forwarding 194 195 forwarding attachments 208 getting entire message 165 getting on desktop 216 221 getting subject only 165 HTML 176 icons 174 193 leaving mail on server 156 marking read and u...

Страница 398: ...o external 34 293 Finding information in applications 47 phone numbers 50 status bar button 17 using the Find application 48 Folders creating new 185 viewing other 177 Fonts 53 choosing fonts in appli...

Страница 399: ...duits for synchronizing applications 273 352 conduits for synchronizing applications Mac 274 customizing 273 274 first time operation 274 278 294 296 IR operation 278 281 linking to external files 34...

Страница 400: ...to install applications 273 Internet access 237 257 entering ISP information 326 using non GSM phones to access 313 IP address 329 330 IR port 10 See also Beaming and Infrared IR See Infrared IrCOMM 2...

Страница 401: ...ar 77 267 command equivalents Graffiti 2 writing 42 command toolbar 42 Edit menu 44 Expense 102 Memos 104 108 menu bar 14 41 Note Pad 108 Palm Photos 128 SMS 138 status bar button 17 Voice Memo 234 Wo...

Страница 402: ...3 Outbox 185 storing e mail 190 synchronizing 222 Outgoing server settings 154 Outlook connecting to 361 Overlapping events 75 Owner preferences 334 335 P Pages See Web pages Palm Photos albums 126 be...

Страница 403: ...97 getting mail 213 Graffiti 2 317 Network 319 334 Owner 334 Personal 298 Phone 335 Power 336 338 Security 338 ShortCuts 344 SMS 135 137 Sounds Alerts 346 348 Trash 211 Primary DNS 330 Prioritizing Ta...

Страница 404: ...ge in the History list 250 to your home page 241 S Saved pages deleting 244 opening 243 renaming 244 timestamp 243 Saving data 44 e mail messages 209 Schedule an event 66 Scheduled retrieval of e mail...

Страница 405: ...age downloading 253 Starting applications 38 Status bar button descriptions 17 location 14 Stopping a download 242 Stylus dragging with 13 pen stroke to activate a feature 307 tapping with 13 Sunday t...

Страница 406: ...03 304 Trusted pairs creating 313 Turning off handheld automatically 336 pen stroke for 307 problems with 358 Turning on handheld displaying owner s name 335 power button 9 problems with 357 U Uninsta...

Страница 407: ...old content 257 list of visited 250 refreshing 245 returning to 241 viewing information about 245 Week Calendar view 72 73 317 360 Wireless LAN access point locations 326 World Clock adding locations...

Страница 408: ...Index 394...

Отзывы: