184
Chapter 6
FRU List
Category
Description
Acer Part No.
ADAPTER
ADAPTER DELTA 65W 19V 1.7X5.5X11 YELLOW
ADP-65JH DB A, LV5 LED LF
AP.06501.026
ADAPTER DELTA 65W 19V 1.7X5.5X11 YELLOW
ADP-65VH BA, LV5, LOW PROFILE LED LF
AP.06501.033
ADAPTER LITE-ON 65W 19V 1.7X5.5X11
YELLOW PA-1650-22AC LV5 LED LF
AP.06503.024
ADAPTER LITE-ON 65W 19V 1.7X5.5X11
YELLOW PA-1650-69AW, LV5, LOW PROFILE
LED LF
AP.06503.029
ADAPTER HIPRO 65W 19V 1.7X5.5X11 YELLOW
HP-A0652R3B 1LF, LV5 LED LF
AP.0650A.012
ADAPTER CHICONY POWER 65W 19V
1.7X5.5X11 YELLOW CPA09-A065N1, LV5, LOW
PROFILE LED LF
AP.0650A.017
ADAPTER LITE-ON 90W 19V 1.7X5.5X11 BLUE
PA-1900-34AR, LV5 LED LF
AP.09003.021
ADAPTER HIPRO 90W 19V 1.7X5.5X11 BLUE HP-
A0904A3 B1LF, LV5 LED LF
AP.0900A.005
BATTERY
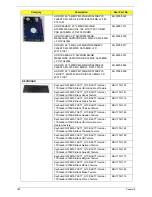
BATTERY SANYO AS10D LI-ION 3S2P SANYO 6
CELL 4400MAH MAIN COMMON ID:AS10D31
BT.00603.111
BATTERY SONY AS10D LI-ION 3S2P SONY 6
CELL 4400MAH MAIN COMMON ID:AS10D41
BT.00604.049
BATTERY PANASONIC AS10D LI-ION 3S2P
PANASONIC 6 CELL 4400MAH MAIN COMMON
ID:AS10D51
BT.00605.062
BATTERY SAMSUNG AS10D LI-ION 3S2P
SAMSUNG 6 CELL 4400MAH MAIN COMMON
ID:AS10D61
BT.00606.008
BATTERY SIMPLO AS10D LI-ION 3S2P
PANASONIC 6 CELL 4400MAH MAIN COMMON
ID:AS10D71
BT.00607.125
BATTERY SIMPLO AS10D LI-ION 3S2P LGC 6
CELL 4400MAH MAIN COMMON ID:AS10D73
BT.00607.126
BATTERY SIMPLO AS10D LI-ION 3S2P
SAMSUNG 6 CELL 4400MAH MAIN COMMON
ID:AS10D
BT.00607.127
BOARD
FOXCONN BLUETOOTH BRM 2046 BT3.0
(T60H928.33) F/W:861
BH.21100.008
FOXCONN BLUETOOTH ATH AR3011 (BT3.0)
BH.21100.009
FOXCONN BLUETOOTH BRM 2070 (T77H114.01)
BT 3.0
BH.21100.010
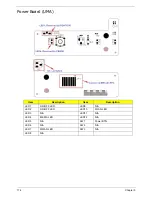
POWER BOARD-UMA
55.R4F02.001
Содержание ENTK83 Series
Страница 6: ...VI...
Страница 10: ...X Table of Contents...
Страница 38: ...28 Chapter 1...
Страница 55: ...Chapter 2 45...
Страница 56: ...46 Chapter 2...
Страница 71: ...Chapter 3 61 4 Detach the WLAN module from the WLAN socket...
Страница 88: ...78 Chapter 3 5 Lift the Bluetooth cable from the cable guides Discrete UMA...
Страница 99: ...Chapter 3 89 8 Remove the LCD assembly from the lower cover...
Страница 105: ...Chapter 3 95 5 Disconnect the inverter board cable going to the LVDS cable 6 Lift the inverter board from the LCD cover...
Страница 110: ...100 Chapter 3 5 Lift the microphone set clear of the panel...
Страница 116: ...106 Chapter 3 4 Replace the adhesive tape securing the microphone cable and the antenna together...
Страница 121: ...Chapter 3 111 4 Replace the adhesive tape securing the inverter board cable to the LCD cover...
Страница 122: ...112 Chapter 3 Replacing the Camera Module 1 Place the camera module in the LCD cover 2 Connect the camera cable...
Страница 127: ...Chapter 3 117 7 Replace the adhesive tape to secure the antennas to the lower cover...
Страница 138: ...128 Chapter 3 4 Connect the USB cable to the mainboard and lock the connector...
Страница 144: ...134 Chapter 3 Replacing the Upper Cover 1 Place the upper cover on the lower cover as shown...
Страница 145: ...Chapter 3 135 2 Connect the following three 3 cables to the mainboard 3 Connect and lock the power board FFC A A B C...
Страница 146: ...136 Chapter 3 4 Connect the speaker cable B 5 Connect and lock the touchpad FFC C...
Страница 148: ...138 Chapter 3 Replacing the RTC Battery UMA Only 1 Place the RTC battery into the mainboard connector...
Страница 150: ...140 Chapter 3 4 Slide the HDD module in the direction of the arrow to connect the interface...
Страница 160: ...150 Chapter 3...
Страница 188: ...178 Chapter 5...
Страница 219: ...Chapter 6 209...
Страница 228: ...Appendix A 200...
Страница 236: ...208 Appendix C...
Страница 240: ...212...


