background image

4.Advanced User Guidebook


54 

Seconds,  5 Seconds 

and

  Infinity

.


When  the  "

Infinity

"  option  is  set  for 

Persist


Time

the measuring points will be stored till the controlling value is 

changed. Select 

OFF

 to turn off persistence and clear the display.   

(5)  Select 

Clear

  in  the  bottom  menu  to  erase  the  results  of  previous 

acquisitions  from  the  display.  The  oscilloscope  will  start  to  accumulate 
acquisitions again.   

Color   

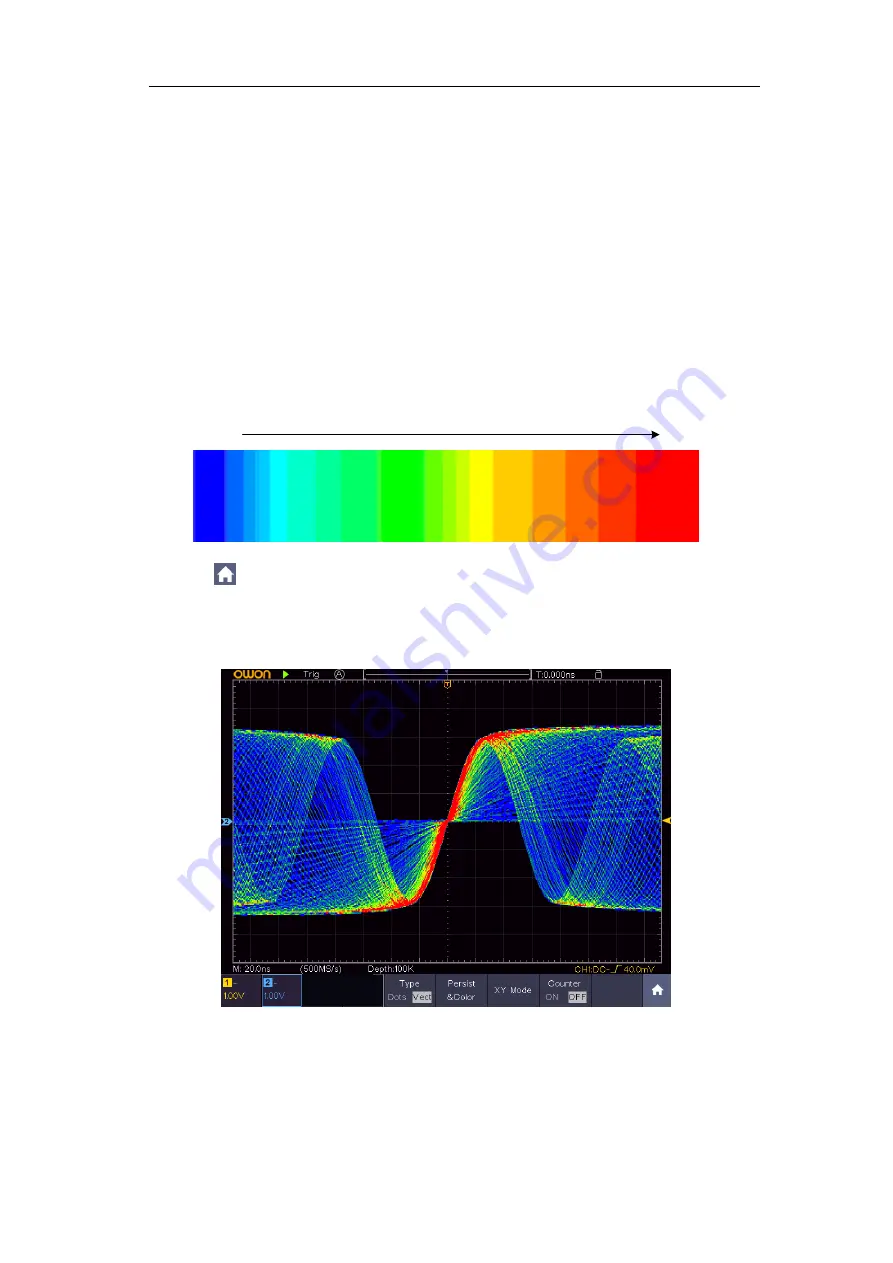
Color  temperature  function  uses  color-grading  to  indicate  frequency  of 
occurrence. The hot colors like red/yellow indicate frequently occurring events, 
and the colder colors like blue/green indicate rarely occurring events. 

Cold

Hot


(1)  Click 

  to call up the menu panel. Click the

 Display

 softkey on panel.   

(2)  Select 

Persist&Color

 in the bottom menu. 

(3)  Select 

Color

 in the right menu, choose between 

ON

/

OFF


Figure 4-6 The color temperature function is on


Counter 

It  is  a  6-digit  single-channel  counter.  The  counter  can  only  measure  the 
frequency of the triggering channel. The frequency range is from 2Hz to the full 

Содержание TAO3000 Dual-Channel Series

Страница 1: ...TAO3000 Dual Channel Series Tablet Oscilloscopes User Manual www owon com ...

Страница 2: ...eplace all materials published The information in this manual was correct at the time of printing However LILLIPUT will continue to improve products and reserves the rights to change specification at any time without notice is the registered trademark of the LILLIPUT Company Fujian LILLIPUT Optoelectronics Technology Co Ltd No 19 Heming Road Lantian Industrial Zone Zhangzhou 363005 P R China Tel 8...

Страница 3: ...purchase is also required This warranty shall not apply to any defect failure or damage caused by improper use or improper or inadequate maintenance and care OWON shall not be obligated to furnish service under this warranty a to repair damage resulting from attempts by personnel other than OWON representatives to install repair or service the product b to repair damage resulting from improper use...

Страница 4: ...ction to the Horizontal System 14 Introduction to the Trigger System 15 Touchscreen Controls 16 4 Advanced User Guidebook 22 How to Set the Vertical System 23 How to Set the Horizontal System 25 Waveform Horizontal Zooming 26 Magnifier For specific models 26 How to Operate the Function Menu 28 Set the Trigger Decoding System 28 Single Trigger 29 Logic Trigger 37 Bus Trigger 38 Bus Decoding Optiona...

Страница 5: ...easuring Resistance 97 Testing Diodes 97 Testing for Continuity 98 Measuring Capacitance 98 Multimeter Features 98 Data Hold Mode 98 Making Relative Measurements 98 Information Display 99 Auto or Manual Range 99 Multimeter Recorder 99 6 Communication with PC 102 Using USB Port 102 Using LAN Port 103 Connect directly 103 Connect through a router 104 Using Wi Fi to Connect with PC 106 Connect with P...

Страница 6: ... 119 Example 4 Analyze the Details of a Signal 121 Example 5 Application of X Y Function 122 Example 6 Video Signal Trigger 124 9 Troubleshooting 125 10 Technical Specifications 126 Oscilloscope 126 Trigger 129 Multimeter 131 General Technical Specifications 131 11 Appendix 133 Appendix A Enclosure 133 Appendix B General Care and Cleaning 133 Appendix C Battery Using Guide 134 ...

Страница 7: ... probe or test lead is connected to a voltage source please do not connect and disconnect the probe or test lead at random Check all Terminal Ratings To avoid fire or shock hazard check all ratings and markers of this product Refer to the user s manual for more information about ratings before connecting to the instrument Do not operate without covers Do not operate the instrument with covers or p...

Страница 8: ...Warning It indicates an injury or hazard may be accessible potentially Caution It indicates a potential damage to the instrument or other property might occur Safety Symbols Symbols on the product The following symbol may appear on the product Hazardous Voltage Refer to Manual Protective Earth Terminal Chassis Ground Test Ground To avoid body damage and prevent product and connected equipment dama...

Страница 9: ...pe is connected to the AC powered PC through the ports Warning To avoid fire or electrical shock when the oscilloscope input signal connected is more than 42V peak 30Vrms or on circuits of more than 4800VA please take note of below items Only use accessory insulated voltage probes and test lead Check the accessories such as probe before use and replace it if there are any damages Remove probes tes...

Страница 10: ...he user interface How to implement the general inspection How to implement the function inspection How to make a probe compensation How to set the probe attenuation coefficient How to use the probe safely How to implement a self calibration Introduction to the vertical system Introduction to the horizontal system Introduction to the trigger system Touchscreen controls ...

Страница 11: ...3 4 7 12 11 9 6 2 5 8 13 Figure 3 1 Front panel 1 LCD touchscreen 2 CH1 CH2 buttons Access to setting menu of CH1 CH2 3 Power button Power on off 4 The upper knob When one of the CH1 CH2 buttons is lighted this knob is used to adjust the vertical position of current channel When HOR button is lighted this knob is used to adjust the horizontal positions of all channels including mathematical operat...

Страница 12: ...utton a prompt will show press again to execute the factory settings 10 Autoset button Quick way to apply a set of pre set functions to the incoming signal and display the best possible viewing waveform of the signal 11 Single button Set the trigger mode as single directly 12 Run Stop button Enable or disable sampling on input signals 13 DMM button Quickly turn on or off the multimeter measurement...

Страница 13: ...ipment connects to the oscilloscope regarded as host device For example Saving the waveform to USB flash disk needs to use this port 5 LAN port the network port which can be used to connect with PC 6 Connector for the DC power source via an AC DC adapter Top Panel Input connectors of channels Input connectors of multimeter Figure 3 3 Top Panel User Interface Introduction 1 3 9 16 28 25 6 8 10 12 1...

Страница 14: ...indicates that there is a USB disk connecting with the oscilloscope 13 Indicating battery power status see Display on P51 14 Multimeter window 15 The waveform of CH1 16 The pointer shows the trigger level position of the source in trigger menu 17 The two blue dotted lines indicate the horizontal position of cursor measurement 18 The waveform of CH2 19 The frequency of the trigger signal 20 The ico...

Страница 15: ...ding datum point zero point position of the waveform of the CH1 channel How to Implement the General Inspection After you get a new oscilloscope it is recommended that you should make a check on the instrument according to the following steps 1 Check whether there is any damage caused by transportation If it is found that the packaging carton or the foamed plastic protection cushion has suffered s...

Страница 16: ...rument The instrument carries out all self check items and shows the Boot Logo Push the Default button on the front panel The default attenuation coefficient set value of the probe on the menu is 10X 2 Set the Switch in the Oscilloscope Probe as 10X and Connect the Oscilloscope with CH1 Channel Align the slot in the probe with the plug in the CH1 connector BNC and then tighten the probe with rotat...

Страница 17: ...ok tip is used ensure that it keeps in close touch with the probe Connect the probe tip with the signal connector of the probe compensator and connect the reference wire clamp with the ground wire connector of the probe connector and then push the Autoset button on the front panel 2 Check the displayed waveforms and regulate the probe till a correct compensation is achieved see Figure 3 6 and Figu...

Страница 18: ...ake sure that the set value of the attenuation switch in the probe is the same as the menu selection of the probe attenuation coefficient in the oscilloscope The set values of the probe switch are 1X and 10X see Figure 3 8 Figure 3 8 Attenuation Switch Caution When the attenuation switch is set to 1X the probe will limit the bandwidth of the oscilloscope in 5MHz To use the full bandwidth of the os...

Страница 19: ...rming a self calibration disconnect all probes or wires from the input connector Click the icon select the Utility softkey select Function in the bottom menu select Adjust in the left menu select Self Cal in the bottom menu run the program after everything is ready Introduction to the Vertical System As shown in Figure 3 10 there are a few of buttons and knobs in Vertical Controls Press one of the...

Страница 20: ...the AC component of the signal with a higher sensitivity Vertical offset back to 0 shortcut key Turn the upper knob to change the vertical display position of the selected channel and push the upper knob to set the vertical display position back to 0 as a shortcut key this is especially helpful when the trace position is far out of the screen and want it to get back to the screen center immediatel...

Страница 21: ...o adjust the horizontal position of the signal in the waveform window The upper knob is used to control the triggering displacement of the signal or for other special applications If it is applied to triggering the displacement it can be observed that the waveform moves horizontally with the knob when you rotate the upper knob Triggering displacement back to 0 shortcut key Turn the upper knob to c...

Страница 22: ...al which is mainly applied to the Normal and Single trigger modes Touchscreen Controls You can control the oscilloscope by different gestures The touchable icon at the top right of the screen is used to enable or disable the touchscreen controls The instruction of touchscreen controls is as below Run Stop Click the or on the left top of the display area to run or stop the waveform sampling Force t...

Страница 23: ...shown click to turn on the function and enter the menu When ON is shown and unselected click to enter the menu click again to turn off Set the channel status Click the channel on the left bottom of the display area you can turn on select or turn off the channel You can also touch the channel pointer on the left side of the display area to make it in selected state Channel is off Channel is on and ...

Страница 24: ...down to control the vertical position of the selected channel Control the horizontal position Control the vertical position of the selected channel Click the P icon to fine turn long press to adjust continuously Set the trigger level Click in the area as shown in the figure below the L icon will appear Click anywhere outside the icon to hide it Note Swipe up down in this area you can make the icon...

Страница 25: ...on to fine turn long press to adjust continuously Control the trigger level of the source in the trigger menu Set the time base and the voltage division Click in the area as shown in the figure below the M and V icons will appear Click anywhere outside the icon to hide it Note Swipe up down or left right in this area you can make the icon appear and control it ...

Страница 26: ...y Control the time base Control the voltage division In the full screen pinch and spread horizontally to change the time base pinch and spread vertically to change the voltage division of the selected channel Measure with Cursors Click nearby a cursor line as shown in the figure below the line will be selected and the C icon will appear Click anywhere outside the icon to hide it Note Swipe in this...

Страница 27: ...Cursor line Selected Unselected When the C icon appears in the full screen swipe left right to move the selected line Click the direction buttons of the C icon to fine turn long press to move continuously Click the center ab button to select a b or a b Control the vertical cursor line Switch to select the lines ...

Страница 28: ...tem How to Set the Horizontal System How to Set the Trigger Decoding System How to Implement the Sampling Setup How to Implement the Auxiliary System Function Setting How to Set the Display System How to Save and Recall Waveform How to Record Playback Waveforms How to Clone and Recall a waveform How to Update your Instrument Firmware How to Measure Automatically How to Customize an Automatic Measu...

Страница 29: ...on Coupling DC AC GROUND Pass both AC and DC components of the input signal Block the DC component of the input signal Disconnect the input signal Inverted ON OFF Display inverted waveform Display original waveform Probe Attenu 0 001X to 1000X Step by 1 2 5 Match this to the probe attenuation factor to have an accurate reading of vertical scale MeasCurr Yes No If you are measuring current by probi...

Страница 30: ...an example if you are measuring current by probing the voltage drop across a 1Ω resistor the operation steps are shown as follows 1 Push the CH1 button to show CH1 SETUP menu 2 Select Probe in the bottom menu In the right menu set MeasCurr as YES the A V radio menu will appear below Select it Click or to set the Amps Volts ratio Amps Volts ratio 1 Resistor value Here the A V radio should be set to...

Страница 31: ... analytic resolution of this control knob changes with the vertical division When the upper knob is rotated the pointer of the earth datum point of the selected channel is directed to move up and down following the waveform and the position message at the center of the screen would change accordingly see Figure 4 1 2 The lower knob is used to regulate the vertical resolution of the selected wave f...

Страница 32: ... shows the horizontally zoomed window The horizontal zoom window is the horizontally enlarged portion of the selected area in the main window Main Window Time base of Zoom window Wave selection Horizontal position of Zoom window Zoom Window Horizontal zoom factor Figure 4 2 Waveform Horizontal Zooming Mode In horizontal zoom mode the upper knob adjusts the horizontal position of the horizontal zoo...

Страница 33: ...ings menu description Function Menu Setting Description Magnifier ON OFF Turn on Magnifier Turn on Horizontal Zooming Ratio 2X 4X 8X 16X 32X Set the vertical magnification Because the magnifier window size does not change the larger this multiple is the smaller the vertical height of the waveform selection area is Window Vertical Hori Set the vertical and horizontal position of the selection Horiz...

Страница 34: ...ere are 5 executive buttons at the bottom right of the front panel Copy Default Run Stop Single Autoset Set the Trigger Decoding System Trigger determines when DSO starts to acquire data and display waveform Once trigger is set correctly it can convert the unstable display to meaningful waveform When DSO starts to acquire data it will collect enough data to draw waveform on left of trigger point D...

Страница 35: ... occurs when the trigger input passes through a specified voltage level with the specified slope Video Trigger Trigger on fields or lines for standard video signal Pulse Trigger Find pulses with certain widths Slope Trigger The oscilloscope begins to trigger according to the signal rising or falling speed Runt Trigger Trigger pulses that pass through one trigger level but fail to pass through the ...

Страница 36: ...e Mode Holdoff Auto Acquire waveform even no trigger occurs Normal Acquire waveform when trigger occurs Single When trigger occurs acquire one waveform then stop Holdoff 100 ns 10 s click or to set time interval before another trigger occur click to move cursor to choose which digit to be set Sensitivity Set the trigger sensitivity Trigger Level trigger level indicates vertical trig position of th...

Страница 37: ...uire waveform even no trigger occurred 3 Pulse Width Trigger Pulse trigger occurs according to the width of pulse The abnormal signals can be detected through setting up the pulse width condition In Pulse Width Trigger mode the trigger setting information is displayed on bottom right of the screen for example indicates that trigger type is pulse width trigger source is CH1 coupling is DC polarity ...

Страница 38: ... trigger setting information is displayed on bottom right of the screen for example indicates that trigger type is slope trigger source is CH1 slope is rising 0 00mV is the differential between up level and low level threshold Slope trigger menu list Menu Setting Instruction Single Slope Set vertical channel trigger type as slope trigger Source CH1 CH2 Select CH1 as the trigger source Select CH2 a...

Страница 39: ... of the screen for example indicates that trigger type is runt trigger source is CH1 polarity is positive 0 00mV is the differential between up level and low level threshold Runt Trigger Runt Trigger menu list Menu Setting Instruction Single Runt Set vertical channel trigger type as runt trigger Source CH1 CH2 Select CH1 as the trigger source Select CH2 as the trigger source Threshold Up Level Low...

Страница 40: ...el the oscilloscope triggers when the input signal passes through the high trigger level or the low trigger level In Windows Trigger mode the trigger setting information is displayed on bottom right of the screen for example indicates that trigger type is windows trigger source is CH1 polarity is positive 0 00mV the differential between up level and low level threshold Windows Trigger menu list Me...

Страница 41: ...e rising edge or the falling edge passes through the trigger level to when the neighboring falling edge or the rising edge passes through the trigger level is greater than the timeout time set In Timeout Trigger mode the trigger setting information is displayed on bottom right of the screen for example indicates that trigger type is Timeout trigger source is CH1 edge is positive 0 00mV is up level...

Страница 42: ...n below the oscilloscope should trigger on the second falling edge after the specified idle time and the idle time should be set to P1 P2 P3 P4 Idle Time M Wherein M P1 P2 P3 and P4 are positive or negative pulse width participating in the counting In Nth Edge Trigger mode the trigger setting information is displayed on bottom right of the screen for example indicates that trigger type is Nth Edge...

Страница 43: ...set time interval before another trigger occur click to move cursor to choose which digit to be set Sensitivity Set the trigger sensitivity Logic Trigger Trigger according to logic relation In Logic Trigger mode the trigger setting information is displayed on bottom right of the screen for example indicates that trigger type is Logic logic mode is AND CH1 high level and trigger level is 0 00mV Log...

Страница 44: ...s 10 s click or to set time interval before another trigger occur click to move cursor to choose which digit to be set Sensitivity Set the trigger sensitivity Bus Trigger 1 UART Trigger UART is a serial communication mode used in the data transmission between PCs or between PC and Terminal A character is transmitted as a frame of data which consist of 1bit start bit 5 8bits data bits 1bit check bi...

Страница 45: ...t data After choosing this condition press Configure to enter detailed settings Configure Start Common Baud click in the left menu to choose common baud Custom Baud click or choose baud ranges from 50 to 10 000 000 Error Stop Bit Select 1 or 2 Parity Select None Odd or Even Common Baud click in the left menu to choose common baud Custom Baud click or to choose baud ranges from 50 to 10 000 000 Chk...

Страница 46: ...rigger mode the trigger setting information is displayed on bottom right of the screen for example indicates that trigger type is I2C CH1 trigger level is 0 00mV I2C Trigger menu list Menu Setting Instruction Bus Type I2C Set vertical channel bus type as I2C trigger Source SCL SDA Set SCL Set SDA When Start Trigger when SDA data transitions from high to low while SCL is high Restart When another s...

Страница 47: ... be the specified value in Data Addr Data Trigger when Address and Data conditions are met at the same time Mode Holdoff Auto Acquire waveform even no trigger occurred Normal Acquire waveform when trigger occurred Single When trigger occurs acquire one waveform then stop 3 SPI Trigger Trigger on the specified data when the timeout condition is meet When using SPI trigger you need to specify the SC...

Страница 48: ...Set all the data bits to be the specified value in Data Mode Holdoff Auto Acquire waveform even no trigger occurred Normal Acquire waveform when trigger occurred Single When trigger occurs acquire one waveform then stop 4 CAN Trigger Optional CAN Controller Area Network is a serial communication protocol of the ISO international standardization By using the CAN bus trigger you can trigger on Start...

Страница 49: ... Baud list on the left Custom Baud Click or to set the Baud The range is 10 000 to 1 000 000 Tip You can select the nearest value in Common Baud and then adjust it in this menu Condition Start Trigger on the start frame of the data frame Type Type Bottom menu Data Trigger on the selected frame Remote Error Overload ID Configure Bottom menu Format Select Standard or Extend ID Click or to set value ...

Страница 50: ...nel Click the Decode softkey on panel to switch to the ON state Select bus type as UART set parameters based on the characteristics of the signal When the parameters are set correctly the information carried by the signal will be displayed Tip If there are repetitive menu items in both trigger menu and decoding menu you can set anyone of them the other will be changed synchronously Note Use the up...

Страница 51: ...on 3 In trigger menu select Bus trigger and select bus type as I2C set parameters based on the characteristics of the signal trigger the signal correctly and obtain stable display Refer to I2C Trigger on page 40 4 Click to call up the menu panel Click the Decode softkey on panel to switch to the ON state Select bus type as I2C set parameters based on the characteristics of the signal When the para...

Страница 52: ... voltage division 3 In trigger menu select Bus trigger and select bus type as SPI set parameters based on the characteristics of the signal trigger the signal correctly and obtain stable display Refer to SPI Trigger on page 41 4 Click to call up the menu panel Click the Decode softkey on panel to switch to the ON state Select bus type as SPI set parameters based on the characteristics of the signa...

Страница 53: ...le Save EventTable If a USB storage device is currently connected to the instrument save the event table data in a csv spreadsheet formatted file on the external USB storage device ASCII Table ON OFF Select ON to display the ASCII table 4 CAN Decoding To decode CAN signal 1 Connect the CAN signal to the Signal Input Channel of the oscilloscope 2 Adjust to the proper time base and voltage division ...

Страница 54: ...red error marks will be displayed in the corresponding position in the waveform Error Frame Remote Frame and Overload Frame will be identified in the Data column in the event table Data Frame will not be identified CAN Decoding menu list Menu Setting Instruction Bus Type CAN Set bus type of decoding as CAN Display Format Binary Decimal Hex ASCII Set the display format of the bus EventTable ON OFF ...

Страница 55: ... Length menu is shown as follows Function Menu Setting Description Length 1000 Choose the record length Note When two channels are turned on the max record length is 20M and max 40M for one channel 10K 100K 1M 10M 20M 40M The description of PERF Mode menu is shown as follows Function Menu Setting Description PERF Mode 8 bit Set the vertical resolution A D 12 bit 14 bit The description of the Intrp...

Страница 56: ... Figure 4 4 Sine x x interpolation Figure 4 5 Linear interpolation Implement the Auxiliary System Function Setting Config Click to call up the menu panel Click the Utility softkey on panel select Function in the bottom menu select Configure in the left menu The description of Configure Menu is shown as the follows ...

Страница 57: ... Self Cal Carry out the self calibration procedure Default Call out the factory settings Function Menu Setting Description Language Choose the display language of the operating system Set Time Display ON OFF On Off the date display Hour Min Setting Hour Minute Day Month Setting Date Month Year Setting Year KeyLock Lock all keys Unlock method push HOR button then push Trigger button repeat 3 times ...

Страница 58: ...dequate compensation According to the checking result users can adjust probe attenuation to the best Operation steps are as follows 1 Connect the probe to CH1 adjust the probe attenuation to the maximum 2 Click to call up the menu panel Click the Utility softkey on panel select Function in the bottom menu select Adjust in the left menu 3 Select ProbeCh in the bottom menu tips about probe checking ...

Страница 59: ...ence display effect of the picture tube oscilloscope can be simulated The reserved original data is displayed in fade color and the new data is in bright color 1 Click to call up the menu panel Click the Display softkey on panel 2 Select Persist Color in the bottom menu 3 Select Persist in the right menu 4 In the Time menu select the persist time including OFF 1 Second 2 Function Menu Setting Desc...

Страница 60: ... Color temperature function uses color grading to indicate frequency of occurrence The hot colors like red yellow indicate frequently occurring events and the colder colors like blue green indicate rarely occurring events Cold Hot 1 Click to call up the menu panel Click the Display softkey on panel 2 Select Persist Color in the bottom menu 3 Select Color in the right menu choose between ON OFF Fig...

Страница 61: ...onfigures screen images record or clone the waveform The description of the Save Function Menu is shown as the following table Function Menu Setting Description Type Wave Configure Image Record Clone Choose the saving type About the Record type see Record Playback Waveforms on P62 About the Clone type see Clone and Recall a waveform on P66 When the type is Wave the menu shows as following Type Wav...

Страница 62: ...he right Format menu you can select the storage format Storage Internal External Save to internal storage or USB storage When External is selected save the waveform according to the current record length see Record Length menu on P49 the file name is editable The BIN waveform file could be open by OWON waveform analysis software on the supplied CD When the type is Configure the menu shows as follo...

Страница 63: ... select Wave1 in the left menu In the right menu select Show as ON the waveform stored in the address will be shown the address number and relevant information will be displayed at the top left of the screen In order to save the waveform of CH1 and CH2 into the USB storage as a BIN file the operation steps should be followed 1 Turn on CH1 and CH2 channels 2 Click to call up the menu panel Click th...

Страница 64: ...he save menu is displayed at the bottom of the screen 3 Select Type in the bottom menu select Image in the left menu 4 Select Save in the bottom menu an input keyboard used to edit the file name will pop up The default name is current system date and time Select the key in the keyboard to confirm USB disk Requirements The supported format of the USB disk FAT32 file system the allocation unit size ...

Страница 65: ...1 or 2 red mark area choose Format And system will pop up a warning message click Yes Figure 4 8 Format the USB disk warning 5 Set File System as FAT32 Allocation unit size 4096 Check Perform a quick format to execute a quick format Click OK and then click Yes on the warning message ...

Страница 66: ...32 with allocation unit size 4096 after formatting Use Minitool Partition Wizard to format Download URL http www partitionwizard com free partition manager html Tip There are many tools for the USB disk formatting on the market just take Minitool Partition Wizard for example here 1 Connect the USB disk to the computer 2 Open the software Minitool Partition Wizard ...

Страница 67: ...t or push keyboard F5 and information about the USB disk will display on the right side with red mark 1 and 2 Figure 4 11 Reload Disk 4 Right click 1 or 2 red mark area choose Format Figure 4 12 Choose format 5 Set File System FAT32 Cluster size 4096 Click OK Figure 4 13 Format setting ...

Страница 68: ... disk successfully Figure 4 16 Format successfully Record Playback Waveforms Click to call up the menu panel Click the Save softkey on panel Select Type in the bottom menu select Record in the left menu Wave Record function can record the input current wave You can set the interval between recorded frames in the range of 10 ms 10 s The max frame number reaches 1000 and you can get better analysis ...

Страница 69: ...or to select the interval between recorded frames 10ms 10s Refresh ON OFF Refresh wave during recording Stop refreshing Operate Play Stop Begin to record Stop recording Note Both of the waveforms of Channel 1 and Channel 2 will be recorded If a Channel is turned off while recording the waveform of the channel is invalid in the playback mode Playback Play back the wave recorded or saved Playback me...

Страница 70: ...ecord in the right menu 6 Select FrameSet in the bottom menu set End frame and Interval in the right menu 7 In the bottom menu set Refresh 8 In the bottom menu select Operate as Play 9 Select Mode in the bottom menu select Playback in the right menu Set FrameSet and Playmode select Operate as Play 10 To save the wave recorded select Mode in the bottom menu select Storage in the right menu Select F...

Страница 71: ...ct Record 3 Select Mode in the bottom menu select OFF in the right menu 4 In the bottom menu select Storage as External 5 Select Mode in the bottom menu select Record in the right menu 6 Select FrameSet in the bottom menu set End frame and Interval in the right menu If you want to record wave to external infinitely select Infinity in the right menu the End frame will display 7 In the bottom menu s...

Страница 72: ...ension ota You can also use OWON signal generator to read ota files and recall the cloned waveforms Clone Wave menu shows as follows Menu Setting Instruction Type Clone Select the clone function Source Mode Out1 Out2 Out1 Out2 Select the source mode The cloned waveform includes one waveform which will be used for AG Out1 The cloned waveform includes one waveform which will be used for AG Out2 The ...

Страница 73: ...nsert a USB memory device into the port on the side panel If the icon appears on the top right of the screen the USB memory device is installed successfully If the USB memory device cannot be recognized format the USB memory device according to the methods in USB disk Requirements on P58 The name is default as current system date and time The cloned waveform will be saved onto the USB memory devic...

Страница 74: ...alue is at least 4 bytes 1 Format description of the file header 1 HEAD Parameter name Meaning Value Comment HEAD Header size 4 bytes int 2 TYPE Parameter name Meaning Value Comment TYPE Model 12 bytes char 3 BYTE Parameter name Meaning Value Comment BYTE Data length in bit 4 bytes int 4 SIZE Parameter name Meaning Value Comment SIZE File size 4 bytes int Used to check the file integrity 5 VOLT Pa...

Страница 75: ...he valid range is determined by the ADCB parameter e g the valid range for 8 bit ADC is 127 to 127 Update your Instrument Firmware Use the side panel USB port to update your instrument firmware using a USB memory device USB memory device requirements Insert a USB memory device into the USB port on the side panel If the icon appears on the top right of the screen the USB memory device is installed ...

Страница 76: ... USB port on your instrument 4 Click to call up the menu panel Click the Utility softkey on panel select Function in the bottom menu select Update in the left menu 5 Select Open in the bottom menu the instrument lists a directory of the folders on the USB memory device Turn the upper knob to select a folder select Open in the bottom menu to enter the folder Navigate to the folder where the firmwar...

Страница 77: ...allEdgeCnt Area and Cycle Area The Automatic Measurements menu is described as the following table Function Menu Description Add Meas Type left menu Select the measure types Source CH1 CH2 Select the source Add Add the selected measure types shown at the left bottom you could only add 8 types at most Remove Meas Type left menu Select the types need to be deleted The selected type and source are sh...

Страница 78: ...u 2 Select Add in the bottom menu 3 In the left Type menu select Period 4 In the right menu select Source as CH1 5 In the right menu select Add The period type is added 6 In the left Type menu select Frequency 7 In the right menu select Source as CH1 8 In the right menu select Add The frequency type is added The measured value will be displayed at the bottom left of the screen automatically see Fi...

Страница 79: ... waveforms Vamp Voltage between Vtop and Vbase of a waveform OverShoot Defined as Vmax Vtop Vamp useful for square and pulse waveforms PreShoot Defined as Vmin Vbase Vamp useful for square and pulse waveforms Cycle RMS The true Root Mean Square voltage over the first entire period of the waveform Cursor RMS The true Root Mean Square voltage over the range of two cursors The automatic measurement o...

Страница 80: ... delay between the two channels at the falling edge Screen Duty Defines as the width of the positive pulse Entire period Phase A B Phase difference calculated according to Delay A B and the period of source A expressed in degree The calculation formula is as shown below Phase A B Delay A B Period of source A 360 Phase A B Phase difference calculated according to Delay A B and the period of source ...

Страница 81: ...of the whole waveform within the screen and the unit is voltage second The area measured above the zero reference namely the vertical offset is positive the area measured below the zero reference is negative The area measured is the algebraic sum of the area of the whole waveform within the screen Cycle Area The area of the first period of waveform on the screen and the unit is voltage second The ...

Страница 82: ...e and voltage measurement cursor and menu The horizontal cursors are set as the intersections of the vertical cursors and the waveform Line Type Time Volt age type Time Voltage Makes the vertical cursors active Makes the horizontal cursors active Window Wave zoom mode Main Extension Measure in the main window Measure in the extension window Source CH1 or CH2 Display the channel to which the cursor...

Страница 83: ...lect it swipe left right to move it 5 In the bottom menu select Line Type as Voltage to make the horizontal cursors active Click line a to select it swipe up down to move it Click line b to select it swipe up down to move it 6 Push the Horizontal HOR button to enter wave zoom mode In the bottom cursor menu select Window as Main or Extension to make the cursors shown in the main window or zoom wind...

Страница 84: ...p or Phase measurement cursor and menu Freq Display the Freq measurement cursor and menu Freq Vamp or Freq Phase Display the corresponding measurement cursor and menu AutoCursr The horizontal cursors are set as the intersections of the vertical cursors and the waveform Line Type Freq Vamp or Freq Phase type Freq Makes the vertical cursors active Vamp or Phase Makes the horizontal cursors active Wi...

Страница 85: ...elect Line Type as Freq to make the vertical cursors active Click line a to select it swipe left right to move it Click line b to select it swipe left right to move it 6 In the bottom menu select Line Type as Vamp to make the horizontal cursors active Click line a to select it swipe up down to move it Click line b to select it swipe up down to move it 7 In the bottom cursor menu you can select Win...

Страница 86: ... can pass the filter band pass Only the signals whose frequencies are greater than the cutoff frequency down and lower than the current cutoff frequency upper can pass the filter band reject Only the signals whose frequencies are lower than the current cutoff frequency down or greater than the current cutoff frequency upper can pass the filter window Retangular Tapered Triangular Hanning Hamming B...

Страница 87: ...ottom 2 Select User Function in the bottom menu select Edit fun in the right menu an expression input keyboard pops up Channel Confirm Clear Operators Integral Differential Square root Expression 3 Create an expression When done choose in the keyboard to confirm The division of Math waveform is displayed at the left bottom of screen Digital Filter Digital filter provides 4 types of filters low pas...

Страница 88: ...signal The function is applied to follow up signals automatically even if the signals change at any time Autoscale enables the instrument to set up trigger mode voltage division and time scale automatically according to the type amplitude and frequency of the signals The menu is as follows Function Menu Setting Instruction Mode Follow up and adjust both vertical and horizontal settings Follow up a...

Страница 89: ...the mode of Autoscale if adjust the vertical position voltage division trigger level or time scale the oscilloscope will pause the Autoscale function To resume Autoscale push the Autoset front panel button 6 When video triggering the horizontal time scale is 50us 7 While the Autoscale is working the settings below will be made forcibly The DSO will switch from the wave zoom mode to the normal mode...

Страница 90: ...nction mathematically converts a time domain waveform into its frequency components It is very useful for analyzing the input signal on Oscilloscope You can match these frequencies with known system frequencies such as system clocks oscillators or power supplies FFT function in this oscilloscope transforms 8192 data points of the time domain signal into its frequency components mathematically the ...

Страница 91: ...agnitude accuracy What you want to measure and your source signal characteristics help you to determine which window to use Use the following guidelines to select the best window Type Characteristics Window Hamming Better solution for magnitude than Rectangle and good for frequency as well It has slightly better frequency resolution than Hanning Recommend to use for Sine periodic and narrow band r...

Страница 92: ...en using the Kaiser window is fair the spectral leakage and amplitude accuracy are both good The Kaiser window is best used when frequencies are very close to the same value but have widely differing amplitudes the side lobe level and shape factor are closest to the traditional Gaussian RBW This window is also good for random signals Bartlett The Bartlett window is a slightly narrower variant of t...

Страница 93: ...4 Advanced User Guidebook 87 Figure 4 24 Hamming window Figure 4 25 Rectangle window ...

Страница 94: ...4 Advanced User Guidebook 88 Figure 4 26 Blackman window Figure 4 27 Hanning window ...

Страница 95: ...4 Advanced User Guidebook 89 Figure 4 28 Kaiser window Figure 4 29 Bartlett window ...

Страница 96: ...ing So pay more attention to the relation between the frequency being sampled and measured Use XY Format Click to call up the menu panel Click the XY softkey on panel to switch to the ON or OFF state The XY menu This format is only applicable to Channel 1 and Channel 2 After the XY display format is selected Channel 1 is displayed in the horizontal axis and Channel 2 in the vertical axis the oscil...

Страница 97: ... satisfies the rule Stop once satisfying the rule Control the display status of info frame Rule Source Horizontal Vertical Create Select the source as CH1 or CH2 Change the Horizontal tolerance value by clicking or Change the Vertical tolerance value by clicking or Use the rule set as testing rule SaveRule Number Save Load Select any one from Rule1 Rule8 as your rule name Select Save to save the r...

Страница 98: ...ode of Factory Auto Scale and Auto Set Pass Fail will be closed 3 When no save setting left in the rule save tip will be given to show NO RULE SAVED 4 Under the status of stop data comparing will stop and when it goes on running the number of Pass Fail will increase from the former number not from zero 5 When the waveform playback mode is on Pass Fail is used to test the played back waveform speci...

Страница 99: ...ling DC Vertical Scale Adjust to the proper division Vertical Position Adjust to the proper position Bandwidth Full Horizontal Level Middle Horizontal Sale Adjust to the proper division Trigger Type Slope or Video Trigger Source The previous source before autoseting When the previous source has no input signal the source will be set to the minimum channel which has input signal When all the channe...

Страница 100: ...Connect the printer to the USB Device port on the side panel of the oscilloscope Note The USB Device port supports PictBridge compatible printers 2 Click to call up the menu panel Click the Utility softkey on panel select Function in the bottom menu select Output in the left menu 3 In the bottom menu select Device as PICT When PC is selected you can get an image by Oscilloscope software 4 In the b...

Страница 101: ...cklight will be lighted when the multimeter function is enabled Select Switch between AC and DC when measuring voltage or current and switch resistance continuity diode and capacitance measurement when selecting other Multimeter Button Figure 5 2 Multimeter Button The bottom menu of multimeter is as below Menu Setting Description Current ACA DCA Measuring AC current Measuring DC current Voltage AC...

Страница 102: ...indow is displayed on the top right of the screen 4 9 1 2 8 5 3 6 7 Figure 5 3 Multimeter Information Window Description 1 Manual Auto range indicators MANUAL refers to the measuring range in manual operation mode and AUTO refers to the measuring range in automatic operation mode 2 Measurement mode indicators A Current measurement V Voltage measurement R Resistance measurement Diode measurement Co...

Страница 103: ...e other side with a higher voltage Reversing the leads will produce a negative reading but will not damage the multimeter 6 Turn on the power of the measured circuit and read the display 7 Turn off the power of the measured circuit and discharge all high voltage capacitors Remove the test leads and restore the circuit to the original condition Measuring AC or DC Voltage 1 Push DMM button on the fr...

Страница 104: ...o C 2 Insert the supplied capacitance measurer to the COM terminal and the V Ω C terminal on the top of the oscilloscope 3 Insert the capacitance to the capacitance measurer then screen shows the capacitance reading Note when measuring the capacitance which is less than 5 nF please use relative value measuring mode to improve measuring precision Multimeter Features Data Hold Mode You can freeze th...

Страница 105: ...er data recorder to record the measurements when measuring current voltage by multimeter optional Click to call up the menu panel Click the Utility softkey on panel select Function in the bottom menu select DAQ in the left menu The description of DAQ Menu is shown as the follows To record the current voltage measurements in the multimeter do the Function Menu Setting Description Set Interval Set t...

Страница 106: ...e same name already exists in the USB memory device it will be overwritten If you want to keep the existing file back up it to other location in advance Select STRT in the bottom menu to start recording 9 When the record time gets to the defined duration the recording will be ended If you want to end recording prematurely select STOP in the bottom menu Day H M S Record time use the defined interva...

Страница 107: ...nts 2 Select the data that you want to chart see Figure 5 4 3 On the Insert tab in the Charts group click Line and then click Line in 2 D Line see Figure 5 5 4 The chart will be displayed see Figure 5 6 If you want to keep the chart save the file to XLS format Figure 5 6 Figure 5 4 Figure 5 5 ...

Страница 108: ...ection to choose from Using USB Port 1 Connection Use a USB data cable to connect the USB Device port in the right panel of the oscilloscope to the USB port of a PC 2 Install the driver Run the Oscilloscope communication software on PC push F1 to open the help document Follow the steps of title I Device connection in the document to install the driver 3 Port setting of the software Run the Oscillo...

Страница 109: ...s Here we set the IP address to 192 168 1 71 Figure 6 2 Set the network parameters of the computer 3 Set the network parameters of the OWON Oscilloscope Software Run the software on the computer choose the Ports settings of the Communications menu item Set Connect using to LAN About the IP the first three bytes is same as the IP in the step 2 the last byte should be different Here we set it to 192...

Страница 110: ...e in step 3 Select Save set in the bottom menu it prompts Reset to update the config After resetting the oscilloscope if you can get data normally in the oscilloscope software the connection is successful Figure 6 4 Set the network parameters of the oscilloscope Connect through a router 1 Connection Use a LAN cable to connect the oscilloscope with a router the LAN port of the oscilloscope is in th...

Страница 111: ... 3 Set the network parameters of the OWON Oscilloscope Software Run the software on the computer choose the Ports settings of the Communications menu item Set Connect using to LAN About the IP the first three bytes is same as the IP in the step 2 the last byte should be different Here we set it to 192 168 1 72 The range of the port value is 0 4000 but the port which under 2000 is always used so it...

Страница 112: ...ect Set In the right menu set IP and Port to the same value as the Ports settings in the software in step 3 The Gateway and Subnet mask should be set according to the router Select Save set in the bottom menu it prompts Reset to update the config After resetting the oscilloscope if you can get data normally in the oscilloscope software the connection is successful Figure 6 7 Set the network parame...

Страница 113: ...FI password 8 to 32 characters 4 In the right menu select IP PORT IP is fixed by the oscilloscope and cannot be edited Here IP is 192 168 1 1 Click or to set the PORT Here we set it to 3000 5 After setting select ON in the Status menu The icon appears on the top right of the screen 6 Select Save set in the bottom menu to save current settings 7 Set Wi Fi connection on PC Enter the WI FI settings o...

Страница 114: ...rd will pop up Touch the keyboard to input the name of the Wi Fi hotspot 3 In the right menu select Encryption push to set the Encryption type of the Wi Fi hotspot Open type needs no password WEP or WPA type need to input the password In the right menu select Password use the keyboard to input the Wi Fi hotspot password 4 In the right menu select IP PORT click or to set the PORT Here we set it to ...

Страница 115: ... should be set according to the router Figure 6 9 Set the network parameters of the computer 8 Set the network parameters of the OWON Oscilloscope Software Run the software on the computer choose the Ports settings of the Communications menu item Set Connect using to LAN Set IP and Port to the same value in the oscilloscope If you can get data normally the connection is successful Figure 6 10 Set ...

Страница 116: ...install the APP Visit www owon com to download APK file and install into the device Note The help content below may be not completely consistent with the application software only for reference Visit www owon com to get the latest version of this user manual How to Connect In Wi Fi settings of the oscilloscope there are two connection types One is WIFI AP Access Point the oscilloscope is set as Wi...

Страница 117: ...d to set the Wi Fi password 8 to 32 characters 4 In the right menu select IP PORT IP is fixed by the oscilloscope and cannot be edited Click or to set the PORT 5 After setting select ON in the Status menu The icon appears on the top right of the screen 6 Select Save set in the bottom menu to save current settings 7 In Android device enter the Wi Fi settings select the oscilloscope access point to ...

Страница 118: ...menu 2 In the right menu select SSID a keyboard will pop up Touch the keyboard to input the name of the Wi Fi hotspot 3 In the right menu select Encryption push to set the Encryption type of the Wi Fi hotspot Open type needs no password WEP or WPA type need to input the password In the right menu select Password use the keyboard to input the Wi Fi hotspot password 4 In the right menu select IP POR...

Страница 119: ...i settings select the oscilloscope access point to connect enter the set password 8 In Android device launch the application 9 Click connect on the left 10 Set IP and Port to the same value as the setting in the oscilloscope Click Confirm to connect Click History to recall the history settings ...

Страница 120: ...gain to turn CH2 on off Touch to stop continue to synchronize with the oscilloscope Time Base Horizontal Position Horizontal Position Pointer CH2 Show hide menu see below Trigger Level Share the image wave file via the installed sharing apps Save into wave file bmp png bin csv Exit APP Submit feedback Swipe from the left edge of the screen to show the trigger source menu Trigger Source Menu Trigge...

Страница 121: ...nal 115 The points will be connected with lines Adjust the brightness of grid Set the auto measurement Display Menu Check to measure time Cursor Menu Cursor Measurement The cursor line can be dragged Check to measure voltage APP Information Setting Menu ...

Страница 122: ...tical position of the selected channel Show the vertical position when gesturing Control the trigger level of the trigger source Control the horizontal position Pinch and spread vertically to change the voltage division of current channel Pinch and spread horizontally to change the time base ...

Страница 123: ...sed on which you can further regulate the vertical and horizontal divisions till the waveform meets your requirement 2 Perform Automatic Measurement The oscilloscope can measure most of the displayed signals automatically To measure the period the frequency of the CH1 following the steps below 1 Click to call up the menu panel Click the Measure softkey on panel to display the Measure menu 2 Select...

Страница 124: ...H1 channel with the circuit signal input end and the CH2 channel to the output end Operation Steps 1 Push the Autoset button and the oscilloscope will automatically adjust the waveforms of the two channels into the proper display state 2 Click to call up the menu panel Click the Measure softkey on panel to display the Measure menu 3 Select Add in the bottom menu 4 In the left Type menu select PK P...

Страница 125: ... functions supported by our Oscilloscope user can solve this problem by taking an easy approach First to run your test using auto trigger to find out the closest trigger level and trigger type this helps user to make few small adjustments to achieve a proper trigger level and mode Here is how we achieve this The operation steps are as follows 1 Set the probe menu attenuation coefficient to 10X and...

Страница 126: ...f the screen if it is not Ready push down the Run Stop button and start acquiring wait for trigger to happen If a signal reaches to the set trigger level one sampling will be made and then displayed in the screen By using this approach a random pulse can be captured easily For instance if we want to find a burst burr of high amplitude set the trigger level to a slightly higher value of the average...

Страница 127: ...menu 2 Select Acqu Mode in the bottom menu 3 Select Peak Detect in the right menu The signal displayed on the screen containing some noise by turning on Peak Detect function and changing time base to slow down the incoming signal any peaks or burr would be detected by the function see Figure 8 4 Figure 8 4 Signal with Noises Separate Noises from the Signal When focusing on signal itself the import...

Страница 128: ...gnals of two Channels Example Test the phase change of the signal after it passes through a circuit network X Y mode is a very useful when examining the Phase shift of two related signals This example takes you step by step to check out the phase change of the signal after it passes a specified circuit Input signal to the circuit and output signal from circuit are used as source signals For the ex...

Страница 129: ...g the waveform 8 With the elliptical oscillogram method adopted observe and calculate the phase difference see Figure 8 6 Figure 8 6 Lissajous Graph Based on the expression sin q A B or C D thereinto q is the phase difference angle and the definitions of A B C and D are shown as the graph above As a result the phase difference angle can be obtained namely q arcsin A B or arcsin C D If the principa...

Страница 130: ...softkey on panel to display the Trigger menu 2 Select the first menu item in the bottom menu Select Single in the right menu 3 In the left menu select Video as the mode 4 Select Source in the bottom menu Select CH1 in the right menu 5 Select Modu in the bottom menu Select NTSC in the right menu 6 Select Sync in the bottom menu Select Field in the right menu 7 Adjust the vertical scale vertical pos...

Страница 131: ...robe to make sure they are match see How to Set the Probe Attenuation Coefficient on P11 4 There is a waveform displayed but it is not stable Check whether the Source item in the TRIG MODE menu is in conformity with the signal channel used in the practical application Check on the trigger Type item The common signal chooses the Edge trigger mode for Type and the video signal the Video Only if a pr...

Страница 132: ...s can be fulfilled except one s marked with the word Typical Oscilloscope Performance Characteristics Instruction Bandwidth TAO3072 TAO3072A 70 MHz TAO3102 TAO3102A 100 MHz TAO3122 TAO3122A 120 MHz Vertical Resolution A D TAO3072 TAO3102 TAO3122 8 bits TAO3072A TAO3102A TAO3122A 8 bits 12 bits 14 bits Channel 2 Waveform Capture Rate 45 000 wfms s Multi level Gray Scale Display Color Temperature Di...

Страница 133: ...andwidth Channel channel isolation 50Hz 100 1 10MHz 40 1 Time delay between channel typical 150ps Horizontal System Sampling rate range TAO3072 TAO3102 TAO3122 Dual CH 0 05 Sa s 500 MSa s Single CH 0 05 Sa s 1 GSa s TAO3072A TAO3102A TAO3122A 8 bits mode Dual CH 0 05 Sa s 500 MSa s Single CH 0 05 Sa s 1 GSa s 12 bits mode Dual CH 0 05 Sa s 250 MSa s Single CH 0 05 Sa s 500 MSa s 14 bits mode Dual ...

Страница 134: ...bandwidth TAO3072 TAO3072A DC to 70 MHz TAO3102 TAO3102A DC to 100 MHz TAO3122 TAO3122A DC to 120 MHz Low Frequency 10 Hz at input AC coupling 3 dB Rise time at input Typical TAO3072 TAO3072A 5 0 ns TAO3102 TAO3102A 3 5 ns TAO3122 TAO3122A 2 9 ns DC gain accuracy TAO3072 TAO3102 TAO3122 1 mV 4 2 mV 3 TAO3072A TAO3102A TAO3122A 8 bits mode 1 mV 4 2 mV 3 12 bits mode 14 bits mode 1 mV 3 2 mV 2 DC ac...

Страница 135: ...t Decoding Type optional UART I2 C SPI CAN Waveform storage 100 waveforms Lissajous figure Bandwidth Full bandwidth Phase difference 3 degrees Communication port USB Host USB Device Trig Out Pass Fail LAN port Printer Compatibility PictBridge Counter Support Trigger Performance Characteristics Instruction Trigger level range Internal 5 div from the screen center Trigger level Accuracy typical Inte...

Страница 136: ...to 128 Logic Trigger Logic Mode AND OR XNOR XOR Input Mode H L X Rising Falling Output Mode Goes True Goes False Is True Is True Is True UART Trigger Polarity Normal Inverted Trigger Condition Start Error Check Error Data Baud Rate Common Custom Data Bits 5 bit 6 bit 7 bit 8 bit I2C Trigger Trigger Condition Start Restart Stop ACK Lost Address Data Addr Data Address Bits 7 bit 8 bit 10 bit Address...

Страница 137: ... virtual value Current DCA 20A 2 10digit ACA 20A 2 5 10digit Impedance 200Ω 0 8 10digit 2KΩ 2MΩ 0 5 3digit 20MΩ 0 8 5digit 100MΩ 5 0 10digit General Technical Specifications Display Display Type 8 Colored LCD Liquid Crystal Display Display Resolution 800 Horizontal 600 Vertical Pixels Display Colors 65536 colors TFT screen Output of the Probe Compensator Output Voltage Typical About 5 V with the P...

Страница 138: ... 60 Relative Humidity 90 Height Operating 3 000 m Non operating 15 000 m Cooling Method Fan cooling Mechanical Specifications Dimension 270 mm 191 mm 48 mm L H W Weight Approx 1 7 kg without accessories Interval Period of Adjustment One year is recommended for the calibration interval period ...

Страница 139: ...ad Options Bag Appendix B General Care and Cleaning General Care Do not store or leave the instrument where the liquid crystal display will be exposed to direct sunlight for long periods of time Caution To avoid any damage to the instrument or probe do not exposed it to any sprays liquids or solvents Cleaning Inspect the instrument and probes as often as operating conditions require To clean the i...

Страница 140: ...power on again for operation it is required to confirm that the instrument has already been dried completely avoiding any electrical short circuit or bodily injury resulting from the moisture Appendix C Battery Using Guide Figure 11 1 Battery level indicator Charging the oscilloscope There will have battery power indication show on the top of panel when oscilloscope power supplied by the battery i...

Страница 141: ...g the Lithium Battery Unit It is usually not required to replace the battery unit But when it is required to replace it only qualified personnel can carry out this operation and only use the same specification lithium battery ...

Отзывы: