background image

6

In Easy Tracking mode, the hand control also needs to be connected to a Sky-Watcher 

telescope mount. The mount must be setup at a proper “Home Position” (refer to Section 

2.1 for details) before turning on the power. After turning on the power to the mount, the 

hand control must complete an “Initialization” routine. Then the user can choose to skip the 

“Alignment” routine and start the tracking function directly (refer to Section 6.1 “Choosing 

Tracking Speed”). Users will need to locate a celestial object in the sky, and then use the 

hand control to manually point the telescope to the target. The object locating function may 

still be used but it will only give a rough result.

The Easy Tracking mode is suitable for quick setup for visual observing of brighter celestial 

objects, such as planets, the moon, or the sun. If the user does not turn on the tracking 

function, the Easy Tracking mode can also be used for observing terrestrial objects.

PART I: INTRODUCTION

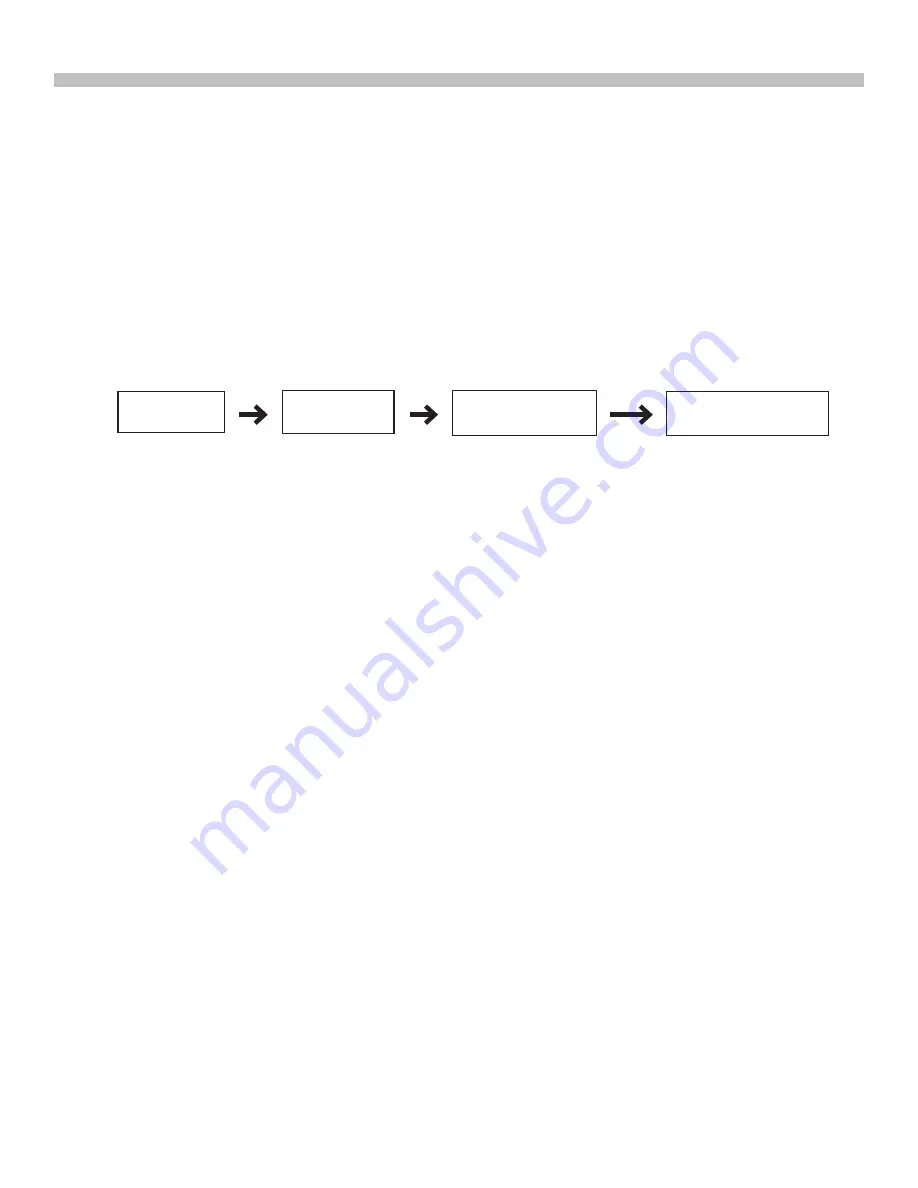
The flow chart of the “Easy Tracking” operation is shown below:

2. 

Easy Tracking Mode:

In Full Feature mode, the hand control must be connected to a Sky-Watcher telescope 

mount. After turning on the power to the mount, the hand control must complete an “Initial-

ization” routine, followed by an “Alignment” routine which establishes a model to transform 

the coordinates of the mount and the coordinates of the sky. Only after the “Alignment” is 

done can the SynScan hand control’s high precise “GOTO” function be used to locate a 

celestial object. 

The Full Feature mode is the most commonly used mode of operation.

Fig. 1.4b

Initialization

Start Tracking

Locate a celestial 

object manually

Observing or other 

operations

Содержание SynScan V5 Hand Control

Страница 1: ...INSTRUCTION MANUAL SynScan TM Copyright Sky Watcher SSHCV5 F 170808V2 EN ...

Страница 2: ...Mounts using Daytime Alignment Method 16 3 7 Tips for Improving Alignment Accuracy 17 3 8 Comparison of Alignment Methods 17 4 1 Menu Structure 19 4 2 Accessing Menus 20 4 3 Short cut Keys 20 5 1 Locating Messier Objects 21 5 2 Locating NGC and IC Objects 22 5 3 Locating Planets and the Moon 22 5 4 Locating Caldwell Objects 22 5 5 Locating SAO Stars 23 5 6 Locating Named Stars Double Stars and Var...

Страница 3: ...Time Coordinates Time Zones and Daylight Saving Time 30 8 2 Re aligningtheMount 30 8 3 Show Position 30 8 4 Show Time and Local Sidereal Time 30 8 5 Display Version Information 30 8 6 Display Power Voltage 31 8 7 Display Polaris Position 31 8 8 Display Polar Alignment Error 31 8 9 Changing Polar Scope Illumination Level 31 8 10 Identifying Objects 31 8 11 Synchronizing Encoders 32 11 1 ParkingTele...

Страница 4: ...trol port on a Sky Watcher mount using an appropriate cable The table below lists the Hand Control ports on different Sky Watcher mounts Mount Model Hand control Port Hand Control Port on Mount EQ6 Pro 8 pin RJ 45 D sub 9 Male HEQ5 Pro EQ5 Pro EQ3 Pro AZ EQ5 Pro AZ EQ6 Pro EQ8 8 pin RJ 45 All Alt azimuth mounts 6 pin RJ 12 1 3 Slew the Mount with the Direction Keys In many situations users need to...

Страница 5: ...nt speed will be kept and the LCD display will return to the previous one The following table lists the available speeds Rate 7 8 9 is primarily used to quickly slew a mount Rate 5 6 is primarily used to move a target in the field of view of a finder scope Rate 2 3 4 is primarily used to move a target in the field of view of an eyepiece Rate 0 1 is used to move a target in the field of view in hig...

Страница 6: ...sual observing of brighter celestial objects such as planets the moon or the sun If the user does not turn on the tracking function the Easy Tracking mode can also be used for observing terrestrial objects PART I INTRODUCTION The flow chart of the Easy Tracking operation is shown below 2 Easy Tracking Mode In Full Feature mode the hand control must be connected to a Sky Watcher telescope mount Aft...

Страница 7: ... Alt azimuth mount A SynScan hand control with firmware version 3 32 or later supports both an equatorial mount and an alt azimuth mount It can detect the model of the mount it is connected to and select the appropriate operation mode For an equatorial Alt azimuth dual mode mount such as the AZ EQ6 GT mount the Syn Scan hand control will require the user to choose the mount s operating mode The LC...

Страница 8: ...is de signed for side by side dual telescopes setup Geographic Coordinates The LCD screen will display Set Longitude or Set Latitude on the first line and display the longitude and latitude on the second line Press the numeric keys at the cursor position to fill in the longitude or latitude digits Use the scroll keys to change east west longitude or north south latitude when the cur sor blinks on ...

Страница 9: ...laris in the polar scope s FOV User can imagine the large circle in the FOV of a polar scope as a clock s face with 12 00 at the top and put Polaris at the HH MM position of the large circle when using a polar scope to do the polar alignment Press the ENTER key to confirm and proceed to the next step Press the ESC key to return to the previous step The LCD screen will display Hour Angle of Polaris...

Страница 10: ...nScan hand control work in the Easy Tracking mode refer to Section 1 4 Step 2 Users can also start an alignment process refer to Section 8 2 to let the SynScan hand control operate in Full Feature mode Users may slew the mount with the direction keys to point the telescope to terrestrial targets for observing The User Defined Objects function refer to Section 5 8 of the SynScan hand control is a u...

Страница 11: ...Scan hand control will then use the data collected in this process to transform between the mount coordinates and the sky coordinates The operating steps of aligning to alignment stars may differ depending on the type of mount used as well as the chosen alignment method Users should read the following section which meets your mount and alignment method Section 3 3 Alignment Method for Equatorial m...

Страница 12: ... again the LCD screen will display Exit Alignment 1 YES 2 NO Press key 1 to exit the alignment process press key 2 to go back to choose an alignment star 1 Find the brightest stars in the current sky with naked eyes and estimate their horizontal region orientation 2 The hand control displays Select Region Use the scroll keys to pick one of the eight re gions shown in Fig 3 4a which matches the hor...

Страница 13: ...nd in this region If multiple bright stars appear in the list users can identify the names of the stars in the real sky by matching the azimuth altitude and magnitude provided by the SynScan hand control Pick one of the star s generally the brightest one as the 1st alignment star and press the ENTER key to proceed to the next step Press the ESC key to return to the previous step Select Region Fig ...

Страница 14: ...1 and Ctr to eyepiece on line 2 The telescope should now point rather closely to the 2nd alignment star generally in the FOV of the finder scope 4 Users can then use the direction keys to move the telescope to align with the 2nd alignment star That is center the 2nd alignment star in the FOV of the finder scope and then center it in the FOV of the telescope s eyepiece Press the ENTER key to confir...

Страница 15: ...rough a list of star names and press ENTER to pick one on the screen as the 2nd alignment star The mount will then automatically slew and point the telescope towards the 2nd alignment star in the sky 2 After the mount stops the hand control will display the name of the selected 2nd alignment star and Ctr to eyepiece The telescope should point rather closely to the 2nd alignment star generally in t...

Страница 16: ...nother alignment object such as the Moon a planet or a bright star to use as a refer ence target Press ENTER to confirm the selection 3 The LCD screen displays Point scope to ZZZ zz z sTT tt t which means point the tele scope to the direction with an azimuth of ZZZ degrees zz z minutes and an altitude of sTT degrees tt t minutes This is also the direction of the selected 1st alignment target Users...

Страница 17: ...ys use the LEFT or DOWN keys to pull the star back to the edge of the FOV and then use the RIGHT or UP keys to center the star again Alignment Stars Selection The choice of alignment stars might also impact the alignment accuracy Please refer to Sec tion 3 8 on the rules of choosing alignment stars for various mounts and alignment methods 3 7 Tips for Improving Alignment Accuracy Rules for choosin...

Страница 18: ...f the meridian For the two alignment star on the same side of the meridian their R A deviation should be greater than 3 hours and the absolute value of the difference between the two alignment stars declination should be between 10 to 30 degrees 10 Dec1 Dec2 30 If there is cone error in the telescope mount setup or users are not sure about it avoid the situation that all 3 alignment stars have sma...

Страница 19: ...k Mode Set Star Name Adv Filter Sort By Time Version Power Voltage Polaris Positiuon Polar Align Error UTILITY FUNC OBJECT LIST NGC Catalog IC Catalog Messier Catalog Caldwell Catalog SAO Catalog Double Stars Variable Stars User Object Deep Sky Tour Recall Object New Object PAE Correction Clear PAE Data Home Position Current Pos Custom Pos Named Stars Solar System The SynScan hand control uses men...

Страница 20: ... short cut keys for accessing the most commonly used sub menu The short cut keys may only be used while the hand control is in stand by mode that is the SynScan hand control is not executing a specific operation Users can always press the ESC key to quit the current operation if the short cut keys are not accessible Here is the list of the short cut keys and their functions MENU Access to the SETU...

Страница 21: ...l display Target over slew limit in this case Users can press the ESC key to stop the mount The screen will display MOUNT STOPPED Press any key Users can press any key to return to the previous step Note The mount will not slew if If the selected object is below the horizon at this time the SynScan hand control will display Below horizon for 2 seconds otherwise it will display the object s current...

Страница 22: ... that for locating Messier objects refer to Section 5 1 for de tails If the selected object is below the horizon at this time the SynScan hand control will display Below horizon for 2 seconds otherwise it will display the object s current az imuth and altitude By using the scroll keys users can browse the following information of the object cur rent celestial coordinates rise time Rise transit tim...

Страница 23: ... 1 for de tails The operation is similar to that of locating Messier objects refer to Section 5 1 for de tails 5 6 Locating Named Stars Double Stars and Variable Stars 1 Choosing an Object 2 Viewing Information on the Object Press the OBJECT shortcut key The screen will then display OBJECT LIST on the top row Use the two scroll keys to browse the list until Named Star Double Stars or Variable Star...

Страница 24: ...time Set size size and asso ciated constellation Constellation Press ENTER key to proceed to the next step 3 Locating the Object The operation is similar to that of locating Messier objects refer to Section 5 1 for de tails 3 Locate the Object The operation is similar to that of locating Messier objects refer to Section 5 1 for de tails Users can define up to 25 objects for observing Defining New ...

Страница 25: ...and the numeric keys to edit the coordinates The scroll keys can be used to change the sign of the declination coordinates or the altitude coordinates Press the ENTER key after editing 4 The screen will display Save 5 The screen will now display View Object Press ENTER to have the mount start slewing towards the selected object If the object is a celestial object the mount will start tracking the ...

Страница 26: ...atorial mounts only Note Users can turn on the tracking without doing a star alignment process In this case the polar alignment should be rather accurate for an equatorial mount and the mount must be set up to the proper home position before turning on the power refer to Section 2 1 Note Set the backlash value to 0 for an axis to disable backlash compensation for that axis If there is backlash in ...

Страница 27: ... Not availi able For an equatorial mount with an autoguider port the SynScan hand control can change the guiding speed of the port 1 Access the menu SETUP Auto Guide Speed and press the ENTER key 2 Use the scroll keys to choose one of the following guiding speeds list 0 125X 0 25X 0 5X 0 75X 1X and then press the ENTER key The following are the steps to set the altitude slewing limits 1 Access the...

Страница 28: ...tween 75 and 75 degrees For an alt azimuth mount the alignment star s altitude must be below 75 degrees or within the altitude limits defined by the user Section 6 3 Not all combinations of alignment stars are good for a 2 star alignment or 3 star alignment The SynScan hand control uses a built in advanced alignment star filter to show only the stars which are suitable to work with the 1st or 2nd ...

Страница 29: ...ist 3 Press ENTER The hand control will display in the selected language Note If the user executes the Factory Setting function under the Setup menu the hand con trol will reset the language to English as its factory default setting Tips If the hand control was set to an unfamiliar language by accident and the foreign language messages are not easy to understand the user may turn off the power pre...

Страница 30: ...o Step 5 in Section 2 2 for detailed input instructions 1 Access the menu UTILITY FUNCTION Show Position and press the ENTER key 2 Use the scroll keys to switch between the following coordinates Dec RA Displays the current celestial coordinates of the telescope Alt Azm Displays the current horizontal coordinates of the telescope Ax1 Ax2 Displays the current coordinates of the mount Ax1 is the posi...

Страница 31: ...IC objects within a 5 degrees range centered by the object in the eyepiece 3 The screen will display No object found if the SynScan hand control cannot identify the object 4 If an object is found within the 5 degree range then the screen will display the object s name in the top row and the deviation from the object to the center of the eyepiece 5 If multiple objects are found use the scroll keys ...

Страница 32: ...se the scroll keys to select an alignment star and press the ENTER key The mount will point the telescope towards the alignment star 3 After the mount has stopped use the direction keys to center the alignment star in the eyepiece then press the ENTER key to confirm 4 The SynScan hand control will display Sync Encoder Completed Press any key to exit 6 Press the ENTER key to select an identified ob...

Страница 33: ... hand control cannot work with the above applications in the following situations When checking GPS information Section 12 2 During the PEC training process When working in PC Direct mode Section 9 2 PC Direct Mode is a special mode for the SynScan hand control to work with a PC Under this mode the SynScan hand control still uses the same hardware connection as described in Section 9 1 but the Syn...

Страница 34: ...ve folder 1 Press and hold the 0 and 8 keys simultaneously and then plug in the USB cable The hand control will display SynScan Update on the screen Release the 0 and 8 keys 2 On the computer run the SynScanFirmwareLoader exe An application window is show in Fig 10 3a Use the Browse button to load the latest firmware file SSF file Check the Enforce database update to enforce updating the hand cont...

Страница 35: ...and try again Close the window and power off the hand control Then repeat the firmware update process again 3 If the update process failed in the middle of updating try to press the SETUP button on the SynScan hand control to use other communication speeds Mi or Lo 4 After the loading starts the application will display a percentage number at the bottom of the windows to show the progress 5 Once u...

Страница 36: ... to the parking position except parking at the current position When the mount stops the screen will display Position saved Turn off power 4 Users may now turn off power to the mount or press the ESC key to cancel parking Resuming Turn on power to the mount Pass through the initial steps When the screen will display Start from park 1 Yes 2 No 11 2 Pointing Accuracy Enhancement The pointing accurac...

Страница 37: ...eration by pressing the Right and Up direction keys together 5 Repeat Step 2 to 5 for viewing different portions of the sky Note Whenever the SynScan hand control locates an object it will automatically check whether any PAE calibration data is available and apply the compensation accordingly No manual intervention is required If multiple PAE calibrations are performed in the same zone the previou...

Страница 38: ... to proceed to the next step 8 The mount will slew to a new position When it stops the screen will display Adjust Azi muth By using ONLY the azimuth control of the mount do not touch the altitude control bring the reference star back to the closest point to the previous position at the end of Step 6 Press the ENTER key to confirm the centering operation 9 The screen will display the polar alignmen...

Страница 39: ...mber of this group the mm ss data is the ex posure time in minutes and seconds and the ending 3 digits number is the frames to be shot Press the ENTER key to pick a group and proceed to the next step The SynScan hand control can control a DSLR camera to do astrophotography It can accept 8 groups of Exposures Time Frames parameters and then controls the camera to take batch exposures without manual...

Страница 40: ...t and press the Enter key 3 The SynScan hand control will start to take batch exposure and display the progress data on the screen a sample screenshot is shown below The top row shows the group index and the frames pending The bottom row shows the remaining exposure time of the current frame At the end of each frame the SynScan hand control will wait for the preset interval before the next exposur...

Страница 41: ...to adjust the posi tion of the star in the FOV of the telescope when a user presses the Left or Right direction key on the SynScan hand control Choosing a 0 125X sidereal rate is recommended for a smaller FOV of telescope and a 0 25X sidereal rate is recommended for a wider FOV of telescope Press the 1 or 2 key to make a selection and proceed to the next step 4 The screen will display the elapsed ...

Страница 42: ...1 key to execute the au to home process 4 Finish the subsequent initialization steps 5 At the end of the initialization choose 1 star alignment to align the mount 6 At the end of the 1 star alignment the hand control will ask Update H P O 1 No 2 Yes The H P O means Home Position Offset 11 7 Setting Cone Error and Non Perpendicular Error Cone error CE occurs when a telescope s optical axis is not p...

Страница 43: ...e Configuration Repeat Times to set the number of photos which will be taken 5 Access the menu UTILITY Astro Time Lapse Configuration Shoot to start taking photos 6 The LCD will display remaining photos and remaining time of the ongoing exposure 7 Press ESC key to pause or cancel the shooting Generally NPE is very small and can be ignored Set to 0 in most cases unless supe rior pointing accuracy i...

Страница 44: ...key to exit Use the left and right direction keys to move the cursor on the screen Use the scroll keys to change or switch the sign for the time zone Use for the time zones in the Eastern Hemisphere use for the time zones in the Western Hemi sphere Use the numeric keys to fill the time zone value in hh mm format Press ENTER to confirm and proceed M O V Local magnetic declination Lat Local latitude...

Страница 45: ...s to bring the Polaris as close as pos sible to the center of the finder scope or the telescope s eyepiece 4 Fine tune the azimuth and latitude of the mount to center the Polaris in the telescope s eyepiece 5 Rotate the R A axis 180 degrees the counterweight shaft should be leveled and pointed to the other side of the mount If the Polaris can be put to the center of the eyepiece by rotating the De...

Страница 46: ...button to continue 5 The LCD screen will become fully black and then fully clear for a while for the purpose of checking the LCD display 6 If there is any problem for the RS 232C function on multi purpose port the RJ 12 outlet or no Loop Test Plug connected to the multi purpose port the screen will display COM1 ERROR Press ENTER to continue 7 Ignore COM2 ERROR message and press ENTER to continue 8...

Страница 47: ...s Adjustable Contrast and Backlight Keypad Rubber Adjustable backlight GPS SynScan GPS Modular Optional PC Connection USB or RS 232C 9600bps No parity check 8 data bits 1 start bit 1 stop bit Power output on Multi purpose port Power Supply Voltage 0 7V Maximum 100mA current output APPENDIX III SCHEMATIC OF THE PORTS APPENDIX IV SPECIFICATIONS 2 3 4 1 5 6 7 8 TelescopeMountPort GND Vpp TX TTL RX TT...

Страница 48: ...SynScan TM Copyright 2017 Sky Watcher All rights reserved www skywatcher com ...

Отзывы: