background image

HiScan Touch


Installation and Operation Manual 

OPTIKON 2000 


Code 14101XEN 

7-16 

2014-09-02 Rev.B  


If the unit is correctly working (the small circle bottom right of the screen is green), 
the operator can carry out the following functions: 
 

  Button <

DB

> : 

 access the patient and tests database. 

  Field <

OD

>:   

 select the eye to link with the test (--, OD, OS). 

  Button <

Main

>:   

 return to main screen. 

  Button <

Unfreeze

> (toggle Freeze): start or stop acquisition. 

  Button <

Clear

>:  

 clear the current screen to start a new test. 

  Button <

Settings

>:  access the pachymetry environment settings window. 

  Button <

Print

>:  

 print the acquired pachymetry map. 

  Button <

Calibration

>: calibrate the instrument. See paragraph 7.1.5.5. 

  Button <

Manual

> (toggle Auto): calculate measurements in automatic or 

manual mode.  

  Button <

Image

>:    allows to go back to the pachymetry main window from 

the map selection window.  

  Button <

Gain

>:  

 modify the gain  

  Button <

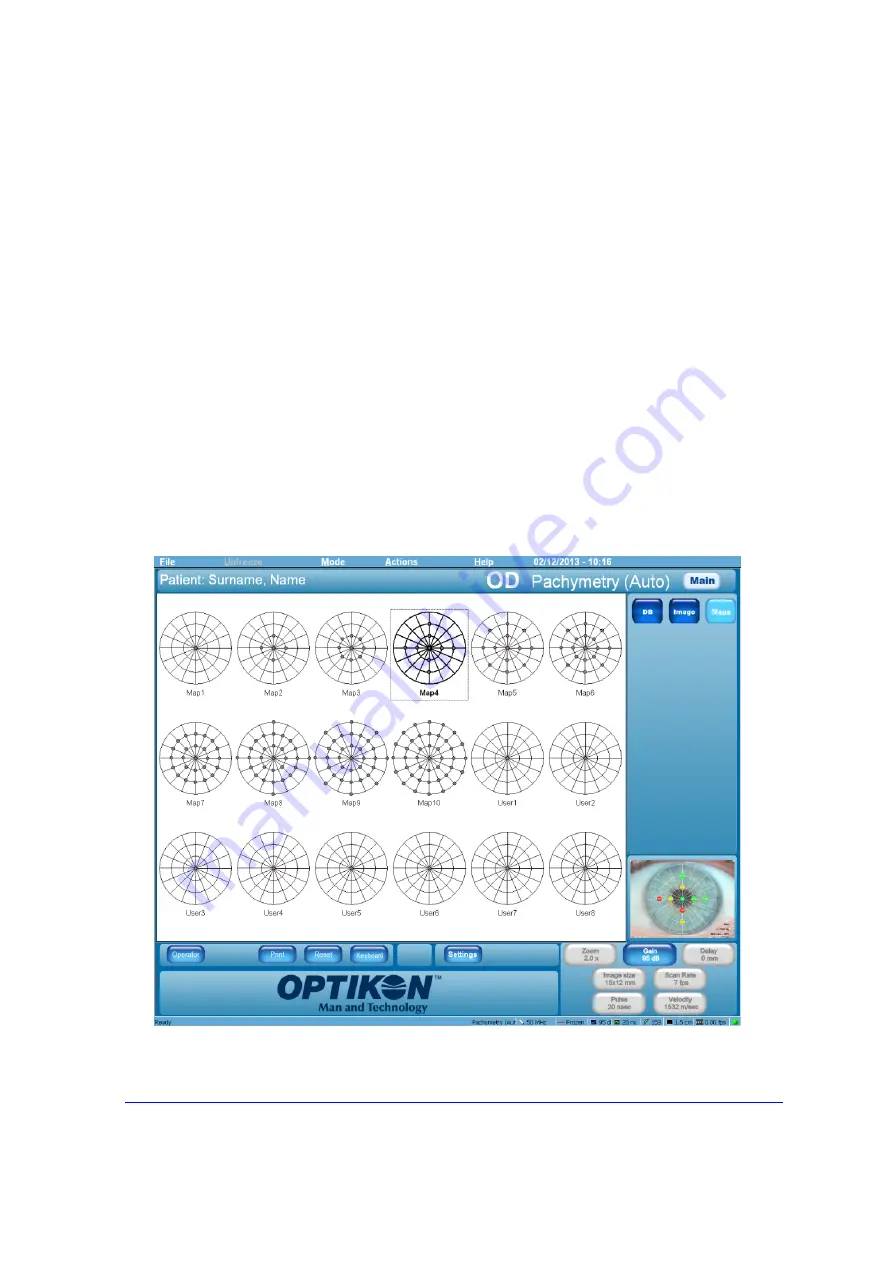
Maps

>: 

 access the map menu from which the operator can select 

one of 10 pre-defined maps and 8 customized by the user.  


Figure 7.14: Map selection menu 


Содержание 14101XEN

Страница 1: ...014 09 02 Rev B HiScan A BSCAN ECHOGRAPH INSTALLATION AND OPERATION MANUAL OPTIKON 2000 S p A Via del Casale di Settebagni 13 00138 Rome Tel 39 06 8888355 Fax 39 06 8888440 E mail sales optikon com ww...

Страница 2: ...01 and ISO 13485 certified company that manufactures surgical and diagnostic devices for ophthalmology All OPTIKON 2000 products are manufactured in compliance with the requirements of Directive 93 42...

Страница 3: ...1 6 3 INSTALLATION PROCEDURE 6 2 6 4 Audible signals 6 4 6 5 How to connect a videoprinter 6 4 6 6 Leakage currents in presence of single points of failure 6 5 6 7 Updating the device software 6 6 7...

Страница 4: ...N 8 19 8 4 5 USING THE FOOTSWITCH 8 22 8 5 SHUTDOWN PROCEDURE 8 23 9 CLEANING STERILIZATION AND MAINTENANCE 9 1 9 1 CLEANING 9 1 9 1 1 DEVICE 9 1 9 1 2 ACCESSORIES 9 1 9 2 STERILIZATION 9 1 9 2 1 DEVI...

Страница 5: ...Updates calibrations and reparations are carried out by personnel specifically authorised by OPTIKON 2000 S p A The device is used in compliance with the user instructions The mains electric installat...

Страница 6: ...HiScan Touch Installation and Operation Manual OPTIKON 2000 Code 14101XEN 1 2 2014 09 02 Rev B THIS PAGE HAS BEEN INTENTIONALLY LEFT BLANK...

Страница 7: ...cations made by persons who are not part of the authorised OPTIKON S p A technical support OPTIKON 2000 S p A reserves the right to verify in case of failures if the device and or its accessories have...

Страница 8: ...HiScan Touch Installation and Operation Manual OPTIKON 2000 Code 14101XEN 2 2 2014 09 02 Rev B THIS PAGE HAS BEEN INTENTIONALLY LEFT BLANK...

Страница 9: ...s The device must never be used in the presence of inflammable anaesthetics inflammable disinfectants or other substances which may cause fires or explosions The use of inflammable anaesthetics N2O O2...

Страница 10: ...device The additional equipotential connection through the cable must be used when it is not possible to guarantee an appropriate grounding protection against indirect contacts in all or part of the s...

Страница 11: ...ilitate the penetration of the ultrasounds in the tissues When using an immersion probe use the special mini bath cup with sclera support The immersion cup must always be filled with sterile solution...

Страница 12: ...HiScan Touch Installation and Operation Manual OPTIKON 2000 Code 14101XEN 3 4 2014 09 02 Rev B THIS PAGE HAS BEEN INTENTIONALLY LEFT BLANK...

Страница 13: ...her in order to highlight a specific hazard or instruction These are the symbols used on the HiScan label Before using the device familiarize yourself with the symbols and definitions provided in the...

Страница 14: ...HiScan Touch Installation and Operation Manual OPTIKON 2000 Code 14101XEN 4 2 2014 09 02 Rev B THIS PAGE HAS BEEN INTENTIONALLY LEFT BLANK...

Страница 15: ...rnea aqueous humour and other objects or tissues that are within the signal propagation path Part of the ultrasound wave passes through the obstacles while part of it is reflected back to the source t...

Страница 16: ...HiScan Touch Installation and Operation Manual OPTIKON 2000 Code 14101XEN 5 2 2014 09 02 Rev B Figure 5 1 Description of the device components...

Страница 17: ...to rebuild the image via software Kinetic B Scan It is possible to view the movement of ciliary muscles during the accommodation and movement of the crystalline and accommodative intraocular lenses Hi...

Страница 18: ...eviation for each measurement DIAGNOSTIC A SCAN Measurements Possibility of using the available biometric measurement functions with a non focused AScan probe at 8 MHz Diagnostics Possibility of highl...

Страница 19: ...HiScan Touch Installation and Operation Manual OPTIKON 2000 Code 14101XEN 5 5 2014 09 02 Rev B ELECTRICAL SPECIFICATIONS Input voltage 100V 240V Frequency 50 60 Hz Maximum load 100VA Fuses T1 5AH...

Страница 20: ...nterpolated 1024 lines x 2048 pixels Field of view from 15 to 60 mm 1x zoom Grey levels 256 Echographies black and white colour Axial resolution 50 MHz probe 35 microns Lateral resolution 50 MHz probe...

Страница 21: ...II Haigis Holladay Hoffer Q SRK T Post refractive Camellin Calossi DEVICES AND CONNECTIVITY HiScan is a PC based standalone device with Windows operating system and supports therefore all the devices...

Страница 22: ...12 1 12 2 Width of pulse group 6 dB parallel wpb6 mm 0 65 0 58 0 30 0 26 Width of pulse group 6 dB orthogonal wpb6 mm 0 67 0 69 0 28 0 26 Frequency of pulse repetition prr Hz 4729 4729 3598 3598 Frequ...

Страница 23: ...the application in the presence of a mixture of inflammable anaesthetics not suitable APPLIED PARTS Biometry output Class of protection against electric shocks B B Scan output Class of protection aga...

Страница 24: ...t Compliance Electromagnetic Environment Guidance RF emissions CISPR 11 Group 1 HiScan uses RF energy for its internal functions only Therefore its RF emissions are very low and are not likely to caus...

Страница 25: ...cles 40 UT 60 dip in UT for 5 cycles 70 UT 30 dip in UT for 25 cycles 5 UT 95 dip in UT for 5 seconds Mains power quality should be that of a typical commercial or hospital environment If the user of...

Страница 26: ...ch as re orienting or relocating HiScan b Over the frequency range 150 kHz to 80 MHz field strengths should be less than 3 V m 5 3 3 RECOMMENDED SEPARATION DISTANCES BETWEEN PORTABLE AND MOBILE RF COM...

Страница 27: ...N 5 13 2014 09 02 Rev B 5 4 CIRCUIT DIAGRAMS On request OPTIKON 2000 S p A may supply circuit diagrams list of components descriptions calibration instructions or other information to assist the user...

Страница 28: ...ng shipping Open the package and examine the components When opening the package handle all the components with care When cutting the packing material be careful not to damage the contents If the pack...

Страница 29: ...ribed below Installation and power up 1 Place the device on an horizontal surface and in a comfortable position for the operator 2 Insert the connector in the footswitch on the rear panel of the devic...

Страница 30: ...HiScan Touch Installation and Operation Manual OPTIKON 2000 Code 14101XEN 6 3 2014 09 02 Rev B Figure 6 1 Connections on the device...

Страница 31: ...s completed pachymetry map or biometry a special audible signal is issued The audible signal is issued by the internal speaker of the device 6 5 HOW TO CONNECT A VIDEOPRINTER To connect a traditional...

Страница 32: ...supply the leakage currents could exceed the limit value foreseen for electromedical devices in the event of single point of failure In this case it is advisable to connect an insulation transformer t...

Страница 33: ...ed and the operator will be prompted for the applicable drivers insert the installation CD in the reader and select the folder XPInstall which contains the required drivers Wait until the hardware ins...

Страница 34: ...lation and Operation Manual OPTIKON 2000 Code 14101XEN 6 7 2014 09 02 Rev B To view the version of HiScan installed in the echograph select Help About Optikon as shown in the figure Fig 6 2 Displaying...

Страница 35: ...HiScan Touch Installation and Operation Manual OPTIKON 2000 Code 14101XEN 6 8 2014 09 02 Rev B THIS PAGE HAS BEEN INTENTIONALLY LEFT BLANK...

Страница 36: ...7 1 USER INTERFACE 7 1 1 MAIN MENU After the start up operations have been completed the device displays an interface similar to the one shown in the following figure Figure 7 1 The UI of the echograp...

Страница 37: ...on DIAGNOSTIC ASCAN AScan measurements PACHYMETRY Measurements of the cornea thickness inactive To switch between the different functions it is necessary to return to the Main window Windows cannot be...

Страница 38: ...ally using the dropdown menu Select menu File option Choose Probe and the type of probe used see Figure 7 3 Figure 7 3 Selection of the B Scan probe The BScan UI consists of a Main window see Figure 7...

Страница 39: ...emographic data in alphabetical order The tabbed controls with the patients demographic data exam data and biometry if available 7 1 2 1 DROPDOWN MENU The dropdown menu is always available and can be...

Страница 40: ...isplays a preview of the exam Export Exports the image in a standard PC format Print Prints a complete exam Print Selected Images Allows to the operator to print on a single A4 printout page up to 6 B...

Страница 41: ...ers Show Gradient Bar Visualize the chromatic scale of the Bscan Images Select Color s Gradient Selection of the chromatic scale Show TGC Curve Visualize the TGC curve Select TGC Curve Selection of a...

Страница 42: ...the operator to memorize the actual test in the database 7 1 3 BIOMETRY Press button BIOMETRY to access the Biometry function and display the window shown in Figure 7 6 Figure 7 6 Biometry window In t...

Страница 43: ...ents etc can be selected from the following modules Biometry data Biometry Settings IOL Calculation Keratometric Constants IOL Database Biometry Data module This module displays all data related to bi...

Страница 44: ...HiScan Touch Installation and Operation Manual OPTIKON 2000 Code 14101XEN 7 9 2014 09 02 Rev B Figure 7 7 Biometry Data module...

Страница 45: ...his module displays the tabbed page of the routine settings used to calculate biometry The module can also be used to recall edit and save the data related to the sound propagation speed through the m...

Страница 46: ...lar lenses using the measured biometry parameters axial length the data stored in the lens database the keratometric constants and the formulas available in the module By means of this window it is po...

Страница 47: ...HiScan Touch Installation and Operation Manual OPTIKON 2000 Code 14101XEN 7 12 2014 09 02 Rev B Figure 7 9 IOL Calculation Module...

Страница 48: ...odule can be used to display the box where it is possible to determine the K and R keratometric constants used to calculate intraocular constants Figura 7 10 Keratometric constants module IOL Database...

Страница 49: ...een to access the Diagnostic Ascan function and the window shown in Figure 7 12 Figure 7 12 Ascan diagnostic window In this case it is necessary to select the connected diagnostic Ascan by means of th...

Страница 50: ...the probe gently to the patient s cornea using the minimum pressure necessary to keep the tip in contact The probe tip must be perpendicular to the cornea surface The measurement must follows immedia...

Страница 51: ...stop acquisition Button Clear clear the current screen to start a new test Button Settings access the pachymetry environment settings window Button Print print the acquired pachymetry map Button Cali...

Страница 52: ...ify It appear when a customizable map is selected from User1 to User8 Pushing the Modify button the selected map is visualized on the main window and the operator can add or remove one or more acquisi...

Страница 53: ...he corneal thickness measured Thickness and the standard deviation Std dev When the map is completely filled if the operator wants to repeat the measurement on some points follow the intructions Doubl...

Страница 54: ...Push the Store button in order to put the value on the map Automatically the system go to the next point Repeat the procedure for all the points on the map Save the map by pusching the Save button on...

Страница 55: ...HiScan Touch Installation and Operation Manual OPTIKON 2000 Code 14101XEN 7 20 2014 09 02 Rev B Figure 7 16 Pachymetry environment settings window...

Страница 56: ...lue to be used for the microkeratome setting Threshold Level Measurement threshold Decrease the threshold in case of very thick cornea Unfreeze on Start Starting condition Freezed or Unfreezed In orde...

Страница 57: ...nstrument Figure 7 17 How to calibrate the pachymetry This is done by placing the pachymetry probe in a glass of water vertically and not touching the bottom as shown in the above diagram and confirmi...

Страница 58: ...king the probe in water to remove any micro bubbles from its sensitive surface and repeat the calibration procedure pressing Calibrate button If the problem persists contact the Optikon 2000 service d...

Страница 59: ...HiScan Touch Installation and Operation Manual OPTIKON 2000 Code 14101XEN 7 24 2014 09 02 Rev B THIS PAGE HAS BEEN INTENTIONALLY LEFT BLANK...

Страница 60: ...indicator displays In this case it is necessary to switch HiScan off and check the cable connections Switch the device back on and wait for the indicator to switch from red to green approximately 5 s...

Страница 61: ...D AMBIENT TEMPERATURE IS ABOVE 25 C THE REFERENCE VALUE IS 20 9 MM CONSIDERING A TOLERANCE OF 0 1 MM THE DEVICE SHOULD REPORT 20 9 0 1 21 OMM AND 20 9 0 1 20 8 MM In all cases the cylinder temperature...

Страница 62: ...owing features Funzione Tasto Operator Enables the operator s name to be entered Print Print of the current test Reset Reset to the default parameters Keyboard Open a virtual keyboard on the screen Re...

Страница 63: ...d in the device memory Therefore the device will continue to display the same name even after a power off until a new operator s name is selected To enter an operator s name press button Operator see...

Страница 64: ...fig 8 3b the operator can do the following items Define an header for the printout This item ca be performed during the equipment installation and the defined header will be available for all the prin...

Страница 65: ...h Installation and Operation Manual OPTIKON 2000 Code 14101XEN 8 6 2014 09 02 Rev B the diagnosis Import and modify an existing text save a diagnosis and proceed to the print Figure 8 3b Multiple imag...

Страница 66: ...HiScan Touch Installation and Operation Manual OPTIKON 2000 Code 14101XEN 8 7 2014 09 02 Rev B Figure 8 4 Inputting of a diagnosis Figure 8 5 Printout header modification...

Страница 67: ...delay pulse length and other settings modified by the operator 8 3 4 KEYBOARD Displays the virtual keyboard on the screen By pressing button Keyboard operators can display a virtual keyboard on the sc...

Страница 68: ...lay operators can start playing the currently selected movie If no movie has been selected the device opens the Movie folder so that the operator can manually choose the movie to play 8 3 7 3D Rebuild...

Страница 69: ...in mm of the image window This option enables operators to select the image sampling rate and to consequently obtain a scannning depth of 63 mm 31 mm and 15 mm both in BScan mode with a 1 mm and Biome...

Страница 70: ...The velocity is not used to calculate biometric values because in this case the device uses the default velocities set for the tissues Operators may however change the default values from the dropdow...

Страница 71: ...simultaneously Their effectiveness is particularly visible with high zoom levels 8 3 17 SEARCH FUNCTION Button Set Filter enables to set a search filter This function enables to configure a set of se...

Страница 72: ...Image classification data Search parameters 8 3 18 DB DATABASE This function can be used to manage the database that contains information on exams and patients Patients and exams database The Patients...

Страница 73: ...he main menu to access this module In this module operators can display the form in which it is possible to enter or edit the demographic data of patients in database Patients This form displays addit...

Страница 74: ...15 2014 09 02 Rev B Patient module This module can be used to display the data of the selected patient in the demographic data tree Test module This module can be used to display the data of the sele...

Страница 75: ...on the display 3 Select the operator s name a If the patient already exists use the tree in the right pane of the screen i Left click symbol in the left pane of the tree ii Click the patient s name t...

Страница 76: ...e or if the vitreous is being tested 4 Move selector Image Size up or down to select the image scale do not change it in ordinary operating conditions because the computer automatically selects the be...

Страница 77: ...the button click it once more and move to the next segment c To measure an area click with the left button of the mouse icon A click the right button of the mouse and follow the perimeter of the surfa...

Страница 78: ...mage A Bscan Active Canc ASCAN 2 Click with the left button of the mouse the line at the centre of the screen and keep the button pressed and move the cursor to explore the BSCAN image The A Scan imag...

Страница 79: ...the button Setting to display the panel in which it is possible to set the ultrasound rate inside the eye and other constants a Corneal is the US rate inside the cornea b Aqueous is the US rate insid...

Страница 80: ...OL database is initially empty and must therefore be populated with the lens data 1 Click Edit IOLs to open the pane in which it is possible to add the characteristics of a new lens Before entering th...

Страница 81: ...TCH The footswitch has three buttons FREEZE SAVE and MOVIE that can be used to activate the following features FREEZE UNFREEZE press button FREEZE for a few seconds to start scanning the probe or stop...

Страница 82: ...of time or whenever the footswitch is pressed 8 5 SHUTDOWN PROCEDURE NOTE Follow the procedure described below to shut the device down for long periods of time 1 Use the shutdown procedure in the oper...

Страница 83: ...HiScan Touch Installation and Operation Manual OPTIKON 2000 Code 14101XEN 8 24 2014 09 02 Rev B THIS PAGE HAS BEEN INTENTIONALLY LEFT BLANK...

Страница 84: ...r If necessary use a neutral detergent only 2 Do not use alcohol solvents or abrasives to clean the device 9 1 2 ACCESSORIES For information on how to clean the accessories please refer to the indicat...

Страница 85: ...to standard EN60601 1 at least once a year Contact the bioengineering division of your facility or your Optikon 2000 authorised distributor service centre 9 4 2 ACCESSORIES 1 Avoid dropping or mishand...

Страница 86: ...ND AN ERROR MESSAGE DISPLAYS Verify that the drivers have been correctly installed a copy of the drivers is available on the CD ROM supplied with the echograph THE ECHOGRAPH SCREEN DISPLAYS BUT THE LO...

Страница 87: ...HE EAR BUT NO IMAGE DISPLAYS Try replacing the problem damaged probe Replace the probe cable Contact the technical support THE IMAGE DISPLAYS BUT THERE IS A LOT OF BACKGROUND NOISE Move the echograph...

Страница 88: ...11 1 11 1INTRODUCTION The 3D imaging software has now been integrated in the HiScan software This software enables to acquire 3D VTK images and is fully compatible with most commercial 3D software app...

Страница 89: ...HiScan Touch Installation and Operation Manual OPTIKON 2000 Code 14101XEN 11 2 2014 09 02 Rev B Figure 11 2 3D image of a coroidal melanoma...

Страница 90: ...ndow is illustrated in Figure 11 2 Figure 11 3 Main window of a 3D reconstruction The following controls are available on the menu bar File Edit Registration View Help All the buttons displayed in the...

Страница 91: ...14101XEN 11 4 2014 09 02 Rev B Figure 11 4 File menu Open enables operators to open an existing VTK 3D image This window can be used to select the file to open Figure 11 5 Window Open The selected 3D...

Страница 92: ...ows and enlarge the images up to the size of the windows even when using PCs with low performances the greater the performances and the faster is the image rendering If the 3D window takes up the whol...

Страница 93: ...size of the image in millimetres To create a 3D image select the first frame Start the last frame Stop and the area that has to be rebuilt the red window in the movie If the settings have already been...

Страница 94: ...As saves the 3D image as VTK file Figure 11 8 Window Save As Enter the name of the 3D image to save and click Save The layout of the window changes according to the selected language and the messages...

Страница 95: ...Rendering Parameters Sampling Distances these are the distances between the sections on axis X Y or Z The value of these parameters is dependant on the scan time of the object being rebuilt For optim...

Страница 96: ...alue of axis Z is increased or reduced Noise Threshold represents the transparency level if the value is increased the 3D image only contains the most widespread points for example to display the mobi...

Страница 97: ...irst option compares adjacent frames in order to reduce the noise resulting from the probe translation during a 3D scan while the second one compares some points on the 3D image in order to prevent th...

Страница 98: ...on Manual OPTIKON 2000 Code 14101XEN 11 11 2014 09 02 Rev B 11 3 HOW TO USE THE 3D RECONSTRUCTOR Follow these steps to create a 3D image Create a movie with a single scan Figure 11 15 Select the movie...

Страница 99: ...Operation Manual OPTIKON 2000 Code 14101XEN 11 12 2014 09 02 Rev B Start 3D Reconstructor Figure 11 17 Drag with the mouse cursor the red window on the section of the image that has to be rebuilt and...

Страница 100: ...ommended corrective actions Figure 11 19 Result of a multiple scan of the anterior eye segment If the probe is moved from one side to the other of the eye from left to right from right to left and aga...

Страница 101: ...Rev B Figure 11 21 3D image with incorrect axis Z parameter If an incorrect parameter of axis Z is used the 3D image is elongated To correct it it is necessary to adjust the rendering of axis Z as sh...

Страница 102: ...nual OPTIKON 2000 Code 14101XEN 11 15 2014 09 02 Rev B Figure 11 23 3D image with an excessively high noise threshold The image is too dark To correct it it is necessary to reduce the noise threshold...

Отзывы: