background image

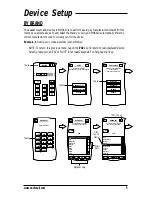
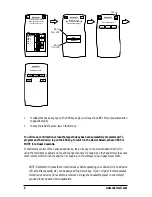
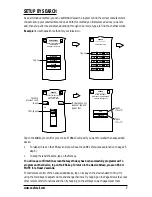
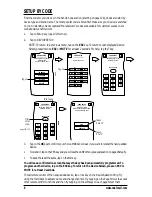
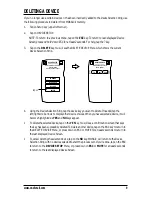
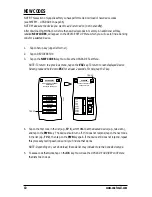
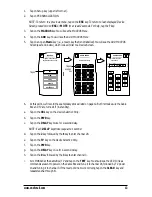
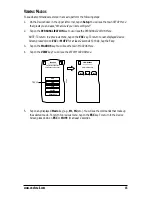
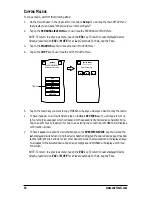
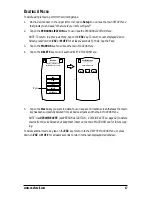
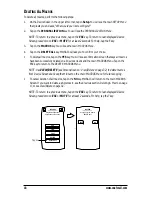
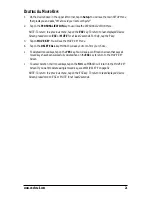
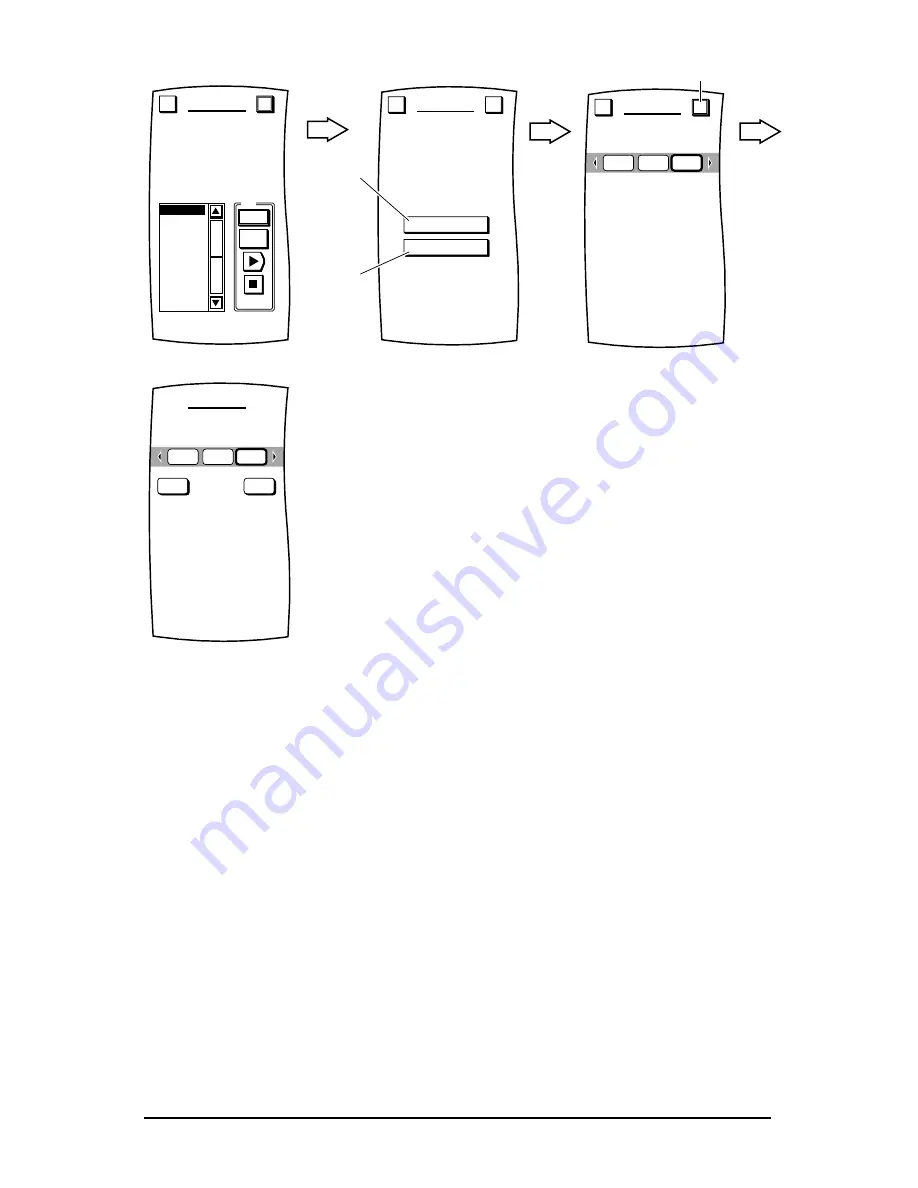
To relabel the device key, tap on the YES key and you will see the LABEL Menu (see explanation
on page 25 step 6).

To keep the label the same, tap on the NO key.

You will see a confirmation screen that says the key has been successfully programmed. To
program another device, tap on the ESC key. To return to the Device Screen, press on ESC or
MUTE for at least 2 seconds.

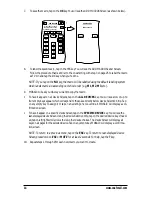
To test remote control of the newly-added device, tap on its key on the Device Selection Strip. Try
using the Hard Keys to adjust volume and change channels. Try tapping on the Page Arrows to access
other remote control functions and then try tapping on the soft keys on each page to test them.

NOTE: Remember to press the correct device key before operating your device. Only one device
(CD, amplifier, cassette, etc.) can be assigned to a device key. If your original remote operates
more than one device (for example, a receiver, CD player and cassette player in one remote),
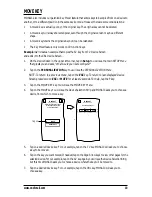
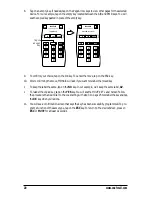
you need to set up each device separately.

6

www.oneforall.com

Test

1

PWR

VCR 1

VCR 2
VCR 3
VCR 4
VCR 5
VCR 6

BRAND SET

Nokia

 Your brand has multiple

types; use the scroll bars

to try each one in turn.

Esc

OK

ADD

REPLACE

BRAND SET

Would you like to

ADD the device or REPLACE

it with an existing one?

Esc

?

Tap on

if 1

st

 VCR

Tap on

if 2

nd

 VCR


Press OK to confirm.

BRAND SET

Esc

OK

CBL

VCR

VCR

Tap on


Relabel the device?

BRAND SET

CBL

VCR

VCR

YES

NO

Содержание Mosaic URC-9990

Страница 1: ...Universal Touch Screen Remote P 2 URC 9990 F D UK ...

Страница 2: ...User guide p 2 Bedienungsanleitung S 44 Mode d emploi p 86 ONE FOR ALL MOSAIC URC 9990 DD 0201 701571 ...

Страница 3: ...S 25 KEY MAGIC 27 VOLUME LOCK 30 VIEW DELETE 32 HOME THEATER 33 SYSTEM UPGRADE ADDING NEW CODES 36 LCD 37 SOUND ON OFF 38 LOCK SETTINGS 39 USER RESET 40 LANGUAGE 41 ABOUT 42 CUSTOMER SERVICE 43 CODES TELEVISION 128 VIDEO RECORDERS 135 SATELLITE RECEIVERS 138 CABLE CONVERTERS 141 VIDEO ACCESSORIES 141 CD MINI DISC 141 PHONO 142 HOME AUTOMATION 142 AMPLIFIERS 142 AMP TUNERS 142 CASSETTE PLAYERS 143 ...

Страница 4: ...ur home entertainment needs Installing Batteries Your MOSAIC needs 4 new AA LR6 alkaline batteries 1 Remove the battery cover from the back of the ONE FOR ALL MOSAIC by pressing down on the tab 2 Match the batteries to the and marks inside the battery case then insert the batteries 3 Press the battery cover back in place Low Battery Indicator Whenever the batteries need replacement the MOSAIC will...

Страница 5: ...0 AV PWR CBL TV VCR THEATER Setup R URC 9990 1 2 3 4 5 6 7 8 9 0 AV PWR TV VCR PWR CBL TV VCR CBL TV VCR THEATER Setup THEATER Setup Tap on next device Current active device Current active device Tap on scroll arrow to see other devices Remote Control Keys for active device Tap on pages to see more Remote Control Keys Phono Jack for future computer connection Stylus and Housing IR Signal Emitters ...

Страница 6: ...L VCR DEVICE SETUP PERSONALIZATION SYSTEM SETUP Welcome to Setup What would you like to configure Esc Tap on BY BRAND BY SEARCH BY CODE DELETE DEVICE SETUP Welcome to Device Setup What method would you like to use Esc Tap on CBL SAT TV DVD LD VCR AMP CD TUN DAT PHO TAPE HOME V ACC BRAND SET Select the device Esc Tap on OTHER A E F M N R S Z A E ASAAdventura AVP Adelsound Adventura Adyson Aiwa Akai...

Страница 7: ...unctions and then try tapping on the soft keys on each page to test them NOTE Remember to press the correct device key before operating your device Only one device CD amplifier cassette etc can be assigned to a device key If your original remote operates more than one device for example a receiver CD player and cassette player in one remote you need to set up each device separately 6 www oneforall...

Страница 8: ... on the ESC key To return to the Device Screen press on ESC or MUTE for at least 2 seconds To test remote control of the newly added device tap on its key on the Device Selection Strip Try using the Hard Keys to adjust volume and change channels Try tapping on the Page Arrows to access other remote control functions and then try tapping on the soft keys on each page to test them www oneforall com ...

Страница 9: ...he key has been successfully programmed To program another device tap on the ESC key To return to the Device Screen press on ESC or MUTE for at least 2 seconds To test remote control of the newly added device tap on its key on the Device Selection Strip Try using the Hard Keys to adjust volume and change channels Try tapping on the Page Arrows to access other remote control functions and then try ...

Страница 10: ...e it will become highlighted as YES and NO keys appear To delete the selected device tap on the YES key You will see a confirmation screen that says the key has been successfully deleted To delete another device tap on the ESC key to return to the DELETE DEVICE Menu or press down on ESC or MUTE for at least 2 seconds to return to the last displayed Device Screen To cancel deleting the selected dev...

Страница 11: ...at least 2 seconds For help tap the key 4 Tap on the first code in the list e g TV 1 aim MOSAIC at the desired device e g television and tap on the PWR key The device should turn off If it does not respond tap on the next code in the list e g TV 2 then tap on the PWR key again If the device still does not respond repeat this process by testing each code until you find one that works NOTE Depending...

Страница 12: ...label the newly added device To relabel it tap on the YES key and you will see the LABEL Menu see explanation on page 25 step 6 To keep the label the same tap on the NO key 8 You will see a confirmation screen that says the key has been successfully programmed To pro gram a function of the same type tap on the ESC key To return to the Device Screen press on ESC or MUTE for at least 2 seconds 9 To ...

Страница 13: ...uction aid we ll create an example Power On macro that turns on the Cable Box and TV power and then tunes in a favorite channel in this exact order 1 Select the Cable Box and power it on 2 Add a 2 second delay 3 On the Cable Box select channel 28 4 Select the TV and power it on 6 Add a 1 second delay 7 On the TV select channel 3 to view the modulated signal from the Cable Box Each command counts a...

Страница 14: ...R key c Tap on the DELAY key twice for 2 second delay NOTE Each DELAY keystroke is equal to 1 second d Tap on the 2 key followed by the 8 key to enter channel 28 e Tap on the TV key on the Device Selection Strip f Tap on the PWR key g Tap on the DELAY key once for 1 second delay h Tap on the 0 key followed by the 3 key to enter channel 3 i Aim MOSAIC at the Cable Box TV and tap on the TEST key You...

Страница 15: ...empty key to assign it or tap on an existing one to override it MOSAIC will display a con firmation screen To have it appear on a specific Device Screen tap on the SPECIFIC DEVICE key You will see the last displayed Device Screen Using the Device Selection Strip tap on the desired device key If need ed tap on left right scroll arrows to view other device choices The Device Screen will display all ...

Страница 16: ...Device Screen press down on ESC or MUTE for at least 2 seconds For help tap the key 3 Tap on the MACROS key You will see the main MACROS Menu 4 Tap on the VIEW key You will see the VIEW MACROS Menu 5 Tap on any displayed Macro key e g M1 M2 etc You will see the commands that make up the selected macro To return to previous menu tap on the ESC key To return to the Device Screen press down on ESC or...

Страница 17: ... up to four empty keys appear which correspond to the space directly below Device Selection Strip Tap on any empty key to assign it or tap on an existing one to override it MOSAIC will display a confirmation screen To have it appear on a specific Device Screen tap on the SPECIFIC DEVICE key You will see the last displayed Device Screen Using the Device Selection Strip tap the desired device key If...

Страница 18: ...TE key You will see the DELETE MACROS Menu 5 Tap on the Macro key you want to delete You will see a confirmation screen that says the macro key has been successfully deleted from all device screens and the main MACROS Menu NOTE Use VIEW DELETE see PERSONALIZATION VIEW DELETE on page 32 to delete macros from Device Screens but keep them intact on the main MACROS Menu for future copy ing To delete a...

Страница 19: ...at says all macros have been successfully deleted on all device screens and the main MACROS Menu Tap on the ESC key to return to the DELETE MACROS Menu NOTE Use VIEW DELETE see Personalization View Delete on page 32 to delete macros from Device Screens but keep them intact on the main MACROS Menu for future copying To cancel deletion of all macros tap on the NO key MOSAIC will return to the main M...

Страница 20: ... PERSONALIZATION Menu NOTE To return to a previous menu tap on the ESC key To return to last displayed Device Screen press down on ESC or MUTE for at least 2 seconds For help tap the key 3 Tap on the MOVE KEY key You will see the MOVE KEY Menu 4 Tap on the MOVE key You will see the Device Selection Strip and MOSAIC asks you to choose a device from which to move a key 5 Tap on a desired device key ...

Страница 21: ...le we ll keep the same label AV To relabel the copied key tap on the YES key You will see the MOVE KEY Label Screen Follow the procedure that is similar to the one starting with step 3 on page 25 to relabel the key and tap the OK key when you re done 11 You will see a confirmation screen that says the key has been successfully programmed To pro gram a function of the same type tap on the ESC key T...

Страница 22: ...VE KEY You will see the MOVE KEY Menu 4 Tap on the DELETE ALL key MOSAIC will ask you to confirm your choice To delete all moved keys tap on the YES key You will see a confirmation screen that says all moved keys have been successfully deleted Tap on the ESC key to return to the MOVE KEY Screen To cancel deletion of all moved keys tap on the NO key MOSAIC will return to the MOVE KEY Screen If you ...

Страница 23: ... Changer A learned key will always be rectangular even though the original version may be a different shape If desired a learned key can be relabelled LEARNING A FUNCTION 1 On the Device Screen in the upper left corner tap on Setup You will see the main SETUP Menu that greets you and asks What would you like to configure 2 Tap on the PERSONALIZATION key You will see the PERSONALIZATION Menu NOTE T...

Страница 24: ...IR codes from your original remote control were successfully captured NOTE If you hear a dual tone audio beep MOSAIC will display an error message stating that the IR codes were not captured MOSAIC will ask you to repeat the procedure again 8 Tap on the OK key to accept the capture MOSAIC will ask you if want to relabel the function key as selected in step 6 To relabel the function key tap on the ...

Страница 25: ... key MOSAIC will ask you to confirm your choice To delete all learned keys tap on the YES key You will see a confirmation screen that says all learned keys have been successfully deleted Tap on the ESC key to return to the LEARN Screen To cancel deletion of all learned functions tap on the NO key MOSAIC will return to the LEARN Screen If you want to delete a single learned key see VIEW DELETE on p...

Страница 26: ...ed the label can be as short as one or as long as eight characters For uppercase letters tap on the SHIFT or CAPS LOCK key To access the total of four pages of symbols tap on the Page Arrow key Tap on the SPACE key to enter a space To reenter a character tap on the key 7 To save your device label tap on the OK key MOSAIC will show a confirmation message saying that the label was successfully progr...

Страница 27: ...n be as short as one or as long as eight characters For uppercase letters tap on the SHIFT or CAPS LOCK key To access the total of four pages of symbols tap on the Page Arrow key Tap on the SPACE key to enter a space To reenter a character tap on the key 8 To save your function label tap on the OK key MOSAIC will show a confirmation message say ing that the label was successfully programmed NOTE T...

Страница 28: ...r even though the original version may be a different shape A Key Magic key retains its original Key Magic number but it can be relabelled The Key Magic feature only works on IR function keys ADDING A KEY MAGIC FUNCTION 1 On the Device Screen in the upper left corner tap on Setup You will see the main SETUP Menu that greets you and asks What would you like to configure 2 Tap on the PERSONALIZATION...

Страница 29: ...red device You will see its Device Screen and MOSAIC will ask on which key you want to store the new function 10 To assign the function tap on any desired key To accept the change tap on the OK key MOSAIC will ask if you want to relabel the function key To relabel it tap on the YES key and you will see the LABEL Menu see explanation on page 25 step 6 To keep the label the same tap on the NO key 11...

Страница 30: ... on the KEY MAGIC key 4 Tap on the DELETE ALL key MOSAIC will ask you to confirm your choice To delete all Key Magic keys tap on the YES key You will see a confirmation screen that says all Key Magic keys have been successfully deleted Tap on the ESC key to return to the KEY MAGIC Screen To cancel deletion of all Key Magic keys tap on the NO key MOSAIC will return to the KEY MAGIC Screen If you wa...

Страница 31: ...CK Menu 6 In the left column tap on a device you want locked e g VCR to the main volume source e g TV originally selected in step 4 You will see the device e g VCR being added to the Locked Devices list on the right NOTE To remove a device from the Locked Devices list tap again on the device in the left column 7 Repeat step 6 for each additional device e g CBL you want locked to the main volume so...

Страница 32: ...You will see the Device VOLUME LOCK Menu 5 In the left column tap on a device you want unlocked from the main volume source You will see the device being removed from the Locked Devices list on the right 6 Repeat step 5 for each additional device you want unlocked from the main volume source If needed use the scroll up down arrows in the left column to view additional devices 7 To save your select...

Страница 33: ... was created in the section Adding A Macro starting on page 12 5 The View Delete program will list all Macros and Moved Learned and Key Magic keys Tap on any key to view a description In the following illustration tapping on M1 shows the recorded keys used to create the example macro key in Adding A Macro starting on page 12 To delete a personalized function tap on the DELETE key MOSAIC will delet...

Страница 34: ...EATER SETUP Menu 4 Tap on the Video Playback key You will see the THEATER SETUP Device Selection Strip as shown on the next page 5 Tap on the device you want to set up as your video playback device e g VCR If you select a device that has a transport e g VCR necessary control keys will be added to the display To make a different selection tap on the ESC key and repeat this step 6 To save your selec...

Страница 35: ...previously programmed Power Macro 3 Using a procedure similar to the one described in Adding A Macro starting on page 12 tap on successive devices and their functions to program the macro 4 After you have programmed the macro aim MOSAIC at your Home Theater system and tap on the TEST key If the devices respond incorrectly tap on the CLEAR key and repeat steps 3 and 4 1 2 3 4 5 6 7 8 9 0 TV VCR PWR...

Страница 36: ... Program Power Macro sub menu tap on the VIEW key You will see the VIEW MACROS Menu which will display the contents of the current Power Macro as shown in the below exam ple 3 To return to the Previous Menu tap on the ESC key To return to the Device Screen press on ESC or MUTE for at least 2 seconds DELETING THE HOME THEATER POWER MACRO 1 If necessary perform steps 1 through 3 of Programming Home ...

Страница 37: ...odem for an in home consumer upgrade using your PC speakers or telephone For help upgrading your MOSAIC http www oneforall com LCD UPGRADE SOUND ON OFF LOCK SETTINGS USER RESET LANGUAGE ABOUT SYSTEM Welcome to System Setup What action would you like to perform Esc Tap on DOWNLOAD UPGRADE The LCD and Backlight will be turned off during downloading Press DOWNLOAD when you re ready Press MUTE to abor...

Страница 38: ... Menu NOTE To return to a previous menu tap on the ESC key To return to last displayed Device Screen press down on ESC or MUTE for at least 2 seconds For help tap the key 3 Tap on the LCD key You will see the LCD Alignment Menu Following the instructions tap on the X on each of the three screens shown below When the procedure is complete the LCD will be aligned and MOSAIC will return to the System...

Страница 39: ...r at least 2 seconds For help tap the key 3 Tap on the SOUND ON OFF key You will see the SOUND Menu with the current setting denot ed by a thicker outline To turn off the beep sound tap on the OFFkey MOSAIC will turn off the beep sound and return to the System Menu To turn on the beep sound tap on the ON key MOSAIC will turn on the beep sound and return to the System Menu NOTE As an additional low...

Страница 40: ...e ESC key To return to last displayed Device Screen press down on ESC or MUTE for at least 2 seconds For help tap the key 3 Tap on the LOCK SETTINGS key You will see the LOCK SETTINGS Menu with the current setting denoted by a thicker outline To lock the settings tap on the LOCK key MOSAIC will lock the settings and return to the last displayed Device Screen To unlock the settings tap on the UNLOC...

Страница 41: ...TE To return to a previous menu tap on the ESC key To return to last displayed Device Screen press down on ESC or MUTE for at least 2 seconds For help tap the key 3 Tap on the USER RESET key You will see the USER RESET Menu 4 To erase all user settings tap on the RESET key You will hear a beep as MOSAIC clears all set tings After a few seconds MOSAIC will show a confirmation message saying that yo...

Страница 42: ... in three languges 1 Tap on the Setup key 2 Tap on SYSTEM 3 Tap on LANGUAGE 4 Tap on the language that you wish to select for the help text ENGLISH DEUTSCH FRANCAIS LANGUAGE Which language would you prefer for help text Esc www oneforall com 41 ...

Страница 43: ...previous menu tap on the ESC key To return to last displayed Device Screen press down on ESC or MUTE for at least 2 seconds For System help tap the key 3 Tap on the ABOUT key You will see the ABOUT Menu LCD UPGRADE SOUND ON OFF LOCK SETTINGS USER RESET LANGUAGE ABOUT SYSTEM Welcome to System Setup What action would you like to perform Esc Tap on ABOUT MOSAIC Touch Screen Control Device VERSION NUM...

Страница 44: ... model nr code 1910805 TV Sony KVX 2950B RMT V131B 0505 example In the UK In Ireland In Australia e mail ofahelp uebv com e mail ofahelp uebv com e mail ofahelp uebv com fax 31 53 432 9816 fax 31 53 432 9816 fax 31 53 432 9816 tel 0808 1000306 tel 1 800 553199 tel 1 800 064472 In South Africa In New Zealand e mail support oneforall co za e mail ofahelp uebv com fax 011 298 2302 fax 06 878 2760 tel...

Страница 45: ...0057 Aristona 0037 0556 0012 1910059 Arthur Martin 0163 0400 1910060 ASA 0105 0346 0070 0104 0087 1910062 Asberg 0037 1911095 Asora 0009 1910070 Asuka 0218 0264 0216 0282 0217 1910072 Atlantic 0037 0216 0206 0259 1910074 Atori 0009 1910075 Auchan 0163 0400 1910080 Audiosonic 0037 0109 0217 0370 0264 0218 0486 1910081 Audioton 0217 0486 0370 0264 1910085 Autovox 0087 0206 0217 0247 0336 1911156 AWA...

Страница 46: ...10 Daytron 0009 0374 0037 1910216 de Graaf 0208 0044 0163 1910214 Decca 0072 0516 0037 0217 1911459 Deitron 0037 1910999 Denko 0264 1911103 DER 0193 0190 1910220 Desmet 0037 1911000 Diamant 0037 1911310 Digiline 0037 1910232 Dixi 0009 0037 0247 0217 1911255 Drean 0037 1910239 DTS 0009 1910240 Dual 0217 0259 0336 0037 0303 0163 1910243 Dumont 0087 0104 0102 0217 0070 0072 1911162 Dux 0037 0012 1910...

Страница 47: ...1107 Gronic 0102 0217 1910355 Grundig 0195 0191 0487 0070 0037 0556 1910359 Halifax 0264 0216 0217 1910360 Hampton 0216 0217 1911108 Hanimex 0294 1910362 Hanseatic 0037 0292 0282 0163 0361 0370 0009 0294 0217 0087 1910363 Hantarex 0009 0037 0102 1910364 Hantor 0037 1911084 Harwood 0009 0412 0037 1911678 Hauppauge 0037 1910370 HCM 0264 0009 0282 0412 0217 0218 0418 0037 1910372 Hema 0217 0009 19103...

Страница 48: ...Leyco 0264 0072 0037 0294 0579 1911072 LG 0037 0370 0290 0009 0377 0217 0247 0216 0163 0178 0361 1911008 Liesenkotter 0037 0327 0328 0012 1910463 Lifetec 0009 0264 0037 0374 0218 0668 0512 1911240 Lloyd s 0009 1910472 Loewe 0512 0037 0087 0292 0370 1910474 Logik 0011 0193 0371 1911456 Logix 0668 1910478 Luma 0206 0037 0163 0259 0411 0374 0009 1911009 Lumatron 0206 0037 0163 0259 0361 0217 0264 007...

Страница 49: ...63 1912100 Odeon 0264 1910590 Okano 0370 0037 0264 0072 1911014 Omega 0264 1910595 Onwa 0371 0218 0433 0581 1910596 Opera 0037 1910598 Optimus 0250 0166 1911299 Optonica 0093 1910599 Orbit 0037 1910602 Orion 0235 0294 0177 0355 0011 0037 0009 0321 0102 0443 0556 0264 0412 1911015 Orline 0037 0218 1911192 Ormond 0668 1910605 Osaki 0072 0218 0217 0264 0493 0037 0412 0374 1911193 Osio 0037 1910607 Os...

Страница 50: ...1910703 Robotron 0087 1911197 Roxy 0448 1910711 Royal Lux 0370 0412 1910715 Saba 0087 0163 0109 0516 0361 0196 0198 0335 0625 1910718 Sagem 0455 0610 0282 1910720 Saisho 0235 0516 0177 0009 0011 0217 0163 0264 1910722 Salora 0290 0194 0163 0356 0361 0516 1910723 Sambers 0516 0102 1910724 Samsung 0037 0556 0587 0009 0217 0178 0448 0370 0264 0216 0290 0072 0208 0644 1910726 Sandra 0216 0217 1911139 ...

Страница 51: ... 0668 1912107 Techica 0218 1910857 Technics 0250 1911453 Tedelex 0217 1911978 Teiron 0009 1910866 Teleavia 0109 0196 1910870 Telecor 0037 0163 0218 0217 0259 1910872 Telefunken 0109 0074 0084 0101 0335 0262 0073 0196 0037 0486 0625 1911213 Telefusion 0037 1910874 Telegazi 0037 0163 0259 0218 0264 1910878 Telemeister 0037 1910882 Telesonic 0037 1910883 Telestar 0037 1910884 Teletech 0009 0247 0037 ...

Страница 52: ...48 0352 0037 1920020 Akai 0106 0315 0041 0020 0352 0240 1920021 Akiba 0072 1920023 Akura 0072 0041 1920024 Alba 0278 0072 0352 0020 0000 0315 0348 1920029 Allorgan 0240 1920032 Allstar 0081 1920037 Ambassador 0020 1920042 Amstrad 0000 0278 0072 1920045 Anitech 0072 1920047 Ansonic 0004 1920057 Aristona 0081 1920060 ASA 0037 0081 1920070 Asuka 0072 0037 0081 0000 0038 1920080 Audiosonic 0278 192008...

Страница 53: ...0240 1920401 Inno Hit 0020 0240 0278 0072 1920404 Interbuy 0037 0072 1920405 Interfunk 0081 0104 1921113 Internal 0278 1921114 International 0278 1920408 Intervision 0000 0278 0037 0348 1920410 Irradio 0072 0037 0081 1920415 ITT 0106 0041 0104 0240 1920416 ITT Nokia 0048 1920417 ITV 0278 0037 0020 1920425 JVC 0041 0067 0008 1920427 Kaisui 0072 1920430 Karcher 0278 1920432 Kendo 0106 0315 0348 0072...

Страница 54: ...away 0278 1920753 SEG 0072 0240 0278 1920755 Sei Sinudyne 0004 0081 1920756 Seleco 0041 0008 0020 0037 1921250 Semivox 0045 1920759 Sentra 0072 0020 1921910 Setron 0072 1920762 Sharp 0048 0037 1920766 Shintom 0072 0104 1920768 Shivaki 0037 1920769 Shorai 0004 1920773 Siemens 0195 0037 0104 0081 1921916 Siera 0081 1920780 Silva 0037 1920781 Silver 0278 1920783 Sinudyne 0004 0081 1920797 Solavox 002...

Страница 55: ...6 Best 0369 1930113 Blaupunkt 0173 1930114 Blue Sky 0713 0885 1930117 Boca 0243 0794 0829 0132 1930122 Brain Wave 0692 1930130 Broco 0713 1931070 BskyB 0847 1931531 BT 0515 0668 0710 1931038 Bubu Sat 0713 1931039 BVV 0692 1930143 Cambridge 0515 0501 1930995 Canal Satellite 0853 1931458 Chess 0157 0605 1930170 CityCom 0818 0115 0607 1931099 Clark 0613 1930176 CNT 0520 1930177 Colombia 0668 1930183 ...

Страница 56: ...447 Kreiselmeyer 0173 1930450 Kyostar 0421 0613 1931304 L S Electronic 0369 1930453 Lasat 0520 0369 0607 0243 0115 0132 0157 1931049 Lemon 0692 1930454 Lenco 0421 0713 0692 0115 0369 0607 1930457 Lenson 0501 1930460 Lexus 0200 1930461 Leyco 0515 1930462 Lifesat 0605 0369 1930472 Loewe 0243 1930475 Lorenzen 0692 0794 0607 0742 0132 1930479 Lupus 0369 1930485 Luxor 0108 0345 0573 0873 0501 1930486 M...

Страница 57: ...1057 Satelco 0369 1930738 Satline 0628 1931058 Schäcke 0613 1930746 Schneider 0805 0710 1930747 Schwaiger 0605 0732 0157 0607 0885 0692 1931442 SCS 0115 1930751 Sedea Electronique 0421 1930752 Seemann 0396 0243 0515 1930753 SEG 0421 0369 0605 0742 0114 1930756 Seleco 0871 1931141 Servi Sat 0136 1930773 Siemens 0173 1930785 Skantin 0713 1931205 Skinsat 0501 1930787 SKR 0713 1931298 Sky 0856 0887 08...

Страница 58: ...1931341 Kabelvision 0003 1930489 Macab 0817 1931782 MNet 0443 1932098 Mr Zapp 0817 1932072 NTL Cabletell 0276 1931447 Optus 0276 1930612 Pace 1068 1930636 Philips 0451 0817 1931065 PVP Stereo Visual 0003 1930718 Sagem 0817 1930748 Scientific Atlanta 0277 1930864 Tele 1 0443 1930879 Telepiu 0443 1930917 Tudi 0286 1930925 United Cable 0003 1930945 Videoway 0250 1930951 Visiopass 0451 0817 1932055 We...

Страница 59: ...utomation 0167 Amplifiers Audio Verstärker Amplificateur 1950019 Aiwa 0406 0010 0159 0404 1952091 BAT 0269 1950139 Bush 0269 0421 1950217 Denon 0160 1951438 Goldmund 0269 1950349 Goodmans 0421 1950355 Grundig 0269 0847 1960425 JVC 0073 1950466 Linn 0269 1950500 Marantz 0321 0269 1950504 Mark 0269 1950523 Meridian 0269 1950528 Micromega 0269 1950557 Naim 0269 1950620 Panasonic 0308 1950636 Philips ...

Страница 60: ...980217 Denon 0059 1980355 Grundig 0059 1980366 Harman Kardon 0194 1980492 Magnavox 0194 1980500 Marantz 0194 1980535 Mitsubishi 0059 1980553 NAD 0059 1980636 Philips 0194 1980642 Pioneer 0059 1980872 Telefunken 0059 1980893 Theta Digital 0194 DAT 1980355 Grundig 0158 1980366 Harman Kardon 0158 1980500 Marantz 0158 1980636 Philips 0158 1980857 Technics 0158 DVD 1982085 3DLAB 0539 1980217 Denon 0490...

Страница 61: ......

Отзывы: