Loading A Garment Onto The Platen (Cont’d)
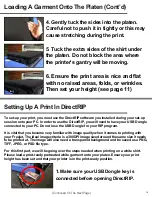
4. Gently tuck the sides into the platen.
Careful not to push it in tightly or this may
cause stretching during the print.
5. Tuck the extra sides of the shirt under
the platen. Do not block the area where
the printer’s gantry will be moving.
6. Ensure the print area is nice and flat
with no raised areas, folds, or wrinkles.
Then set your height (see page 11)
Setting Up A Print In DirectRIP
To set-up your print, you must use the DirectRIP software you installed during your set-up
session onto your PC. In order to use the DirectRIP, you will need to have your USB Dongle
connected to your PC. Do not lose the USB Dongle for your RIP program.
It is vital that you become very familiar with image quality when it comes to printing with
your Freejet. The ideal image criteria is a 300DPI image sized around the same size it needs
to be printed at. The image will also need a transparent background and be saved as a PNG,
TIFF, JPEG, or PSD file type.
For this first part, we will be going over the steps needed when printing on a white shirt.
Please load a print-ready pretreated white garment onto your platen. Ensure your print
height has been set and that your printer is in the print-ready position.
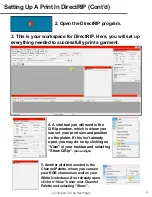
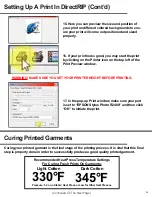
1. Make sure your USB Dongle key is
connected before opening DirectRIP.
(Continued On The Next Page)
15
Содержание FREEJET 330TX
Страница 1: ...F r e e J e t 3 3 0 T X O f f i c i a l U s e r M a n u a l 2 0 1 9 E d i t i o n ...
Страница 2: ......
Страница 65: ...62 ...
Страница 66: ...63 ...
Страница 67: ...64 ...


