


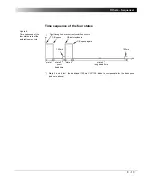


Others - Ramping
8 - 19
Pressing the S
E T T I N G S
menu key opens the
Settings
page. The
Settings
page allows setting the test cards individually. As a rule, do not use the
Settings
page but the
Device Setup
tab in the
Options
view (see ”Device Setup” on
page 2-33) to set the test cards. For more information, see ”Settings Page” on
page 2-28.
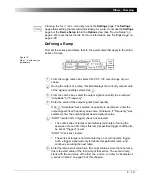
Defining a Ramp
First set the series parameters, that is, the parameters that apply to the entire
series of ramps.
Figure 15:
Step 1 - Set the series
parameters
From the range combo box select the
CPC 100
output range of your
choice.
During the output of a ramp, this field displays the currently output value
of the signal’s quantity selected at
.
From the combo box, select the output signal’s quantity to be ramped:
"Amplitude" or "Frequency".
Enter the value of the output signal’s fixed quantity.
If at
"Amplitude" was selected as quantity to be ramped, enter the
output signal’s fixed frequency value here. Otherwise, if "Frequency" was
selected, enter the output signal’s fixed amplitude value.
"SOOT" (switch off on trigger) check box selected:
• The entire series of ramps is prematurely terminated if during the
execution of one of its ramps this ramp’s specified trigger condition (to
be set at "Trigger") occurs.
"SOOT" check box cleared:
• The series of ramps is not terminated by an occurring ramp trigger.
Such a trigger signal will only terminate this particular ramp, and
continue executing the next ramp.
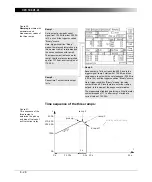
Enter the ramp’s start value here. If a series contains more than one ramp,
this is the start value of the first ramp of that series. The second ramp
starts with the end value of the first one, and so on (refer to ”Example of
a series of ramps” on page 23 of this chapter).
1
2
3
4
5
6
1
2
3
3
4
3
5
6
Содержание CPC 100
Страница 12: ...CPC 100 V1 41 x...
Страница 28: ...CPC 100 V1 41 1 16...
Страница 90: ...CPC 100 V1 41 3 14...
Страница 194: ...CPC 100 V1 41 6 30...
Страница 250: ...CPC 100 V1 41 8 32 Figure 24 Settings of Amplifier test card for this example use case...
Страница 258: ...CPC 100 V1 41 9 4...
Страница 264: ...CPC 100 V1 41 10 6...
Страница 282: ...CPC 100 V1 41 12 10 Figure 9 Saving tests with the CPC Editor...
Страница 284: ...CPC 100 V1 41 12 12...
Страница 312: ...CPC 100 V1 41 14 12...
Страница 316: ...CPC 100 V1 41 15 4...
Страница 350: ...CPC 100 V1 41 16 34...
Страница 370: ...CPC 100 V1 41 17 20 7 Finish the assembly by screwing the backnut to the housing and by tightening them with wrenches...
Страница 372: ...OMICRON Contact Addresses 22...


