65
STM7
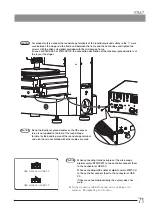
Loosen the revolving nosepiece clamping screw a on the reflected
light arm using the Allen screwdriver provided with the microscope frame.
Fit the mount dovetail b of the revolving nosepiece gently into the
revolving nosepiece attaching area on the reflected light arm and push
in all the way until it is stopped.
Tighten the revolving nosepiece clamping screw a using the Allen
screwdriver provided with the microscope frame, and mount the desired
UIS2 (UIS) objectives c by screwing in firmly.
} It is recommended to mount objectives in order from low-
magnification to high-magnification objectives. In this way, it will be
easy to change the magnification later.
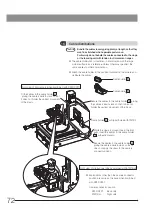
When using the coded revolving nosepiece
} Before mounting the nosepiece, remove the reflected light arm from
the microscope frame. (see page 62)
Loosen and remove the screws e (4 pcs.) of the revolving nosepiece
mount on the reflected light arm d using the Allen screwdriver
provided with the microscope frame.
Turn the revolving nosepiece mount f 90 degrees.
Fix the revolving nosepiece mount by tightening the screws e (4
pcs.) using the Allen screwdriver.
After mounting the reflected light arm d on the microscope frame, fit
the coded revolving nose into the mount from left side.
Mount the desired UIS2 (UIS) objectives by screwing in firmly.
1
2
3
1
2
3
4
5
a
b
c
10
Mounting the revolving nosepiece/objectives
(MM6C-KMAS, MM6C-RLAS)
d
f
e
e
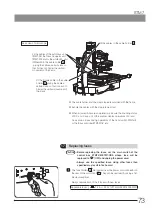
When using the measurement objective
Loosen the clamping screws g of the reflected light arm sufficiently
using the Allen screwdriver provided with the frame.
Insert the dovetails of the adapter to mount measuring objectives
STM7-MMOBAD h into the objective attaching area of the reflected
light illuminator arm from the front. And push it until it touches the end.
Tighten the clamping screws g of the reflected light arm securely
using the Allen screwdriver provided with the frame.
Screw the objective securely into the objective i attaching area.
1
2
3
4
g
h
i


