background image

46

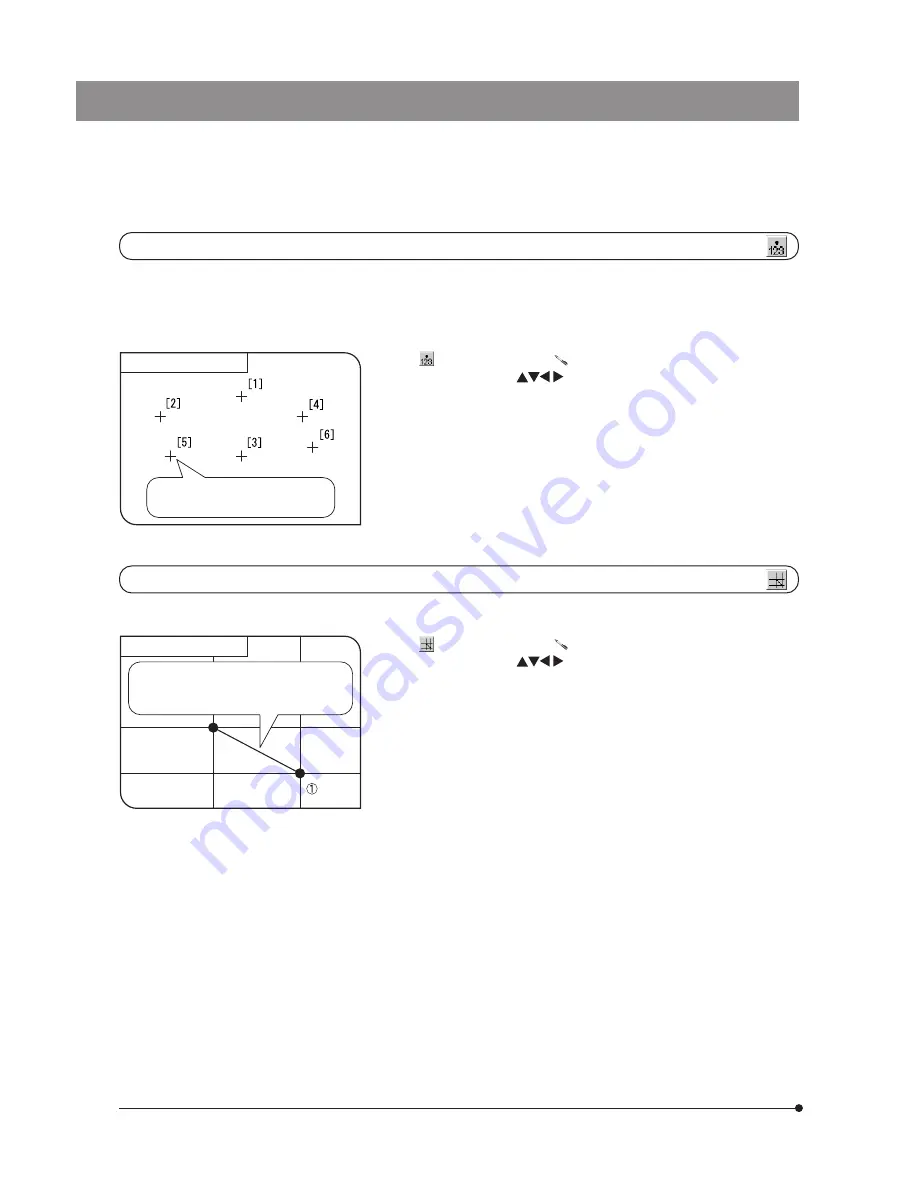
Count

Measurement target

When the SET/OK button is pressed (or 
the mouse is left-clicked), the markings 
and serial numbers are displayed.

This function draws markings and serial numbers on the specified positions. Up to 50 markings can be displayed
simultaneously.

}Even after this measurement is exited or another measurement function is performed, the markings are displayed in order

of serial numbers unless they are erased.

1. When 

 is selected, pointer “ 

 ” is displayed. The pointer can be moved

using the cursor buttons 

   or the mouse.

2. Press the SHIFT button (or left-click the mouse if this is in use) on the points to

be counted.

3. To end measurement, press the SET/OK button or MENU button (if you are

using the mouse, right-click it or left-click it on [END (MENU)] at the top right of
the screen).

Cross Line

Measurement target

The line connecting the specified point and 
origin point and the cross lines are drawn, and 
the distance between the two points is 
displayed.

This function measures the distance between the specified point and the origin point (image center).

1. When 

 is selected, pointer “ 

 ” is displayed. The pointer can be moved

using the cursor buttons 

   or the mouse.

2. Press the SHIFT button (or left-click the mouse if this is in use) on the points

desired for the measurement. If you want to perform another Cross Line mea-
surement, press the SHIFT button on the desired points.

3. To end measurement, press the SET/OK button or MENU button (if you are

using the mouse, right-click it or left-click it on [END (MENU)] at the top right of
the screen).

Содержание DP21

Страница 1: ...mum performance and familiarize yourself fully with the use of this camera we recommend that you study this manual thoroughly before operating the camera Retain this instruction manual in an easily ac...

Страница 2: ...r compliance could void the user s authority to operate the equipment In accordance with European Directive 2002 96 EC on Waste Electrical and Electronic Equipment this symbol indicates that the produ...

Страница 3: ...ouch White Balance 22 8 Recording Still Images 23 9 Recording Movies 24 2 6 Recording Function Setting Operation REC 25 48 2 6 1 Operation using the hand switch 25 48 1 Available Functions 25 2 Exposu...

Страница 4: ...nctions 53 59 1 Media Setup 53 2 Date Time Setting 53 3 Reset 54 4 Recorded Folder Setting 54 5 Options 54 55 6 Maintenance Setting 55 58 7 Operation Using Mouse and Keyboard 59 3 PC Connection System...

Страница 5: ...them Also distribute the cords and cables away from a heat generating part such as the lamp housing of the microscope 4 To prevent the microscope from toppling down avoid using microscope attachments...

Страница 6: ...X 10X objective in combination with the MM6C VL MM6 ETR 8 When the SZX16 is combined the peripheral brightness may become insufficient with a zoom ratio of no more than 10x 9 The image of dark specime...

Страница 7: ...ition be sure to keep it away from open flames or potential sources of electric sparks for example electrical equipment that is being switched on or off Also remember to always use these chemicals onl...

Страница 8: ...t Olympus will not assume any liabilities for the loss destruction of recorded data The image data may also be destroyed by an unexpected cause It is recommended to back up the data periodically When...

Страница 9: ...et 100 Mbps 100BASE TX Fast Ethernet Even when the connection requirements above are met connection and operation in any network environment is not guaranteed Computer Virus Note As a countermeasure a...

Страница 10: ...on fan Be careful not to block the ventilation opening To ensure sufficient ventilation install the control box at a distance of 10 cm or more from an obstacle such as a wall Blocking the ventilation...

Страница 11: ...isplay cable Monitor display To network LAN cable Mouse Keyboard Hand Switch D21 HS USB memory U CMAD3 C mount Camera Adapter U TV0 5X Camera Adapter 0 5X U TV1X 2 Camera Adapter 1X U TV0 5XC 3 C moun...

Страница 12: ...ment other than these products is connected Olympus cannot guarantee any performance of the camera Main switch 2 3 1 Hardware controls Pilot LED Camera cable connector C mount thread AE LOCK button PR...

Страница 13: ...Main switch USB ports DC IN connector Display connector DVI I D A RS232C connector For connection of the control box U CBS etc LAN cable connector Camera cable connector USB ports Stabilizer With 2 cl...

Страница 14: ...White balance p 33 Exposure adjustment p 26 Scale setting p 35 Scale display area p 37 Zoom p 27 File name p 33 AE lock p 27 Image quality p 30 ISO speed p 30 Metering area p 26 Folder name p 31 Expo...

Страница 15: ...ual As the photographed field is as shown below use a camera adapter having magnification of 0 5X to 1X If a 0 35X camera adapter is used the peripheral part of the image will be obscured Field number...

Страница 16: ...he control box using the provided screws Always use the provided stabilizer for vertical installation 3 Connecting the Camera Cable Fig 3 The cords and cables are vulnerable to bend or twist Do not ap...

Страница 17: ...d to prevent the cable from easily disconnecting from the control box 2 Insert the output connector of the AC adapter into the DC input con nector of the control box Always use the power cord provided...

Страница 18: ...let and stop using the sys tem Also contact Olympus immediately Never use an AC adapter other than the designated AC adapter Otherwise a failure of the control box camera head or power supply or an in...

Страница 19: ...the USB port of the hand switch Otherwise malfunction may result If you use a commercially available USB memory connect it to a USB port of the control box The USB memory provided with the DP21 can a...

Страница 20: ...a special driver for the mouse or keyboard in the DP21 As a result if a device requires a special driver only the stan dard functions of the device are available with the DP21 When using a USB keyboa...

Страница 21: ...cope brightness Engage an LBD filter in the microscope light path Set the microscope s control to the marking or the voltage specified for photographing Select the recording TV light path on the micro...

Страница 22: ...With the standalone system turning the control box or hand switch OFF automatically turns the camera head OFF so it is not required to operate the main switch of the camera head It is recommended to...

Страница 23: ...estarts after comple tion of the setting See page 54 for the language setting and page 35 for the scale magni fication setting The clock setting and monitor resolution setting windows are not dis play...

Страница 24: ...started up in the mode selected when it was turned OFF the last time Fig 14 2 4 Viewing Hiding the INFO Display When the live image is displayed the INFO display is displayed on the upper right of the...

Страница 25: ...selected setting content Selecting a setting content Press the cursor buttons to place the cursor on the desired setting content When setting a pull down item resolution etc press the cursor buttons a...

Страница 26: ...o display the images at the optimum aspect ratio refer to Monitor resolu tion setting on page 56 Fig 17 1 7 OTWB One Touch White Balance Adjust the white balance before recording to record image in op...

Страница 27: ...e number of remaining image reaches 0 warning message MEMORY FULL is displayed on the monitor screen Tip The image save destination can be changed p 31 The image can also be saved in the networked PC...

Страница 28: ...the recording A movie can be recorded for up to 5 minutes this period is variable depending on the frame rate and storage medium capacity Movie re cording may stop anytime automatically when the maxi...

Страница 29: ...exposure time set by AE Auto Exposure Exposure time setting MANUAL mode Sets the exposure time by direct entry of the figure To enter the exposure time directly press the MODE button to select the RE...

Страница 30: ...d switch to hide it Example 4 3EV 2EV 0 2EV Fig 22 1 3 SPOT Metering Setting REC AUTO mode When the observation target is dispersed in the image the image may become too bright or too dark due to the...

Страница 31: ...ch a case for observing the target at constant brightness 2 Fig 24 1 5 Zooming Scrolling 1 Press the MENU button to hide the MENU display 2 Press the cursor button or to change the electronic zoom rat...

Страница 32: ...zoomed 2x or 4x This can also be used in left right scrolling in the save destination window SET OK MENU or MODE Scale data setting change Shift MENU INFO display view hide switching Shift Cursor butt...

Страница 33: ...r button to place the cursor on the desired item 3 Press the SET OK button to enter the selection For applied functions and settings see Applied operations p 34 Page select tabs Tab Content Page for t...

Страница 34: ...capturing The figures are set based on the ISO speeds of photo films Three options of 100 200 and 400 are available The larger ISO speed is more suitable for recording of dark specimens or quickly mo...

Страница 35: ...ded images are saved in the folder that is created automatically in the medium The folder names as well as the file names of the recorded images are created automatically For details on the folder and...

Страница 36: ...ossible using the up down cursor buttons of the hand switch and left right scrolling is possible using the Shift left right buttons 1 Place the cursor on and press the cursor button 2 Select the save...

Страница 37: ...re if the lighting condition such as the brightness was different from the moment the OTWB button was last pressed the optimum color tone would not be obtained If this happens view a white image on th...

Страница 38: ...hes The display is switched to the live image display when the recording operation has com pleted The recorded image is displayed after the EXPOSE button is pressed In 5 seconds later it is switched a...

Страница 39: ...Objective power Memory No 4 2 Setting a scale 1 Select setting The Scale Setting window shown below appears 2 Change the settings in the Scale Setting window Press the SET OK button to apply the setti...

Страница 40: ...g icon The Microscope Setting Wizard will start 2 Enter the camera adapter magnification objective power etc following the Microscope Setting Wizard Operation using the hand switch Adjust the value wi...

Страница 41: ...corded images This setting is also applied to the measurement related display 6 Image Orientation Setting Default Erect The image can be displayed in one of the four orientations This opera tion is no...

Страница 42: ...y is turned ON Normal status display The current level is indicated by the blue bar and the maximum level by the red bar Current level Peak level Adjust the focus precisely so that the current level a...

Страница 43: ...ot be changed The display result is displayed near the drawn line or circle It is not possible to change the display position the font the line thickness and the number of displayed digits 1 Select ST...

Страница 44: ...ures the total length of its sides Up to 100 corners can be speci fied per polygon Up to 100 corners can be speci fied per polygon Up to 10 perpendicular lines can be drawn from the reference line Dis...

Страница 45: ...e SHIFT button on each of the points you want to specify or left click the mouse if this is in use To measure another circle press the SHIFT button at each of the points to be specified newly 3 To end...

Страница 46: ...ouse right click it or left click it on END MENU at the top right of the screen 3 Points Angle This function draws two lines based on the three points specified by the user and measures the angle form...

Страница 47: ...ee 3 Points Angle above Perpendiculars Measurement target The line passing and 2 reference line is drawn The line orthogonal to the reference line is drawn from 3 and its length is displayed This func...

Страница 48: ...he mouse right click it or left click it on END MENU at the top right of the screen Boundary Length Measurement target The point is drawn on the specified position When the SET OK button is pressed or...

Страница 49: ...ress the SET OK button or MENU button if you are using the mouse right click it or left click it on END MENU at the top right of the screen XY Distance Measurement target The line connecting and 2 is...

Страница 50: ...on or MENU button if you are using the mouse right click it or left click it on END MENU at the top right of the screen Cross Line Measurement target The line connecting the specified point and origin...

Страница 51: ...t click the mouse if this is in use 3 Select to erase the specified measurement result This function cannot erase more than one measurement result at a time Text Measurement target Press the SET OK bu...

Страница 52: ...tion erases all of the measurements results displayed on the screen simultaneously Select to erase all of the measurement results Line text color setup This function displays the measurement lines and...

Страница 53: ...can be displayed or hidden by the user While holding the SHIFT button press the MENU button to view or hide the INFO display alternately 1 Fig 27 2 1 3 Selecting the Played Image The image to be playe...

Страница 54: ...zooming Scrolling allows viewing the desired part in the image 1 Press the MENU button to hide the MENU display 2 Press the cursor button or to change the electronic zoom ratio of the image switches...

Страница 55: ...ss the thumbnails using the cursor but tons 3 The image in the current cursor position is displayed on the center of the screen 4 While holding the SHIFT button press or to update the thumbnail displa...

Страница 56: ...FO display shows the protect symbol To unprotect an image select a protected image and press the PRO TECT button again 9 Measurement of played image Measurement is also possible with played images The...

Страница 57: ...rget of formatting When multiple USB memories are connected this operation formats only the first connected one If a single USB memory is divided into multiple partitions it formats only the first dri...

Страница 58: ...sh The language used in the operation can be selected from English and Japanese When the button is selected the Language Setting Wizard shown below appears Select the desired language by following thi...

Страница 59: ...ected from OFF 1 minute 5 minutes and 10 minutes The sleep mode is canceled when the hand switch mouse or keyboard is controlled A certain time may be required before the setting change is applied 6 M...

Страница 60: ...024 x 768 XGA 800 x 600 SVGA If nothing is displayed due to inappropriate resolution set the main switch to OFF then ON again In about 30 seconds after the instrument is started up the AE Lock LED lig...

Страница 61: ...ow will appear 3 Enter the setting items Member IP address DNS server name by following the instructions in the Network Connection Setting window Enter the setting items according to the connection en...

Страница 62: ...functions as well as to solve the vulnerability problems For the latest update information please visit the following website http microscope olympus global com en Copy system information This functio...

Страница 63: ...when the mouse is right clicked on a window other than the MENU INFO display The pop up menus can be used to control the following functions MODE switching MENU INFO display hiding Zoom setting Index...

Страница 64: ...switch can be installed on the microscope to facilitate image recording during observation through the microscope Control box U CBS U CBM BX3 CBH Revolving nosepiece U D7RES U D7REA Hand switch for e...

Страница 65: ...annot guarantee any of the system performance if a non designated module is used Be sure to set the POWER switch of the control box for coded units U CBS to OFF in the high position before connecting...

Страница 66: ...s U D7REA U CBM AC adapter for U CBM RS232C cable DP21 CB RS232C connector The OUT 1 to 4 connectors are universal type connectors The U D7REA can be connected to any of them Connection of BX3 CBH BX3...

Страница 67: ...the left or right Please note that if the attaching position of U HSEXP is too close to the coarse adjustment knob it may touch the pre focusing lever 3 Clean the final fixing position with absolute a...

Страница 68: ...done by following the Microscope Setting Wizard that is displayed the first time the power is switched ON If you have already started up the DP21 the objective magnifications can be input with the fol...

Страница 69: ...st rotate the revolving nosepiece and input the magnifications and memory numbers of the objectives that are present 5When the information of all of the revolving nosepiece positions has been input pr...

Страница 70: ...ation on the microscope The shutter switch cannot be used unless the control box U CBS etc and revolving nosepiece U D7RES or U D7REA are connected It cannot be recorded by the shutter switch Use the...

Страница 71: ...after the DP21 dedicated driver is uninstalled When connecting the DP21 to the PC connect the DP21 s camera head directly to the 1394 connector of the PC Connection through a commercially available 1...

Страница 72: ...icroscopes that are not listed in the above may also be applicable For details please consult Olympus AX80 AX70 BX63 BX61 BX53 BX51 BX46 BX43 BX41 CX41 CX31 MX80 MX50 MX40 MX61L MX61 MX51 Erected Micr...

Страница 73: ...tem 3 3 Nomenclature Main switch Pilot LED Camera cable connector C mount thread Camera Cable Desktop PC cable Laptop PC cable 9 pin 6 pin without lock 9 pin 4 pin without lock DP2 TWAIN Camera Head D...

Страница 74: ...rformance of the system may not be manifested fully If the C mount camera adapter or C mount lens a has a thread length over 4 5 mm b it will hit the inside of the camera head and cause damage to it F...

Страница 75: ...us can no longer warrant the electrical safety performance of the equipment The AC adapter generates heat after long hours of use but this is not malfunction The AC adapter of the camera is required o...

Страница 76: ...Trademark Information Windows is a registered trademark of Microsoft Corporation All other brand and product names are trademarks or registered trademarks of their respective owners 1 Windows R Vista...

Страница 77: ...ick on the Next button shown above 9 The Choose Destination Location window appears If you want to change the destination location click on the Browse button to find a new location Click on the Next b...

Страница 78: ...tion is completed successfully click on Control Panel 13 When the installation completes the window below ap pears Then click on the Finish button 10 The Select Additional Tasks window appears Check t...

Страница 79: ...onnectors are in PC DP21 cannot be operated if OLYMPUS R MICROSCOPE 1394 DIGITAL CAMERA SYSTEM has not been installed to 1394 connec tor of PC connected to DP21 If DP21 is not operable please confirm...

Страница 80: ...ntinue to step 4 4 Click on the Start button and then click on Run 5 Select setup exe in the CD ROM drive folder and click on the OK button 6 Wait a while until the preparation for installation comple...

Страница 81: ...been checked the dialogue box shown below appears Click on the OK button to close the box and click on the Next button shown above 10 The Choose Destination Location window appears If you want to chan...

Страница 82: ...E 1394 DIGITAL CAM ERA SYSTEM under 1394 Bus Host Controllers it means the installation has been executed correctly After confirm ing it clock on the button If your PC has multiple 1394 connectors the...

Страница 83: ...saving refer to the manual for the TWAIN compatible application Manual Auto Manual Brightfield Observation Flow Set up the microscope Exposure mode Set the exposure time Select the area 30 or 1 Adjus...

Страница 84: ...d movies For details refer to the DP2 TWAIN instruction manual Image capturing Exposure mode setting Exposure time setting Only when the exposure mode is Manual AE lock Metering area selection ISO spe...

Страница 85: ...is deleted 2 Windows R XP 1 Click on the Start button and select Control Panel 2 Click on Add or Remove Programs 3 When the Add or Remove Programs window appears select OLYMPUS DP2 TWAIN under Current...

Страница 86: ...is pressed Warning Displayed in case of an error with low severity when the operation can be continued by redoing etc The message is kept displayed until OK ANY KEY is clicked Confirm Confirmation of...

Страница 87: ...2EV in 1 3 EV steps possible only during Auto Exposure Common Metering method Center 1 Center 30 average metering ISO speeds 100 200 400 Exposure time AUTO 2 to 1 20 000 sec MANUAL 8 to 1 20 000 sec...

Страница 88: ...Polygon Area Boundary Length Distance of Parallel Lines XY Distance Count Cross Line The following conditions are required to enable the measurement functions Scale display ON Scale setting Entry of...

Страница 89: ...age files The USB memory is connected im properly Insert all the way into the connector The LAN cable is connected improp erly applicable only when the save destination is a networked PC Connect the...

Страница 90: ...ent lamp is used Use a light source other than a fluo rescent light g The colors in the image are strange The white balance is erroneous be cause of a wrong color temperature setting Set the color tem...

Страница 91: ...d units Connect the coded revolving nose piece to the control box for coded units 64 k Functions interlocked with micro scope operations do not work Cables are connected improperly Connect the cables...

Страница 92: ...p 33 Formatting p 53 Frame rate p 84 H Hand switch p 7 8 Hand switch connection method p 15 Hand switch functions p 25 I Image Image size p 22 30 83 Image playback p 49 Image erasure p 52 53 Image ori...

Страница 93: ...Text p 46 Thumbnails p 51 59 TIFF p 30 Troubleshooting Troubleshooting guide p 85 U USB p 5 8 15 59 USB device compatibility p 15 USB memory connection p 15 Update setting p 58 V Version display p 56...

Страница 94: ...Table 1 Certified Cord A power supply cord should be certified by one of the agencies listed in Table 1 or comprised of cordage marked with an agency marking per Table 1 or marked per Table 2 The fit...

Страница 95: ...talter sterreichischer Verband f r Elektrotechnik VE Danmarks Elektriske Materialkontroll DEMKO National Standards Authority of Ireland NSAI Norges Elektriske Materiellkontroll NEMKO Asociacion Electr...

Страница 96: ...MEMO...

Страница 97: ......

Страница 98: ...Germany 3500 Corporate Parkway Center Valley Pennsylvania 18034 0610 U S A 491B River Valley Road 12 01 04 Valley Point Office Tower Singapore 248373 31 Gilby Road Mount Waverley VIC 3149 Melbourne Au...

Отзывы: