background image

4

Print Operations

4-44

d-Color MF350/250/201Plus

Selecting a recipient from the phone book

!

Detail 

To use the phone book, the names and fax numbers of the recipients must be added to the phone book 
first. For details, refer to "Adding a recipient to the phone book" on page 4-53.

1

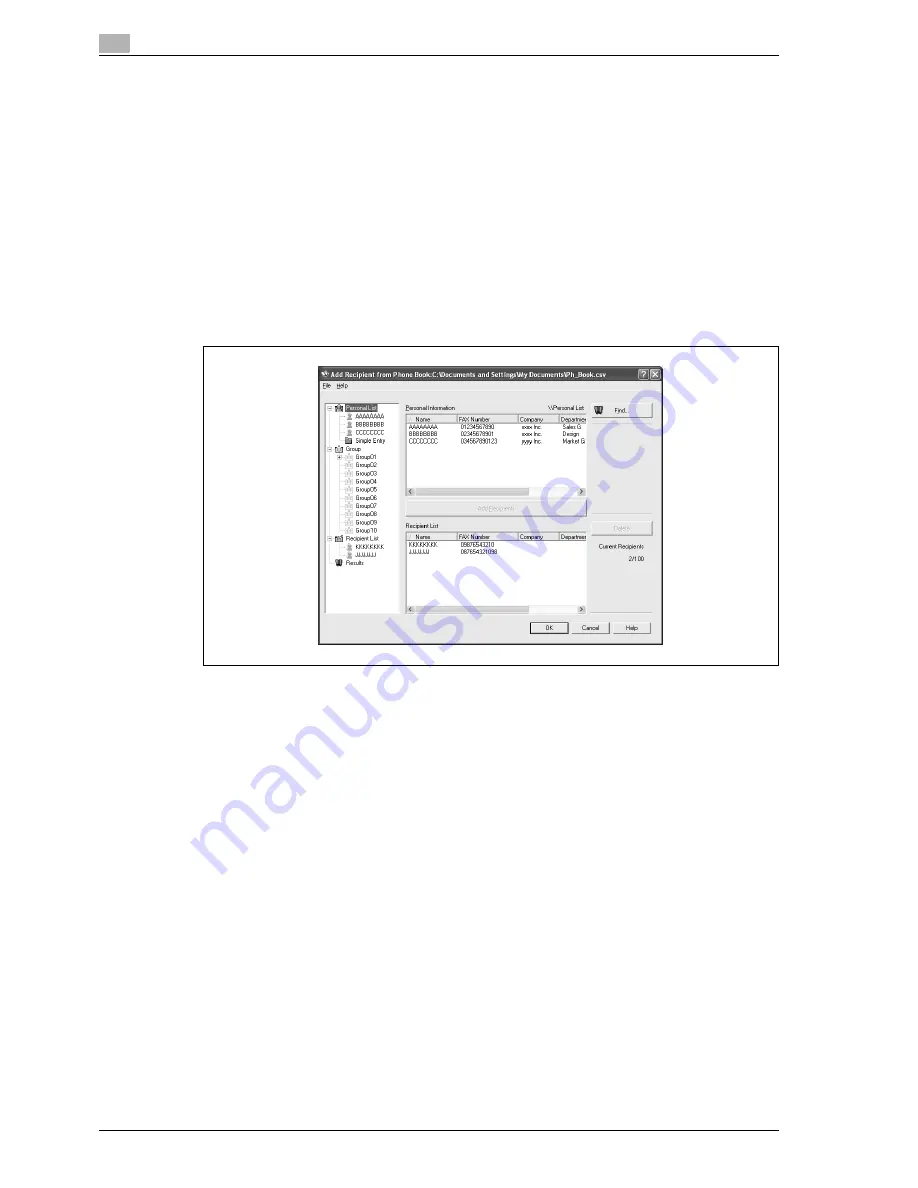
When sending a fax, click the [Add From Phone Book] button in the FAX Transmission Popup dialog 
box.

To open the FAX Transmission Popup dialog box, follow steps 1 to 5 under "Fax operations". For 
details, refer to "Fax operations" on page 4-42.

2

Select "Personal List" or "Group" from the list on the left side of the dialog box to display the desired 
recipient in "Personal Information".

Click the [Find] button to specify the conditions to search for a recipient.

Содержание d-Color 201Plus

Страница 1: ...Code 543103en d Color MF250 MF350 201plus USER MANUAL d Color MF250 d Color MF350 d Color 201Plus...

Страница 2: ...uct certifies that the product satisfies the basic quality requirements Your attention is drawn to the following actions which could compromise the conformity attested to above as well as the characte...

Страница 3: ...9 Before successive holidays 2 9 2 2 Regulation notices 2 10 CE Marking Declaration of Conformity for users of the European Union EU 2 10 User Instructions FCC Part 15 Radio Frequency Devices for U S...

Страница 4: ...o Zoom Setting 3 41 3 8 2 Specifying the zoom ratio of the original Full Size setting 3 42 3 8 3 Slightly reducing the copy Minimal setting 3 43 3 8 4 Selecting a preset zoom ratio Enlarge and Reduce...

Страница 5: ...3 112 3 27 Scanning originals with different settings and printing copies all together Program Jobs function 3 115 3 28 Producing separate copies of each page in a page spread Book Copy function 3 12...

Страница 6: ...4 51 Layout tab 4 51 Stamp Composition tab 4 51 Configure tab 4 51 Settings tab 4 52 4 9 Using a phone book 4 53 Adding a recipient to the phone book 4 53 Editing a phone book 4 55 5 Box Operations 5...

Страница 7: ...27 5 4 10 Combining Order 5 28 5 5 Sending documents in user boxes 5 29 5 5 1 Overview of Send 5 34 5 5 2 Description of the Send screen 5 34 5 6 Organizing user box documents 5 35 5 6 1 Public Person...

Страница 8: ...tents 6 10 6 5 Using Web services 6 11 6 5 1 Settings required for using Web services 6 11 6 5 2 Installing the driver of this machine on the computer 6 11 Pre installation checking 6 11 Installation...

Страница 9: ...6 43 E Mail Addr 6 43 Fax Number 6 44 Last Name 6 44 First Name 6 44 City 6 44 Company Name 6 44 Department 6 44 OR AND STARTS WITH ENDS WITH 6 44 6 8 16 Off Hook G3 6 45 Manual transmission 6 45 6 9...

Страница 10: ...Print Position Print Position 6 61 Print Position Fine Tune 6 61 6 9 13 Application Stamp Composition Page Number 6 62 Starting Page Number 6 62 Starting Chapter Number 6 62 Page Number Type 6 62 Text...

Страница 11: ...Overseas TX 6 76 ECM OFF 6 76 V 34 OFF 6 77 Check Dest Send 6 77 Select Line 6 77 6 11 2 E Mail Settings E Mail I FAX 6 78 About E Mail settings 6 78 Document Name 6 78 Subject 6 78 From 6 79 Body 6 7...

Страница 12: ...d 6 102 Host Address 6 103 File Path 6 103 Reference 6 103 6 14 6 Address Book FTP 6 104 No 6 105 Name 6 105 Index 6 105 Host Address 6 106 File Path 6 106 User ID 6 106 Password 6 106 anonymous 6 106...

Страница 13: ...x Confidential User Box G3 6 123 6 14 15 Create User Box Bulletin Board User Box G3 6 123 6 14 16 Create User Box Relay User Box G3 6 123 6 14 17 Limiting Access to Destinations Apply Levels Groups to...

Страница 14: ...available characters 8 5 8 2 Glossary 8 6 8 3 Trademarks and copyrights 8 10 OpenSSL Statement 8 11 NetSNMP License 8 12 Copyright 8 14 8 4 About Adobe Color Profile 8 15 8 5 ICC Profile for TOYO INK...

Страница 15: ...1 Introduction...

Страница 16: ......

Страница 17: ...nual as needed The illustrations used in this manual may appear slightly different from views of the actual equipment 1 1 Energy Star As an ENERGY STAR Partner we have determined that this machine mee...

Страница 18: ...not to modify adapt or translate the Software and Documentation 6 You agree that you will not attempt to alter disassemble decrypt reverse engineer or decompile the Software 7 Title to and ownership...

Страница 19: ...n slight injuries or property damage Observe all cautions in order to prevent injuries and to ensure safe use of the machine Sequence of action 1 The number 1 as formatted here indicates the first ste...

Страница 20: ...nd paper The descriptions used in this manual for originals and paper are explained below Whenever original and paper dimensions are mentioned in this manual the value shown as Y in the illustration r...

Страница 21: ...2 Installation and operation precautions...

Страница 22: ......

Страница 23: ...KM_Ver 01E_C 2 Note Some parts of the contents of this section may not correspond with the purchased product Warning and precaution symbols The following indicators are used on the warning labels or...

Страница 24: ...oys a laser the laser beam source could cause blindness Warning Symbol Use only the power cord supplied in the package If a power cord is not supplied only use the power cord and plug that is specifie...

Страница 25: ...to the product connecting to inadequate power supply volt age current capacity grounding and may result in fire or shock If proper wall outlet is not available the customer shall ask qualified electr...

Страница 26: ...not tug the power cord when unplugging Pulling on the power cord could damage the cord resulting in a fire or electrical shock Remove the power plug from the outlet more than one time a year and clean...

Страница 27: ...lug the power cord from the power outlet and then call your authorized service representative Caution Symbol After installing this product mount it on a secure base If the unit moves or falls it may c...

Страница 28: ...electrical shock could result Do not keep using this product if this product has been dropped or its cover damaged Immediately turn OFF the power switch unplug the power cord from the power outlet an...

Страница 29: ...o property Do not ignore these safety advices Caution Symbol Whenever moving this product be sure to disconnect the power cord and other ca bles Failure to do this could damage the cord or cable resul...

Страница 30: ...production of this unit conform to FCC regulations and any changes or modifications must be registered with the FCC and are subject to FCC control Any changes made by the purchaser or user without fi...

Страница 31: ...er for Devices and Radiological Health CDRH of the U S Food and Drug Administration of the U S Department of Health and Human Services DHHS This means that the device does not produce hazardous laser...

Страница 32: ...m For Finland Sweden users LOUKAN 1 LASERLAITE KLASS 1 LASER APPARAT 7 VAROITUS T m on puolijohdelaser Laitteen K ytt minen muulla kuin t ss k ytt ohjeessa mainitulla tavalla saattaa altistaa k ytt j...

Страница 33: ...esifisert i denne bruksanvisning kan brukeren utsettes for unsynlig laserstr ling som overskrider grensen for laser klass 1 Dette en halvleder laser Maksimal effekt till laserdiode er 30 mW og b lgele...

Страница 34: ...e de travailler dans un environnement r unissant des conditions de confort sant et de s curit il est pr f rable de bien a rer la pi ce ou se trouve l appareil Acoustic noise for European users only Ma...

Страница 35: ...ation precautions 2 2 3 Caution notations and labels Safety precaution notations and labels appear on this machine at the following positions Be very careful that an accident does not occur when opera...

Страница 36: ...regular maintenance can easily be performed adhere to the recommended space requirements detailed below 2 Reminder When the option is not installed be sure to allow a clearance of 200 mm or more at t...

Страница 37: ...l requirements for correct operation of the machine are as follows Temperature 10 C 50 F to 30 C 86 F with fluctuations of no more than 10 C 18 F within an hour Humidity 15 to 85 with fluctuations of...

Страница 38: ...drawn by government agencies Internal revenue stamps canceled or uncanceled Passports Immigration papers Motor vehicle licenses and titles House and property titles and deeds General Identification c...

Страница 39: ...3 Copy Operations...

Страница 40: ......

Страница 41: ...Press to display the Meter Count screen and the Utility screen 6 Reset key Press to clear all settings except programmed settings entered in the control panel and touch panel 7 Interrupt key Press to...

Страница 42: ...Press to enter Enlarge Display mode 16 Accessibility key Press to display the screen for specifying settings for user accessibility func tions 17 Power Save key Press to enter Power Save mode While th...

Страница 43: ...screens When the machine is ready to begin making copies after being turned on the Basic screen appears To activate a function or to select a setting lightly touch the desired button in the touch pane...

Страница 44: ...operations are displayed 2 Functions settings display area Tabs and buttons for displaying screens containing various functions are dis played Touch a tab or button to display the corresponding scree...

Страница 45: ...a warning occurred touch this button to display the warning screen again Appears when there is a message indicating that consumables must be replaced or the ma chine requires maintenance Touch this i...

Страница 46: ...ey lights up in orange and a screen indicating that the machine is starting up appears After a few seconds the message Warming up Ready to scan appears on the touch panel and the indicator on the Star...

Страница 47: ...Start key lights up in blue 2 Check that the message Warming up Ready to scan appears on the touch panel 3 Position the original to be copied For details on positioning the original refer to Feeding...

Страница 48: ...front door and then set the main power switch to o 3 Close the front door 2 Reminder When the machine is turned off then on again with the main power switch wait at least 10 seconds to turn the machin...

Страница 49: ...nergy conservation mode Low Power mode or Sleep mode 1 Press the Power Save key or press the Power auxiliary power key As the factory default the machine enters Low Power mode Detail Whether the machi...

Страница 50: ...n use this machine 0 Contact the administrator for a user name and password and for the server name 0 If machine authentication or external server authentication has been set a total of 1 000 users an...

Страница 51: ...entication was selected as the user authentication method Server Name appears with the name of the default server Touch Server Name to display the names of the registered servers and then select the d...

Страница 52: ...rack screen appears However if Synchronize User Authentication Account Track has been set to Synchronize the account track screen does not appear if the users and accounts are synchronized 6 Make copi...

Страница 53: ...hronize User Authentication Account Track parameter is set to Synchronize complete user authentication and then log on by using the account track screen User authentication settings can be specified u...

Страница 54: ...ints produced with each account can be controlled This is account track 0 When account track settings have been specified only users who enter passwords for specified accounts can use this machine 0 I...

Страница 55: ...d Color MF350 250 201Plus 3 17 Copy Operations 3 2 Type in the account name and then touch OK 3 Touch Password 4 Type in the password and then touch OK...

Страница 56: ...appears requesting confirmation to log off 8 Touch Yes and then touch OK The account track screen appears Detail The accounts can be managed in Administrator Settings mode available from the Utility...

Страница 57: ...ral guides to fit the size of paper to be loaded If the lateral guides are not positioned correctly for the loaded paper the paper size will not be correctly detected Be sure to adjust the lateral gui...

Страница 58: ...of plain paper that the top of the stack is higher than the mark 4 Close tray 1 Detail If special paper is loaded the paper type setting must be specified 2 Reminder Be careful not to touch the film F...

Страница 59: ...the Power auxiliary power key 0 LCT is an option 1 Press the tray release button 2 Pull out the LCT 3 Load the paper into the right side of the LCT so that the side of the paper to be printed on the s...

Страница 60: ...or details refer to Specifying a setting for special paper on page 3 94 2 Reminder Be careful not to touch the film Do not load so many sheets of paper that the top of the stack is higher than the mar...

Страница 61: ...en the bypass tray When loading large sized paper pull out the tray extension 2 With the side to be printed on facing down insert the paper as much as possible into the feed slot 3 Slide the lateral g...

Страница 62: ...etails on special paper refer to Special paper on page 3 80 5 Touch OK and then touch OK in the next screen that appears The Basic screen appears again 2 Reminder Push the paper guides firmly up again...

Страница 63: ...only in black Before loading envelopes press them down to make sure that all air is removed and make sure that the folds of the flaps are firmly pressed otherwise the envelopes may become wrinkled or...

Страница 64: ...he bypass tray Be sure to load letterhead paper so that the side to be printed on faces up 2 Note The image will be printed on the surface of the paper facing down when the paper is loaded into the by...

Страница 65: ...Separate Scan setting on page 3 30 0 If the original is not loaded correctly it may not be fed in straight or an original misfeed or damage to the original may occur 0 If the original is loaded in an...

Страница 66: ...nal glass In addition do not press down extremely hard on a book spread on the original glass otherwise the original glass may be damaged 0 For thick books or large objects make the copy without closi...

Страница 67: ...blank sheet of paper of the same size as the original over the original For bound originals spread over two facing pages such as a book or magazine position the top of the original toward the back of...

Страница 68: ...dition the scanning location can be switched between the original glass and the ADF during the scanning operation 0 The loading capacity of the ADF is 100 sheets of plain paper 80 g m2 or 38 sheets of...

Страница 69: ...Separate Scan Output Method parameter is set to Batch Print touch Finish in the following screen which appears while the original is scanned with the ADF to continue to step 5 If the original cannot...

Страница 70: ...ded Binding Position Zoom Frame Erase Center Erase Original Size To cancel changes to the settings touch Cancel The amount of memory available can be checked beside Memory in the lower left corner of...

Страница 71: ...an Output Method parameter is set to Batch Print touch Print or press the Start key If the Separate Scan Output Method parameter is set to Batch Print the copy settings can be changed To change the co...

Страница 72: ...d copies 0 The output method used with the Separate Scan setting can be set to Page Print or Batch Print As a default Page Print is selected 1 Lift open the ADF or the original cover 2 Position the fi...

Страница 73: ...5 Copy Operations 3 5 Touch 1 Sided 2 Sided 6 Touch Binding Position select the binding position for the copy and then touch OK 7 Touch Original Direction select the orientation of the loaded original...

Страница 74: ...rt key To scan the remaining pages in the original repeat step 10 To change the scanning settings touch Change Setting The buttons that appear in the screen for changing the settings differ depending...

Страница 75: ...e Start key If the Separate Scan Output Method parameter is set to Batch Print touch Print or press the Start key If the Separate Scan Output Method parameter is set to Batch Print the copy settings c...

Страница 76: ...paper is selected for a paper tray that tray is not selected automatically with the Auto Paper setting However a paper tray set to Single Side Only is given priority to be selected with single sided p...

Страница 77: ...oduced using paper of the same size If the Full Size Zoom setting was specified paper of the same size as the original is selected If the zoom ratio was increased or decreased a paper size that corres...

Страница 78: ...the size of the loaded original and the specified paper size For details on the Auto Zoom setting refer to Automatically selecting the zoom ratio Auto Zoom Setting on page 3 41 0 Load the appropriate...

Страница 79: ...with the Auto Paper Setting 3 8 1 Automatically selecting the zoom ratio Auto Zoom Setting The most appropriate zoom ratio is automatically selected based on the size of the loaded original and the s...

Страница 80: ...iginal Full Size setting A copy that is the same size as the original 100 is produced 0 Touch to enlarge the zoom ratio and touch to reduce the zoom ratio in 0 1 increments 1 In the Basic screen touch...

Страница 81: ...g An original image can be printed slightly smaller 93 0 than the original size and centered in the copy 0 The zoom ratio of the Minimal setting can be changed between 90 0 and 99 9 1 In the Basic scr...

Страница 82: ...suitable zoom ratios for copying from common standard original sizes to standard paper sizes are preset 1 In the Basic screen touch Zoom The Zoom screen appears 2 Touch the button for the appropriate...

Страница 83: ...Original Copy settings Description 1 Sided 1 Sided Select this setting to produce single sided copies from single sided originals 1 Sided 2 Sided Select this setting to produce one double sided copy...

Страница 84: ...e changed manually 2 Note As the factory default Auto Display Zoom Ratio is selected The Auto Zoom for Combine Booklet parameter in Utility mode can be set so that the recommended zoom ratios are not...

Страница 85: ...ing If a combined copy setting is selected specify the position of the binding margin and the loading orientation for the original otherwise the copies may not be printed in the desired arrangement 1...

Страница 86: ...al paper arrangement is selected can be viewed in the touch panel However this appears only if the Left Pane Display Default parameter in Utility mode is set to Check Job Settings If 2in1 was selected...

Страница 87: ...ls containing both text and images such as pamphlets or catalogs Photo Photo Paper Select this setting when printing photos from originals onto photo graphic paper Select this setting to produce bette...

Страница 88: ...al to be copied For details on positioning the original refer to Feeding the original on page 3 27 2 In the Basic screen touch Quality Density The Quality Density screen appears 3 Touch the button for...

Страница 89: ...setting and then touch OK For an original that contains photos touch Photo to display the Photo Type screen Touch the button for the appropriate setting and then touch OK For an original that contain...

Страница 90: ...e Mixed Original setting is selected 2 Note From Administrator Settings mode the machine can be set so that copies are fed out without being shifted when the finisher or the separator is installed As...

Страница 91: ...Center Staple Fold setting can be used if the saddle stitcher is installed on op tional finisher Output Tray Select the output tray where the finished copies are to be fed Staple Select one of these s...

Страница 92: ...ze and type is loaded with the w orientation in one paper tray and with the v orientation in another tray The Auto Paper setting is selected The Auto Paper setting is not selected when the Mixed Origi...

Страница 93: ...ize and type is loaded with the w orientation in one paper tray and with the v orientation in another tray The Auto Paper setting is selected The Auto Paper setting is not selected when the Mixed Orig...

Страница 94: ...6 d Color MF350 250 201Plus 3 12 3 Selecting the output tray 0 The output tray can be selected only if optional finisher is installed 1 In the Basic screen touch Finishing The Finishing screen appears...

Страница 95: ...is selected all copies must have the same paper width When Finisher FS 519 is installed Number of Bound Pages Examples of the possible number of bound pages are listed below 50 sheets of 90 g m2 pape...

Страница 96: ...ns 3 58 d Color MF350 250 201Plus 1 In the Basic screen touch Finishing The Finishing screen appears 2 Under Staple touch either Corner or 2 Position To cancel the Staple setting touch None 3 Touch Po...

Страница 97: ...tapled If the original length is more than 297 mm the short side of the paper is stapled If Auto is selected for the stapling position load the original with the top toward the back of the machine If...

Страница 98: ...is to be selected select the orientation in which the original is positioned If an Original Direction setting is not selected holes may not be punched in the copies as desired 2 Note The Punch setting...

Страница 99: ...th is more than 297 mm the holes are punched along the short side of the paper If Auto is selected for the stapling position load the original with the top toward the back of the machine If the origin...

Страница 100: ...60 to 90 g m2 paper maximum of 60 pages Maximum of 13 sheets of 91 to 120 g m2 paper Maximum of 10 sheets of 121 to 150 g m2 paper Maximum of 8 sheets of 151 to 209 g m2 paper Detail In order for copi...

Страница 101: ...d Color MF350 250 201Plus 3 63 Copy Operations 3 1 In the Basic screen touch Finishing The Finishing screen appears 2 Touch Center Staple Fold The Center Staple Fold screen appears...

Страница 102: ...Plus 3 Touch Yes below Half Fold As the factory default the Booklet function is automatically specified when Half Fold is selected To cancel the Half Fold setting touch No or the button for a differen...

Страница 103: ...eets of 91 to 120 g m2 paper Maximum of 10 sheets of 121 to 150 g m2 paper Maximum of 8 sheets of 151 to 209 g m2 paper Detail In order for copies to be bound at the center or folded in half all of th...

Страница 104: ...eet is added with the Cover Sheet function the cover sheet 50 g m2 to 200 g m2 cannot be stapled When the Center Staple Fold setting is selected the following factory default settings are automaticall...

Страница 105: ...orarily stop scanning the original and stop the printing operation 0 If an original is being scanned for a job pressing the Stop key stops scanning 1 Press the Stop key while an original is being scan...

Страница 106: ...s up in green and printing of the current job stops What settings are selected when the Interrupt key is pressed When the Interrupt key is pressed all functions and settings are reset to their default...

Страница 107: ...tered in the copy program Can the current settings be checked To check the currently specified copy settings touch Check Job in the left panel and then touch Job Details 2 Press the Mode Memory key Th...

Страница 108: ...of 16 characters For details on typing in text refer to Entering text on page 8 3 5 After typing in the name touch OK The copy program can be given the same name as a copy program that has already be...

Страница 109: ...ch the button for the desired copy program and then touch Check Program Settings For details refer to Copying with programmed copy settings Mode Memory on page 3 72 6 Touch OK or Cancel To return to t...

Страница 110: ...n positioning the original refer to Feeding the original on page 3 27 2 Press the Mode Memory key The Recall Copy Program screen appears 3 Touch the button for the copy program registered with the cop...

Страница 111: ...touch Forward 5 Check the copy settings registered with the selected copy program 6 Touch Close The Recall Copy Program screen appears again 7 Again touch the button for the copy program registered wi...

Страница 112: ...Proof Copy Access Mode Memory Enlarge Display Items in the Help Menu screen and other Help screens can be selected by touching the button or by pressing the key in the keypad for the number of the des...

Страница 113: ...Detail The items displayed in the Help menu for the name and function of each part differ depending on the options that are installed Help screen bottom level Example Function Copy Color Item Descript...

Страница 114: ...t for the Help screen that you wish to view Detail There are 13 Function Map screens for Copy mode The top number indicates the number of the 13 screens that is currently displayed To display the prev...

Страница 115: ...ons by using Function 1 With the Basic screen displayed press the Help key The Help Menu screen appears 2 Touch Function or press the 1 key in the keypad The Help screen for Function appears Is there...

Страница 116: ...right of the desired information or press the key in the keypad for the number to the left of the desired information to display the corresponding Help screen 5 After checking the Help information to...

Страница 117: ...ble paper feed cabi nets LCT Double sided copies 139 7 mm to 311 1 mm 148 mm to 457 2 mm Paper source Paper size Bypass tray A3 w to B6 w A6 w 12 e 18 w to 5 1 2 e 8 1 2 w v 8 e 13 w 1 16K w v 8K w Tr...

Страница 118: ...e Only setting selected is given priority when the Auto Paper setting is specified A paper tray with this setting is not automatically selected during double sided printing Special Paper Select this s...

Страница 119: ...tray with this setting is not automatically selected when the Auto Paper setting is specified Envelopes Select these settings when envelopes are loaded A paper tray with this setting is not automatic...

Страница 120: ...paper into the bypass tray on page 3 23 3 20 1 Automatically detecting the paper size Auto Detect setting The size of the paper loaded into tray 1 2 3 4 and the bypass tray can be detected automatica...

Страница 121: ...ize setting Size Setting The paper size can be set for the bypass tray so that it can be used with the specified paper size This is useful for example when the size of the paper that is loaded cannot...

Страница 122: ...3 Copy Operations 3 84 d Color MF350 250 201Plus 2 Select the button for the bypass tray 3 Touch Change Tray Settings 4 Touch Standard Size The Standard Size screen appears...

Страница 123: ...ange the paper type setting For details on the paper type settings refer to Specifying a setting for special paper on page 3 94 6 Touch OK and then touch OK in the next two screens that appear The Bas...

Страница 124: ...er size Custom Size settings Non standard sized paper can be loaded into the bypass tray If wide paper is loaded it will be necessary to enter the paper size 1 In the Basic screen touch Paper The Pape...

Страница 125: ...e range If the value was incorrectly entered press the C clear key in the keypad to erase the value and then specify the correct value To cancel changes to the settings touch Cancel Can paper sizes be...

Страница 126: ...ettings Five non standard paper sizes can be stored Storing paper sizes that are used often allows the paper size to be quickly selected without having to re enter the setting 1 In the Basic screen to...

Страница 127: ...ch Y to select it and then use the keypad to type in the length of side Y between 90 0 mm and 311 1 mm Check the illustration in the screen for the sides that are considered X and Y If a value outside...

Страница 128: ...a memory key touch Change Custom Size Name and then touch the key to be renamed Using the keyboard that appears type in the name of the key touch OK and then touch Close For details on typing in text...

Страница 129: ...xample if A3 wide paper is used an area up to 311 1 mm e 457 2 mm can be printed allowing the entire area of an A3 size original to be printed If wide paper is loaded it will be necessary to enter the...

Страница 130: ...screen appears 5 Select the size of the paper to be loaded Touch and until the button for the desired paper size is displayed If tray 1 2 3 4 is set for wide paper the size cannot be changed 6 To cha...

Страница 131: ...sizes If the orientation of the loaded paper does not match the sizes specified for X and Y Input error appears even if the values are within the allowable range In addition do not enter the same siz...

Страница 132: ...e Paper screen appears 2 Touch the button for tray 1 To specify a setting for special paper for tray 2 3 4 or the bypass tray touch the button for the corresponding paper tray If a setting for special...

Страница 133: ...re are limits on the types of paper that can be loaded in a paper tray For details on the type of paper that can loaded refer to Copy paper on page 3 79 If postcards were loaded select Thick 3 5 Touch...

Страница 134: ...paper that cannot be fed through the automatic duplex unit The paper to be used for printing the second side can be loaded into the bypass tray 1 In the Basic screen touch Paper The Paper screen appea...

Страница 135: ...Color MF350 250 201Plus 3 97 Copy Operations 3 4 Select the type of paper to be loaded 5 Touch Duplex 2nd Side 6 Touch OK and then touch OK in the next screen that appears The Basic screen appears aga...

Страница 136: ...iginal size of the mixed originals width of the adjustable lateral guides of the automatic document feeder 2Indicates original sizes that can be specified together with the maximum original width Sing...

Страница 137: ...s that can be placed on the original glass To copy originals that cannot be loaded into the ADF position them on the original glass 3 21 4 Precautions for positioning originals on the original glass O...

Страница 138: ...the original on page 3 27 For details on loading OHP transparencies refer to Paper types and paper capacities on page 3 80 and Loading paper into the bypass tray on page 3 23 2 In the Basic screen to...

Страница 139: ...and then touch Sheet Cover Chapter Insert To cancel changes to the settings for all Application functions press the Reset key All changes to the settings are canceled The Sheet Cover Chapter Insert sc...

Страница 140: ...loaded with the interleaf paper To cancel the setting and select the default press the Reset key To cancel the OHP Interleave function touch No 8 Touch OK 9 Specify any other desired copy settings The...

Страница 141: ...ays Use paper with the same size for the cover pages and for the main body of the original and load them in the same orientation Setting Description Front Cover Front Copy The first page of the origin...

Страница 142: ...heets and on loading the paper refer to Paper types and paper capacities on page 3 80 and Loading paper into the bypass tray on page 3 23 To cancel changes to the settings for all Application function...

Страница 143: ...paper tray loaded with cover pages can be specified from the Utility mode 6 If desired touch Paper under Front Cover or Back Cover The corresponding Cover Paper screen appears 7 Select the paper tray...

Страница 144: ...Detail The specified paper can be inserted at a maximum of 30 locations within an original of up to 999 pages In double sided originals one double sided page is considered to be two pages one for the...

Страница 145: ...s and for the main body of the original and load them in the same orientation To cancel changes to the settings for all Application functions press the Reset key All changes to the settings are cancel...

Страница 146: ...ing is not possible Delete repeated page numbers If the entered page number is greater than the number of pages in the original paper is not inserted 6 Touch Insert Paper The Insert Paper Settings scr...

Страница 147: ...n original of up to 999 pages In double sided originals one double sided page is considered to be two pages one for the front and one for the back 1 Load the original into the ADF For details on posit...

Страница 148: ...If the original scanned from the original glass has more pages than the number of pages specified in the Insert Image screen the extra pages of the insertion original are printed at the end of the ori...

Страница 149: ...he original glass For details on positioning the original refer to Feeding the original on page 3 27 10 Press the Start key Scanning begins 11 Touch Finish To insert a multi page original repeat steps...

Страница 150: ...cified page can be printed on different paper Detail A maximum of 30 pages can be specified to be printed on the front side of the paper within an original of up to 999 pages In double sided originals...

Страница 151: ...hapter Insert To cancel changes to the settings for all Application functions press the Reset key All changes to the settings are canceled The Sheet Cover Chapter Insert screen appears 3 Touch Chapter...

Страница 152: ...s If the specified page number is greater than the number of pages in the original that page number is ignored 5 Under Chapter Paper touch Copy Insert or None If None is selected all pages of the copy...

Страница 153: ...be printed together 2 Note 100 original batches can be set The Group Finishing setting is not available when programming jobs Instead select Sort 1 Position the original to be copied For details on p...

Страница 154: ...ess the Start key To print a single copy to be checked press the Proof Copy key Scanning begins 5 Touch Fix and then touch OK If the original was loaded on the original glass touch Finish in the scree...

Страница 155: ...In addition the number of original batches can be checked beside Scanned Batches When the memory is full a message appears Select whether to delete the last part of the data and scan it again delete t...

Страница 156: ...OK If No was selected touch Change Setting to change the copy settings 10 Specify any other desired copy settings Touch Print List and then specify the printing method for the entire scanned original...

Страница 157: ...Operations 3 11 Using the keypad type in the desired number of copies 12 Touch Start or press the Start key If Cancel is touched a message appears requesting confirmation to delete the data To stop p...

Страница 158: ...anned before the back cover and then all page spreads are scanned in order How are the front and back covers copied Scan the front cover then the back cover and then scan the remainder of the original...

Страница 159: ...Copy Repeat To cancel changes to the settings for all Application functions press the Reset key All changes to the settings are canceled The Book Copy Repeat screen appears 4 Touch Book Copy Booklet O...

Страница 160: ...cancel the Book Copy function touch No What do the Book Erase functions do The shadow of the book binding and the shadow of the book edges can be erased from the copies The Frame Erase and Center Era...

Страница 161: ...ils on positioning the original refer to Scanning a multi page original from the original glass on page 3 34 Position the next page and repeat step 10 until all pages of the original are scanned Scann...

Страница 162: ...3 Copy Operations 3 124 d Color MF350 250 201Plus If Front Cover was selected all page spreads are scanned in order after the front cover 12 Press the Start key...

Страница 163: ...n and then touch Book Copy Repeat To cancel changes to the settings for all Application functions press the Reset key All changes to the settings are canceled The Book Copy Repeat screen appears Setti...

Страница 164: ...if optional finisher is not installed The Image Repeat screen appears 5 Under Layout touch With Margin or Without Margin or touch 2 4 8 Repeat To cancel the Image Repeat function touch No Touching 2 4...

Страница 165: ...t screen that appears If the original size does not appear under Scan Range or to specify the scanning area touch Set Range and then specify the scanning area from any of the screens Touch Photo Size...

Страница 166: ...ue outside of the allowable range is specified The message Input error appears If Input error appears or if the value was incorrectly entered press the C clear key in the keypad and then specify the c...

Страница 167: ...paper size 1 Place the original on the original glass For details on positioning the original refer to Feeding the original on page 3 27 2 Touch Application and then touch Book Copy Repeat To cancel...

Страница 168: ...e Size select the finished image size and then touch OK Touch or to display a different list of standard sizes Touching Custom Size displays the Custom Size screen Touch X or Y to select the dimension...

Страница 169: ...original size and then touch OK If the original size cannot be detected automatically or to specify the original size touch Original Size and then specify the original size from any of the screens To...

Страница 170: ...the correct value To enter a value press the C clear key and then use the keypad to type in the new value What happens when a value outside of the allowable range is specified The message Input error...

Страница 171: ...ls on positioning the original refer to Feeding the original on page 3 27 0 This function can be used when optional finisher is installed 1 Position the original to be copied Load a booklet with the s...

Страница 172: ...appears 3 Touch Booklet Original 4 Touch Close 5 Specify any other desired copy settings 6 Using the keypad type in the desired number of copies 7 Press the Start key If the original is placed on the...

Страница 173: ...ze or Center Zoom is to be set position the original on the original glass 2 Touch Application and then touch Image Adjust To cancel changes to the settings for all Application functions press the Res...

Страница 174: ...not detected Therefore specify the original size in the Custom Size screen and then press the Start key 4 Check the original size and then touch OK If the original size cannot be detected automatical...

Страница 175: ...rect value To enter a value press the C clear key and then use the keypad to type in the new value What happens when a value outside of the allowable range is specified The message Input error appears...

Страница 176: ...sided original If there are not enough pages blank pages are automatically added at the end For details on stapling refer to Binding copies at the center Center Staple Fold setting on page 3 65 For a...

Страница 177: ...andscape orientation they will be bound at the top regardless of which setting is selected To cancel the setting and select the default press the Reset key To cancel the Booklet function touch No 4 To...

Страница 178: ...er Stamp Preset Stamp Print copies with previously stored preset stamps overlapping pages Registered Stamp Print copies with a stamp registered with the Copy Protection Utility overlapping pages Copy...

Страница 179: ...user box Save in User Box function A scanned original can be saved in a user box Documents saved in user boxes can be printed when necessary 1 Position the original to be copied 2 Touch Application an...

Страница 180: ...User Box No It is not necessary to enter the password when saving data even if a password has been specified for the box Touching Search User Box displays the Search User Box screen User boxes can be...

Страница 181: ...d To change the name that is automatically specified touch Document Name 7 After typing in the name touch OK For details on typing in text refer to Entering text on page 8 3 8 Select whether or not a...

Страница 182: ...ion screen appears again 10 Specify any other desired copy settings 11 Press the Start key If Yes beside Save Print was selected the scanned original is copied and the document data is saved in the sp...

Страница 183: ...ress Book 2 Group 3 E mail Settings 2 Create User Box 1 Public Personal User Box 2 Bulletin Board User Box 3 Relay User Box 3 Limiting Access to Destinations 1 Apply Levels Groups to Destina tions 2 U...

Страница 184: ...Auto Zoom ADF Specify Default Tray when APS Off Select Tray for Insert Sheet Print Jobs During Copy Operation Automatic Image Rotation 4 Scan Fax Settings JPEG Compression Level Black Compression Leve...

Страница 185: ...Box Registra tion 1 Create One Touch Destination 2 Create User Box 3 One Touch User Box Registra tion List 4 Maximum Number of User Boxes 4 User Authentication Account Track 1 General Settings 2 User...

Страница 186: ...Fax Settings 1 Header Information 2 Header Footer Position 3 Line Parameter Setting 4 TX RX Settings 5 Function Settings 6 PBX Connection Setting 7 Report Settings 8 Job Settings List 9 Multi Line Set...

Страница 187: ...4 Print Operations...

Страница 188: ......

Страница 189: ...isplay the help for each item on the currently displayed dialog box Add Favorite Setting Click this button to save the current settings and to view them at a later time Edit Favorite Setting Click thi...

Страница 190: ...the original document Custom Size Register the size Paper Size Paper size registered as the stand ard paper size and non standard paper size available on this ma chine Specifies the output paper size...

Страница 191: ...D and password is required in the control panel of this machine Select this option when printing highly con fidential documents Save in User Box Saves the document to be printed in the user box on thi...

Страница 192: ...ed in Combina tion Rotate 180 ON OFF Rotates 180 to print Skip Blank Pages ON OFF Does not print blank pages in the data Chapters ON OFF Specifies the page to be printed on the front side You can spec...

Страница 193: ...ccording to the Binding Position setting Image Shift ON OFF Prints by shifting the entire print image Click the Im age Shift Settings button to specify the image shift values Image Shift Set tings Uni...

Страница 194: ...ld ON OFF Specifies to saddle stitch a printed document Punch ON OFF Specifies hole punching From the drop down list specify the number of punches and the position Fold ON OFF Specifies folding Output...

Страница 195: ...er between pages and switches the paper and tray for each page Edit List allows you to create a list by setting conditions by page Edit List List Name Selects the name of the list to be edited The set...

Страница 196: ...leaves when printing over head projector transparencies You can specify it when Transparency is selected for the paper type Interleave Tray Tray1 4 LCT Selects the paper tray for the transparency inte...

Страница 197: ...es the pages to be printed Pattern Overwrite Specifies the sequence for printing the overlay on top of the original document Copy Protect ON OFF Prints a special pattern to prevent copying Edit al low...

Страница 198: ...ge Setting Verify Authentication settings before printing Popup Authentication Dialog when printing Edit Distribution Control Number Prints the number of copies in the header and footer when printing...

Страница 199: ...ermark position can also be specified by using the horizontal and vertical sliders in the dialog box Angle Specifies the watermark print angle Font Name Specifies the font Size Specifies the size Styl...

Страница 200: ...rn By clicking the Edit button under Format you can specify the display type or the time format Serial Number Embeds the serial number of this machine in a pattern Distribution Control Number Embeds t...

Страница 201: ...Stamp Repeat Prints a text pattern Function name Description Pattern Specifies the embedding method of a pattern Pattern Overwrite Specifies the order for printing a pattern on the original Background...

Страница 202: ...the date and time Text Color Specifies the text color used for printing Print Position Specifies the print position Starting Page Specifies the page to start printing the page number Starting Page Nu...

Страница 203: ...g DTP Web Prints with a quality suitable for Web page printing CAD Prints with a quality suitable for CAD data printing Resolution Indicates the resolution You may not change this item Pattern Fine Co...

Страница 204: ...d only when the printer driver setting dialog is displayed in the Printers Printers and Faxes for Windows XP Server 2003 window Function name Option Description Excel Job Control ON OFF When multiple...

Страница 205: ...is machine This function is not available unless the connection is enabled for communications with the machine Item Description Paper View A preview of the page layout as specified in the current sett...

Страница 206: ...0 2 10 3 select Custom Paper Sizes from Settings 3 Click the button OS 10 4 or the Add button OS 10 2 10 3 4 Enter the paper size name 5 Specify settings for the following Page size paper size Specifi...

Страница 207: ...ering a non standard paper size refer to How to add a custom size Mac OS X on page 4 20 When W is selected for each standard paper size the data can be centered and printed For example if you want to...

Страница 208: ...Pages In the File menu select Print Function name Option Description Copies 1 to 999 Specifies the number of copies to be printed Collated ON OFF Do not specify this function Select Output Method and...

Страница 209: ...ighly con fidential documents Save in User Box Saves the document to be printed in the user box on this machine Save in User Box and Print Saves the document in a box and prints at the same time Proof...

Страница 210: ...iption Secure Print This is the same dialog box that appears when you select Output Method and specify Secure Print Save in User Box This is the same dialog box that appears when you select Output Met...

Страница 211: ...g when printing Displays the User Authentication and Account Track dialog box when a print job is specified and checks entry of a user name and a department name each time Encryption Passphrase Specif...

Страница 212: ...inish You can switch between the Layout dialog box and the Finish dialog box 2 Note When printing a job that contains pages of different sizes and orientations with the Poster Mode setting specified i...

Страница 213: ...shift length Front Side Back Side Specifies the shift direction and values For 2 sided printing clearing the Same Value for Front and Back Sides check box allows you to set different values between t...

Страница 214: ...elects the paper type for printing Can be changed only when the paper tray is set to Auto When the paper tray is not set to Auto the paper type registered by Paper Settings for Each Tray is effective...

Страница 215: ...d Color MF350 250 201Plus 4 29 Print Operations 4 4 5 6 Cover Mode Transparency Interleave You can switch between the Cover Mode dialog box and the Transparency Interleave dialog box...

Страница 216: ...d Back Cover Off Print Blank Attaches a back cover page You can specify it when Auto is not selected for the paper tray Tray 1 4 LCT manual paper feed Selects the paper tray for the back cover page Th...

Страница 217: ...y items pages and positions to be printed by clicking the Settings button Settings For details refer to Editing date time on page 4 34 Page Number ON OFF Prints the page number You can specify items p...

Страница 218: ...date and time in a pattern By clicking the Edit button under Format you can specify the display type or the time format Serial Number Embeds the serial number of this machine in a pattern Distribution...

Страница 219: ...table Stamp Function name Description Copy Protect Embeds a hidden pattern that appears on unauthorized copies Pattern Specifies the embedding method of a pattern Pattern Overwrite Specifies the order...

Страница 220: ...lor used for printing Print Position Specifies the print position Function name Description Starting Page Specifies the page to start printing the page number Starting Page Number Specifies the start...

Страница 221: ...er footer settings registered in this machine Distribution Control Number Prints the number of copies in the header and footer when printing multiple copies The start number or the number of digits di...

Страница 222: ...selected for the color Color Settings Document photo DTP Web CAD Prints with a quality suitable for the selected original document Document Prints with a quality suitable for docu ments with many cha...

Страница 223: ...1 Page Attributes In the File menu select Page Setup or Paper Setup 2 Note To print on paper sizes other than the standard sizes be sure to set the custom paper sizes in Custom Size Settings first Fo...

Страница 224: ...Add button 4 Specify settings for the following Paper size Specifies the intended paper size Printer Margins Specifies the paper margins Custom Page Size Name Enter the registered name for the specif...

Страница 225: ...ption Copies Specifies the number of copies to be printed Collated Specifies whether to print multiple copies by collating them Pages Specifies the print range to print Paper Source Selects the paper...

Страница 226: ...es between overhead projector transparencies Interleave Tray Selects the paper tray for the transparency interleaves Output Method Specifies whether to stop printing temporarily after one copy of the...

Страница 227: ...Adjusts the color quality of a chart and graph in the original to the text or photo settings Smoothing Graphic Adjusts smoothing of a chart and graph in the original to the text or photo settings Ton...

Страница 228: ...the Name and FAX Number text boxes Up to 80 characters can be entered in the Name text box Up to 38 characters numbers 0 through 9 hyphens P and T can be entered in the FAX Number text box To send a...

Страница 229: ...from the list click the Delete From List button 8 If necessary click the Fax Mode Setting Details button to specify the fax mode setting details or select the FAX Cover Sheet check box to create a fa...

Страница 230: ...on page 4 53 1 When sending a fax click the Add From Phone Book button in the FAX Transmission Popup dialog box To open the FAX Transmission Popup dialog box follow steps 1 to 5 under Fax operations...

Страница 231: ...Up to 100 recipients can be added To delete a recipient click the Delete button If recipients have been added to a group all the members of the group can be added to Recipient List group transmission...

Страница 232: ...to another fax model enter the sub address and sender ID in the SUB Address and the Sender ID text boxes Up to 20 characters numbers 0 through 9 can be entered in the Sub Address text box Up to 20 cha...

Страница 233: ...f the following functions at the same time User Authentication Account Track Verify Authentication settings before printing Popup Authentication Dialog when printing 1 Select the FAX Cover Sheet check...

Страница 234: ...dialog box Load Set Information Lists the information that was entered in the Company Department Name and FAX Number text boxes Read Reads the information of the first recipient to the information box...

Страница 235: ...on a cover sheet specify the image file on the Image tab Select the Zoom check box to specify the size and set the position with the values in the X and Y boxes 8 Check the specified settings Click th...

Страница 236: ...is button to cancel any settings that have been changed and close the dialog box Help Click this button to display the help for each item on the currently displayed dialog box Add Favorite Setting Cli...

Страница 237: ...larges or reduces when the Original Size setting is changed Zoom Specifies the enlargement and reduction ratio Authentication Account Track Specifies the user name and password when performing user au...

Страница 238: ...play paper set in Print Server Properties Uses the paper that was added in Server Properties of the printer folder Verify Authentication set tings before printing Verifies the authentication settings...

Страница 239: ...ars 2 From the left side of the dialog box select Personal List and then click the Add New button The Personal Information Personal List dialog box appears 3 Enter the appropriate information in the N...

Страница 240: ...added If adding a recipient to a group you can specify the recipient in a group group transmission To send faxes to specific members it comes in handy to add them to a group Multiple groups can be se...

Страница 241: ...e file extension for the phone book files is csv Editing a phone book You can easily change the personal information that was registered change the group names edit or organize the phone books To chan...

Страница 242: ...of the dialog box and then specify Change Group Name from the Edit menu To create a folder 1 Select Personal List on the left side of the dialog box 2 Specify Add Folder from the Edit menu You can mo...

Страница 243: ...5 Box Operations...

Страница 244: ......

Страница 245: ...an be saved to the following box 1 To connect an external memory an optional local interface kit is required User box Description Public personal group user box es Document data that has been copied o...

Страница 246: ...n be printed Secure print user box Saved documents can be printed To print the data enter an ID and password Memory RX user box This box appears when the optional fax kit is installed The fax document...

Страница 247: ...them User box Delete Change name Move Copy Details Public personal group user boxes o o o o o Bulletin board user box o e e e e Polling TX user box o e e e e Secure print user box o o e e o Memory RX...

Страница 248: ...g boxes can be created Public personal group user boxes p 5 7 Bulletin board user box if needed p 5 10 Annotation user box To use the machine for relay device If the optional fax kit is installed and...

Страница 249: ...ht characters containing eight characters before enabling Password Rules Item Description Public user box Shared box that any user can access Personal user box Personal use user box that only the user...

Страница 250: ...99 User Box Name Touch User Box Name and then enter the user box name from the touch panel 20 characters or less Multiple user boxes can be registered under the same user box name if different user bo...

Страница 251: ...ox es on the User Box Registration page Item Description Auto Document Delete Time Specify the length of time for documents to remain before they are deleted counting from the registration Confidentia...

Страница 252: ...er box number between 1 and 999999999 User Box Name Touch User Box Name and then enter the user box name from the touch panel 20 characters or less Multiple user boxes can be registered under the same...

Страница 253: ...escription User Box No The next available user box number appears automatically To specify a user box number touch User Box No and then use the keypad to type in the user box number between 1 and 9999...

Страница 254: ...ox Operations 5 12 d Color MF350 250 201Plus 5 3 Saving documents in user boxes 1 Press the User Box key 2 Touch Save Document 3 Select the user box where the documents are to be saved and then touch...

Страница 255: ...following screen appears 4 Specify the document name scan settings and original settings Touch Document Name to change the name of the document Touch Scan Settings to specify the scan settings Touch...

Страница 256: ...5 Box Operations 5 14 d Color MF350 250 201Plus 5 Position the original 6 Press the Start key or touch Start...

Страница 257: ...particular user Annotation User Box To print or send document data saved with an image of the date time or an annotation number save the document data in this Annotation User Box Touch the System User...

Страница 258: ...sonal Group user box Selecting the Public Personal Group User Box tab lists the boxes where documents can be saved Select a box you want to save documents in System User Box Selecting the System User...

Страница 259: ...ou can change the user box where docu ments are saved To change it touch User Box to select the desired user box It is not possible to select a user box to save documents contained in an external memo...

Страница 260: ...5 Box Operations 5 18 d Color MF350 250 201Plus 5 4 Printing documents in user boxes 1 Press the User Box key 2 Touch Use Document 3 Select the desired user box and then touch OK...

Страница 261: ...Operations 5 4 Select one or multiple documents If one document is selected touch Print If multiple documents are selected touch Combine Specify an order for printing combination order One document se...

Страница 262: ...d double sided printing can be added when the document is printed Bind can also be specified to select and print multiple documents at the same time Transmitting Documents saved in user boxes in Fax S...

Страница 263: ...le boxes 2 Select a box you want to use System User Box 1 Select the System User Box tab lists to display available system boxes 2 Select a box you want to use When you select Bulletin Board User Box...

Страница 264: ...5 34 5 Combine Specifies the binding order and print information of the selected document p 5 28 6 Bind TX Specifies the binding order and sending information of the selected document 7 Document De ta...

Страница 265: ...installed The Punch setting is available only if the punch kit is installed on the optional finisher Item Description Copies Specifies the number of copies to be printed Print Specifies whether 1 sid...

Страница 266: ...type in the desired number of copies The number of copies can be specified between 1 and 999 Detail To reset the number of copies to 1 press the C button 1 2 No Part Name Description 1 Basic Specifie...

Страница 267: ...oup Select Sort to feed out the document by copies Select Group to feed out the document by pages Offset Specifies offset to separate the copies or pages of the document If a finisher is installed the...

Страница 268: ...5 26 d Color MF350 250 201Plus Staple Position Setting When you select a staple type you can specify the position Punch Select the setting to punch holes for filing Punch Position Setting Specify the...

Страница 269: ...specified You can adjust the center staple and half fold position by pressing Position Adjustment Press and to adjust the position Item Description Center Staple Select this option to staple copies at...

Страница 270: ...cting multiple documents and touching Combine displays a screen to specify the combining order The document is printed in the displayed order here Selecting two documents switches their order Item Des...

Страница 271: ...ox Operations 5 5 5 Sending documents in user boxes The following outlines are the steps for sending documents saved in public user boxes 1 Press the User Box key 2 Touch Use Document 3 Select the des...

Страница 272: ...0 250 201Plus 4 Select one or multiple documents If one document is selected touch Send If multiple documents are selected touch Bind TX Specify an order for printing combination order One document se...

Страница 273: ...d Color MF350 250 201Plus 5 31 Box Operations 5 5 Specify a recipient Selecting from Address Book Selecting from Direct Input Selecting from Job History Selecting via Address Search...

Страница 274: ...5 Box Operations 5 32 d Color MF350 250 201Plus 6 Specify file types communication settings and application settings From Address Book or Direct Input File Type Communication Settings Application...

Страница 275: ...d Color MF350 250 201Plus 5 33 Box Operations 5 From Job History and Address Search 7 Press the Start key or touch Start File Type Communication Settings Application...

Страница 276: ...ax Scan to SMB Document data is sent to a shared folder on the specified computer Scan to FTP Document data is sent to the specified FTP server Scan to Web DAV Document data is sent to the specified s...

Страница 277: ...ents The following outlines are the steps for organizing documents saved in public user boxes 1 Connect an external memory to the machine and then press the User Box key 2 Touch File Document 3 Select...

Страница 278: ...o the following operations System Documents stored in a system user box are subject to different operations depending on the hosting box Item Description Delete Deletes documents that are no longer ne...

Страница 279: ...cifies moving of the selected document 6 Copy Specifies copying of the selected document 7 Document De tails Enables checking of detailed information and a preview image of a document 8 Select All Sel...

Страница 280: ...en Auth Error functions available from Security Setting Security Details under Administrator Settings the procedure to input the ID and password for the secure print user box may vary 5 6 3 Deleting a...

Страница 281: ...the user who is logged on Password entry is not necessary even if a password has been specified for the destination box 5 6 6 Copy Copies data of documents stored in the user box to another user box...

Страница 282: ...he date and time when the document was stored User Name Displays the mode Scan Copy or Print and name of the user who stored the document Document Name Displays the name of the document No of Pages Di...

Страница 283: ...be viewed at full size or at a size of 2 4 or 8 times the normal size 2 Select the display size 3 Use the scroll bars in the right end and bottom end of the image to view the desired section of the i...

Страница 284: ...hibited Functions When Authentication Error displayed by touching Security Settings and then Security Details in Administrator Settings is set to Mode 1 1 Touch Secure Print User Box 2 Type in the sec...

Страница 285: ...ed in the File Document screen Function Description Copies Type in the desired number of print copies using the keypad The input range is 1 to 999 1 Sided 2 Sided Select either 1 sided or 2 sided Fini...

Страница 286: ...Detail Printing is instructed from the encrypted PDF box to print an encrypted PDF file with an external memory 5 8 2 Encrypted PDF User Box screen 1 Select Encrypted PDF user box to display the list...

Страница 287: ...6 Network Scan Fax Network Fax Operations...

Страница 288: ......

Страница 289: ...ne line for the following You cannot connect a business phone as an external telephone If a digital dedicated line is multiplexed in an enterprise network fax transmission speed may be limited or the...

Страница 290: ...may not be delivered to the recipient indicates that a message is sent to the server successfully If the machine receives a message disposition notification MDN OK appears in the TX Result screen or t...

Страница 291: ...an to E Mail Scanned data can be sent to a specified E Mail address Select the destinations from the touch panel of the machine for sending the scanned data as an E Mail attachment FTP TX Scanned data...

Страница 292: ...from the touch panel of the machine Save in User Box Scanned data can be saved in a user box created on the hard disk of this machine allowing the data to be reused The file name can be entered from t...

Страница 293: ...to the server can be downloaded from a computer on the network Web Service If a driver is installed with the machine recognized by a computer on the network Windows Vista it is possible to give a scan...

Страница 294: ...you can add data using edit function available with the Scan function Polling By sending a polling command you can receive original data from other fax machines polling RX Also you can save original d...

Страница 295: ...E Mail message IP Address Fax This function enables fax transmission over an IP network Specify the destination host name or IP address to send a fax The differences between IP Address fax and G3 fax...

Страница 296: ...rvice Specify the destination by directly entering the address 6 3 2 Group A set of addresses registered in the Address Book can be registered as a group Group registration is useful for sending a mes...

Страница 297: ...n this machine can be specified in the Administrator Settings screen 6 5 2 Installing the driver of this machine on the computer Pre installation checking Before installation check that Network discov...

Страница 298: ...50 201Plus 6 6 Operation flow 6 6 1 Scan Network fax This section describes the flow of steps for sending scanned data and using Internet fax operations 1 Press the Fax Scan key 2 Specify a recipient...

Страница 299: ...work Fax Operations 6 On the Address Search tab p 6 43 3 Specify scan settings p 6 46 original settings p 6 72 and communication settings p 6 76 To specify the scan settings touch Scan Settings To spe...

Страница 300: ...6 Network Scan Fax Network Fax Operations 6 14 d Color MF350 250 201Plus To specify the communication settings touch Communication Settings 4 Position the original 5 Press the Start key...

Страница 301: ...etwork Scan Fax Network Fax Operations 6 6 6 2 Fax G3 This section describes the flow of steps for using G3 fax operations 1 Press the Fax Scan key 2 Specify a recipient On the Address Book tab p 6 33...

Страница 302: ...Color MF350 250 201Plus On the Job History tab p 6 43 3 Specify scan settings p 6 46 original settings p 6 72 and communication settings p 6 76 To specify the scan settings touch Scan Settings To spec...

Страница 303: ...d Color MF350 250 201Plus 6 17 Network Scan Fax Network Fax Operations 6 To specify the communication settings touch Communication Settings 4 Position the original 5 Press the Start key...

Страница 304: ...ions 6 18 d Color MF350 250 201Plus 6 6 3 Recalling a program This section describes the flow of steps for recalling a registered fax scan program 1 Press the Fax Scan key 2 Press the Mode Memory key...

Страница 305: ...ns 6 4 Specify scan settings p 6 46 original settings p 6 72 and communication settings p 6 76 To specify the scan settings touch Scan Settings To specify the original settings touch Original Settings...

Страница 306: ...Fax Network Fax Operations 6 20 d Color MF350 250 201Plus 5 Position the original 6 Press the Start key 2 Note For details and the procedure of program registration refer to Register Scan Fax Program...

Страница 307: ...Fax Operations 6 6 6 4 Broadcasting This section describes the procedure for transmitting data to multiple recipients at the same time 1 Press the Fax Scan key 2 Specify two or more recipients On the...

Страница 308: ...6 Network Scan Fax Network Fax Operations 6 22 d Color MF350 250 201Plus On the Job History tab p 6 42 On the Address Search tab p 6 43...

Страница 309: ...ns 6 3 Specify scan settings p 6 46 original settings p 6 72 and communication settings p 6 76 To specify the scan settings touch Scan Settings To specify the original settings touch Original Settings...

Страница 310: ...6 Network Scan Fax Network Fax Operations 6 24 d Color MF350 250 201Plus 4 Position the original 5 Press the Start key...

Страница 311: ...an mode are structured as shown below Address Book tab 2 Note For details refer to Address Book on page 6 33 Operations available on the Address Book tab are as follows Detail For details on Search re...

Страница 312: ...Mail refer to p 6 35 For details on User Box refer to p 6 36 For details on Internet Fax refer to p 6 37 For details on IP Address Fax refer to p 6 38 For details on PC SMB refer to p 6 38 For details...

Страница 313: ...to p 6 46 For details on Original Settings refer to p 6 72 For details on Communication Settings refer to p 6 76 Address Search tab Operations available on the Address Search tab are as follows Detail...

Страница 314: ...an Settings screen are as follows First level menu Second level menu Third level menu Fourth level menu Original Type p 6 46 Simplex Duplex p 6 47 Resolution p 6 47 File Type p 6 48 File Type p 6 48 S...

Страница 315: ...Page Number p 6 62 Starting Page Number Starting Chapter Number Page Number Type Text Color Text Size Print Position Stamp p 6 64 Stamp Type Preset Stamps Pages Text Size Text Color Print Position He...

Страница 316: ...tions available on the Original Settings screen are as follows First level menu Second level menu Third level menu Fourth level menu Special Original p 6 72 Mixed Original p 6 72 Z Folded Original p 6...

Страница 317: ...tings p 6 76 Overseas TX p 6 76 ECM OFF p 6 76 V 34 OFF p 6 77 Check Dest Send p 6 77 Select Line p 6 77 E Mail Settings p 6 78 Document Name p 6 78 Subject p 6 78 From p 6 79 Body p 6 79 URL Notifica...

Страница 318: ...lt Address Book on page 6 127 1 2 3 4 5 6 7 8 No Item Description Refer to 1 Address Book Select a recipient from the registered destinations p 6 33 2 Direct Input Enter and specify an unregistered de...

Страница 319: ...es can be searched based on the type that was specified when the destination was registered Detail This button appears if Default Address Book displayed by touching Custom Display Settings Scan Fax Se...

Страница 320: ...played by touching Custom Display Settings Fax Scan Settings on the User Settings is set to Address Type For details refer to Default Address Book on page 6 127 2 Note For the method to register desti...

Страница 321: ...Fax Network Fax Operations 6 6 8 3 Direct Input Specify an unregistered destination by directly entering it 6 8 4 Direct Input Fax Enter a Fax number from the touch panel 6 8 5 Direct Input E Mail En...

Страница 322: ...6 Network Scan Fax Network Fax Operations 6 36 d Color MF350 250 201Plus 6 8 6 Direct Input User Box 1 Select a user box type 2 Specify a user box for saving the document...

Страница 323: ...Ability Destination Select a receivable setting at the Internet fax destination You can select multiple receivable settings Item Description Compression Type MMR MR and MH can be selected Paper Size...

Страница 324: ...uch panel File Path Type the path to the destination folder in uppercase letters from the touch panel User Name Type the user name to log in from the touch panel Item Description IP Address Specify th...

Страница 325: ...to directly specify the destination folder Next Destination Touch this button to add other destinations 6 8 10 Direct Input FTP Specify the FTP address directly Host Name Specify the host name or IP...

Страница 326: ...ton to add other destinations 6 8 11 Direct Input WebDAV Specify the WebDAV address directly Host Name Specify the host name or IP address for the destination from the touch panel File Path Specify th...

Страница 327: ...Password Type the login password from the touch panel Detailed Settings Specify more detailed settings Next Destination Touch this button to add other destinations Item Description Port Number Enter...

Страница 328: ...nd from the computer to the machine and save the data Computers on the network in which the machine is registered as a Web service scanner are listed on the screen as available destinations Select a d...

Страница 329: ...search keyword 2 Touch Start Search to search data in the specified LDAP server for the relevant address 6 8 15 Address Search Advanced Search Specify multiple search conditions to search for the tar...

Страница 330: ...the last name from the touch panel First Name Enter the first name from the touch panel City Enter the city name from the touch panel Company Name Enter the company name from the touch panel Departme...

Страница 331: ...hook operations memory transmission is disabled Manual transmission 1 Set the original in place 2 Specify settings for scanning as needed 3 Touch On Hook to display a screen for specifying the destin...

Страница 332: ...nal The original type can be selected from the following Text Select this setting for a text only original Text Photo Select this setting for originals consisting of both text and photos halftones If...

Страница 333: ...or originals with an even density produced using a copier or printer 6 9 2 Basic Simplex Duplex Select a scanning mode to either scan one side or both sides of the original 1 Sided Select this setting...

Страница 334: ...t be available depending on the setting for Color The possible combinations of the File Type and Color settings are shown below Item Description PDF Saves the data in the PDF format Compact PDF Saves...

Страница 335: ...le Type the encryption level can be specified Encryption Password 1 Enter the password necessary to open encrypted data within 32 characters 2 For confirmation enter the password twice Encryption Docu...

Страница 336: ...lected under Encryption details of the permission can be specified Under Printing Allowed select whether or not data printing should be allowed When you specify High Level for the encryption level Low...

Страница 337: ...l Settings Changes Allowed In the Detail Settings screen touch Forward to select details of the changes allowed Under Changes Allowed select the appropriate permission level for document changes inclu...

Страница 338: ...age print Detail The date time page number and header footer can be combined as text Stamps are combined as images 6 9 5 Scan Settings Density 1 Adjust the density for scanning 2 To adjust the density...

Страница 339: ...d documents To specify this setting touch Separate Scan to have the key label highlighted 6 9 7 Quality Adjustment Adjust the quality such as color and background for scanning Color E Mail User Box SM...

Страница 340: ...setting for originals with distinct black and white areas such as in line drawings Background Removal Use this option to adjust the density of the original background during scanning When colored pape...

Страница 341: ...ouch the button for the desired location and then specify a value To cancel frame erasing touch No Detail If a width to be erased around the original is specified with Frame Erase in the Book Copy scr...

Страница 342: ...e second page as the back cover and the remaining pages as the body Book Erase Frame Erase Select this setting to specify frame erasing for page spreads To erase the same width on all sides touch Fram...

Страница 343: ...s setting to erase the shadows along the binding position at the center of the original 2 Enter the frame erase width using the keypad or the and keys range 0 1 to 30 0 mm Binding Position If Separati...

Страница 344: ...t the size of the first sheet of the original upon scanning touch Auto To scan an original of a preset paper size such as A4 or B5 select the relevant paper size Custom Size Enter the dimensions of a...

Страница 345: ...a saved in Scan mode can be printed or transmitted with an image of the date time or an annotation number Selecting an annotation user box To use an annotation number the scanned data must be stored i...

Страница 346: ...Prints the date and time of printing on pages Date Format Select the format for displaying the date Time Format Select whether or not the time is added and select its format Pages Select either All P...

Страница 347: ...ect a size of characters to be printed from Minimal and Std Print Position Print Position Select a desired printing position Print Position Fine Tune 1 To make fine adjustments touch Adjust Position 2...

Страница 348: ...Number Page numbers can be added to all pages of the document Starting Page Number Specify the starting page number Starting Chapter Number Specify the starting chapter number Page Number Type Select...

Страница 349: ...ect a size of characters to be printed from Minimal and Std Print Position Print Position Select a desired printing position Print Position Fine Tune 1 To make fine adjustments touch Adjust Position 2...

Страница 350: ...omposition Stamp Add preset text such as URGENT to pages Stamp Type Preset Stamps Select a stamp such as URGENT PLEASE REPLY or DO NOT COPY Pages Select the pages to be printed on either All Pages or...

Страница 351: ...ect a size of characters to be printed from Minimal and Std Print Position Print Position Select a desired printing position Print Position Fine Tune 1 To make fine adjustments touch Adjust Position 2...

Страница 352: ...or footers on all pages The contents of the header footer must be registered in advance in Administrator settings Touch Check Change Temporarily to change what is registered and print it Recall Heade...

Страница 353: ...Settings Footer Settings 1 Specify whether or not to print a header footer 2 Touch Print to specify a text the date time or other information distribution number job number or serial number Check Cha...

Страница 354: ...Temporarily Header Settings Footer Settings Other The distribution control number job number and serial number can be included in the header footer Detail The serial number set up here represents the...

Страница 355: ...can Fax Network Fax Operations 6 Check Change Temporarily Text Color Select a printing color from Black Red Blue Green Yellow Cyan and Magenta Check Change Temporarily Text Size Select a size of chara...

Страница 356: ...it is transmitted In addition various settings can be specified for printing Copies Enter the desired number of print copies using the keypad The input range is 1 to 999 Simplex Duplex Select either 1...

Страница 357: ...s required The stamp ink is a consumable item If the stamp color becomes faint contact your service representative When the original is mixed the stamp position may be displaced from the point shown i...

Страница 358: ...d pages 6 10 1 Special Original Mixed Original Select this setting when originals of different sizes are loaded together into the ADF The scan speed is decreased since the size of each page is detecte...

Страница 359: ...nching positions or stapling positions on the original Detail This function also corrects the orientation when scanning a double sided original so that the binding position is not reversed Item Descri...

Страница 360: ...ory TX function 2 Touch Total of Pages 3 Enter the number of pages in the original using the keypad Detail If the number of pages specified differs from the number of pages actually scanned the number...

Страница 361: ...peckle Select this setting to reduce the effect that dust on the left partition glass has on images when the original is loaded into the ADF Detail The scanning speed will be reduced if the Despeckle...

Страница 362: ...method of communication defined by the ITU T International Telecommunication Union As faxes equipped with the ECM mode communicate by checking if the sent data has an error they can prevent image blur...

Страница 363: ...il This function cannot be used together with the following functions Polling RX Polling TX Bulletin Registration Bulletin Polling RX Check Dest Send A fax is sent only after a comparison of the speci...

Страница 364: ...body for sending messages Document Name Displays the name of the file to be saved The document name specified later appears as the document name even if the document name was specified in the File Do...

Страница 365: ...r Internet fax the E Mail address of the machine is used If you set Change the From Address displayed by touching System Settings on the Administrator Settings screen then Restrict User Access then Re...

Страница 366: ...be specified for URL notification setting include FTP SMB and WebDAV destinations Even if specified this feature does not work for the Scan to E Mail Internet fax or G3 fax functions Detail Search 1...

Страница 367: ...unication method Quick Memory TX In this method fax transmission starts as soon as one page of the original has been scanned Even when there are a large number of pages in the original this function e...

Страница 368: ...the recipient This is convenient when the recipient desires to bear the communications fees Select Normal then a recipient Polling RX Bulletin This function enables a document in a bulletin board user...

Страница 369: ...e Total of Pages Mixed Original Z Folded Original Long Original Binding Position Polling TX Overseas TX ECM OFF Password TX F Code TX V 34 OFF Separate Scan Timer TX The transmission time can be speci...

Страница 370: ...as the closed network reception password This function is available only when the recipient s machine has the closed network reception password function Enter the password from the numeric keypad Poll...

Страница 371: ...of the original The document is automatically saved in the bulletin board user box that has been created beforehand Detail A number between 1 and 999999999 can be entered for the bulletin board number...

Страница 372: ...relay transmission password as the Sender ID Specify the SUB address or transmission ID for the recipient Detail The recipient needs to have the F code function to use an F code 6 11 5 E Mail Encrypt...

Страница 373: ...AX 1 Specify whether or not to add sender information for transmission 2 Select one from the list of sender names Detail Use TTI Setting in Administrator Settings to register the detail added to the o...

Страница 374: ...recipient s number is automatically redialed as many times as specified in the Line Parameter Setting screen Until successfully redialed the transmission job is handled as a scheduled job in a rediali...

Страница 375: ...uccessful transmission Open the retransmit user box to redial manually 1 Select the job to be retransmitted 2 Touch Fax Detail To save the job in the retransmit user box Incomplete TX Hold must be spe...

Страница 376: ...menu Third level menu Fourth level menu 1 Create One Touch Destination 1 Address Book 1 E Mail p 6 94 No Name Index E Mail Address 2 User Box p 6 96 No Name Index User Box 3 Fax p 6 98 No Name Index...

Страница 377: ...roxy SSL Settings Port Number 7 IP Address Fax p 6 110 No Name Index Host Address Port Number Destination Machine Type 8 Internet Fax p 6 112 No Name Index E Mail Address RX Ability Destination 2 Grou...

Страница 378: ...Settings Default Tab p 6 125 Program Default p 6 126 Address Book Index De fault p 6 126 Shortcut Key 1 p 6 127 Shortcut Key 2 p 6 127 Default Address Book p 6 127 4 Fax Active Screen TX Display p 6 1...

Страница 379: ...vel menu Third level menu Fourth level menu Register Program Name p 6 118 Address p 6 119 URL Notif Destination p 6 119 Check Program Settings Check Address p 6 120 Check Scan Settings p 6 120 Check O...

Страница 380: ...he Administrator Settings screen 6 14 1 Displaying the One Touch User Box Registration screen 1 To display the One Touch User Box Registration screen press the Utility Counter key on the control panel...

Страница 381: ...egistered address select a desired registration name and then touch Delete No Touch No and then enter the registration number of Address Book between 1 and 2 000 When the screen is displayed the small...

Страница 382: ...me and then touch Check Job Settings To change registered address settings select a desired registration name and then touch Edit On the Edit screen the registration number cannot be changed To delete...

Страница 383: ...work Scan Fax Network Fax Operations 6 Index Select the index characters For frequently used destinations simultaneously specify them in Favorites This setting speeds up searches User Box Select one u...

Страница 384: ...ed address settings select a desired registration name and then touch Edit On the Edit screen the registration number cannot be changed To delete a registered address select a desired registration nam...

Страница 385: ...dress Enter the fax number of the destination using up to 38 digits Enter the number using the keypad In order to dial a number without fail to send a fax from an extension number to the outside line...

Страница 386: ...oise on the phone line V 34 OFF V 34 is a communication mode used for Fax communication of super G3 There are cases when the communication is not possible in super G3 mode depending on the telephone l...

Страница 387: ...w 1 2 screen 2 2 screen 2 Note To check a registered address select a desired registration name and then touch Check Job Settings To change registered address settings select a desired registration na...

Страница 388: ...ration name of the Address Book using up to 24 characters from the touch panel Index Select the index characters For frequently used destinations simultaneously specify them in Favorites This setting...

Страница 389: ...t is touched after the IP address was entered the entered IP address is cleared Enter the host name and file path in uppercase letters File Path Enter the path to the saved file using up to 255 charac...

Страница 390: ...2 screen 2 2 screen Detail To check a registered address select a desired registration name and then touch Check Job Settings To change registered address settings select a desired registration name...

Страница 391: ...Book between 1 and 2 000 When the screen is displayed the smallest available number is displayed Name Enter the registration name of the Address Book using up to 24 characters from the touch panel Ind...

Страница 392: ...displays it in the character input screen Before entering a host name check that the DNS setting is correctly specified File Path Enter the path to the saved file using up to 96 characters from the to...

Страница 393: ...olor MF350 250 201Plus 6 107 Network Scan Fax Network Fax Operations 6 6 14 7 Address Book WebDAV Specify the WebDAV address directly To register a new address touch New 1 3 screen 2 3 screen 3 3 scre...

Страница 394: ...umber cannot be changed To delete a registered address select a desired registration name and then touch Delete No Touch No and then enter the registration number of Address Book between 1 and 2 000 W...

Страница 395: ...IPv6 address For a host name enter 63 characters or less Detail When the input format is switched to the IP address input mode after the host name was entered the host name is cleared Touching Input H...

Страница 396: ...ngs To change registered address settings select a desired registration name and then touch Edit On the Edit screen the registration number cannot be changed To delete a registered address select a de...

Страница 397: ...address For a host name enter 63 characters or less Detail When the input format is switched to the IP address input mode after the host name was entered the host name is cleared Touching Input Host...

Страница 398: ...ge registered address settings select a desired registration name and then touch Edit On the Edit screen the registration number cannot be changed To delete a registered address select a desired regis...

Страница 399: ...ters For frequently used destinations simultaneously specify them in Favorites This setting speeds up searches E Mail Address Enter the destination E Mail address from the touch panel RX Ability Desti...

Страница 400: ...groups 00 to 99 can be registered using the Fax Scan mode For one group up to 500 address book destinations can be registered 2 To register a new group touch New Name Enter the registration name of th...

Страница 401: ...d Color MF350 250 201Plus 6 115 Network Scan Fax Network Fax Operations 6 Check Program Settings Check the address book list registered in the group...

Страница 402: ...To register a new subject touch New Detail To check a registered subject select a desired subject name and then touch Check Job Settings To change a registered subject select a desired subject name an...

Страница 403: ...when sending To register a new body touch New Detail To check a registered body select a desired body and then touch Check Job Settings To change the registered body settings select a desired body an...

Страница 404: ...key Detail Up to 400 normal programs and 10 temporary programs that are used temporarily can be registered in program If 410 programs have been already registered delete an unnecessary program and th...

Страница 405: ...ress Select one address Select an address using Select from Address Book or Direct Input Register Program URL Notif Destination When notifying that the job in the FTP SMB WebDAV or User Box mode has f...

Страница 406: ...Program Settings 1 To check the already registered program settings touch Check Program Settings 2 After checking the settings touch Close Check Program Settings Check Address Check the specified addr...

Страница 407: ...rations 6 Check Program Settings Check Original Settings Check the specified original settings Check Program Settings Communication Settings Check the specified communication settings Check Program Se...

Страница 408: ...or MF350 250 201Plus Check Program Settings Check URL Notif Destination Check the specified URL notification destination settings Delete 1 To delete the already registered program touch this key 2 If...

Страница 409: ...box registration refer to to chapter 5 Box Operations 6 14 17 Limiting Access to Destinations Apply Levels Groups to Destinations Specify the access allowed level for the address book Log on as a user...

Страница 410: ...01Plus Group 1 Select an address of which level must be changed 2 Touch Limiting Access to Destinations or Apply levels to Destinations Program 1 Select an address of which level must be changed 2 Tou...

Страница 411: ...ter key on the control panel 2 Touch User Settings Detail In the Utility screen you can also select a setting by using the keypad to enter the number next to the desired button For 2 User Settings pre...

Страница 412: ...ons 6 126 d Color MF350 250 201Plus Program Default Specify settings for the default screen for Fax Scan mode Default PAGE1 Address Book Index Default Select the index characters that appear as a defa...

Страница 413: ...ettings Original Settings or Communication Settings mode provided at the bottom of the screen Detail Two shortcut keys can be programmed For a machine equipped with the optional image controller IC 40...

Страница 414: ...350 250 201Plus 6 15 3 Custom Display Settings FAX Active Screen G3 IP I FAX The FAX Active screen can be customized TX Display Specify whether to display messages being sent Default No RX Display Spe...

Страница 415: ...data size becomes large Standard Default Provides images of data size and quality of a mid level between High Quality and High Compression High Compression Provides lower quality images but the data...

Страница 416: ...using TWAIN install the GENERIC TWAIN driver software designed for that purpose For details refer to the TWAIN driver manual on the MF350 Series CD ROM When GENERIC TWAIN is used it is automatically u...

Страница 417: ...y the compression method for saving data in the compact PDF format High Quality Provides higher quality images but the data size becomes large Standard Default Provides images of data size and quality...

Страница 418: ...6 Network Scan Fax Network Fax Operations 6 132 d Color MF350 250 201Plus...

Страница 419: ...7 Web Connection Operation...

Страница 420: ......

Страница 421: ...tion The current system configuration options consumables and counter values can be displayed Online Assistance Support information for the machine can be displayed Change User Password The password f...

Страница 422: ...0 201Plus 7 2 Job Item Description Current Jobs On this list you can check curently running jobs and those in a queue Job History On this list you can check completed jobs Communica tion List On this...

Страница 423: ...ate User Box New user boxes can be created Open System User Box Displays if the optional fax kit has been installed System user boxes Bulletin Board User Box Polling TX User Box Memory RX User Box Rel...

Страница 424: ...7 Web Connection Operation 7 6 d Color MF350 250 201Plus 7 4 Direct Print Item Description Direct Print Files that are saved in a computer can be specified and printed with this machine...

Страница 425: ...achine can be displayed and destinations can be registered or their settings can be changed Program The list of program destinations registered to the machine can be displayed and destinations can be...

Страница 426: ...7 Web Connection Operation 7 8 d Color MF350 250 201Plus...

Страница 427: ...8 Appendix...

Страница 428: ......

Страница 429: ...ibes how to use the keyboard that appears in the touch panel for typing in the names of registered users and custom paper sizes The keypad can also be used to type in numbers Any of the following keyb...

Страница 430: ...ch the keyboard display between lowercase letters numbers and uppercase letters symbols Enlarging the keyboard The keyboard can be displayed larger so that it easier to read 1 While the keyboard is di...

Страница 431: ...letters or symbols touch Shift Numbers can also be typed in with the keypad The entered characters appear in the text box 2 Note To revert to the setting when the keyboard was displayed touch Cancel...

Страница 432: ...e background color of the original to one of nine levels Blue Set this parameter to adjust the level of blue in the image for example if you wish to emphasize the blue of water or the sky Brightness S...

Страница 433: ...erence and to manage security H Hue Set this parameter to make the image either more reddish or more bluish I Insert Image Set this function to later scan multiple images from the original glass and i...

Страница 434: ...wish to redden skin tones S Saturation Set this parameter to adjust the degree of vividness of the colors in the image Save in User Box Temporarily saves the job on the hard disk so that it can later...

Страница 435: ...MF350 250 201Plus 8 9 Appendix 8 X XY Zoom Touch this button to use the keypad to specify the zoom ratio for producing an enlarged reduced copy of the loaded original Z Zoom Specify the zoom ratio of...

Страница 436: ...tosh and Mac OS are registered trademarks of Apple Computer Inc Safari is a trademark of Apple Computer Inc Adobe the Adobe logo Acrobat and PostScript are either registered trademarks or trademarks o...

Страница 437: ...ARISING IN ANY WAY OUT OF THE USE OF THIS SOFTWARE EVEN IF ADVISED OF THE POSSIBILITY OF SUCH DAMAGE This product includes cryptographic software written by Eric Young eay crypt Soft com This product...

Страница 438: ...DAMAGES OR ANY DAMAGES WHATSOEVER RESULTING FROM THE LOSS OF USE DATA OR PROFITS WHETHER IN AN ACTION OF CONTRACT NEGLIGENCE OR OTHER TORTIOUS ACTION ARISING OUT OF OR IN CONNECTION WITH THE USE OR PE...

Страница 439: ...products derived from this software without specific prior written permission THIS SOFTWARE IS PROVIDED BY THE COPYRIGHT HOLDERS AND CONTRIBUTORS AS IS AND ANY EXPRESS OR IMPLIED WARRANTIES INCLUDING...

Страница 440: ...IS SOFTWARE IS PROVIDED BY THE COPYRIGHT HOLDERS AND CONTRIBUTORS AS IS AND ANY EXPRESS OR IMPLIED WARRANTIES INCLUDING BUT NOT LIMITED TO THE IMPLIED WARRANTIES OF MERCHANTABILITY AND FITNESS FOR A P...

Страница 441: ...on or through a medium customarily used for software exchange Any distributed Software will include the Adobe copyright notices as included in the Software provided to you by Adobe 4 DISCLAIMER OF WAR...

Страница 442: ...d by the conflict of law rules of any jurisdiction or the United Nations Convention on Contracts for the International Sale of Goods the application of which is expressly excluded All disputes arising...

Страница 443: ...on Coated paper 2 Any and all copyrights of this ICC Profile shall remain in TOYO INK therefore you shall not transfer provide rent distribute disclose or grant any rights in this ICC Profile to any t...

Страница 444: ...disclaimers Section 5 and the limitation of liability Section 6 shall survive any termination of this License Agreement 4 License Method and Restrictions a You may install and use the Profile on a sin...

Страница 445: ...g effect to principles of conflict of laws If any provision of this License Agreement shall be held by a court of competent jurisdiction to be contrary to law that provision will be enforced to the ma...

Страница 446: ...8 Appendix 8 20 d Color MF350 250 201Plus...

Страница 447: ...9 Index...

Страница 448: ......

Страница 449: ...Binding Direction 4 40 Binding Margin 4 6 Binding Position 4 6 4 26 6 73 8 6 Black Compression Level 6 129 Body 6 79 Book Copy 3 120 6 55 Book Erase 6 57 Booklet 3 138 4 40 Booklet Original 3 133 Bor...

Страница 450: ...FAX 6 117 E Mail Settings E Mail Subject E Mail I FAX 6 116 Encrypted PDF User Box 5 44 Encryption 6 49 Encryption Passphrase 4 24 Enlarge Reduce settings 3 44 Entering text 8 3 Erase 6 55 F FAX Activ...

Страница 451: ...4 40 Output Tray 4 8 4 28 4 40 Overseas TX 6 76 Oversized paper 3 91 P Page Attributes 4 21 4 37 Page Number 4 11 4 31 6 62 Pages 4 22 4 39 Pages per sheet 4 39 Paper 4 37 Paper Arrangement 4 8 4 26 P...

Страница 452: ...ab 4 52 Sharpness 6 54 Shortcut Key 6 127 Simplex Duplex 6 47 Skip Blank Pages 4 6 SMB TX 6 6 Smoothing 4 40 Sort 3 52 3 54 Sort Group 5 25 Space requirements 2 16 Special paper 3 80 3 94 Stamp 6 64 S...

Страница 453: ...you need and the instructions for handling the waste correctly for example location and times of the waste collection centres etc b When you purchase a new device of ours give a used device similar t...

Отзывы: