background image

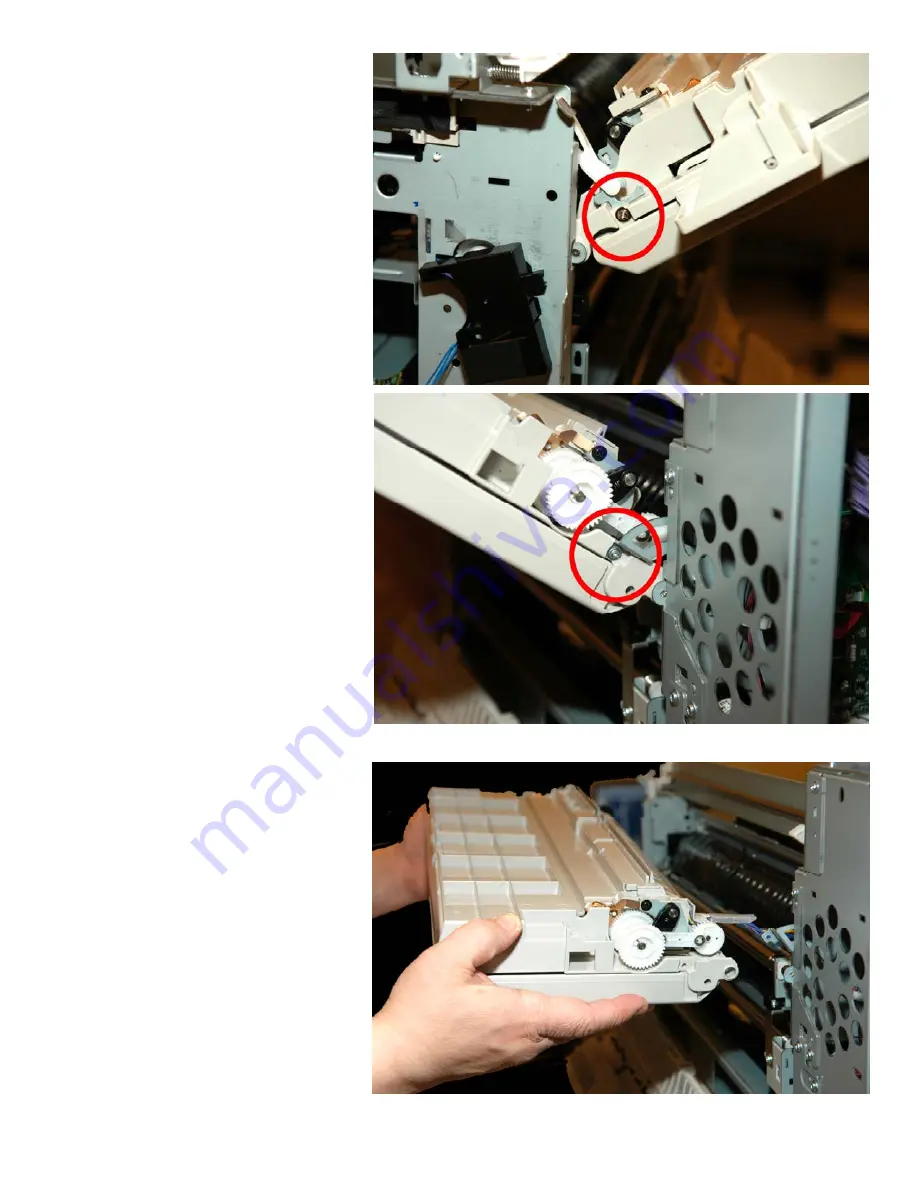
24.4.  Open the Multi-

Purpose Tray 
using the lever at 
the front of the 
unit. Remove one 
screw from the 
front stay. 


24.5. Remove 

one 

screw from the 
rear stay. Take 
note of the rear 
stay as it will most 
likely fall into the 
machine. 


24.6.  Release the Multi-

Purpose Tray from 
the hinges and 
gently unthread 
the two connectors 
from step 22.2 
through the 
channel. 


32

Содержание C910

Страница 1: ...I proColor C910 C930 Engine Service Training Disassembly Procedures DISTRIBUTED AT THE C910 C930 SERVICE TRAINING CLASSES OKI DATA TRAINING DEPARTMENT REV 3 20 2000 Bishops Gate Blvd Mt Laurel NJ 0805...

Страница 2: ...f printers Oki Data assumes that each student has already demonstrated their knowledge of basic electronics troubleshooting disassembly and reassembly of this type of equipment Important Safety Notes...

Страница 3: ...e contains a lot of metal Be careful 9 Store the removed screws with the appropriate assembly they secure 10 Notify the instructor if you have any left over parts screws once you ve completed the re a...

Страница 4: ...This Page Is Intentionally Blank IV...

Страница 5: ...and reinstall in your printer 1 Print the following pages 1 1 1 Configuration Pages 1 1 2 Demo Page 1 2 Unplug the power cord from the wall and from the printer 2 1 Remove all consumables from the pri...

Страница 6: ...3 Remove the Paper Cassette from the printer 4 Removing the Power Supply Cover 4 1 Remove 5 screws from the Power Supply Cover 4 2 Remove the Power Supply Cover 2...

Страница 7: ...Right Side Lower Access Cover 5 1 Remove 2 screws from the Right Side Cover and use a flat blade screwdriver to release the four tabs Push down on the top taps and up on the bottom tabs 5 2 Release t...

Страница 8: ...e Right Side Lower Access Cover by gently prying the plastic pins away from the metal frame 6 Removing the Rear Right Side Cover 6 1 Open the Top Cover and remove two screws 6 2 Remove the Rear Right...

Страница 9: ...uplexer if equipped Dummy Duplex Cover from the left side 8 Removing the Left Side Cover 8 1 Remove the 4 screws and release the tabs by pressing down with a flat blade screwdriver 8 2 Remove the Left...

Страница 10: ...ossible and open the Front Cover Assy Remove the 2 screws from the support straps NOTE Be sure the Waste Toner Box has been removed 9 2 Make sure the cover is open all the way remove it by pushing to...

Страница 11: ...ight Cover Guard NOTE Read the next 2 pages before starting this step to familiarize yourself with the procedure 10 1 Remove 1 screw and use a flat blade screwdriver to release the tab 10 2 Remove Rig...

Страница 12: ...10 3 Take note of the wire routing in the Right Cover Guard for the Waste Toner Box sensor and unthread 10 4 Remove the Sensor board and wiring harness from the right cover card as an assembly 8...

Страница 13: ...11 Removing the Left Cover Guard NOTE Lift the Basket Assy 11 1 Remove 2 screws and use a flat blade screwdriver to release the 3 latches 11 2 Remove the Left Cover Guard 9...

Страница 14: ...12 Removing the Front Cover Guard 12 1 Remove 3 screws and remove the Front Cover Guard 12 2 The Front Cover Guard has a very tight fit even with the screws removed Gently work it off 10...

Страница 15: ...ext 2 pages before starting this step to familiarize yourself with the procedure 13 1 Remove 2 screws 13 2 Remove the Op Panel but do not let it drop as there is ribbon cable attached 13 3 Release the...

Страница 16: ...13 4 Remove the Op Panel Cover 13 5 Remove 1 screw 13 6 Gently unplug the ribbon cable 12...

Страница 17: ...s closed Loosen the 2 captured thumb screws on the side and remove the 2 screws along the top NOTE Be careful when handling any sheet metal as there may be sharp edges left over from the manufacturing...

Страница 18: ...15 Removing the Engine Board Fan and Air Duct 15 1 Gently release tab 15 2 Remove the air duct by pulling it outward 14...

Страница 19: ...15 3 Unplug the fan connector 15 4 Release the tabs that secure the fan to the Plate Shield Box Assy Card Cage and remove the fan by lifting up and out 15...

Страница 20: ...e that these screws are longer than rest 16 4 Remove the bracket and fans Oki Data manufactures and sells many different versions of this A3 Engine employing different controller cards Some are EFI Fi...

Страница 21: ...16 5 Remove two screws from the controller card as shown 16 6 Remove one screw from the controller bracket inside the frame 16 7 Remove one screw on the outside of the bracket 17...

Страница 22: ...16 8 Slide the Controller Board slightly to the right and remove 17 Removing the Engine Board 18...

Страница 23: ...h than to try and figure it out when you re rushing to reassemble the unit 17 2 Push the Engine Board slightly to the left pull the bottom of the board out then remove entire board NOTE If replacing a...

Страница 24: ...rd Cage 18 3 Remove Card Cage NOTE To help make the reassembly process easier it is recommended that any of the cables and harnesses that enter the Card Cage from the bottom be taped down in their rel...

Страница 25: ...bs on the end of the cover first and reach under the area marked with the Red arrow and press to release latches Gently pivot the cover up to remove NOTE Do Not Pull cover outlined in the Yellow oval...

Страница 26: ...Face up Output Stacker 19 4 Remove 1 screw from the front of the Exit Assembly 19 5 Remove 1 screw at the rear of the Exit Assembly make sure you remove the correct screw no way to picture the correc...

Страница 27: ...19 6 Release the tabs two inside the printer cavity and one outside 19 7 Lift Exit Guide up and out and gently unthread the cable bundle and connector through the side 23...

Страница 28: ...into it correct position The correct threading for the exit tray guide cable harness is through the wire guide in the rear of the printer cavity When reassembling also insure the cable threading arou...

Страница 29: ...20 Removing the Belt Motor at the front of the unit 20 1 Remove 2 screws and unplug connector 20 2 Remove the Belt Motor 25...

Страница 30: ...g the Sensor Registration Assy 21 1 Remove the Board Regist Sensor S2Z cover 21 2 Unplug the yellow wire harness connector NOTE The second connector should stay plugged in it is removed just for this...

Страница 31: ...to reinstall the screw through the front of the chassis it s a step many technicians forget 21 4 A flat blade screwdriver may be required to pry the side plate away from the frame at the front of the...

Страница 32: ...and remove the Middle Cover 22 2 Lift the connector for the waste toner motor to wiring harness from under the motor s printed wiring board NOTE Orange connectors are soldered to the board and are no...

Страница 33: ...22 3 Unplug the Waste Toner Motor to wiring harness connector 22 4 Remove the Waste Toner Motor by removing the two screws diagonally mounted and lifting it out 29...

Страница 34: ...23 Removing the Multi Purpose Tray 24 Gently pry out the top center and pull up to remove the Sensor Board Cover NOTE While gently prying lift up on the sides of the cover to remove 30...

Страница 35: ...2 Unplug the ribbon cable to that board 24 3 Using the Special Oki Data Tool a small piece of transparent tape wrap the larger white connector parallel to the purple blue cable bundle to assist in th...

Страница 36: ...move one screw from the front stay 24 5 Remove one screw from the rear stay Take note of the rear stay as it will most likely fall into the machine 24 6 Release the Multi Purpose Tray from the hinges...

Страница 37: ...carefully and fully reinserted into the channel If it is not fully reinserted it will become damaged and the Multi Purpose Tray will not close properly If this happens and the plastic wire harness pr...

Страница 38: ...moving the Registration Unit Right Paper Guide Assy NOTE Be sure the Top Cover is open and the basket is up 25 1 Remove four screws The screw marked by the arrow will also remove the right basket latc...

Страница 39: ...Multi Purpose Tray Lock Plate Assy 25 3 Remove two screws from rear of Registration Unit 25 4 Unthread the wires at the front and remove the Registration Unit being careful of the spring loaded gear...

Страница 40: ...26 Removing the Paper Feed Unit 26 1 Remove four screws and remove the Metal Right Side Cover 36...

Страница 41: ...26 2 Remove nine screws from the right side and one from the front Unplug 3 connectors from the ORS2M Motor Driver Board Remove the Paper Feed Unit 37...

Страница 42: ...over NOTE When reinstalling the HVPS cover insure that all 3 tabs are snapped under the chassis plate Failure to do this may cause transfer voltage problems resulting in washed out images 27 2 Remove...

Страница 43: ...28 Removing the Low Voltage Power Supply LVPS 28 1 Release the power switch linkage by lifting up and away 28 2 Remove 14 screws 28 3 Unplug four connectors and remove the LVPS 39...

Страница 44: ...bly NOTE Each of the four motors is mounted with two screws Also the Black ID motor is mounted at a 90 angle to the other three The 4 drum motors are interchangeable When you reassemble the printer ma...

Страница 45: ...30 Removing OR S2M Motor Driver Board 30 1 Unplug remaining connectors and remove two screws 30 2 Remove Motor Driver Board 41...

Страница 46: ...ner Supply Motor 31 1 Using a flat blade screwdriver push up to release the tab NOTE Both the motors and the mounting plates are the same however the motors are mounted to the plates 180 opposite of e...

Страница 47: ...ensor 32 2 Use a flat blade screwdriver to release the tabs securing the main portion of the Drum Contact and Sensor Board Assy and unplug one connector Remove the board being careful of the drum cont...

Страница 48: ...bly manual in reverse NOTE Take your time and be very careful when reconnecting the wiring harnesses to the 1 motor driver board 2 the engine driver board and 3 when reconnecting the 2 ribbon cables b...

Страница 49: ...val 1 Open the top cover 2 Place media large sheet of paper plastic over top of the consumables cavity to catch any falling screws NOTE Fit the media to go around the hinge plates so the media complet...

Страница 50: ...46 3 Remove the 9 black screws as shown 4 Detach the small cover outlined in red NOTE Consumables have been removed for image clarity 5 Remove the exposed black screw...

Страница 51: ...47 6 Gently lift the top cover skin off the frame of the printer s top cover 7 Close the top cover and gently lower the metal cover brace on the printer s left side...

Страница 52: ...e mounted over the toner cartridges NOTE The ribbon cable connector mounted on the circuit boards has a locking collar that must be opened prior to removing and installing the cable 9 Reassemble the T...

Отзывы: