㸿㸱
B
㸯㸱㹱
ಶᩘ㸸
ᑍἲ㸸
ᰴᘧ♫ࠉṊ࣭࣮ࣝࢺᕤᴗ
⇕
ฎ
⌮
ᣦᐃ௨እࣀᑍἲࢽᑐࢫࣝᑍἲᕪࠉࠉ㸦s㸧
➼⣭
ࣚࣅᑍἲ
௨ୗ
ᅗ
␒
సᡂᖺ᭶᪥
ရ
〇
ᅗ
〇
ィ
タ
ᅗ
᳨
ㄆ
ᢎ
ኚࠉ
᭦
ࠉグ
ࠉ
ኚ᭦⪅
ྡ
㠃
⾲ ฎ
⌮
ୖ
ᮦ
㉁
ᐃ
ᣦ
➼
⣭
ゅ
ᗘ
ᑻ
ᗘ
㸮⣭ 㸯⣭ 㸰⣭ 㸱⣭ 㸲⣭ 㸳⣭
ࣤࢥ࢚ࠉ
࣐ࢹ
ࣤࢥ࢚ࠉ
࣐ࢹ
ࣤࢥ࢚ࠉ
࣐ࢹ
ࣤࢥ࢚ࠉ
࣐ࢹ
ࣤࢥ࢚ࠉ
࣐ࢹ
㒊
ရ ྡ
ぶ
␒
㒊
ᖺ᭶᪥
ኚ᭦␒ྕ
ᢎ
ㄆ
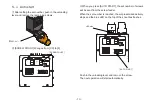
③
②
Operation panel
⑥
- 7 -
④
⑤
①
⑧
⑦
⑦
[AUTO START]
The operation will start.
The [RUN] LED lights up during operation.
⑧
[SCREW SET]
Set the number of settings.
The left side (X10) is the tens digit, and the right side (X1) is the ones digit.
It is valid only when [RESET] is pressed.
①
[SCREW SET]
Displays the number of settings.
After setting [AUTO START], the dots on the display turn off and the LED
brightness increase.
After setting [AUTO START], the number of settings is memorized, and the
number of settings cannot be changed until [RESET] is pressed.
②
[SCREW COUNT]
Displays the number of screws sent to the shoot box from the start of
operation to the present.
When the number of screws sent reaches the set
number, the [SCREW COUNT] dot lights up and [FINISH] (blue) flashes.
At the same time, the LED at the top of the shoot box also blinks.
If the
number of screws sent exceeds the set number, the value will blink.
③
[WAITING]LED yellow
Turns on when the screw feeder is in preparation. Turns off when the screw
feeder is ready for air-pressurized delivery.
④
[RUN]LED green
Turns on during operation.
Turns off when the operation is completed.
⑤
[FINISH]LED blue
Blinks when the operation is completed. Turns off during operation.
⑥
[RESET]
Set the number of settings.
* If pressed during operation, the set number will be reset and the count
value will be reset (initial value = 0).
・
・


