background image

Specifying Utility mode parameters

3

cm5520

3-25

Specify

ing Utility 

mode parameters

Chapter 3

3

Touch [Name], and then type in the registration name, using the key-
board that appears.

For details on typing in text, refer to “Entering text” on page 6-4.

4

Touch [OK].

5

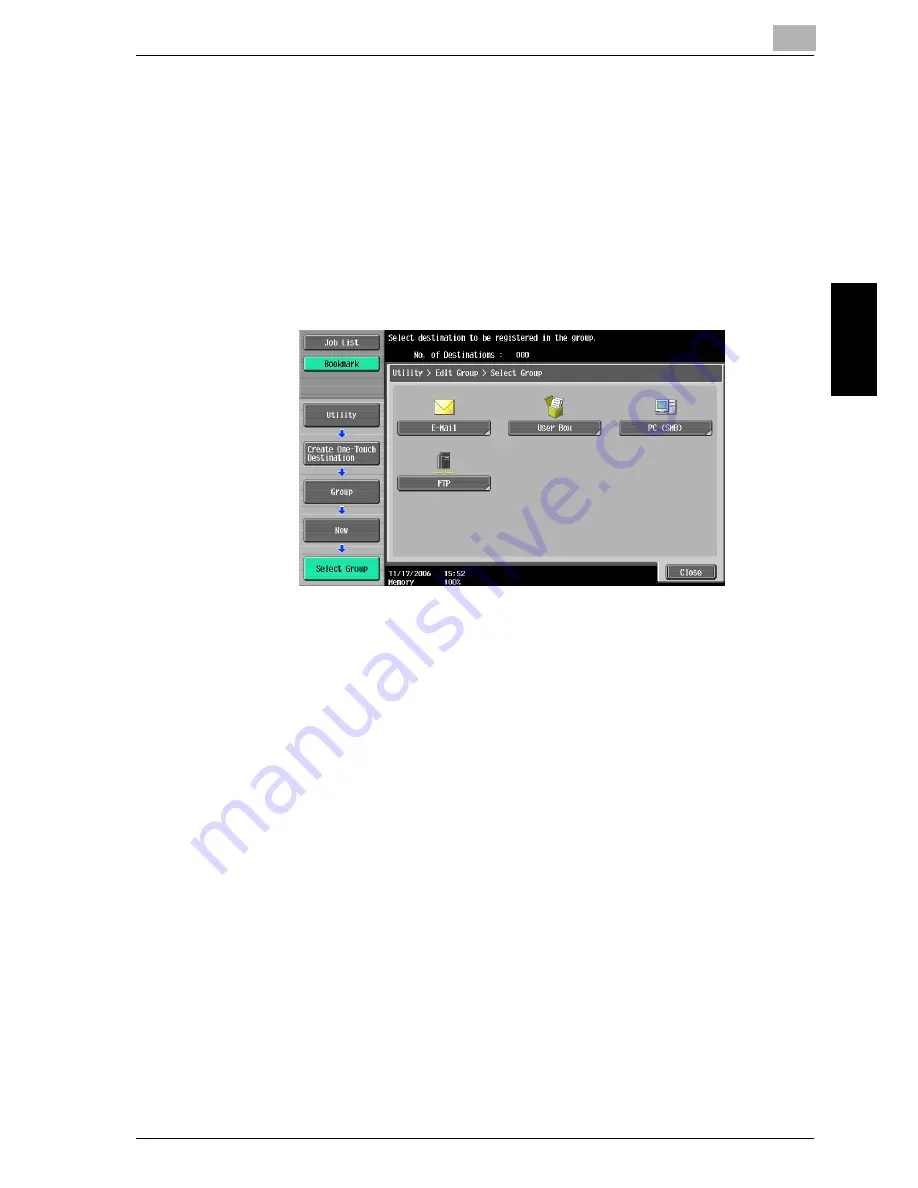
Touch [Select Group].

6

Select a destination type, and then select the destination to be regis-
tered.

7

Touch [OK].

8

Touch [Close].

9

Touch [OK].

The Group destination is registered.

Содержание cm5520

Страница 1: ...Océ cm5520 Network Scanner Operations User s Guide Printing for Professionals ...

Страница 2: ...on of Web Connection which can be used to operate this machine over a network refer to the User s Guide Web Connection Operations Views of the actual equipment may be slightly different from the illustrations used in this manual Energy Star As an ENERGY STAR Partner we have determined that this machine meets the ENERGY STAR Guidelines for energy efficiency What is an ENERGY STAR product An ENERGY ...

Страница 3: ...enSSL Project All rights reserved Redistribution and use in source and binary forms with or without modifica tion are permitted provided that the following conditions are met 1 Redistributions of source code must retain the above copyright notice this list of conditions and the following disclaimer 2 Redistributions in binary form must reproduce the above copyright no tice this list of conditions ...

Страница 4: ...itten by Eric Young eay crypt Soft com This product includes software written by Tim Hud son tjh cryptsoft com Original SSLeay license Copyright 1995 1998 Eric Young eay cryptsoft com All rights reserved This package is an SSL implementation written by Eric Young eay crypt soft com The implementation was written so as to conform with Netscapes SSL This library is free for commercial and non commer...

Страница 5: ...h crypt soft com THIS SOFTWARE IS PROVIDED BY ERIC YOUNG AS IS AND ANY EX PRESS OR IMPLIED WARRANTIES INCLUDING BUT NOT LIMITED TO THE IMPLIED WARRANTIES OF MERCHANTABILITY AND FITNESS FOR A PARTICULAR PURPOSE ARE DISCLAIMED IN NO EVENT SHALL THE AU THOR OR CONTRIBUTORS BE LIABLE FOR ANY DIRECT INDIRECT INCI DENTAL SPECIAL EXEMPLARY OR CONSEQUENTIAL DAMAGES INCLUDING BUT NOT LIMITED TO PROCUREMENT...

Страница 6: ...CTION OF CONTRACT NEGLIGENCE OR OTHER TORTIOUS ACTION ARISING OUT OF OR IN CONNECTION WITH THE USE OR PERFORMANCE OF THIS SOFTWARE Part 2 Networks Associates Technology Inc copyright notice BSD Copyright 2001 2003 Networks Associates Technology Inc All rights reserved Redistribution and use in source and binary forms with or without modifica tion are permitted provided that the following condition...

Страница 7: ...not be used to endorse or promote products derived from this software without specific prior writ ten permission THIS SOFTWARE IS PROVIDED BY THE COPYRIGHT HOLDER AS IS AND ANY EXPRESS OR IMPLIED WARRANTIES INCLUDING BUT NOT LIMITED TO THE IMPLIED WARRANTIES OF MERCHANTABILITY AND FIT NESS FOR A PARTICULAR PURPOSE ARE DISCLAIMED IN NO EVENT SHALL THE COPYRIGHT HOLDER BE LIABLE FOR ANY DIRECT INDI ...

Страница 8: ...R CAUSED AND ON ANY THEORY OF LIABILITY WHETH ER IN CONTRACT STRICT LIABILITY OR TORT INCLUDING NEGLIGENCE OR OTHERWISE ARISING IN ANY WAY OUT OF THE USE OF THIS SOFTWARE EVEN IF ADVISED OF THE POSSIBILITY OF SUCH DAMAGE Part 5 Sparta Inc copyright notice BSD Copyright 2003 2004 Sparta Inc All rights reserved Redistribution and use in source and binary forms with or without modifica tion are permi...

Страница 9: ...er materials provided with the distribution Neither the name of Cisco Inc Beijing University of Posts and Telecom munications nor the names of their contributors may be used to endorse or promote products derived from this software without specific prior written permission THIS SOFTWARE IS PROVIDED BY THE COPYRIGHT HOLDERS AND CONTRIBUTORS AS IS AND ANY EXPRESS OR IMPLIED WARRANTIES INCLUDING BUT ...

Страница 10: ... mail message 1 3 Sending scan data as files FTP 1 4 Sending scan data to a computer on the network SMB 1 5 Saving scan data in user boxes 1 6 Using the machine as a scanner 1 7 1 3 Settings to be specified in advance 1 8 Network Setting 1 8 Registering and specifying destinations 1 8 Specifying the e mail address of the machine 1 9 Specifying scan and transmission settings 1 10 Fax scan programs ...

Страница 11: ...ation from the address book 2 34 Entering addresses directly 2 36 2 6 Sending data to a server Scan to FTP 2 39 Scan to FTP 2 39 Selecting a destination from the address book 2 40 Entering addresses directly 2 42 2 7 Specifying scan and transmission settings Scan Settings Original Settings Communication Settings 2 45 Settings that can be specified 2 45 Original Type 2 47 Simplex Duplex 2 49 Resolu...

Страница 12: ...3 3 2 Displaying settings screens 3 4 Displaying the Create One Touch Destination screen 3 4 Displaying the User Settings screen 3 6 Displaying the Administrator Settings screen 3 7 3 3 Registering an address book destination 3 10 E Mail destination 3 10 User Box 3 12 PC SMB 3 16 FTP 3 19 3 4 Registering a group destination 3 24 3 5 Specifying e mail settings 3 27 Subject 3 27 E Mail Text 3 28 3 6...

Страница 13: ...3 66 4 Network Settings 4 1 Available Network Settings parameters 4 2 4 2 Network settings with external server authentication 4 4 When SSL is installed 4 5 Using Active Directory 4 5 Using NTLM v1 and NTLM v2 4 10 Using Novell NDS 4 12 Using LDAP 4 14 4 3 TCP IP Settings 4 17 Displaying the TCP IP Settings screen 4 18 IP Settings 4 19 DNS Host 4 20 DNS Domain 4 22 DNS Server Settings 4 23 RAW Por...

Страница 14: ...ication 4 78 4 10 E Mail RX POP 4 81 POP Server Address 4 85 4 11 S MIME Communication Settings 4 87 Before specifying settings to use S MIME 4 87 Specifying S MIME communication settings 4 88 4 12 SNMP Settings 4 92 SNMP v1 v2c Settings 4 94 SNMP v3 Settings 4 96 4 13 AppleTalk Settings 4 102 4 14 Bonjour Settings 4 103 4 15 TCP Socket Settings 4 104 TCP Socket 4 104 TCP Socket ASCII Mode 4 106 4...

Страница 15: ...ertificate 4 134 5 Scan function troubleshooting 5 1 Troubleshooting 5 2 If an error message appears when connecting to the machine from a computer 5 2 If MTP cannot be used or FTP cannot be used appears 5 2 If the HDD Ready indicator indicates an HDD malfunction 5 2 5 2 Network error message list 5 3 6 Appendix 6 1 Product specifications 6 2 Scanning functions 6 2 Network Functions 6 3 6 2 Enteri...

Страница 16: ... Structure of the manual This manual consists of the following chapters Chapter 1 Before using scanning functions Chapter 2 Scanning Chapter 3 Specifying Utility mode parameters Chapter 4 Network Settings Chapter 5 Scan function troubleshooting Chapter 6 Appendix Chapter 7 Index Lists the product specifications and the characters that can be entered from the control panel Notation Product name Not...

Страница 17: ...Introduction x 16 cm5520 Explanation of manual conventions ...

Страница 18: ...Introduction cm5520 x 17 ...

Страница 19: ...he printing functions that can be specified with the standard built in printer controller Refer to this manual for basic op erating procedures for the printing functions User s Guide CD manuals User s Guide Copy Operations This manual contains descriptions of the Copy mode operations and ma chine maintenance Refer to this manual for details on the paper and docu ments copy procedures using conveni...

Страница 20: ...ettings that can be spec ified remotely with Web Connection from a Web browser on a computer Re fer to this manual for details on operating procedures for using Web Connection User s Guide Fax Operations This manual contains descriptions of the G3 fax operations Refer to this manual for details on using the G3 fax operations when the optional fax kit is installed In order to use the fax functions ...

Страница 21: ...Introduction x 20 cm5520 ...

Страница 22: ...1 Before using scanning functions Chapter 1 Before using scanning functions ...

Страница 23: ... be used over a TCP IP network First connect the cable for connecting to the network For details refer to Connecting to the net work on page 1 11 In order to use this machine on a network settings such as the IP address of the machine must be specified For details re fer to chapter 4 Network Settings on page 4 2 The driver software is installed on the computer In order to use this machine as a sca...

Страница 24: ... a file server In addition the data can be stored on the internal hard disk of this machine This function can be used from Box mode which is described in the User s Guide Box Operations Furthermore this machine can be used simply as a scanner Sending scan data in an e mail message The scan data can be sent to the specified e mail address Destinations can be selected from the touch panel of this ma...

Страница 25: ...the specified FTP server The FTP server address logon password and other information are entered from the touch panel of this machine The data uploaded to the FTP server can be downloaded from a computer on the network For details refer to Sending data to a server Scan to FTP on page 2 39 Original Machine Memory Scan data Download FTP server Internet ...

Страница 26: ...he network SMB The scan data can be sent to a shared folder on a specified computer The host name file path and other information are entered from the touch panel of this machine For details refer to Sending data to a computer on the network Scan to SMB on page 2 33 Original Machine Memory Scan data Save to a shared folder ...

Страница 27: ...scan data can be saved in a user box created on the hard disk of this machine allowing the data to be reused The file name can be entered from the touch panel of this machine when the data is saved For details on saving data in user boxes and reusing the saved data refer to the User s Guide Box Operations Machine Hard disk ...

Страница 28: ... scanner This machine can be used as a scanner The scanner can be controlled from a computer connected to the network and the scanned image can be im ported into an application on the computer to be processed For more details refer to the TWAIN driver manual on the User Software CD ROM Original Machine Memory ...

Страница 29: ...tings can be specified by using the machine s touch panel or by using Web Connection from a Web browser on a computer on the network Registering and specifying destinations The destinations recipients for scan data can be registered in either of the following ways Using the touch panel of the machine Using Web Connection from a computer on the network The following destinations can be registered 2...

Страница 30: ... recommended that the e mail address registered for the administrator be used If the e mail address registered for the administrator is not specified the sender s e mail address must be entered for each Scan to E mail operation Note that Scan to E Mail operations are not possible if a From address is not entered To register the e mail address of this machine specify a setting for E Mail Address di...

Страница 31: ...pro gram This is convenient for frequently scanning documents and sending data under the same conditions Use the touch panel of the machine to specify the settings Detail For details refer to Registering Scan Fax programs on page 2 12 Specifying screen settings The settings that are selected when Fax Scan key in the control panel is pressed can be specified Detail For details refer to Customizing ...

Страница 32: ...1 4 Connecting to the network Connect the machine to the network 2 Reminder Be sure to connect the machine to the network in order to use the scan functions Connecting the network Connect a USB cable category 5 or later recommended from the network to the Ethernet connector on the machine ...

Страница 33: ...gs on page 4 62 E Mail TX SMTP on page 4 72 E Mail RX POP on page 4 81 S MIME Communication Settings on page 4 87 SNMP Settings on page 4 92 AppleTalk Settings on page 4 102 Bonjour Settings on page 4 103 TCP Socket Settings on page 4 104 Device Setting on page 4 108 Time Adjustment Setting on page 4 110 Status Notification Setting on page 4 113 Total Counter Notification Settings on page 4 121 PI...

Страница 34: ...e Web Connection Operations For details on external server authentication refer to Network settings with external server authentication on page 4 4 For details on registering a destination using a Scan Fax program refer to Using Scan Fax programs on page 2 7 Specify the scan settings Specifying scan and transmission settings Scan Settings Original Settings Communication Settings on page 2 45 Press...

Страница 35: ...1 Before using scanning functions 1 14 cm5520 Before using scanning functions Chapter 1 ...

Страница 36: ...2 Scanning Chapter 2 Scanning ...

Страница 37: ...ey Press to turn on off machine operations for example for copying printing or scanning When turned off the ma chine enters a state where it conserves energy 4 Mode Memory key Press to register store the desired scan settings as a pro gram or to recall a registered scan program 5 Utility Counter key Press to display the Meter Count screen and the Utility screen 6 Reset key Press to clear all setti...

Страница 38: ...ptions of the various functions and details of operations 15 Enlarge Display key Press to enter Enlarge Display mode 16 Accessibility key Press to display the screen for specifying settings for user accessibility functions 17 Power Save key Press to enter Power Save mode While the machine is in Power Save mode the indicator on the Power Save key lights up in green and the touch panel goes off To c...

Страница 39: ...Chapter 2 7 CAUTION Do not apply extreme pressure to the touch panel otherwise it may be scratched or damaged Never push down on the touch panel with force and never use a hard or pointed object to make a selection in the touch panel ...

Страница 40: ...ur rently being performed or waiting to be performed Touch Mode Check to check and change the destination set tings In addition the amount of toner remaining can be checked 2 Message display The status of the machine and details on operations that must be performed are displayed here 3 Number of destinations The number of specified destinations are indicated 4 Enter New Address button Touch this b...

Страница 41: ...tings for scanning for the document orientation and for communication 7 Shortcut keys This area contains the shortcut keys for settings specified with the shortcut key parameters displayed by touching Custom Display Settings on the User Settings screen then Scan Fax Settings 8 Date time display The current date and time are displayed 9 Available memory display The amount of available memory used w...

Страница 42: ...ow to register and recall a Scan Fax program Detail Up to 400 normal programs and 10 temporary programs which are tem porarily available can be registered If 410 programs have been registered delete an unnecessary program For details on deleting programs refer to Editing and deleting Scan Fax programs on page 2 17 Recalling a Scan Fax program When a Scan Fax program is recalled the registered sett...

Страница 43: ...he Recall Scan Fax Program screen ap pears 3 Touch the button for the program that is to be recalled To continue without checking the settings registered with the se lected program continue with step 7 To stop recalling a program press the Reset key or the Mode Memory key ...

Страница 44: ...pecified destinations touch Check Address The settings cannot be changed from the Check Scan Fax Program Settings screen To check the scan settings for the document such as the docu ment quality background adjustment and scanning area size touch Check Scan Settings There are three Check Scan Settings screens The number of the currently displayed screen appears to the right of the screen title ...

Страница 45: ...uch Back To display the next screen touch Forward To check settings such as the document orientation and binding position touch Check Original Settings To check settings such as the e mail subject name and message text for Scan to E Mail operations touch Check E Mail Settings ...

Страница 46: ...anning Chapter 2 To check the e mail destination for notification of the completion of jobs touch Check URL Notif Destination 6 After checking the settings touch Close The Recall Scan Fax Program screen appears again 7 Touch OK ...

Страница 47: ...ograms 1 Press the Fax Scan key in the control panel The Fax Scan mode screen appears 2 Touch Scan Settings Original Settings or Communication Settings and then specify the desired scan settings 3 Press the Mode Memo ry key The Recall Scan Fax Program screen ap pears ...

Страница 48: ...Scanning 2 cm5520 2 13 Scanning Chapter 2 4 Touch the button where the program is to be saved 5 Touch Register Program The Register Scan Fax Program screen appears ...

Страница 49: ...Reset key or the Mode Memory key For details on typing in text refer to Entering text on page 6 4 7 Touch OK 8 Touch Address and then select the destination When selecting destinations registered in the address book desti nations can be selected from each destination type Destinations can be specified either by selecting destinations reg istered in the address book or by typing them in directly De...

Страница 50: ...e completion of jobs touch URL No tif Destination The destinations that can be specified for URL notification are FTP SMB or user box destinations This feature is not available with Scan to E Mail operations 11 Touch Yes and then specify the e mail address for the destination of URL notifications Recipients can be specified either by selecting destinations regis tered in the address book or by typ...

Страница 51: ...2 Scanning 2 16 cm5520 Scanning Chapter 2 13 Touch OK The Recall Scan Fax Program screen appears again The program is registered and a button with the entered program name appears 14 Touch OK ...

Страница 52: ...ting Scan Fax programs The names of registered Scan Fax programs can be edited or the program can be deleted 1 Press the Fax Scan key in the control panel The Fax Scan mode screen appears 2 Press the Mode Memo ry key The Recall Scan Fax Program screen ap pears ...

Страница 53: ...select the items to be checked To stop editing or checking a program press the Reset key or the Mode Memory key To view a list of the pages touch Page List From the Page List screen the name of the page can be changed To change the name of the selected program touch Register Pro gram and then touch Name The program name can contain a maximum of 24 characters For details on typing in text refer to ...

Страница 54: ...Scanning 2 cm5520 2 19 Scanning Chapter 2 To delete the selected program touch Delete Then touch Yes then OK 4 Touch OK ...

Страница 55: ...ons can be selected using any of the fol lowing methods For details refer to the corresponding section Selecting a destination from the address book Follow the procedure described below to send data by selecting a recipient from the already registered destinations For details on registering destinations refer to Registering an address book destination on page 3 10 1 Press the Fax Scan key in the c...

Страница 56: ...ess appears as the name of the registered destination when an index button is touched The desired destination can be searched for For details refer to Selecting a destination that was searched for on page 2 27 A list of registered destinations appears 3 Touch a destination button to select the address Multiple destinations can be specified at the same time Additional destinations can be added by d...

Страница 57: ...is deleted from the Job List screen Selecting a group destination Group refers to multiple destinations that are registered collectively Follow the procedure described below to send data by selecting a group that has been registered in advance For details on registering group destinations refer to Registering a group destination on page 3 24 Detail In order to select a group destination Address Bo...

Страница 58: ... 2 1 Press the Fax Scan key in the control panel The Fax Scan mode screen appears 2 Touch Group The destinations registered as groups appear 3 Touch the button for the group destination A list of destinations registered in the group appears ...

Страница 59: ...roadcast Destinations 5 Touch Scan Settings Original Settings or Communication Settings and then specify the desired scan settings For details on the scan settings refer to Specifying scan and transmission settings Scan Settings Original Settings Communi cation Settings on page 2 45 6 Load the document into the ADF or place it on the original glass 7 Press the Start key in the control panel Scanni...

Страница 60: ...y in the control panel The Fax Scan mode screen appears 2 Touch E Mail on the Direct Input screen A screen appears allowing you to type in the address of the destina tion Why is the Direct Input tab not displayed If the Manual Destination Input displayed by touching Security Settings on the Administrator Settings screen then Security De tails is set to Restrict the Direct Input tab does not appear...

Страница 61: ...pear under Broadcast Destinations 4 Touch Scan Settings Original Settings or Communication Settings and then specify the desired scan settings For details on the scan settings refer to Specifying scan and transmission settings Scan Settings Original Settings Communi cation Settings on page 2 45 5 Load the document into the ADF or place it on the original glass 6 Press the Start key in the control ...

Страница 62: ...ddress Type The index characters can be searched based on the character that was specified when the destination was registered Address Type This button appears if Address Book Default displayed by touch ing Custom Display Settings on the User Settings screen then Fax Scan Settings is set to Index The destination types can be searched based on the type that was specified when the destination was re...

Страница 63: ...2 Scanning 2 28 cm5520 Scanning Chapter 2 1 Touch Address Book in the Fax Scan mode screen and then touch Search 2 Touch Detailed Search 3 Touch Name or Address to select the search to be performed ...

Страница 64: ...m5520 2 29 Scanning Chapter 2 4 Type in the text to be searched for and then touch OK The Detailed Search screen appears again and the search results are displayed 5 Select the desired destination and then touch OK ...

Страница 65: ...DAP on page 4 62 If the if Manual Destination Input displayed by touching Security Set tings on the Administrator Settings screen then Security Details is set to Restrict Address Search does not appear The position of Address Search can be changed from the User Settings screen For details refer to Default Address Book on page 3 39 1 Touch Address Search in the Fax Scan mode screen 2 If multiple LD...

Страница 66: ...m5520 2 31 Scanning Chapter 2 3 Select the desired search type Authentication may be necessary depending on the LDAP server that is specified When there is only one LDAP server When there are multiple LDAP servers ...

Страница 67: ... Basic Search was selected type in the keyword to be searched for and then touch Start Search If Advanced Search was selected select the search condition types and type in the text to be searched for and then touch Start Search 5 Select the desired destination and then touch OK ...

Страница 68: ...ng Scan to SMB operations with Mac OS X Linux or UNIX the network settings and user names must meet the following conditions Change the settings according to the environment used with the transmis sion Machine settings Set NTLM Settings displayed by touching Network Setting on the Ad ministrator Settings screen then SMB Settings then Client Settings to v1 Server settings The user names and shared ...

Страница 69: ...meet the following conditions Machine settings Set NTLM Settings displayed by touching Network Setting on the Ad ministrator Settings screen then SMB Settings then Client Settings to v1 v2 or v1 Selecting a destination from the address book Follow the procedure described below to send data by selecting a recipient from the already registered destinations For details on registering destinations ref...

Страница 70: ...ess appears as the name of the registered destination when an index button is touched The desired destination can be searched for For details refer to Selecting a destination that was searched for on page 2 27 A list of registered destinations appears 3 Touch a destination button to select the address Multiple destinations can be specified at the same time Additional destinations can be added by d...

Страница 71: ...eleted from the Job List screen Entering addresses directly Using the control panel to directly type in the destination address when scanning is called direct input Settings can be specified for the following Parameter Description Host Name Specify the host name in uppercase letters or IP address for the destination Type using the keyboard that appears and then touch OK File Path Type the path to ...

Страница 72: ... Direct Input screen A screen appears allowing you to type in the host name for the desti nation and the file path Why is the Direct Input tab not displayed If the Manual Destination Input displayed by touching Security Settings on the Administrator Settings screen then Security De tails is set to Restrict the Direct Input tab does not appear ...

Страница 73: ...ings For details on the scan settings refer to Specifying scan and transmission settings Scan Settings Original Settings Communi cation Settings on page 2 45 5 Load the document into the ADF or place it on the original glass 6 Press the Start key in the control panel Scanning of the document begins and the data is sent 2 Note Do not turn off the machine until the scan job is deleted from the Job L...

Страница 74: ...e the scan ning settings are used consult your network administrator when specifying the document name Destinations can be selected for Scan to FTP operations using any of the fol lowing methods For details refer to the corresponding section Detail If a mail server is available in the network environment the e mail notifi cation function can be used to send notifications that job are completed For...

Страница 75: ...he Fax Scan mode screen appears 2 Touch Address Book The index appears if Address Book Default displayed by touch ing Custom Display Settings on the User Settings screen then Fax Scan Settings is set to Index If Address Type is selected the index of destination types is displayed The corresponding address appears as the name of the registered destination when an index button is touched The desired...

Страница 76: ...ouch Scan Settings Original Settings or Communication Settings and then specify the desired scan settings For details on the scan settings refer to Specifying scan and transmission settings Scan Settings Original Settings Communi cation Settings on page 2 45 5 Load the document into the ADF or place it on the original glass 6 Press the Start key in the control panel Scanning of the document begins...

Страница 77: ...the host name or IP address for the destination Type using the keyboard that appears and then touch OK File Path Specify the path to the destination folder Type using the keyboard that appears and then touch OK User Name Type in the user name used to log on and then touch OK Password Specify the password Type using the keyboard that appears and then touch OK Parameter Description Port Number Type ...

Страница 78: ...Input tab not displayed If the Manual Destination Input displayed by touching Security Settings on the Administrator Settings screen then Security De tails is set to Restrict the Direct Input tab does not appear 3 Type in the destination information To specify an additional address touch Next Destination and then enter the information The entered addresses appear under Broadcast Destinations ...

Страница 79: ...ngs and then specify the desired scan settings For details on the scan settings refer to Specifying scan and transmission settings Scan Settings Original Settings Communi cation Settings on page 2 45 7 Load the document into the ADF or place it on the original glass 8 Press the Start key in the control panel Scanning of the document begins and the data is sent 2 Note Do not turn off the machine un...

Страница 80: ...ble sided document is to be scanned p 2 49 Resolution Select the resolution for scanning p 2 50 File Type Select the file format for the scan data to be saved p 2 51 Density Select the density for scanning p 2 54 Separate Scan The scan operation can be divided into several sessions when all pages of a document cannot be loaded into the ADF or when placing the docu ment on the original glass p 2 55...

Страница 81: ...ng when loading a zigzag folded document p 2 88 Long Original Select this setting for documents that are longer than the standard size p 2 88 Original Direction Select the orientation of the loaded document p 2 88 Binding Position Select the binding position for the document p 2 88 Despeckle Select this setting to reduce the effect that dust on the left partition glass has on images when the docum...

Страница 82: ...b are to be sent p 2 93 E Mail Encryption This parameter appears when S MIME Commu nication Settings is set to ON Select whether or not to encrypt e mail messages that are sent p 2 94 Digital Signature This parameter appears when S MIME Commu nication Settings is set to ON Select whether or not to add a digital signature to e mail messag es that are sent p 2 95 Setting Description Text Select this...

Страница 83: ... cm5520 Scanning Chapter 2 1 Touch Scan Settings in the Fax Scan mode screen 2 Touch Original Type 3 Touch the button for the image quality 4 If Text Photo or Photo is selected select the photo type and then touch OK ...

Страница 84: ... Fax Scan mode screen 2 Touch Simplex Duplex 3 Select the scanning type 4 Touch OK and then touch OK in the next screen that appears Setting Description 1 Sided Select this setting to scan a single sided document 2 Sided Select this setting to scan a double sided document Cover 2 Sided Select this setting to scan the first page of the document as a single sided cover page then scan the remaining p...

Страница 85: ...20 Scanning Chapter 2 Resolution Select the resolution for scanning 1 Touch Scan Settings in the Fax Scan mode screen 2 Touch Resolution 3 Select the resolution 4 Touch OK and then touch OK in the next screen that appears ...

Страница 86: ...setting to save the data in a highly compressed PDF format TIFF Select this setting to save data in the TIFF format JPEG Select this setting to save the data in the JPEG format Auto Color Full Color Grayscale Black PDF o o o o Compact PDF o o o TIFF o o o o JPEG o o o Parameter Description Encryption Level Select the encryption level Password Enter the password necessary to open encrypted data Typ...

Страница 87: ...For details on specifying the Color setting refer to Color Quality Adjust ment on page 2 56 1 Touch Scan Settings in the Fax Scan mode screen 2 Touch File Type Setting Description Single Page Select this setting to create a single file for each page of the document Multi Page Select this setting to create a single file from the entire scanned doc ument This setting cannot be selected if the JPEG F...

Страница 88: ...Scanning 2 cm5520 2 53 Scanning Chapter 2 3 Select the file format 4 If PDF or Compact PDF was selected touch Encryption if neces sary 5 Specify the encryption settings ...

Страница 89: ...n method touch Stamp Composi tion 7 Select the desired stamp composition 8 Touch OK 9 Select the scan setting 10 Touch OK and then touch OK in the next screen that appears Density Adjust the density for scanning 1 Touch Scan Settings in the Fax Scan mode screen 2 Touch Density ...

Страница 90: ...appears Separate Scan The scan operation can be divided into several sessions for various types of documents for example when all pages of a document cannot be loaded into the ADF when placing the document on the original glass or when sin gle sided documents are combined with double sided documents Touch Separate Scan in the Fax Scan mode screen The setting is selected when the button appears sel...

Страница 91: ... File Type setting refer to File Type on page 2 51 1 Touch Scan Settings in the Fax Scan mode screen Setting Description Auto Color Select this setting to automatically detect the color of the document and scan it with the corresponding setting Full Color Select this setting to scan in full color Grayscale Select this setting for documents with many halftones such as in black and white photos Blac...

Страница 92: ...Scanning 2 cm5520 2 57 Scanning Chapter 2 2 Touch Quality Adjustment 3 Select the color type 4 Touch OK and then touch OK in the next screen that appears ...

Страница 93: ...y of the document background can be adjusted When documents printed on colored paper are scanned in color the background may become black In that case the density of the background can be ad justed 1 Touch Scan Settings in the Fax Scan mode screen 2 Touch Quality Adjustment 3 Touch Background Removal ...

Страница 94: ...o To adjust the density touch Light or Dark To select the default setting touch Standard 5 Touch OK and then touch OK in the next screen that appears Sharpness Quality Adjustment Contours for example the edges of text can be emphasized when scan ning 1 Touch Scan Settings in the Fax Scan mode screen 2 Touch Quality Adjustment ...

Страница 95: ...2 Scanning 2 60 cm5520 Scanning Chapter 2 3 Touch Sharpness 4 Adjust the sharpness 5 Touch OK and then touch OK in the next screen that appears ...

Страница 96: ...cified separately for the left and right sides and the top and bottom 2 Note If a width to be erased around the document is specified with Frame Erase with the Book Scanning function the same settings are also ap plied on the Frame Erase screen displayed from the Erase screen 1 Touch Scan Settings in the Fax Scan mode screen 2 Touch Erase 3 Touch Frame Erase ...

Страница 97: ...uch Yes To erase the same width on all sides touch Frame and then spec ify a value To specify different widths for the top left right and bottom touch the button for the desired location and then specify a value To cancel frame erasing touch None 5 Touch OK and then touch OK in the next two screens that appear ...

Страница 98: ...ase screen Setting Description Book Spread Select this setting to scan a page spread as a single page Separation Select this setting to scan a page spread as two separate pages left and right Front Cover Select this setting to scan the first page as the front cover Front Back Covers Select this setting to scan the first page as the front cover the second page as the back cover and the remaining pa...

Страница 99: ...2 Scanning 2 64 cm5520 Scanning Chapter 2 1 Touch Scan Settings in the Fax Scan mode screen 2 Touch Book Scan 3 Touch Book Copy 4 Specify the settings for the Book Copy function ...

Страница 100: ...ok Scanning function was set specify the size of the page spread Setting Description Auto Select this setting to detect the size of the first page in the loaded doc ument When the Mixed Original setting is not selected Standard sizes Select a preset paper size such as A4 or B5 and orientation Custom Size Type in the dimensions of a custom size that is not available as a pre set size The size in th...

Страница 101: ...2 Scanning 2 66 cm5520 Scanning Chapter 2 1 Touch Scan Settings in the Fax Scan mode screen 2 Touch Application 3 Touch Scan Size 4 Select the size and orientation ...

Страница 102: ...isplays the Custom Size screen Use the keypad to type in the size and then touch OK The values can be specified in 0 1 mm increments Touching Photo Size displays the Photo Size screen Select the orientation and size of the photo to be scanned and then touch OK 5 Touch OK and then touch OK in the next two screens that appear ...

Страница 103: ...be specified for the following 1 Touch Scan Settings in the Fax Scan mode screen 2 Touch Application Parameter Description Date Format Select the format for the date Time Format Select the whether or not the time is added and select its format Pages Select the pages to be printed on either all pages or 1st page only Text Color Select the printing color black red blue green yellow cyan and ma genta...

Страница 104: ...Scanning 2 cm5520 2 69 Scanning Chapter 2 3 Touch Stamp Composition 4 Touch Date Time 5 To specify a date and time touch Yes and then specify the date and time settings ...

Страница 105: ...en touch OK Touching Text Size displays a screen for specifying the text size Touch the button for the desired size and then touch OK Touching Print Position displays a screen for specifying the print ing position Touch the button for the desired printing position and then make any fine adjustments if necessary After specifying the settings touch OK ...

Страница 106: ...ng Chapter 2 To make fine adjustments touch Adjust Position The position can be adjusted between 0 1 and 50 mm in the left right direction and the up down direction 6 Touch OK and then touch OK in the next three screens that appear ...

Страница 107: ...ption Starting Page Number Specify the starting page number Starting Chapter Number Specify the starting chapter number Page Number Type Select the format for the page number Text Color Select the printing color black red blue green yellow cyan and ma genta Text Size Select the size minimal std in which text is printed Print Position Select the position within the page where the image is printed A...

Страница 108: ...Scanning 2 cm5520 2 73 Scanning Chapter 2 3 Touch Stamp Composition 4 Touch Page Number 5 To specify the page numbers touch Yes and then specify the page number settings ...

Страница 109: ...en touch OK Touching Text Size displays a screen for specifying the text size Touch the button for the desired size and then touch OK Touching Print Position displays a screen for specifying the print ing position Touch the button for the desired printing position and then make any fine adjustments if necessary After specifying the settings touch OK ...

Страница 110: ...ng Chapter 2 To make fine adjustments touch Adjust Position The position can be adjusted between 0 1 and 50 mm in the left right direction and the up down direction 6 Touch OK and then touch OK in the next three screens that appear ...

Страница 111: ...the Fax Scan mode screen 2 Touch Application Parameter Description Stamp Type Preset Stamps Select a stamp such as URGENT PLEASE REPLY or DO NOT COPY Pages Select the pages to be printed on either all pages or 1st page only Text Color Select the printing color black red blue green yellow cyan and magen ta Text Size Select the size minimal or std in which text is printed Print Position Select the p...

Страница 112: ...Scanning 2 cm5520 2 77 Scanning Chapter 2 3 Touch Stamp Composition 4 Touch Stamp 5 To specify a stamp touch Yes and then specify the stamp settings ...

Страница 113: ...en touch OK Touching Text Size displays a screen for specifying the text size Touch the button for the desired size and then touch OK Touching Print Position displays a screen for specifying the print ing position Touch the button for the desired printing position and then make any fine adjustments if necessary After specifying the settings touch OK ...

Страница 114: ...ng Chapter 2 To make fine adjustments touch Adjust Position The position can be adjusted between 0 1 and 50 mm in the left right direction and the up down direction 6 Touch OK and then touch OK in the next three screens that appear ...

Страница 115: ... mode screen 2 Touch Application Parameter Description Header Settings Select whether or not to insert a header If a header is to be inserted specify whether to insert text the date time or other information dis tribution number job number or serial number Footer Settings Select whether or not to insert a footer If a footer is to be inserted specify whether to insert text the date time or other in...

Страница 116: ...Scanning 2 cm5520 2 81 Scanning Chapter 2 3 Touch Stamp Composition 4 Touch Header Footer 5 To print a header footer touch YES and then select the type of head er footer to be recalled ...

Страница 117: ... Chapter 2 6 To check or temporarily change the selected settings touch Check Change Temporarily The Check Change Temporarily screen appears 7 Touch Header Settings or Footer Settings and then specify the header footer settings Text ...

Страница 118: ...Scanning 2 cm5520 2 83 Scanning Chapter 2 Date Time Other 8 Specify the settings for the pages to be printed on the text color and the text size Text Color ...

Страница 119: ...t while scanning Various print settings can be specified Settings can be specified for the following 1 Touch Scan Settings in the Fax Scan mode screen Parameter Description Copies Use the keypad to type in the number of copies to be printed A number between 1 and 9999 can be specified Simplex Duplex Select whether a single sided or double sided copy is to be printed Staple Select whether or not th...

Страница 120: ...Scanning 2 cm5520 2 85 Scanning Chapter 2 2 Touch Application 3 Touch Send Print 4 To print while scanning touch Yes and then specify the desired set tings ...

Страница 121: ...ng Chapter 2 5 To select the staple position touch Corner or 2 Positions and then touch Position Setting 6 Touch the button for the desired position and then touch OK 7 Touch OK and then touch OK in the next two screens that appear ...

Страница 122: ... parameter on the Administrator Machine Setting screen in Administrator mode A name of up to 10 characters can be specified 06102315231 This indicates the year last two digits month day hour and minutes when the data was scanned The last digit is a serial number if the document is part of a series of scans _0001 This indicates the page when multi page data is scanned This numeral does not appear i...

Страница 123: ...length fed through the ADF Long Original Select this setting for documents that are longer than the standard size Original Direction Select the orientation of the document After the document is scanned the data is processed so that it is correctly oriented Binding Position Select the binding position such as when holes are punched in the document or the document is stapled In addition specify the ...

Страница 124: ...ons can be used together 1 Touch Original Settings in the Fax Scan mode screen 2 Select settings for the Original Settings functions Touching Original Direction displays the Original Direction screen Touch the button for the desired orientation and then touch OK ...

Страница 125: ...sition and then touch OK To apply the Despeckle setting touch Despeckle to select it 3 Touch OK and then touch OK in the next screen that appears Detail The scanning speed will be reduced if the Despeckle setting is select ed Clean the left partition glass when it becomes extremely dirty For details refer to the User s Guide Copy Operations ...

Страница 126: ...eter Description Document Name The name of the file to be saved is displayed The document name spec ified later appears as the document name even if the document name was specified with Document Name on the Scan Settings screen If no document name is specified the name automatically specified based on the settings in the Administrator Settings screen is displayed A maxi mum of 30 characters can be...

Страница 127: ...2 Scanning 2 92 cm5520 Scanning Chapter 2 3 Specify the e mail transmission settings 4 Touch Close and then touch Close in the next screen that appears ...

Страница 128: ...s that can be specified for URL Notification Setting in clude FTP servers SMB server or user boxes This feature does not function during e mail transmissions even if a set ting is specified 1 Touch Communication Settings in the Fax Scan mode screen 2 Touch URL Notification Setting 3 Specify the e mail address where notifications will be sent Select a registered e mail address ...

Страница 129: ... setting can be specified for this parameter when S MIME Communication Settings is set to ON Select whether or not to encrypt e mail messages that are sent Detail For details on the S MIME Communication Settings parameter refer to S MIME Communication Settings on page 4 87 1 Touch Communication Settings in the Fax Scan mode screen 2 Touch E Mail Encryption 3 Touch Close and then touch Close in the...

Страница 130: ...For details on the S MIME Communication Settings parameter refer to S MIME Communication Settings on page 4 87 2 Note This parameter may not be available or may be set to normally sign de pending on the specified S MIME communication settings 1 Touch Communication Settings in the Fax Scan mode screen 2 To add a digital signature touch Digital Signature 3 Touch Close and then touch Close in the nex...

Страница 131: ...screen appears Parameter Description Destination Settings The list of destinations can be viewed or changed and destinations can be added An address that was directly typed in can also be reg istered Check Scan Settings The scan settings can be checked or changed For details refer to Specifying scan and transmission settings Scan Settings Original Settings Communication Settings on page 2 45 Check...

Страница 132: ... transmission recipients 3 Touch Check Job Settings The Check Job Detailed Settings screen appears 4 Touch the button for the setting to be changed and then check or change the setting If a setting is changed the changed destination moves to the end of the list 5 After checking the settings touch Close ...

Страница 133: ...2 Deleting unnecessary destinations The selected destination can be deleted 1 Touch Check Job in the Fax Scan mode screen The Check Job screen appears 2 Select the destination to be deleted from the list of registered transmis sion recipients ...

Страница 134: ...Scanning 2 cm5520 2 99 Scanning Chapter 2 3 Touch Delete The destination is deleted ...

Страница 135: ...er 2 2 9 Checking the scan transmission log The list of scan transmission jobs can be displayed from the machine s con trol panel Displaying the current jobs 1 Press the Fax Scan key in the control panel 2 Touch Job List in the touch panel ...

Страница 136: ...uch Job Details and then touch Send The Current Jobs list appears on the Send tab Detail For details on the function of each key refer to the User s Guide Copy Operations Displaying the Job History list 1 Press the Fax Scan key in the control panel ...

Страница 137: ... list appears on the Send tab 5 Touch the button for the desired list Deleted Jobs Displays only jobs that were deleted before they were finished Finished Jobs Displays only jobs that were correctly completed Active Jobs Displays all jobs The Job History list appears Detail For details on the function of each key refer to the User s Guide Copy Operations ...

Страница 138: ... Displays the destination type E Mail FTP PC SMB or TWAIN Status Current Jobs list only Displays the status of the job Transferring Waiting Destinations Shows the name of the recipient Time Stored Displays the time that the job was queued Org Displays the number of pages in the original document Result Job History list only Displays the result of the operation Job Complete Deleted Due To Er ror De...

Страница 139: ...2 Scanning 2 104 cm5520 Scanning Chapter 2 ...

Страница 140: ...3 Specifying Utility mode parameters Chapter 3 Specifying Utility mode parameters ...

Страница 141: ...ngs for scan destina tions Destinations can be regis tered as programs groups or in the address book Registering an address book destina tion on page 3 10 Registering a group destination on page 3 24 Specifying e mail settings on page 3 27 Limiting Access to Destinations on page 3 31 User Settings Specify default settings for the Fax Scan mode screen and set tings for saving data Customizing the F...

Страница 142: ...tings can be specified from Web Connec tion Specifying settings with the utility is convenient since text can easily be typed in from your computer instead of with the machine s control panel Since some settings can only be specified with Web Connection for details refer to the User s Guide Web Connection Operations Parameter Description Page reference Administrator Registration If the e mail addr...

Страница 143: ...ttings screens Displaying the Create One Touch Destination screen 1 Press the Utility Coun ter key 2 Touch 1 One Touch User Box Registration An item can also be selected by pressing the key in the keypad for the number beside the desired button For 1 One Touch User Box Registration press the 1 key in the keypad ...

Страница 144: ... Touch 1 Create One Touch Destination The Create One Touch Destination screen appears 2 Note To finish specifying settings in the Utility mode press the Utility Counter key Otherwise exit the Utility mode by touching Close in each screen until the screen for the Copy Fax Scan or Box mode appears ...

Страница 145: ...de parameters Chapter 3 Displaying the User Settings screen 1 Press the Utility Coun ter key 2 Touch 2 User Settings An item can also be selected by pressing the key in the keypad for the number beside the desired button For 2 User Settings press the 2 key in the keypad ...

Страница 146: ...ings screen appears 2 Note To finish specifying settings in the Utility mode press the Utility Counter key Otherwise exit the Utility mode by touching Close in each screen until the screen for the Copy Fax Scan or Box mode appears Displaying the Administrator Settings screen 1 Press the Utility Coun ter key ...

Страница 147: ...uch 3 Administrator Settings An item can also be selected by pressing the key in the keypad for the number beside the desired button For 3 Administrator Set tings press the 3 key in the keypad 3 Type in the password and then touch OK For details on typing in text refer to Entering text on page 6 4 ...

Страница 148: ...parameters Chapter 3 The Administrator Settings screen appears 2 Note To finish specifying settings in the Utility mode press the Utility Counter key Otherwise exit the Utility mode by touching Close in each screen until the screen for the Copy Fax Scan or Box mode appears ...

Страница 149: ...t to Restrict specify these settings with One Touch User Box Registra tion on the Administrator Settings screen 1 Touch 1 Create One Touch Destination Address Book in the Create One Touch Destination screen 2 Touch 1 E Mail The E Mail screen appears Parameter Description No Type in the registration number between 1 and 2000 for the ad dress book destination When the screen appears the displayed nu...

Страница 150: ...d to type in the number 5 Touch Name and then type in the registration name using the key board that appears For details on typing in text refer to Entering text on page 6 4 6 Touch OK 7 Touch Index and then select the index characters 8 Touch OK 9 Touch E Mail Address and then type in the e mail address using the keyboard that appears 10 Touch OK and then touch OK in the next screen that appears ...

Страница 151: ...ancel To finish specifying settings in the Utility mode press the Utility Counter key Otherwise exit the Utility mode by touching Close in each screen until the screen for the Copy Fax Scan or Box mode appears User Box Settings can be specified for the following for the user box destination to be registered Parameter Description No Type in the registration number between 1 and 2000 for the ad dres...

Страница 152: ...de Box Operations For details on displaying the Create One Touch Destination screen refer to Displaying the Create One Touch Destination screen on page 3 4 1 Touch 1 Create One Touch Destination Address Book in the Create One Touch Destination screen 2 Touch 2 User Box The User Box screen appears 3 Touch New The New screen appears 4 To specify the registration number touch No and then use the key ...

Страница 153: ...gistration name using the key board that appears For details on typing in text refer to Entering text on page 6 4 6 Touch OK 7 Touch Index and then select the index characters 8 Touch OK 9 Touch User Box and then select a user box 10 Touch OK and then touch OK in the next screen that appears The user box destination is registered ...

Страница 154: ...registration number cannot be changed in the Edit screen To delete a registered destination select it and then touch Delete 2 Note The registration cannot be completed if no settings are specified for Name and User Box To cancel the registration touch Cancel To finish specifying settings in the Utility mode press the Utility Counter key Otherwise exit the Utility mode by touching Close in each scr...

Страница 155: ...mber is the lowest available number Name Type in a name of 24 characters or less for the registered destina tion Index Select the index characters For frequently used destinations touch Favorites so that the destination can be found more easily User ID Type in 127 characters or less for the user ID for logging onto the destination computer Password Type in 14 characters or less for the password fo...

Страница 156: ...touch No and then use the key pad to type in the number 5 Touch Name and then type in the registration name using the key board that appears For details on typing in text refer to Entering text on page 6 4 6 Touch OK 7 Touch Index and then select the index characters 8 Touch OK 9 Touch User ID and then type in the user ID using the keyboard that appears 10 Touch OK ...

Страница 157: ... address using the keypad or the number buttons that appear Touch or to move the cursor to the desired position and then type in the numbers When the input format is switched to entering an IP address after the host name was entered the host name is cleared If Host Name Input is touched after the IP address was entered the entered IP address is saved and the input screen appears Type the host name...

Страница 158: ...tration touch Cancel To finish specifying settings in the Utility mode press the Utility Counter key Otherwise exit the Utility mode by touching Close in each screen until the screen for the Copy Fax Scan or Box mode appears FTP Settings can be specified for the following for the FTP destination to be reg istered Parameter Description No Type in the registration number between 1 and 2000 for the a...

Страница 159: ...estination screen on page 3 4 2 Touch 5 FTP The FTP screen appears User ID Type in 47 characters or less for the user ID for logging onto the host compu ter Password Type in 31 characters or less for the password for logging onto the host com puter anonymous To specify no user ID for logging onto the host computer touch ON PASV Select whether or not the PASV mode is used Proxy Select whether or no...

Страница 160: ... in the number 5 Touch Name and then type in the registration name using the key board that appears For details on typing in text refer to Entering text on page 6 4 6 Touch OK 7 Touch Index and then select the index characters 8 Touch OK 9 Touch Host Address and then type in the IP address or host name To enter a host name touch Host Name Input and then type in the host name using the keyboard tha...

Страница 161: ...me Input is touched after the IP address was entered the entered IP address is saved and the input screen appears When Host Name Input is touched check that the DNS setting is correctly specified For details on the DNS settings refer to TCP IP Settings on page 4 17 10 Touch OK 11 Touch File Path and then type in the file path using the keyboard that appears 12 Touch OK 13 Touch or New screen 2 2 a...

Страница 162: ...ered Detail To check a registered destination select it and then touch Check Job Set To change the settings for a registered destination select it and then touch Edit The registration number cannot be changed in the Edit screen To delete a registered destination select it and then touch Delete 2 Note The registration cannot be completed if no settings are specified for Name Host Address File Path ...

Страница 163: ... Detail Up to 100 groups can be registered and up to 500 destinations can be registered in a single group 1 Touch 2 Create Group in the Create One Touch Destination screen For details on displaying the Create One Touch Destination screen refer to Displaying the Create One Touch Destination screen on page 3 4 The Group screen appears 2 Touch New The New screen appears ...

Страница 164: ...hen type in the registration name using the key board that appears For details on typing in text refer to Entering text on page 6 4 4 Touch OK 5 Touch Select Group 6 Select a destination type and then select the destination to be regis tered 7 Touch OK 8 Touch Close 9 Touch OK The Group destination is registered ...

Страница 165: ...t it and then touch Edit To delete a registered destination select it and then touch Delete 2 Note The registration cannot be completed if no settings are specified for Name and Destination To cancel the registration touch Cancel To finish specifying settings in the Utility mode press the Utility Counter key Otherwise exit the Utility mode by touching Close in each screen until the screen for the ...

Страница 166: ...Up to 10 e mail message subjects can be registered A registered subject can be selected when sending 1 Touch 3 E Mail Settings in the Create One Touch Destination screen For details on displaying the Create One Touch Destination screen refer to Displaying the Create One Touch Destination screen on page 3 4 2 Touch 1 E Mail Subject The E Mail Subject screen appears 3 Touch New The New screen appear...

Страница 167: ...nge the default setting select a subject and then touch Set as Default 2 Note The registration cannot be completed if no setting is specified for Sub ject To cancel the registration touch Cancel To finish specifying settings in the Utility mode press the Utility Counter key Otherwise exit the Utility mode by touching Close in each screen until the screen for the Copy Fax Scan or Box mode appears E...

Страница 168: ...il Body The E Mail Body screen appears 3 Touch New The New screen appears 4 Touch Body and then type in the registration body text using the keyboard that appears For details on typing in text refer to Entering text on page 6 4 Up to 256 characters can be entered 5 Touch OK The e mail body text is registered ...

Страница 169: ...stered body text select it and then touch Delete To change the default setting select a body text and then touch Set as Default 2 Note The registration cannot be completed if no setting is specified for Body To cancel the registration touch Cancel To finish specifying settings in the Utility mode press the Utility Counter key Otherwise exit the Utility mode by touching Close in each screen until t...

Страница 170: ... limited access settings Level settings can be specified for registered address book destinations group destinations and Fax Scan program destinations Detail The level for a registered destination is 0 The level and group cannot be set to level higher than the level specified for the user who is logged on In order to specify a group for a destination the group must first have been registered in Ad...

Страница 171: ...ode parameters Chapter 3 5 Touch 1 Apply Levels Groups to Destinations 6 Select the destination type As an example the following procedure describes how to specify set tings for an address book destination 7 Select the destination whose level or group is to be specified ...

Страница 172: ... Utility mode parameters 3 cm5520 3 33 Specifying Utility mode parameters Chapter 3 8 To specify a group touch Apply Group To specify a level touch Ap ply Level 9 Select the group or level For a group For a level ...

Страница 173: ...3 Specifying Utility mode parameters 3 34 cm5520 Specifying Utility mode parameters Chapter 3 10 Touch OK 11 Touch Close and then touch Close in the next screen that appears ...

Страница 174: ...can mode can be specified The default setting is Address Book 1 Touch 2 Custom Display Settings in the User Settings screen For details on displaying the User Settings screen refer to Display ing the User Settings screen on page 3 6 2 Touch 2 Scan Fax Settings 3 Touch Default Tab Buttons for the available settings appear 4 Touch the button for the desired setting 5 Touch OK ...

Страница 175: ...ified The default setting is PAGE 1 1 Touch 2 Custom Display Settings in the User Settings screen For details on displaying the User Settings screen refer to Display ing the User Settings screen on page 3 6 2 Touch 2 Scan Fax Settings 3 Touch Program Default The list of available pages appears 4 Touch and until the button for the desired page is displayed 5 Touch OK ...

Страница 176: ...pear as a default in Address Book tab The default setting is Favorites 1 Touch 2 Custom Display Settings in the User Settings screen For details on displaying the User Settings screen refer to Display ing the User Settings screen on page 3 6 2 Touch 2 Scan Fax Settings 3 Touch Address Book Index Default 4 Touch the button for the desired setting 5 Touch OK ...

Страница 177: ...reen 1 Touch 2 Custom Display Settings in the User Settings screen For details on displaying the User Settings screen refer to Display ing the User Settings screen on page 3 6 2 Touch 2 Scan Fax Settings 3 Touch Shortcut Key 1 or Shortcut Key 2 Two shortcut keys can be programmed If optional image controller IC 409 has been installed only one shortcut key can be pro grammed To cancel the shortcut ...

Страница 178: ...s a default in the Ad dress Book screen 1 Touch 2 Custom Display Settings in the User Settings screen For details on displaying the User Settings screen refer to Display ing the User Settings screen on page 3 6 2 Touch 2 Scan Fax Settings 3 Touch or and then touch Default Address Book Buttons for the available settings appear 4 Touch the button for the desired setting 5 Touch OK ...

Страница 179: ...playing the User Settings screen refer to Display ing the User Settings screen on page 3 6 2 Touch JPEG Compression Level 3 Touch the button for the desired setting Setting Description High Quality The data size will become large but the data will be high quality Standard de fault Both the data size and image quality will be between High Quality and High Compression High Compres sion The data size...

Страница 180: ...se in each screen until the screen for the Copy Fax Scan or Box mode appears Black Compression Level Select the compression method for saving black and white data 1 Touch 4 Scan Fax Settings For details on displaying the User Settings screen refer to Display ing the User Settings screen on page 3 6 2 Touch Black Compression Level Setting Description MH The data size will become large MMR default T...

Страница 181: ...in each screen until the screen for the Copy Fax Scan or Box mode appears When saved data is opened on a computer some applications may not be able to open MMR compressed data TWAIN Lock Time Specify the length of time until the machine s operations are unlocked during scanning except with PUSH scanning The default setting is 120 seconds 1 Touch 4 Scan Fax Settings For details on displaying the Us...

Страница 182: ... the allowable range is specified the message In put error appears Type a value within the allowable range 4 Touch OK The TWAIN lock time is set 2 Note To finish specifying settings in the Utility mode press the Utility Counter key Otherwise exit the Utility mode by touching Close in each screen until the screen for the Copy Fax Scan or Box mode appears If TWAIN is being used it is automatically u...

Страница 183: ...s not available Default Scan Fax Settings Specify the default settings settings selected when the Reset key is pressed for the Fax Scan mode screen 1 Touch 4 Scan Fax Settings For details on displaying the User Settings screen refer to Display ing the User Settings screen on page 3 6 2 Press the Default Scan Fax Settings key 3 Select the default settings 4 Touch OK ...

Страница 184: ...was locked from the computer Compact PDF Compression Level Select the compression method for saving data in the compact PDF format 1 Touch 4 Scan Fax Settings For details on displaying the User Settings screen refer to Display ing the User Settings screen on page 3 6 2 Touch Compact PDF Compression Level Setting Description High Quality The data size will become large but the data will be high qua...

Страница 185: ...parameters Chapter 3 3 Touch the button for the desired setting 2 Note To finish specifying settings in the Utility mode press the Utility Counter key Otherwise exit the Utility mode by touching Close in each screen until the screen for the Copy Fax Scan or Box mode appears ...

Страница 186: ...ying the Administrator Settings screen on page 3 7 Parameter Description Name Type in a name of 16 characters or less for the header footer to be reg istered Header Settings Select whether or not to insert a header If a header is to be inserted specify whether to insert text the date time or other information distri bution number job number or serial number Footer Settings Select whether or not to...

Страница 187: ...3 Specifying Utility mode parameters 3 48 cm5520 Specifying Utility mode parameters Chapter 3 2 Touch Forward and then touch 2 Stamp Settings 3 Touch 1 Header Footer Settings 4 Touch New ...

Страница 188: ... Utility mode parameters Chapter 3 5 Specify the name of the header footer to be registered Touch Name 6 Type in the name and then touch OK 7 Specify the header footer settings Touch Header Settings or Footer Settings and then specify the header footer settings ...

Страница 189: ...3 Specifying Utility mode parameters 3 50 cm5520 Specifying Utility mode parameters Chapter 3 Text Date Time Other 8 Specify the settings for the pages to be printed on the text color and the text size ...

Страница 190: ...fying Utility mode parameters 3 cm5520 3 51 Specifying Utility mode parameters Chapter 3 Text Color Text Size To cancel the registration touch Cancel to return to the Header Footer Settings screen 9 Touch OK ...

Страница 191: ... Deleting headers footers 1 Touch 1 System Settings in the Administrator Settings screen For details on displaying the Administrator Settings screen refer to Displaying the Administrator Settings screen on page 3 7 2 Touch Forward and then touch 2 Stamp Settings 3 Touch 1 Header Footer Settings ...

Страница 192: ...e parameters 3 cm5520 3 53 Specifying Utility mode parameters Chapter 3 4 Touch the button for the header footer to be deleted and then touch Delete 5 Check the message touch Yes to delete the header footer and then touch OK ...

Страница 193: ... User Box Registration in the Admin istrator Settings screen Item Description Address Book List Prints the information for up to 100 destinations for the selected destination type Group List Prints the information for up to 20 group destinations Program List Prints the information for up to 50 destinations for the selected Scan Fax pro gram number and destination type E Mail Subject Text List Prin...

Страница 194: ...3 55 Specifying Utility mode parameters Chapter 3 2 Touch 3 One Touch User Box Registration List in the One Touch User Box Registration screen 3 Touch 1 Address Book List 4 Specify the settings and then touch Print To cancel printing touch Cancel ...

Страница 195: ... screen refer to Dis playing the Administrator Settings screen on page 3 7 1 Touch 3 One Touch Destination User Box Registration in the Admin istrator Settings screen 2 Touch 3 One Touch User Box Registration List in the One Touch User Box Registration screen Parameter Description Starting Desti nation No Use the keypad to type in the destination number where printing starts Number of Destinations...

Страница 196: ...rogram number and destination type Settings can be specified for the following before printing Parameter Description Starting Desti nation No Use the keypad to type in the destination number where printing starts Number of Destinations Use the keypad to type in the number of destinations to be printed Range 1 to 50 Print Destina tion List by Type Select the type of destinations One Touch Group or ...

Страница 197: ...isplaying the Administrator Settings screen refer to Dis playing the Administrator Settings screen on page 3 7 1 Touch 3 One Touch Destination User Box Registration in the Admin istrator Settings screen 2 Touch 3 One Touch User Box Registration List in the One Touch User Box Registration screen 3 Touch 3 Program List ...

Страница 198: ...ext List Prints the registered e mail message subjects and body text 2 Note For details on displaying the Administrator Settings screen refer to Dis playing the Administrator Settings screen on page 3 7 1 Touch 3 One Touch Destination User Box Registration in the Admin istrator Settings screen 2 Touch 3 One Touch User Box Registration List in the One Touch User Box Registration screen ...

Страница 199: ... mode parameters 3 60 cm5520 Specifying Utility mode parameters Chapter 3 3 Touch 4 E Mail Subject Text List 4 Select the desired Paper Tray and Simplex Duplex settings and then touch Start To cancel printing touch Cancel ...

Страница 200: ...permit access from other systems that use Open API The default setting is Allow 1 Touch System Connection in the Administrator Settings screen For details on displaying the Administrator Settings screen refer to Displaying the Administrator Settings screen on page 3 7 2 Touch 1 Open API Settings in the System Connection screen 3 Touch Access Setting in the Open API Settings screen Buttons for the ...

Страница 201: ...and the default SSL port number is 50003 2 Note For details on displaying the Administrator Settings screen refer to Dis playing the Administrator Settings screen on page 3 7 In order to specify a port number for SSL communication a certificate must first be installed from Web Connection For details refer to the Us er s Guide Web Connection Operations 1 Touch System Connection in the Administrator...

Страница 202: ... Specifying Utility mode parameters Chapter 3 3 Touch Port Number in the Open API Settings screen The Port Number screen appears 4 Press the C clear key to erase the value and then use the keypad to specify the desired port number between 1 and 65535 ...

Страница 203: ...ty mode parameters Chapter 3 If a value outside the allowable range is specified the message In put error appears Type a value within the allowable range When SSL settings are specified 5 Touch OK The port number that other systems access using Open API is speci fied ...

Страница 204: ...ings screen refer to Dis playing the Administrator Settings screen on page 3 7 In order to specify a port number for SSL communication a certificate must first be installed from Web Connection For details refer to the Us er s Guide Web Connection Operations 1 Touch System Connection in the Administrator Settings screen 2 Touch 1 Open API Settings in the System Connection screen 3 Touch SSL in the ...

Страница 205: ... The default setting is OFF 2 Note For details on displaying the Administrator Settings screen refer to Dis playing the Administrator Settings screen on page 3 7 1 Touch System Connection in the Administrator Settings screen 2 Touch 1 Open API Settings in the System Connection screen 3 Touch Authentication in the Open API Settings screen The Authentication screen appears 4 Touch the button for the...

Страница 206: ...ep 9 5 Touch Login Name 6 Type in the logon name up to 8 characters long and then touch OK For details on typing in text refer to Entering text on page 6 4 The logon name is set 7 Touch Password 8 Type in the password up to 8 characters long and then touch OK The password is set 9 Touch OK Authentication for using Open API is set ...

Страница 207: ...3 Specifying Utility mode parameters 3 68 cm5520 Specifying Utility mode parameters Chapter 3 ...

Страница 208: ...4 Network Settings Chapter 4 Network Settings ...

Страница 209: ...r Settings on page 4 46 FTP Settings Specify settings for performing FTP transmissions FTP Settings on page 4 53 SMB Settings Specify settings for the SMB client print ing and WINS SMB Settings on page 4 57 LDAP Settings Specify the server to be connected to when using an LDAP server LDAP Settings on page 4 62 Setting Up LDAP on page 4 63 Default Search Settings on page 4 70 E Mail Settings Specif...

Страница 210: ...rations Detail Settings Specify other settings for the network connection Device Setting on page 4 108 Time Adjustment Setting on page 4 110 Status Notification Setting on page 4 113 Total Counter Notification Settings on page 4 121 PING Confirmation on page 4 126 SLP Setting on page 4 128 LPD Setting on page 4 129 Prefix Suffix Setting on page 4 130 Action for Invalid Certifi cate on page 4 134 P...

Страница 211: ...dminis trator If Password Rules is set to Enable only a password with 8 digits can be specified For details on the password rules refer to the User s Guide Copy Operations A maximum of 20 external servers can be registered If external server authentication was selected Server Name appears in the user authentication screen so that logon is possible by selecting a server from those that are register...

Страница 212: ... address of this machine required Subnet mask required Default gateway Priority DNS server address required Alternate DNS server address 1 Alternate DNS server address 2 Default DNS domain name DNS host name Default domain name for Active Directory required IP address of the NTP server time adjustment List of users for authentication required 1 Display the Administrator Settings screen For details...

Страница 213: ... on the TCP IP settings refer to TCP IP Settings on page 4 17 3 Touch Network Setting then TCP IP Settings then DNS Host and then specify settings for the following Set Dynamic DNS Settings to Enable Set Dynamic DNS Set tings to Enable only when necessary DNS Host Name ...

Страница 214: ...tting then TCP IP Settings then DNS Server Set tings and then specify settings for the following Priority DNS Server Secondary DNS Server 1 Secondary DNS Server 2 Specify a DNS server linked to Active Directory 6 Touch Administrator Settings then User Authentication Account Track then External Server Settings and then specify settings for the following Register an external server Specify the serve...

Страница 215: ... Active Directory as the server type Specify the default domain name 7 Touch Administrator Settings then User Authentication Account Track then User Authentication and then specify settings for the following Set User Authentication to External Server Authentication ...

Страница 216: ...For details on specifying the date and time settings refer to the Us er s Guide Copy Operations Specify the current time and the time zone If the settings for the NTP server time adjustment are specified the time on this machine can be set correctly through the network For details refer to Time Adjustment Setting on page 4 110 To cancel changes to the settings touch the menu item name in the Bookm...

Страница 217: ...f Password Rules is set to Enable only a password with 8 digits can be specified For details on the password rules refer to the User s Guide Copy Operations 2 Note NTLMv2 is applied from Windows NT 4 0 Service Pack 4 1 Display the Administrator Settings screen For details on displaying the Administrator Settings screen refer to Displaying the Administrator Settings screen on page 3 7 2 Touch Admin...

Страница 218: ...t Track then User Authentication and then specify settings for the fol lowing For details on the user authentication and account track settings refer to the User s Guide Copy Operations Set User Authentication to External Server Authentication To cancel changes to the settings touch the menu item name in the Bookmark screen to return to the selected screen without applying the changes to the setti...

Страница 219: ...rnal server contact the network adminis trator If Password Rules is set to Enable only a password with 8 digits can be specified For details on the password rules refer to the User s Guide Copy Operations NDS can be used only when IPX is used as the protocol NDS cannot be used when IP is used 1 Display the Administrator Settings screen For details on displaying the Administrator Settings screen re...

Страница 220: ... User Authentication and then specify settings for the fol lowing For details on the user authentication and account track settings refer to the User s Guide Copy Operations Set User Authentication to External Server Authentication To cancel changes to the settings touch the menu item name in the Bookmark screen to return to the selected screen without applying the changes to the settings ...

Страница 221: ...uthentication method required Logon attributes required List of users for authentication required 1 Display the Administrator Settings screen For details on displaying the Administrator Settings screen refer to Displaying the Administrator Settings screen on page 3 7 2 Touch Administrator Settings then User Authentication Account Track then External Server Settings and then specify settings for th...

Страница 222: ...ouch Administrator Settings then User Authentication Account Track then User Authentication and then specify settings for the fol lowing For details on the user authentication and account track settings refer to the User s Guide Copy Operations Set User Authentication to External Server Authentication ...

Страница 223: ...k Settings 4 16 cm5520 Network Settings Chapter 4 To cancel changes to the settings touch the menu item name in the Bookmark screen to return to the selected screen without applying the changes to the settings ...

Страница 224: ...cally assigned by the DHCP server therefore it is not necessary to assign them manually However note the following points Check with the network administrator that the DHCP server is available If a DHCP server is not available be sure to specify settings for IP Ad dress Subnet Mask and Default Gateway If the IP address and other settings have been assigned by the DHCP server they may automatically...

Страница 225: ...ork Settings Chapter 4 Displaying the TCP IP Settings screen 1 Touch 5 Network Setting in the Administrator Settings screen 2 Touch 1 TCP IP Settings in the Network Settings screen 3 Touch ON The parameters of the TCP IP settings appear ...

Страница 226: ... Specify the desired settings Parameter Description IP Application Meth od Select whether to directly specify a fixed IP address Manual Input or to automatically retrieve the IP address Auto Input IP Address If Manual Input was selected specify the IP address of the machine Use the keypad to type in the address Subnet Mask If Manual Input was selected specify the subnet mask for the network to be ...

Страница 227: ...turn to the selected screen without applying the changes to the settings DNS Host Specify dynamic DNS settings Settings can be specified for the following 1 Touch DNS Host in the TCP IP Settings screen Parameter Description Dynamic DNS Set tings Select whether or not dynamic DNS is enabled when the DNS server be ing used is compatible with dynamic DNS functions DNS Host Name Use the keyboard that ...

Страница 228: ...ouch DNS Host Name and then type in the DNS host name using the keyboard that appears To clear the entered DNS host name press the C clear key 3 Touch OK To cancel changes to the settings touch the menu item name in the Bookmark screen to return to the selected screen without applying the changes to the settings ...

Страница 229: ...lect the domain name to be entered and then type in the domain name using the keyboard that ap pears Parameter Description DNS Domain Name Auto Retrieval Select whether or not the name of the DNS domain is automatically ac quired Default DNS domain name Type in the default DNS domain name Use the keyboard that appears in the touch panel to type in the domain name 253 characters or less DNS Search ...

Страница 230: ... 2 Note IPv4 or IPv6 can be selected for entering the IP address of the DNS serv er 1 Touch DNS Server Settings in the TCP IP Settings screen Parameter Description DNS Server Auto Obtain Select whether or not the DNS server is automatically acquired Priority DNS Server Specify the address of the DNS server given priority Use the keypad to type in the address Secondary DNS Server 1 Specify the addr...

Страница 231: ...er address select the server to be entered and then type in the address Use the keypad to type in the address To correct the entered numbers touch or to move the cur sor to the character to be changed touch Delete and then type in the desired number To clear the entered address press the C clear key With IPv4 ...

Страница 232: ... settings RAW Port Number Specify the number of the RAW port used by the printer By selecting multi ple ports as printers multiple data can be received at the same time 2 Note When a RAW port is used set Spool Print Jobs in HDD before RIP to ON If OFF is selected a timeout may occur For details on Spool Print Jobs in HDD before RIP refer to the User s Guide Print Operations 1 Touch RAW Port Number...

Страница 233: ...t number between 1 and 65535 If a value outside the allowable range is specified the message In put error appears Type a value within the allowable range To not use the port touch OFF 4 Touch OK To cancel changes to the settings touch the menu item name in the Bookmark screen to return to the selected screen without applying the changes to the settings The use of RAW ports and the RAW port numbers...

Страница 234: ... 0 0 0 1 to 192 168 1 20 A maximum of five ranges of permitted IP addresses can be specified 1 Touch IP Filtering Permit Access in the TCP IP Settings screen 2 To specify permitted access touch Enable Specify the range of IP addresses permitted access 3 Select a range and then type in the IP addresses Use the keypad to type in the address To correct the entered numbers touch or to move the cur sor...

Страница 235: ...een to return to the selected screen without applying the changes to the settings IP Filtering Deny Access Specify the range of IP addresses denied access 2 Note 0 0 0 0 cannot be included in a specified range For example to specify the range of addresses before 192 168 1 20 specify the range from 0 0 0 1 to 192 168 1 20 A maximum of five ranges of denied IP addresses can be specified 1 Touch IP F...

Страница 236: ... the address To correct the entered numbers touch or to move the cur sor to the character to be changed touch Delete and then type in the desired number To clear the entered address press the C clear key 4 Touch OK and then touch OK in the next screen that appears To cancel changes to the settings touch the menu item name in the Bookmark screen to return to the selected screen without applying the...

Страница 237: ...rect the entered numbers touch or to move the cur sor to the character to be changed touch Delete and then type in the desired number Parameter Description Auto IPv6 Settings To automatically obtain IPv6 addresses touch ON Global Address Specify a setting when ON is selected under Auto IPv6 Set tings Specify the prefix length between 1 and 128 and the global address to be retrieved Gateway Address...

Страница 238: ...ess the C clear key After touching Prefix Length to specify a setting 4 Touch OK and then touch OK in the next screen that appears To cancel changes to the settings touch the menu item name in the Bookmark screen to return to the selected screen without applying the changes to the settings ...

Страница 239: ...er to apply the IPsec settings settings must be specified for IKE Settings IPsec SA Settings and Peer 1 Touch IPsec Settings in the TCP IP Settings screen 2 To specify settings touch ON and then touch IKE Settings IKE Settings screen 1 2 appears Parameter Description Encryption Algorithm Select the encryption algorithm Authentication Algorithm Select the authentication algorithm Key Validity Perio...

Страница 240: ...Specify the desired settings To change the setting under Key Validity Period press the C clear key and then use the keypad to type in the desired value Under Diffie Hellman Group select a group 6 Touch OK To cancel changes to the settings touch the menu item name in the Bookmark screen to return to the selected screen without applying the changes to the settings The IPsec Settings screen appears a...

Страница 241: ...Psec SA Settings and Peer 1 Touch IPsec Settings in the TCP IP Settings screen 2 To specify settings touch ON and then touch IPsec SA Settings The IPsec SA Settings screen appears Parameter Description Group Set Number Select the security protocol ESP encryption algorithm ESP authentica tion algorithm and AH authentication algorithm and save the settings in eight groups Lifetime After Estab lishin...

Страница 242: ...ettings Chapter 4 3 Select the group where the algorithm combination will be stored A screen appears allowing the group to selected 4 Specify the algorithm settings 5 Touch OK The group is stored and the IPsec SA Settings screen appears again ...

Страница 243: ...tion settings for each peer Peer settings can be saved in ten groups Settings can be specified for the following 0 In order to apply the IPsec settings settings must be specified for IKE Settings IPsec SA Settings and Peer 1 Touch IPsec Settings in the TCP IP Settings screen Parameter Description Encapsulation Mode Specify the encryption type IP Address Specify a setting when Tunnel Mode or Transp...

Страница 244: ...cm5520 4 37 Network Settings Chapter 4 2 To specify settings touch ON and then touch Peer A screen appears allowing the peer to selected 3 Select the group to be programmed A screen appears allowing the group to selected ...

Страница 245: ...sired settings 5 Touch OK and then touch OK in the next screen that appears To cancel changes to the settings touch the menu item name in the Bookmark screen to return to the selected screen without applying the changes to the settings The IPsec Settings screen appears again ...

Страница 246: ...can be specified for the following 1 Touch 5 Network Setting in the Administrator Settings screen For details on displaying the Administrator Settings screen refer to Displaying the Administrator Settings screen on page 3 7 2 Touch 2 NetWare Settings in the Network Settings screen The NetWare Setting screen appears 3 Touch 1 IPX Settings Parameter Description Ethernet Frame Type Select the frame t...

Страница 247: ... be checked Parameter Description Print Server Name Specify the print server name Use the keyboard that appears in the touch panel to type in the server name 63 characters or less Print Server Pass word Specify the password required when the print server logs on to the file server Use the keyboard that appears in the touch panel to type in the password 63 characters or less Polling Interval Specif...

Страница 248: ...or Settings screen 2 Touch 2 NetWare Settings in the Network Settings screen The NetWare Setting screen appears 3 Touch 2 NetWare Print Settings NDS Tree Name Specify the NDS tree name Use the keyboard that appears in the touch panel to type in the NDS tree name 63 characters or less Parameter Description Print Server Name Specify the print server name Use the keyboard that appears in the touch pa...

Страница 249: ...2 cm5520 Network Settings Chapter 4 4 Select the NetWare print mode and then specify the desired settings If PServer was selected specify the desired settings and then touch OK To display a different screen touch Back or Fwd ...

Страница 250: ...and then touch OK 5 To check the status touch Status 6 Touch or until the server whose status is to be checked is dis played 7 Touch Close 8 Touch OK 9 Touch Close To cancel changes to the settings touch the menu item name in the Bookmark screen to return to the selected screen without applying the changes to the settings ...

Страница 251: ...s set to ON over IP is not compatible 1 Touch 5 Network Setting in the Administrator Settings screen 2 Touch 2 NetWare Settings in the Network Settings screen The NetWare Setting screen appears 3 Touch 3 User Authentication Setting NDS Parameter Description User Authentication Setting NDS When User Authentication is set to External Server Authentication select whether or not NDS authentication is ...

Страница 252: ... 4 Specify the desired settings 5 Touch Close and then touch Close in the next screen that appears To cancel changes to the settings touch the menu item name in the Bookmark screen to return to the selected screen without applying the changes to the settings ...

Страница 253: ...tor Settings screen on page 3 7 Parameter Description http Server Settings Select whether or not the http server settings are used Parameter Description IPP Settings Select whether to enable or disable the IPP print function Accept IPP Jobs Select whether or not IPP jobs are permitted Support Information Specify the support information For details refer to Support Informa tion on page 4 49 Printer...

Страница 254: ...uch 3 http Server Settings in the Network Settings screen http Server Settings screen 1 4 appears 3 Specify the desired settings 4 Touch Fwd http Server Settings screen 2 4 appears 5 Specify the desired settings 6 Touch Fwd http Server Settings screen 3 4 appears ...

Страница 255: ... Touch Fwd http Server Settings screen 4 4 appears 9 Specify the desired settings 10 Touch OK To cancel changes to the settings touch the menu item name in the Bookmark screen to return to the selected screen without applying the changes to the settings The http server details are specified ...

Страница 256: ...ation No response is returned for Cancel Job Open Job and Open Job Attributes 1 Touch Support Information in http Server Settings screen 2 4 The Support Operation screen appears 2 Touch ON or OFF for each operation 3 Touch OK To cancel changes to the settings touch the menu item name in the Bookmark screen to return to the selected screen without applying the changes to the settings The support op...

Страница 257: ... The Printer Related Info screen appears 2 Touch Printer Name The Printer Name screen appears 3 Type in the printer name 127 characters or less For details on typing in text refer to Entering text on page 6 4 4 Touch OK The printer name is specified and the Printer Related Info screen ap pears again 5 Touch Printer Location The Printer Location screen appears ...

Страница 258: ...fied and the Printer Related Info screen appears again 8 Touch Printer Information The Printer Information screen appears 9 Type in the printer information 127 characters or less 10 Touch OK The printer information is specified and the Printer Related Info screen appears again 11 To check the printer URI touch Printer URI The Printer URI screen appears ...

Страница 259: ...After checking the printer URI touch Close The Printer Related Info screen appears again 13 Touch Close To cancel changes to the settings touch the menu item name in the Bookmark screen to return to the selected screen without applying the changes to the settings ...

Страница 260: ...e format of a host name IPv4 address or IPv6 address Proxy Server Port Number Specify the port number for the proxy server To change the setting press the C clear key and then use the keypad to type in the desired port number Range 1 to 65535 Port No Specify the number of the port used for communicating with the FTP server To change the setting press the C clear key and then use the keypad to type...

Страница 261: ...4 54 cm5520 Network Settings Chapter 4 4 To use FTP touch ON and then specify the desired settings To specify the proxy server address touch Host Address and then type in the address 5 Touch Fwd FTP TX screen 2 2 appears ...

Страница 262: ...s The FTP transmission details are specified FTP Server Settings Select whether or not the machine is used as an FTP server 0 If an application is used that links to this machine as an FTP client of this machine ON must be selected 1 Touch 5 Network Setting in the Administrator Settings screen For details on displaying the Administrator Settings screen refer to Displaying the Administrator Setting...

Страница 263: ...TP Server Settings screen appears 4 To use the FTP server touch ON 5 Touch OK 6 Touch Close To cancel changes to the settings touch the menu item name in the Bookmark screen to return to the selected screen without applying the changes to the settings The FTP transmission details are specified ...

Страница 264: ...ls on displaying the Administrator Settings screen refer to Displaying the Administrator Settings screen on page 3 7 2 Touch 5 SMB Settings in the Network Settings screen 3 Touch 1 Client Settings The Client Settings screen appears Parameter Description User Authentication NTLM Select whether or not the NTLM user authentication is performed NTLM Settings Select the NTLM version to be used If the n...

Страница 265: ...etails on displaying the Administrator Settings screen refer to Displaying the Administrator Settings screen on page 3 7 2 Touch 5 SMB Settings in the Network Settings screen Parameter Description NetBIOS Name Specify the NetBIOS name with uppercase letters Use the keyboard that appears in the touch panel to type in the NetBIOS name 15 characters or less Print Service Name Specify the print servic...

Страница 266: ...e Printer Setting screen appears 4 To use the SMB port touch ON and then specify the desired settings 5 Touch OK 6 Touch Close To cancel changes to the settings touch the menu item name in the Bookmark screen to return to the selected screen without applying the changes to the settings ...

Страница 267: ...creen For details on displaying the Administrator Settings screen refer to Displaying the Administrator Settings screen on page 3 7 2 Touch 5 SMB Settings in the Network Settings screen 3 Touch 3 WINS Settings WINS Settings screen 1 2 appears Parameter Description Automatic Retrieval Set tings Select whether Enable or not No Limit the IP address of the WINS server is automatically retrieved from t...

Страница 268: ... then specify the desired set tings 5 Touch Fwd WINS Settings screen 2 2 appears 6 Specify the desired settings 7 Touch OK 8 Touch Close To cancel changes to the settings touch the menu item name in the Bookmark screen to return to the selected screen without applying the changes to the settings ...

Страница 269: ...arameter should be specified by the network administrator Enabling LDAP Select whether or not a connection is established with the LDAP server and the LDAP function is used 1 Touch 5 Network Setting in the Administrator Settings screen For details on displaying the Administrator Settings screen refer to Displaying the Administrator Settings screen on page 3 7 2 Touch 6 LDAP Settings in the Network...

Страница 270: ...the LDAP server to be registered Use the keyboard that appeared in the touch panel to type in the server name 32 characters or less Max Search Results Specify the maximum number of destinations to be displayed after a search To change the setting press the C clear key and then use the keypad to type in the desired setting Range 5 to 1000 Timeout Specify the maximum wait time for a search operation...

Страница 271: ...n use the keypad to type in the desired port number Range 1 to 65535 Port Number SSL Specify the port number when SSL is used To change the setting press the C clear key and then use the keypad to type in the de sired port number Range 1 to 65535 Parameter Description Authentication Type Select the authentication method used for logging on to the LDAP server Anonymous This authentication method do...

Страница 272: ... user name and password is requested Referral Setting Select whether or not the referral setting is used If referral is used the search base that was specified in the LDAP server settings searches the upper and lower levels as the starting point Parameter Description Login Name Specify the logon name for connecting to the LDAP server Use the keyboard that appears in the touch panel to type in the ...

Страница 273: ... 4 66 cm5520 Network Settings Chapter 4 3 Touch 2 Setting Up LDAP The Setup LDAP screen appears 4 Touch the button to be programmed and where settings are to be specified for the LDAP server Setup LDAP screen 1 6 appears ...

Страница 274: ...fy the initial search conditions in an advanced search touch Initial Setting for Search Details Select a condition and its setting Select the default condition OR AND START and END The specified conditions can be changed when a user performs an LDAP search 6 Touch Fwd Setup LDAP screen 2 6 appears ...

Страница 275: ...Connection appears only if Enabling LDAP displayed from the LDAP Setting screen is set to ON and Manual Destina tion Input displayed on the Security Details screen is set to Al low 8 Touch Fwd Setup LDAP screen 3 6 appears 9 Specify the desired settings 10 Touch Fwd Setup LDAP screen 4 6 appears ...

Страница 276: ...is selected as the authentication method type in the domain name of Active Directory Depending on the selected authentication method a connection check cannot be performed if the following settings are incorrectly specified in Setup LDAP screen 6 6 For Simple and Digest MD5 Login Name For GSS SPNEGO Login Name and Domain Name 12 Touch Fwd Setup LDAP screen 5 6 appears 13 Specify the desired settin...

Страница 277: ...n without applying the changes to the settings The LDAP server is registered and the authentication settings are specified Default Search Settings Specify which of the registered LDAP servers is to be given priority for per forming searches 1 Touch 5 Network Setting in the Administrator Settings screen For details on displaying the Administrator Settings screen refer to Displaying the Administrato...

Страница 278: ...h Settings screen appears 4 Select the LDAP server to be given priority for performing searches 5 Touch OK To cancel changes to the settings touch the menu item name in the Bookmark screen to return to the selected screen without applying the changes to the settings The LDAP server given priority is specified ...

Страница 279: ...il message is divided and sent in small sections This is used to send data that has exceeded the maximum capacity when the maximum capacity is limited per e mail message on the e mail server Divided Mail Size Specify the size of divided data when dividing the data to be sent To change the setting press the C clear key and then use the keypad to type in the desired setting Range 100 to 15000 KB Par...

Страница 280: ...n SSL is used To change the setting touch Input press the C clear key and then use the keypad to type in the desired port number Range 1 to 65535 Port No Specify the port number for e mail transmissions To change the setting touch Input press the C clear key and then use the keypad to type in the desired port number Range 1 to 65535 Parameter Description SMTP Authentication Select whether or not S...

Страница 281: ...s touch Detail Setting To spec ify SMTP authentication settings refer to SMTP Authentication on page 4 78 In order to perform user authentication with POP Before SMTP some settings must be specified so that the mail server can be ac cessed correctly with POP For details refer to E Mail RX POP on page 4 81 5 Touch Fwd E Mail TX SMTP screen 2 5 appears ...

Страница 282: ...ired settings If virus scanning software is used on the mail server the Binary Di vision feature may not be available For details contact your net work administrator To receive e mail messages that have been divided mail client software supporting divided reception is required Depending on the mail client software being used it may not be possible to com bine received e mail messages that have bee...

Страница 283: ... 5 5 appears 12 Specify the desired settings 13 Touch OK 14 Touch Close and then touch Close in the next screen that appears To cancel changes to the settings touch the menu item name in the Bookmark screen to return to the selected screen without applying the changes to the settings The SMTP server information is specified ...

Страница 284: ...s screen appears 2 Select the method for specifying the host address To specify the host address as an IPv4 address touch IPv4 Ad dress Input To specify the host address as an IPv6 address touch IPv6 Ad dress Input To specify the host address as a host name touch Host Name In put When Host Name Input is touched check that the DNS setting is correctly specified For details refer to TCP IP Settings ...

Страница 285: ...orrectly even if the SMTP server name has been entered For de tails on the DNS settings refer to TCP IP Settings on page 4 17 4 Touch OK To cancel changes to the settings touch the menu item name in the Bookmark screen to return to the selected screen without applying the changes to the settings The SMTP server address is specified SMTP Authentication Specify these settings when SMTP authenticatio...

Страница 286: ...cters or less 4 Touch OK The user ID is specified and the SMTP Authentication screen appears again 5 Touch Password in the SMTP Authentication screen The Password screen appears 6 Type in the password 15 characters or less 7 Touch OK The password is specified and the SMTP Authentication screen ap pears again ...

Страница 287: ...ype in the domain name 255 characters or less 10 Touch OK The domain name is specified and the SMTP Authentication screen appears again 11 Touch Close To cancel changes to the settings touch the menu item name in the Bookmark screen to return to the selected screen without applying the changes to the settings The SMTP Detail screen appears again ...

Страница 288: ...ting in 30 second incre ments Range 30 to 300 seconds Parameter Description SSL Setting Select whether or not SSL is used during e mail receptions When SSL is used the communication settings are encrypted Port No Specify the number of the port used for communicating with the POP server To change the setting touch Input press the C clear key and then use the keypad to type in the desired port numbe...

Страница 289: ...rator Settings screen on page 3 7 2 Touch 7 E Mail Settings in the Network Settings screen 3 Touch 2 E Mail RX POP E Mail RX POP screen 1 4 appears Parameter Description Check for New Messages Select whether or not the server is automatically checked for re ceived e mail messages Polling Interval Specify the polling interval To change the setting press the C clear key and then use the keypad to ty...

Страница 290: ... reception touch ON and then specify the desired settings To specify the host address touch Host Address For details refer to POP Server Address on page 4 85 5 Touch Fwd E Mail RX POP screen 2 4 appears 6 Specify the desired settings 7 Touch Fwd E Mail RX POP screen 3 4 appears ...

Страница 291: ... 9 Touch Fwd E Mail RX POP screen 4 4 appears 10 Specify the desired settings 11 Touch OK To cancel changes to the settings touch the menu item name in the Bookmark screen to return to the selected screen without applying the changes to the settings The POP server information is specified ...

Страница 292: ...s screen appears 2 Select the method for specifying the host address To specify the host address as an IPv4 address touch IPv4 Ad dress Input To specify the host address as an IPv6 address touch IPv6 Ad dress Input To specify the host address as a host name touch Host Name In put When Host Name Input is touched check that the DNS setting is correctly specified For details refer to TCP IP Settings ...

Страница 293: ...r to the character to be changed touch Delete and then type in the desired number To clear all entered values press the C clear key For details on typing in text refer to Entering text on page 6 4 4 Touch OK To cancel changes to the settings touch the menu item name in the Bookmark screen to return to the selected screen without applying the changes to the settings The POP server address is specif...

Страница 294: ...ertificates parameter available from the S MIME Communications Settings screen must first be set to Yes 1 From the machine s control panel register the e mail destination in the address book Method Description Registering certificates by sending e mail messages to this machine The certificate is registered by sending an e mail message to this machine from the client computer to be the e mail desti...

Страница 295: ...ings for S MIME communication where e mail transmis sions are encrypted Settings can be specified for the following 1 Touch 5 Network Setting in the Administrator Settings screen For details on displaying the Administrator Settings screen refer to Displaying the Administrator Settings screen on page 3 7 2 Touch 7 E Mail Settings in the Network Settings screen Parameter Description Digital Signatur...

Страница 296: ...4 89 Network Settings Chapter 4 3 Touch 3 S MIME Communication Settings The S MIME Communication Settings screen appears 4 To enable S MIME communication settings touch ON and then specify the desired settings Digital Signature ...

Страница 297: ...4 Network Settings 4 90 cm5520 Network Settings Chapter 4 E Mail Text Encryption Method Print S MIME Information Automatically Obtain Certificates ...

Страница 298: ... 4 5 Touch OK and then touch OK in the next screen that appears To cancel changes to the settings touch the menu item name in the Bookmark screen to return to the selected screen without applying the changes to the settings The S MIME details are specified ...

Страница 299: ...h 8 SNMP Settings in the Network Settings screen SNMP Setting screen 1 3 appears Parameter Description SNMP v1 v2c IP Select whether or not SNMP v1 v2c IP is used SNMP v3 IP Select whether or not SNMP v3 IP is used SNMP v1 IPX Select whether or not SNMP v1 IPX is used Parameter Description UDP Port Number Specify the UDP port number To change the setting press the C clear key and then use the keyp...

Страница 300: ...hapter 4 3 To enable the SNMP settings touch ON and then specify the desired settings Select the desired settings and then touch OK 4 Touch Fwd SNMP Setting screen 2 3 appears 5 Specify the desired settings 6 Touch Fwd SNMP Setting screen 3 3 appears ...

Страница 301: ...d settings for SNMP v1 v2c Settings can be specified for the following Parameter Description Read Community Name Settings Specify the name of the read community The default setting is public Use the keyboard that appears in the touch panel to type in the read community name Write Settings Select whether to enable or disable the write permissions Write Community Name Settings Specify the name of th...

Страница 302: ...4 cm5520 4 95 Network Settings Chapter 4 1 Touch SNMP v1 v2c Settings in the SNMP Setting screen SNMP v1 v2c Settings screen 1 2 appears 2 Specify the desired settings 3 Touch Fwd SNMP v1 v2c Settings screen 2 2 appears ...

Страница 303: ...er permissions Discovery User Name Set tings Specify the discovery user name Use the keyboard that appears in the touch panel to type in the discovery user name 32 charac ters or less Read User Name Settings Specify the read user name Use the keyboard that appears in the touch panel to type in the read user name 32 characters or less Security Level Select the authentication security level Password...

Страница 304: ...ord Setting Write Specify the authentication password Type in a password 32 char acters or less for each security level If auth password is selected type in Write auth If auth password privpassword is selected type in Write auth and Write priv Parameter Description ...

Страница 305: ...es agentPingInterval smuxpeer dlmod snmpd rouser noauth auth priv authPriv noAuthNoPriv rwuser rocommunity rwcommunity rocommunity6 rwcommunity6 com2sec com2sec6 group access view engineID createUser syslocation syscontact sysname sysservices sysdescr sysobjectid agentaddress agentgroup agentuser interface ignoredisk storageUseNFS authtrapenable override trapcommunity trapsink trap2sink informsink...

Страница 306: ...ttings 4 cm5520 4 99 Network Settings Chapter 4 1 Touch SNMP v3 Settings in the SNMP Setting screen SNMP v3 Setting screen 1 4 appears 2 Specify the desired settings 3 Touch Fwd SNMP v3 Setting screen 2 4 appears ...

Страница 307: ...ork Settings 4 100 cm5520 Network Settings Chapter 4 4 Specify the desired settings 5 Touch Fwd SNMP v3 Setting screen 3 4 appears 6 Specify the desired settings 7 Touch Fwd SNMP v3 Setting screen 4 4 appears ...

Страница 308: ...password privpassword is selected under Security Level touch Password Setting and then specify the password 9 Touch OK To cancel changes to the settings touch the menu item name in the Bookmark screen to return to the selected screen without applying the changes to the settings The SNMP Setting screen appears again ...

Страница 309: ...pears 3 To use AppleTalk touch ON and then specify the desired settings 4 Touch OK 5 Touch Close To cancel changes to the settings touch the menu item name in the Bookmark screen to return to the selected screen without applying the changes to the settings Parameter Description Printer Name Specify the name of the machine that appears in the AppleTalk network Use the keyboard that appears in the t...

Страница 310: ...s screen on page 3 7 2 Touch 0 Bonjour Settings in the Network Settings screen The Bonjour Setting screen appears 3 To use Bonjour touch ON and then specify the desired settings 4 Touch OK 5 Touch Close To cancel changes to the settings touch the menu item name in the Bookmark screen to return to the selected screen without applying the changes to the settings Parameter Description Bonjour Name Sp...

Страница 311: ...server authentication is specified Use SSL TLS automatical ly changes to ON To enable authentication turn the machine off then on again after specifying the external server authentication settings Parameter Description Port Number Specify the port number to be used To change the setting press the C clear key and then use the keypad to type in the desired port number Range 1 to 65535 Parameter Desc...

Страница 312: ...ator Settings screen refer to Displaying the Administrator Settings screen on page 3 7 2 Touch Fwd in the Network Settings screen and then touch 1 TCP Socket Settings 3 Touch 1 TCP Socket The TCP Socket screen appears 4 To use TCP socket touch ON and then specify the desired settings When SSL settings are not specified When SSL settings are specified 5 Touch OK ...

Страница 313: ...pplications on the computer If Web Connection is being used be sure to select ON 1 Touch 5 Network Setting in the Administrator Settings screen For details on displaying the Administrator Settings screen refer to Displaying the Administrator Settings screen on page 3 7 2 Touch Fwd in the Network Settings screen and then touch 1 TCP Socket Settings 3 Touch 2 TCP Socket ASCII Mode The TCP Socket ASC...

Страница 314: ... To use TCP socket ASCII mode touch ON and then specify the de sired settings 5 Touch OK 6 Touch Close To cancel changes to the settings touch the menu item name in the Bookmark screen to return to the selected screen without applying the changes to the settings ...

Страница 315: ...ttings screen and then touch 1 De tail Setting 3 Touch 1 Device Setting The Device Setting screen appears 4 Specify the desired settings 5 Touch OK To cancel changes to the settings touch the menu item name in the Bookmark screen to return to the selected screen without applying the changes to the settings The device information is specified Parameter Description MAC Address The Mac address of the...

Страница 316: ...09 Network Settings Chapter 4 2 Reminder When the machine is turned off then on again with the main power switch wait at least 10 seconds to turn on the machine after turning it off otherwise the machine may not function correctly ...

Страница 317: ...or details on displaying the Administrator Settings screen refer to Displaying the Administrator Settings screen on page 3 7 2 Touch Fwd in the Network Settings screen and then touch 1 De tail Settings 3 Touch 2 Time Adjustment Setting The Time Adjustment Setting screen appears 4 To adjust the time touch ON and then specify the desired settings Parameter Description NTP Server Setting Specify the ...

Страница 318: ...st address as an IPv4 address touch IPv4 Ad dress Input To specify the host address as an IPv6 address touch IPv6 Ad dress Input To specify the host address as a host name touch Host Name In put When Host Name Input is touched check that the DNS setting is correctly specified For details refer to TCP IP Settings on page 4 17 3 Type in the host address 255 characters or less for a host name To corr...

Страница 319: ...work Settings Chapter 4 4 Touch OK To cancel changes to the settings touch the menu item name in the Bookmark screen to return to the selected screen without applying the changes to the settings The address of the NTP server is specified ...

Страница 320: ... Specifying an IP address Settings can be specified for the following 1 Touch 5 Network Setting in the Administrator Settings screen For details on displaying the Administrator Settings screen refer to Displaying the Administrator Settings screen on page 3 7 2 Touch Fwd in the Network Settings screen and then touch 1 De tail Settings 3 Touch 3 Status Notification Setting The Status Notification Se...

Страница 321: ...cm5520 Network Settings Chapter 4 4 Touch 1 Notification Address Setting The Notification Address Setting screen appears 5 Touch the button for the IP address to be specified 6 Touch Host Address The Host Address screen appears ...

Страница 322: ...ed For details refer to TCP IP Settings on page 4 17 8 Type in the host address 255 characters or less for a host name and then touch OK To correct the entered IP address touch or to move the cursor to the character to be changed touch Delete and then type in the desired number To clear all entered values press the C clear key For details on typing in text refer to Entering text on page 6 4 9 Spec...

Страница 323: ...the Network Settings screen and then touch 1 De tail Settings 3 Touch 3 Status Notification Setting The Status Notification Setting screen appears 4 Touch 1 Notification Address Setting The Register Address screen appears Parameter Description Network Address Specify the 8 digit hexadecimal network address Node Address Specify the 12 digit hexadecimal node address Community Name Type in the commun...

Страница 324: ... Settings Chapter 4 5 Touch IPX Address 6 Specify the desired settings 7 Touch OK To cancel changes to the settings touch the menu item name in the Bookmark screen to return to the selected screen without applying the changes to the settings ...

Страница 325: ...P Setting in the User s Guide Web Connec tion Operations 1 Touch 5 Network Setting in the Administrator Settings screen For details on displaying the Administrator Settings screen refer to Displaying the Administrator Settings screen on page 3 7 2 Touch Fwd in the Network Settings screen and then touch 1 De tail Settings 3 Touch 3 Status Notification Setting The Status Notification Setting screen ...

Страница 326: ... appears 5 Touch Fwd and then touch the button for the e mail address to be specified 6 Specify the desired settings 7 Touch OK To cancel changes to the settings touch the menu item name in the Bookmark screen to return to the selected screen without applying the changes to the settings ...

Страница 327: ...cation Item in the address setting screen The Notification Items screen appears 2 Touch ON or OFF for each operation 3 Touch OK To cancel changes to the settings touch the menu item name in the Bookmark screen to return to the selected screen without applying the changes to the settings The conditions when notification of the machine s status is sent are specified ...

Страница 328: ...l Counter Notif Setting screen appears 4 Specify the desired settings Parameter Description Notification Schedule Set ting Specify the time when notification of the total counter is sent Two notification schedules can be specified For details refer to Noti fication Schedule Setting on page 4 122 Address Setting Specify the e mail address where notifications will be sent A schedule can be specified...

Страница 329: ...e for sending total counter notifications As an example the procedure for specifying settings for Schedule 1 is described below 1 Touch Schedule 1 in the Total Counter Notif Setting screen The Schedule Set screen appears 2 Specify settings for the following If Day is selected under Notification Frequency Setting specify the interval of days when the notification is sent To change the setting press...

Страница 330: ... To change the setting press the C clear key and then use the keypad to type in the desired value Range 1 to 6 If Month is selected under Notification Frequency Setting specify the monthly frequency for sending the notification In addi tion select the date of the month when the notification is sent To change the setting under Monthly Frequency touch Input press the C clear key and then use the key...

Страница 331: ...tem name in the Bookmark screen to return to the selected screen without applying the changes to the settings The Total Counter Notif Setting screen appears again Address Setting Specify the e mail address where total counter notifications will be sent Up to three addresses can be specified As an example the procedure for spec ifying settings for Address 1 is described below 1 Touch Address 1 in t...

Страница 332: ...ch Schedule Settings The Notification Address Setting screen appears 5 Select whether or not each schedule is applied using this address 6 Touch Close and then touch Close in the next screen that appears To cancel changes to the settings touch the menu item name in the Bookmark screen to return to the selected screen without applying the changes to the settings The Total Counter Notif Setting scre...

Страница 333: ...ttings screen refer to Displaying the Administrator Settings screen on page 3 7 2 Touch Fwd in the Network Settings screen and then touch 1 De tail Settings 3 Touch 5 PING Confirmation The PING Confirmation screen appears 4 Touch Host Address The Host Address screen appears 5 Select the method for specifying the host address To specify the host address as an IPv4 address touch IPv4 Ad dress Input ...

Страница 334: ...move the cursor to the character to be changed touch Delete and then type in the desired number To clear all entered values press the C clear key For details on typing in text using the keyboard that appears in the touch panel refer to Entering text on page 6 4 7 Touch Check Connection A ping is sent to check the connection 8 Check the results and then touch OK To cancel changes to the settings to...

Страница 335: ...tings screen For details on displaying the Administrator Settings screen refer to Displaying the Administrator Settings screen on page 3 7 2 Touch Fwd in the Network Settings screen and then touch 1 De tail Settings 3 Touch 6 SLP Setting The SLP Setting screen appears 4 Specify the desired settings 5 Touch OK To cancel changes to the settings touch the menu item name in the Bookmark screen to retu...

Страница 336: ...nistrator Settings screen refer to Displaying the Administrator Settings screen on page 3 7 2 Touch Fwd in the Network Settings screen and then touch 1 De tail Settings 3 Touch 7 LPD Setting The LPD Setting screen appears 4 Specify the desired settings 5 Touch OK To cancel changes to the settings touch the menu item name in the Bookmark screen to return to the selected screen without applying the ...

Страница 337: ...d such as domain names ON OFF Setting Select whether or not the prefix suffix function is used 1 Touch 5 Network Setting in the Administrator Settings screen For details on displaying the Administrator Settings screen refer to Displaying the Administrator Settings screen on page 3 7 2 Touch Fwd in the Network Settings screen and then touch 1 De tail Settings 3 Touch 8 Prefix Suffix Settings The Pr...

Страница 338: ...Suffix Setting Text can be registered to be used by the prefix suffix function Detail Up to eight prefixes and suffixes can be registered For details on typing in text refer to Entering text on page 6 4 1 Touch 5 Network Setting in the Administrator Settings screen For details on displaying the Administrator Settings screen refer to Displaying the Administrator Settings screen on page 3 7 2 Touch ...

Страница 339: ... cm5520 Network Settings Chapter 4 4 Touch Prefix Suffix Setting 5 Specify the text to be registered as a prefix or suffix Touch Prefix The Prefix screen appears 6 Type in the text to be used as a prefix 20 characters or less ...

Страница 340: ...ffix The Suffix screen appears 9 Type in the text to be used as a suffix 64 characters or less 10 Touch OK The suffix is specified 11 Touch Close To cancel changes to the settings touch the menu item name in the Bookmark screen to return to the selected screen without applying the changes to the settings ...

Страница 341: ... the Administrator Settings screen For details on displaying the Administrator Settings screen refer to Displaying the Administrator Settings screen on page 3 7 2 Touch Fwd in the Network Settings screen and then touch 1 De tail Settings 3 Touch 9 Action for Invalid Certificate The Action for Invalid Certificate screen appears 4 Specify the desired settings If Continue is selected the job continue...

Страница 342: ...gs 4 cm5520 4 135 Network Settings Chapter 4 5 Touch OK To cancel changes to the settings touch the menu item name in the Bookmark screen to return to the selected screen without applying the changes to the settings ...

Страница 343: ...4 Network Settings 4 136 cm5520 Network Settings Chapter 4 ...

Страница 344: ...5 Scan function troubleshooting Chapter 5 Scan function troubleshooting ...

Страница 345: ...pears when connecting to the machine from a computer Check the IP address of the machine If a connection is still not possible contact your network administrator If MTP cannot be used or FTP cannot be used appears Check that the network cable is correctly connected If the HDD Ready indicator indicates an HDD malfunction Contact your technical representative ...

Страница 346: ...cast destinations or send the transmission in mul tiple batches Image could not be saved in the User Box due to insufficient HDD capacity Check log The hard disk is full Delete unnecessary data and then try saving the data again The number of User Boxes has reached its maximum The number of user boxes that can be registered has reached the maximum number possible Delete unneces sary user boxes and...

Страница 347: ...5 Scan function troubleshooting 5 4 cm5520 Scan function troubleshooting Chapter 5 ...

Страница 348: ...6 Appendix Chapter 6 Appendix ...

Страница 349: ...e Same as the copier 11 17 Ledger maximum Functions Scan to E Mail Scan to FTP Scan to SMB Save in User BOX Scanner resolution 200 300 400 600 dpi Scannable paper size 8 1 2 11 w 8 1 2 11 5 1 2 8 1 2 5 1 2 8 1 2 w 8 1 2 14 11 17 12 18 4 6 Special functions Mixed Original Z Folded Original Long Original Binding Position Erase Book Scanning Original Direction Stamp Composition ...

Страница 350: ...LDAP Compatible LDAP Servers OpenLDAP 2 0 27 Active Directory Exchange5 5 Netscape iPlanet Directory Server Novell Netware5 NDS Novell eDirectory 8 6 8 7 and LotusDominoServer Supported LDAP protocol LDAP Protocol Version 3 Version 2 not supported Compatible SSL versions SSL2 SSL3 and TLS1 0 An x 509 certificate must be in stalled on the server Multiprotocol Auto detection Network setting tool gen...

Страница 351: ...ow to use the keyboard that appears in the touch panel for typing in the names of registered accounts and custom paper sizes The keypad can also be used to type in numbers Any of the following keyboards may appear Example Password input screen Screen for entering the name of a custom paper size ...

Страница 352: ...Appendix 6 cm5520 6 5 Appendix Chapter 6 Touching Shift switches the keyboard display between lowercase letters numbers and uppercase letters symbols ...

Страница 353: ...asier to read 1 While the keyboard is displayed touch Enlarge ON The keyboard is displayed enlarged 2 To cancel the enlarged display and return the keyboard to its normal size touch Enlarge OFF while the keyboard is displayed enlarged 2 Note The keyboard is used in the same way even when it is displayed en larged ...

Страница 354: ...ppear in the text box 2 Note To revert to the setting when the keyboard was displayed touch Cancel To clear all entered text press the C clear key Some buttons may not appear depending on the characters being en tered Detail To change a character in the entered text touch and to move the cursor to the character to be changed touch Delete and then type in the desired letter or number List of Availa...

Страница 355: ...AppleTalk A generic name for the protocol suite developed by Apple Computer for computer networking Auto IP A function for automatically acquiring the IP address If acquisition of the IP address failed with DHCP an IP address is acquired from the address space of 169 254 0 0 bit Abbreviation for Binary Digit The smallest unit of information data quantity on a computer or printer Displays data usin...

Страница 356: ...ork environment DNS allows the user to access other computers over a network by specifying host names instead of difficult to memorize and under stand IP addresses DPI dpi Abbreviation for Dots Per Inch A resolution unit used by printers and scanners Indicates how many dots per inch are represented in an image The higher the value the higher the resolution Driver Software that works as a bridge be...

Страница 357: ...nternet Printing Protocol A protocol that sends and receives print data and controls printers over the Internet on a TCP IP network Data can also be sent to printers in remote areas to print over the Internet IPsec The security technology that is used with TCP IP A service with en hanced security can be provided by specifying the encryption of transmission packets and the authentication protocol I...

Страница 358: ...rom Windows or Unix to a printer over a network MAC address Abbreviation for Media Access Control address With a special ID number for each Ethernet card data can be sent and received be tween the cards A number consists of 48 bits The first 24 bits con sist of a special number for each manufacture controlling and assigning IEEE The last 24 bits consist of a number that the manu facturer assigns u...

Страница 359: ... smallest unit of an image POP Abbreviation for Post Office Protocol A protocol for retrieving e mail messages from a mail server Currently POP3 the third version of POP is most often used POP Before SMTP A user authentication method for sending e mail messages First the reception operation is performed and the user is authenticated by the POP server Then IP addresses where the user was success fu...

Страница 360: ...Message Block A protocol that shares files and printers over a network and which is mainly used by Microsoft Windows S MIME Abbreviation for Secure Multipurpose Internet Mail Extensions A protocol for adding features such as encryption and digital signa tures to MIME e mail operations With this standard public key encryption which uses a different key for encryption and decryption is used SMTP Abb...

Страница 361: ...USB Abbreviation for Universal Serial Bus A general interface standard for connecting a mouse printer and other devices to a computer Uninstall To delete software installed on a computer Web browser Software such as Internet Explorer and Netscape Navigator for view ing Web pages WINS Abbreviation for Windows Internet Naming Service A service for re calling named servers for the conversion of compu...

Страница 362: ...7 Index Chapter 7 Index ...

Страница 363: ...s list 2 100 Custom Display Settings 3 35 D Date Time 2 68 Default Address Book 3 39 Default Scan Fax Settings 3 44 Default Search Settings 4 70 Default Tab 3 35 Density 2 54 Destination Settings 2 96 Detail explanation x 16 Device Setting 4 108 Digital Signature 2 95 Direct input 2 25 2 36 2 42 DNS Domain 4 22 DNS Host 4 20 DNS Server Settings 4 23 Document Name 2 87 E E mail address 4 118 E Mail...

Страница 364: ...al 2 88 N NetWare Print Settings 4 40 NetWare Settings 4 39 Network connections 1 11 Network error message list 5 3 Network Settings 4 2 Note explanation x 16 Notification Item 4 120 Notification Schedule Setting 4 122 Novell NDS 4 12 NTLM v1 NTLM v2 4 10 NTP server address 4 111 O Open API Settings 3 61 Original Settings 2 45 2 88 Original Type 2 47 P Page Number 2 72 PC SMB 2 33 3 16 Peer 4 36 P...

Страница 365: ...ttings 4 92 SNMP v1 v2c Settings 4 94 SNMP v3 Settings 4 96 SSL 3 65 Stamp 2 76 Status Notification Setting 4 113 Subject 3 27 Support Information 4 49 T TCP Socket ASCII Mode 4 106 TCP Socket Settings 4 104 TCP IP Settings 4 17 Text entry 6 4 Time Adjustment Setting 4 110 Total Counter Notification Settings 4 121 TWAIN Lock Time 3 42 U URL Notification Setting 2 93 User Authentication Setting NDS...

Страница 366: ...Printing for Professionals Beyond the Ordinary Océ 100 Oakview Drive Trumbull CT 06611 www oceusa com Océ 2007 All Rights Reserved ...

Отзывы: