


Installation |
14
Mounting
1
The MES2 humidifier can be wall or floor mounted. No mounting holes are provided but can
be made anywhere in the base and sides of the cabinet at installation time.
2
Use a minimum of 2 x #8 screws mounted securely into structural surfaces.
3
Make sure the unit is level.
4
If enclosed plumbing option is installed then mounting screws can also be installed into the
plumbing enclosure.
5
It is the installer’s responsibility to insure that the humidifier is securely and safely mounted
in the air handler.
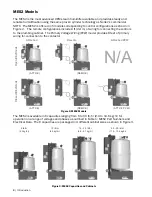
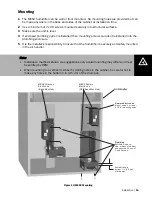
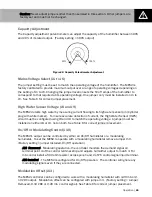
Figure 10: MES2 Mounting
Note:
Installation methods shown are suggestions only actual mounting may differ and must
be verified by OEM.
When mounting to a vertical member by drilling holes in the cabinet, be careful not to
make any holes in the bottom 1 in (2.5 cm) of the drain pan.
MES2 Attached
Electronics
(Back Mounted)
MES2 Remote
Electronics
(Side/Base Mounted)
Air Handler
Plumbing
Drill holes in back,
side, or base of cabinet
and secure with min. of
2 x #8 Screws.
Remote Electronics
Mount using 4 screws i
0.19 in. mounting holes
Avoid drilling in
bottom 1 in (2.5 cm)
of drain pan.
Содержание MES2
Страница 41: ...Maintenance and Servicing 38 ...
Страница 49: ...Spare Parts 46 Exploded View and Spare Parts List ...
Страница 50: ...47 Spare Parts MES2 Spare Parts Figure 28 MES2 Spare Parts 1 10 9 7 2 11 13 5 14 15 3 4 6 17 12 8 16 ...
Страница 52: ...49 Warranty ...