Norsup 7028005 Скачать руководство пользователя страница 15

28

29

Alterations which serve the technological progress as well as errors excepted!


ORIGINAL MANUAL 

NORSUP

WWW.NORSUP.EU 

Alterations which serve the technological progress as well as errors excepted!

CONTROLLER & LOW SALT ELECTROLYSE UNIT TYPE NORSUPONE

CONTROLLER & LOW SALT ELECTROLYSE UNIT TYPE NORSUPONE

EN

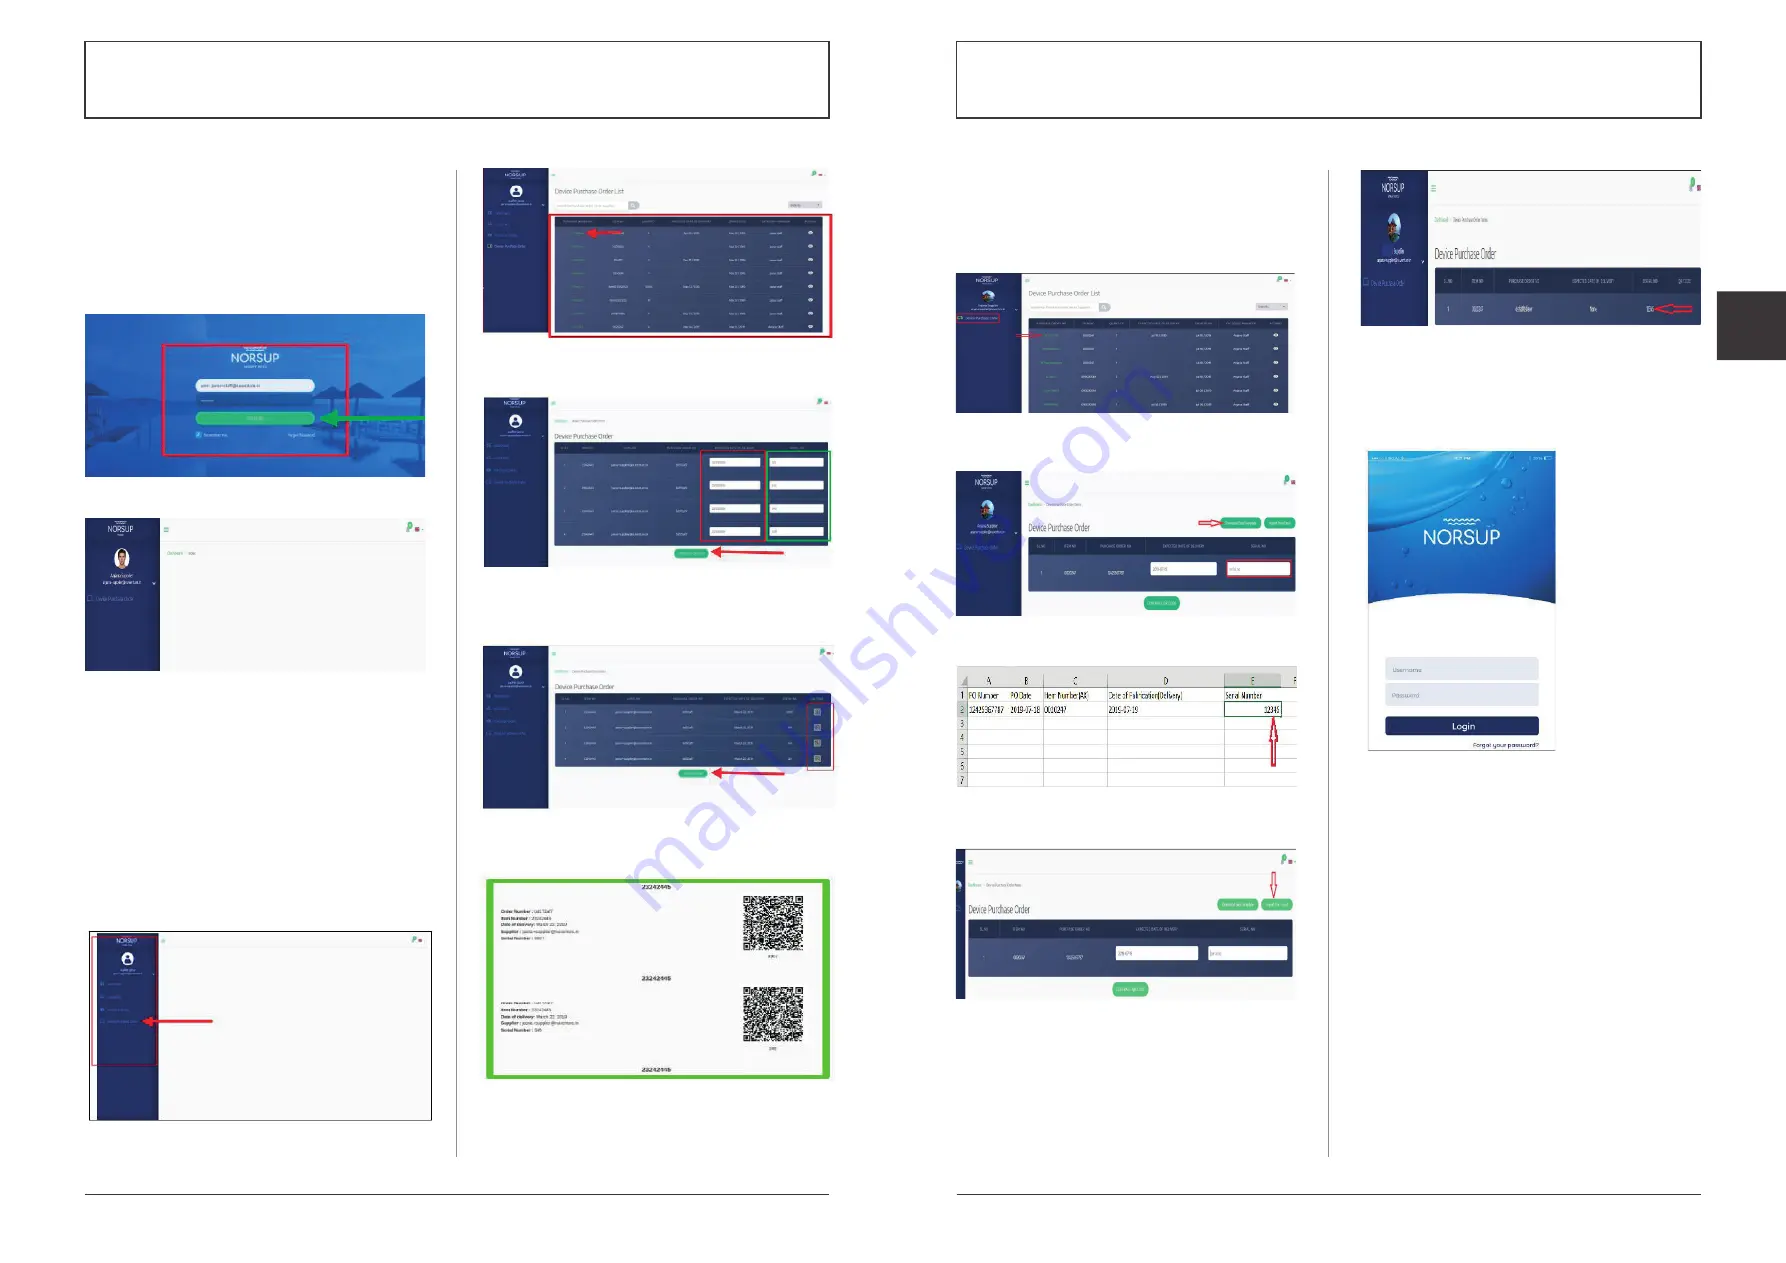
D.4  SUPPLIER SIGN IN

Once the purchase order has been sent to the 

supplier, he will get the purchase order request on 

Email and as notification on ‘Device Purchase Order’ 

option. For seeing the request on the page supplier 

should: (To invite supplier refer B.3)

•  Login to supplier account with his username and 

password

•  Supplier account will be opened

Fig. 85: supplier login page

Fig. 86: shows the supplier account menu

D.4.1  GENERATE QR CODE

•  Click on ‘Device Purchase Order’ option at the 

bottom left, Device purchaseorder list will be shown

•  Click on the ‘Purchase order number’ in which the 

supplier wants to generatethe QR code

•  List of items (will be equal to the quantity ordered) 

will be shown

•  The supplier can enter the ‘Expected date of delivery’ 

and ‘serial number’ ofeach item (the serial number 

for each item should be different)

•  Then click on ‘Generate QR code’ option. QR codes 

will be generated for eachitem

•  To take print click on ‘Print QR code’ option  

Fig. 87: Shows Device purchase order option

Fig. 88:  Shows Device purchase order list and 

purchase order number

Fig. 89:  Shows fields for entering the expected date  

of delivery, serial number of the items and the 

option for generate QR code

Fig. 90:  Shows the generated QR codes and option for 

Print QR code

Fig. 91: shows the print form of QR code of items

The supplier will send the product after sticking the 

QR code on the items.

D.4.2 DOWNLOAD EXCEL TEMPLATE

• Select the Purchase Order Number

• Click on Download Excel Template option

• Enter the Serial number on the given field, Save it

• Click on Import from Excel option, select the file

• The serial number will be displayed on the list

Fig. 92:  Shows the Device Purchase Order option and 

purchase order number

Fig. 93: Shows the Download Excel Template

Fig. 94:  Shows the Excel template and the field to 

enter the serial number

Fig. 95: Shows the Import from Excel option 

Fig. 96: Shows the Serial number

D.5  CUSTOMER LOGIN

Customer or installer on behalf of customer can add 

the bill details and other information to get the 

warranty information. (To invite customer, refer B.4)

• Log into account with the user id and password.

Fig. 97: shows the customer login page

D.5.1  TO ADD PRODUCTS BY A CUSTOMER

•  Log into the application and go the navigation drawer

•  Tap on the Products option

•  Tap on the Add icon at the right bottom of the page, 

add product page will bedisplayed

•  Product page has an option to Scan the QR or Bar 

code and a field to enter the serialnumber, choose one

If you choose to Scan

•  Tap on the Scan option and scan the QR code or Bar code

•  List of products will be shown, select the product

•  Choose your device, the image and serial number of 

the product will be displayed

•  Tap on the Save option, the product will be added 

and it will be shown in the Productspage

•  Tap on Upload Bill copy option, a page with product 

image will be displayed

•  Tap on the Add purchase bill option at the bottom of 

the page

•  To produce the bill of the product, either use the 

camera option or upload the bill from the device

•  Enter the Purchase date and then tap on the Add 

option, the bill will be added and the warranty of 

the product will be shown

Содержание 7028005

Страница 1: ...CONTROLLER LOW SALT ELECTROLYSE UNIT TYPE NORSUPONE ORIGINAL MANUAL Item nr 7028001 7028005 ...

Страница 2: ...ms of use 53 F 7 1 Object 53 F 7 2 The instructions 53 F 7 3 Updates 54 F 7 4 Sensors 54 F 7 5 Garanties 54 F 7 6 Nomadic mode 54 F 7 7 Intellectual property 54 F 7 7 Personal data 54 F 7 8 Archiving proof 54 F 7 9 User acceptance 55 F 7 10 Litigation 55 A HARDWARE INFORMATION 4 1 GENERAL INFORMATION 4 A 1 1 Overview 4 A 1 2 Warnings 4 2 INSTALLATION 5 A 2 1 Description 5 A 2 2 Control box 5 A 2 3...

Страница 3: ...an equipotential bonding to the hydraulic circuit before filtration in series with the earth intended for the devices If in doubt contact your service representative or your licensed electrician The mobile application of NorsupOne will enable the installer and the customer to control devices and sensors using IoT Flowers via IoT Flowers cloud service and the web application enables the installer t...

Страница 4: ...ting process Fig 8 Shows the Back arrow A 2 4 4 CONNECTION OF VARIABLE SPEED PUMP The ports 13 to 15 of controller refer figure 10 corresponds to speed 1 2 and 3 of variable speed pump and must be linked to the relay box to any of the 8 ports the power wire which is port 16 Fig 9 Connecting wires of Variable speed pump Fig 10 Variable speed pump connection to relay board Bridge the red on the 3 NC...

Страница 5: ...n in the below diagram A 2 4 6 CONNECTION OF POOL LAMP Connect two cables of light into NO and COM ports of relay box as shown in the image below And connect the corresponding communication cable from relay box to control box port number 12 Fig 14 Connection of Pool Lamp to the Relay box A 2 5 CONNECTING CONTROL BOX AND RELAY BOX Fig 15 Connection between Control box and Relay box Fig 16 Control b...

Страница 6: ...roup and staff has authority to invite the Installer and the Supplier Installer is the person who invites the Customer B 1 TO INVITE STAFF The Megagroup admin can invite the Staff Click on the Customer option choose Staffs Click on Invite Staff and enter the staff s email address Click on Invite B 2 TO INVITE INSTALLER The installers will be added in the AX and all the installers have an AX id The...

Страница 7: ...invite the customer by entering their email id on the respective field Installer can use both mobile and web application to invite the customers B 3 TO INVITE SUPPLIER The staff can invite the supplier by entering their email id and shop id on the respective field Fig 25 Shows the Supplier option Fig 28 Shows the steps of inviting a customer Fig 26 Shows the Invite Supplier option Fig 29 Shows the...

Страница 8: ...st of customers will be shown On tapping the customer name the details of the controllers products etc added under the customer will be displayed Fig 34 Shows the customer list and page come under a customer C 3 1 TO ADD CONTROLLERS UNDER A CUSTOMER IN INSTALLER LOGIN The installer can add controllers and products under a specific customer To add controller or products Select the customer under wh...

Страница 9: ... will be displayed when you tap on the controller To view the controller details Select the customer whose controller details you would like to view Choose the controller you want to see The sensors and devices added under the controller will be displayed Fig 36 Shows the steps to view the devices and sensors under a customer C 4 CRITICAL ALARMS If the devices show any abnormality in its functioni...

Страница 10: ...riable speed pump and Salt Chlorinator are the available devices Customer can add the devices by following the given steps Choose Smart Pool from the navigation drawer new page will be opened Tap on the add icon two options Devices and Sensors will be shown Choose Devices option list of devices will be displayed select the one that you would like to add C 7 1 TO ADD SMART LIGHT Tap on the add icon...

Страница 11: ...devices option Connect variable speed pump to port 13 C 7 6 CONTROLLING THE VARIABLE SPEED PUMP Fig 59 Shows the controlling options of Variable Speed Pump C 7 7 TO ADD SALT CHLORINATOR You can follow the same procedure as in smart light Refer C 7 1 to add Salt Chlorinator Choose Salt Chlorinator after taping on the devices option Connect Salt Chlorinator to port 17 The salt chlorinator should be ...

Страница 12: ...The customer can add sensors under a controller Temperature sensor PH electrode ORP sensor and EC electrode are the available sensors To add sensors follow the given steps Choose Smart Pool from the navigation drawer new page will be opened Tap on the add icon two options Devices and Sensors will be shown Choose Sensors option list of devices will be displayed select the one that you would like to...

Страница 13: ...Fi SSID and Password swimo000 then tap on Reset option at the bottom Restart the controller power off and power on then tap on next option Connect your phone with home Wi Fi network then tap next Refer steps in C 3 1 TO ADD CONTROLLERS UNDER A CUSTOMER C 7 11 TO ADD PH ELECTRODE Follow the same steps as in adding temperature sensor Refer C 7 10 Choose pH electrode option from the sensors list Conn...

Страница 14: ...ge will be opened Fig 76 shows sign in option D 3 1 ADD DEVICE PURCHASE ORDER Staff creates new purchase order based on the requirement from the installer To add order Click on Device purchase order at the bottom left of the page the list will be displayed Click on add device purchase order On the top right of the screen New box will be opened asking the details like select supplier item number qu...

Страница 15: ...upplier will send the product after sticking the QR code on the items D 4 2 DOWNLOAD EXCEL TEMPLATE Select the Purchase Order Number Click on Download Excel Template option Enter the Serial number on the given field Save it Click on Import from Excel option select the file The serial number will be displayed on the list Fig 92 Shows the Device Purchase Order option and purchase order number Fig 93...

Страница 16: ...he update is successful Device updated success fully message will be shown at the top of the page The bill will be added and on clicking the eye icon Warranty details will be displayed Fig 100 shows the device option Fig 101 shows the device list and the eye icon Fig 102 shows the details of order and add bill option Fig 103 showschoosefileoptionandupdatedeviceoption Fig 104 shows the Updation suc...

Страница 17: ...ASHBOARD On the dashboard the staff can view all the details come under him Fig 107 Shows the details in the Dashboard E 3 2 TO ADD PRODUCTS Only the Staff can add products and all the products will be automatically fetched from the AX system NS All the products will be automatically fetched from the AX system From Home page click on Products Click Add Product button Enter the details in Add Produ...

Страница 18: ...he home page click on drop down arrow given near to the customer option Choose the Staff option staff list will be displayed Fig 123 Shows the Customers option Fig 124 Shows the Staff option Fig 125 Shows the Staff list E 3 8 TO VIEW THE SUBSCRIPTION From Home page click on Subscriptions The Subscription list will be displayed Fig 126 Shows the Subscription option Fig 127 Shows the Subscription li...

Страница 19: ...t the right top of the list Add Device Purchase Order option has been given click on that Enter the details on the given field Click on Send option Fig 139 Shows the Device Purchase order option Fig 140 Shows the Add Device Purchase order option Fig 141 Shows the field to enter the details and the Send option Fig 142 Shows the Device option Fig 143 Shows the Device list E 4 INSTALLER LOGIN The ins...

Страница 20: ...S FROM CUSTOMERS Click on the Purchase order option Choose Orders from Customers Fig 153 Shows the Purchase Order option Fig 154 Shows the Orders from customers option Fig 155 Shows the Orders from customers E 4 6 2 ORDERS TO CUSTOMERS Click on the Purchase order option Choose Orders to customers Fig 156 Shows the Purchase Order option Fig 157 Shows the Orders to Megagroup option Fig 158 Shows the...

Страница 21: ...1 CUSTOMER DASHBOARD Customer can view the order details on the dashboard Fig 169 Shows the dashboard option Fig 170 Shows the dashboard E 5 2 TO VIEW POOLS LIST From the home page click on the Pools option the pools list will be displayed Fig 171 Shows the Pools option Fig 172 Shows the Pools list E 5 3 TO ADD POOL From the home page click on the Pools option Click on Add pool option at the top r...

Страница 22: ...ows the confirmation message E 5 4 TO ADD SUBSCRIPTION Once the pool has been added the customer can add the subscription for the pool From the home page click on the Subscription option Click on the Add subscription option at the right top of the page Enter the subscription details On Choosing the End Month a Subscription table will be displayed with Products Details From the Subscription table c...

Страница 23: ...ck on the Subscription option Delete icon has given with every subscription click on that subscription will be cancelled Fig 199 Shows the Subscription option Fig 200 Shows the Delete icon E 5 5 TO SHOP From the home page click on the Shop option Product list will be displayed Click on Add to cart option Click on View in cart option product image and price will be shown Click on Proceed to checkou...

Страница 24: ...r Password Need to set a password before login in through App E 6 1 TO ADD POOL Log into the application and go to the navigation drawer Tap on the Store option pool subscription shop and orders will be displayed Tap on the Pools option on the dashboard Tap on the add icon at the right bottom of the screen Enter the pool details and tap on Done the pool will be added Fig 213 Shows the mobile app l...

Страница 25: ...D SUBSCRIPTION Tap on the Subscriptions option on the dashboard Tap on the add icon at the right bottom of the screen Enter the subscription details and tap on ADD the subscription will be added Fig 226 Shows the Subscription option Fig 227 Shows the Add icon Fig 228 Shows the field to enter the details and the Add option E 6 5 TO EDIT SUBSCRIPTION Tap on the Subscriptions option on the dashboard ...

Страница 26: ...Fig 234 Shows the Subscription option Fig 235 Shows the Subscription list Fig 236 Shows the Unsubscribe option E 6 7 TO SHOP Choose Shop from the dashboard the chemical list will be displayed choose the chemical Tap on the Checkout option Confirmation pop up will be displayed choose Checkout Select the shipping address Confirm shipping by tap on the Checkout option Select the payment mode and tap ...

Страница 27: ...re you have a temperature sensor connected to the hydraulic circuit and that your PH and RX calibrations are correct If you have any disturbances that are not reported here contact your customer service who will be able to advise you F 6 5 LEDS MOTHER BOARD SWITCH OFF In the event of an overvoltage the 2 Ampere PF1 protection fuse ensures the durability of the motherboard In the event that the car...

Страница 28: ...hin 48 hours of a new circuit Any movement by the supplier or its distributor to make the replacement will be billed at the hourly rate in effect on the day of the intervention Any failure occurring on a circuit for whatever reason cannot claim any compensation If necessary the supplier can send a replacement circuit on simple request to save time and notify of its warranty later on simple written...

Страница 29: ...Powered by Norsup installer brochure 2019 2020 v2 ...

Отзывы: