24
25
Alterations which serve the technological progress as well as errors excepted!
ORIGINAL MANUAL
NORSUP
WWW.NORSUP.EU
Alterations which serve the technological progress as well as errors excepted!
CONTROLLER & LOW SALT ELECTROLYSE UNIT TYPE NORSUPONE
CONTROLLER & LOW SALT ELECTROLYSE UNIT TYPE NORSUPONE
EN
C.8 ALARMS
If there is any misfunctioning in the devices the
customer will get an alarm as push notification. To
view the details of alarm, tap on the notification.
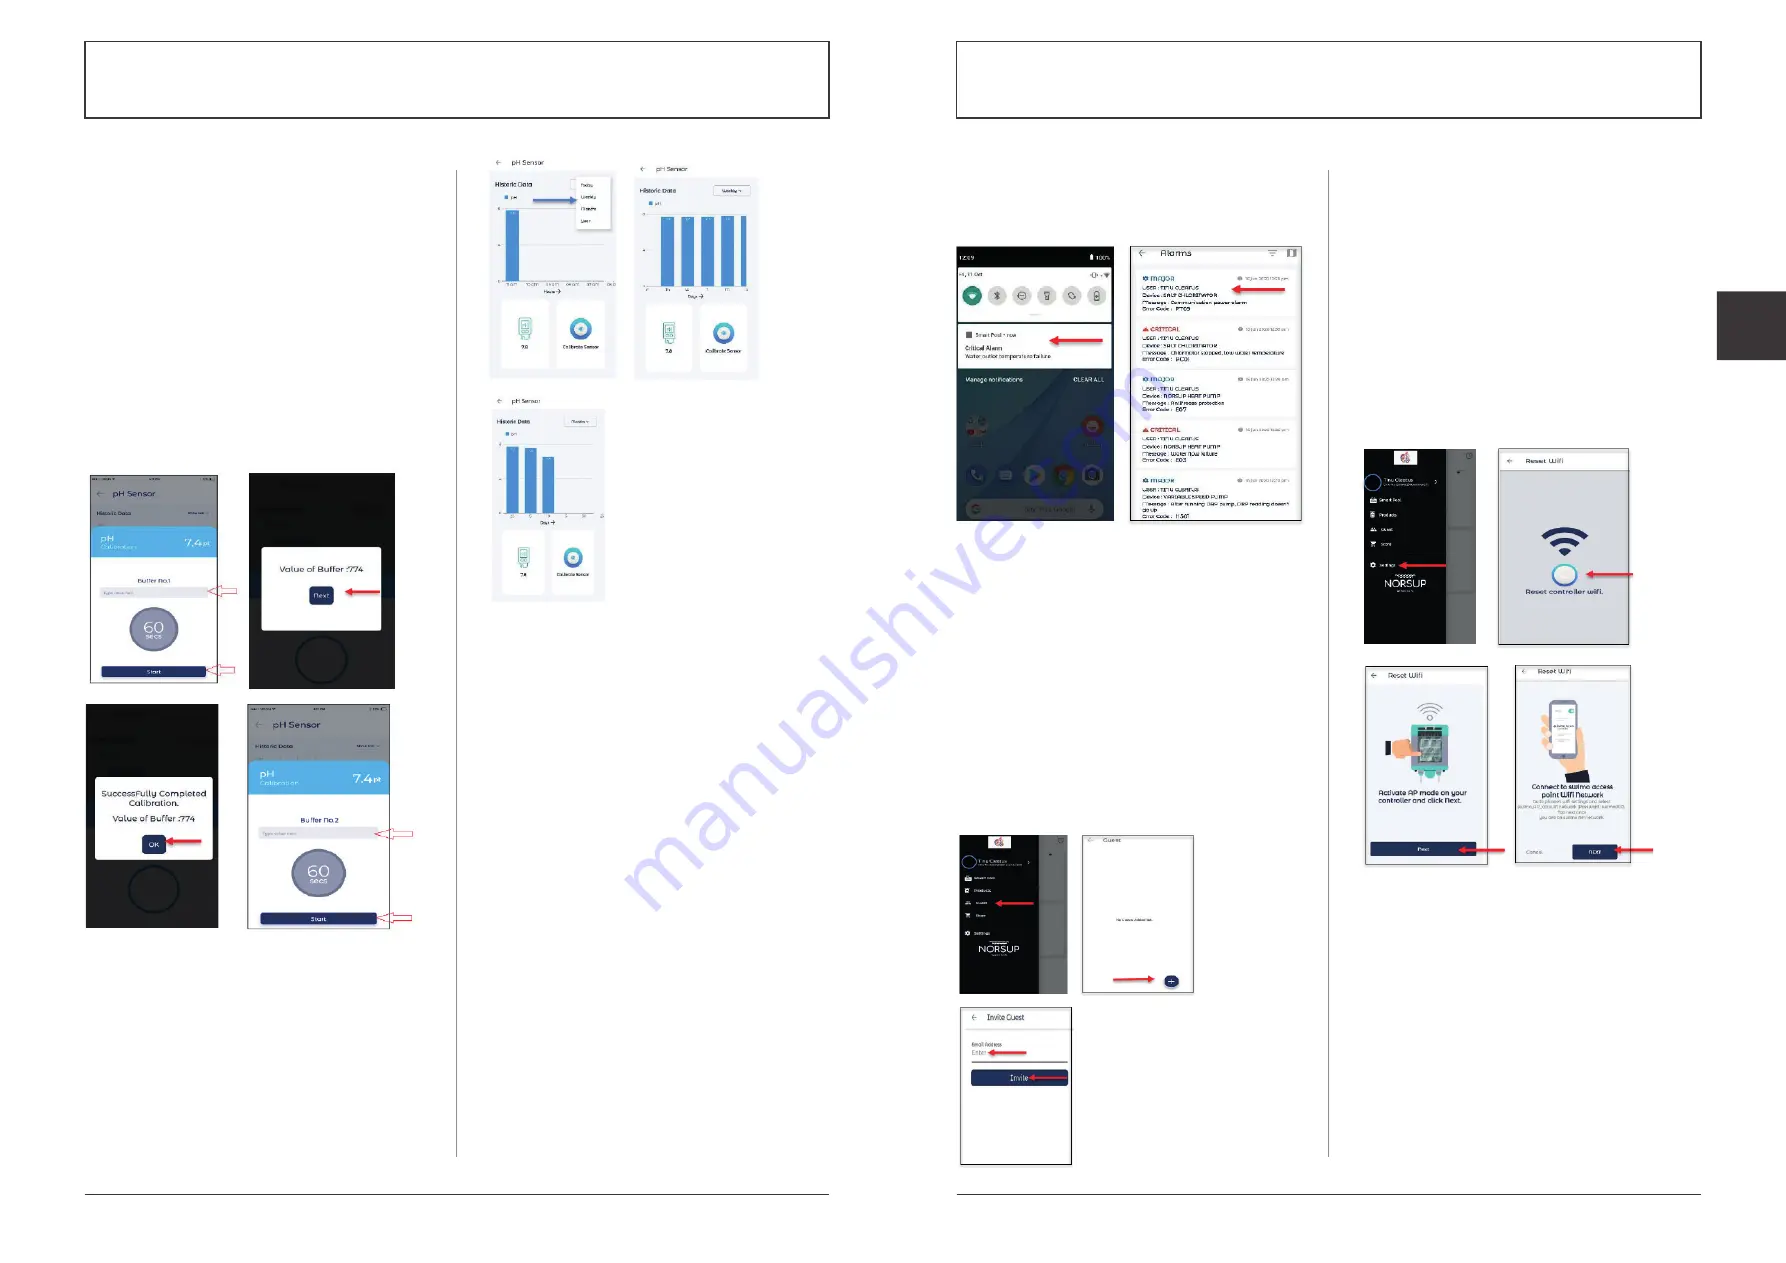
Fig. 71: Shows the steps to view the alarm details
To filter the alarm list, you can follow the same steps
as in installer, please refer C.4.2
C.9 TO INVITE GUEST
The customer can invite a guest to add and control
the devices and sensors in his absence. The guest also
has access to view the products but he/she cannot
add or delete the controller or products.
To invite a guest, follow the given steps:
• Go to navigation drawer
• Select the Guest option, a blank page will be opened
along with a Add icon
• Tap on the add icon, then enter the email address of
the guest and tap on the Invite option
• The guest can fill the profile details by log into the
link sent to their email id
C.10 RESET WI-FI
The customer can reset the Wi-Fi password by,
• Go to navigation drawer, select settings
• Tap on the Reset controller Wi-Fi button
• Activate AP mode on your controller and click next
• Connect to swimo access point Wi-Fi network on
your mobile phone, then tap on next option
• Enter the Wi-Fi SSID and Password (swimo000),
then tap on Reset option at the bottom
• Restart the controller (power off and power on)
then tap on next option
• Connect your phone with home Wi-Fi network,
then tap next
(Refer steps in C.3.1 TO ADD CONTROLLERS
UNDER A CUSTOMER)
C.7.11 TO ADD PH ELECTRODE
Follow the same steps as in adding temperature
sensor (Refer C.7.10). Choose pH electrode option from
the sensors list. (Connect pH electrode to port: 1).
C.7.12 TO CALIBRATE THE PH SENSOR
To calibrate the pH sensor:
• Tap on the pH sensor, a new screen will be opened
• At the bottom Calibrate sensor option has been
given, tap on that, a popup screen will be shown
• Enter the value of Buffer no.1 on the given field, then
tap on the Start option at the bottom. It takes 60
seconds to complete it
• Then enter the value of the Buffer no.2 and tap on
the Start option
• A popup showing the Calibration completed
message will be displayed, tap on the Ok option to
complete the calibration
Fig. 69: Shows the calibration process of pH sensor
C.7.13 TO ADD ORP/EC ELECTRODE
You can follow the same steps as in adding temperature
sensor (Refer C.7.10) to add an ORP electrode. Choose
the ORP sensor from the sensors list to add the same
(connect your ORP electrode to port:2)
C.7.14 TO CALIBRATE THE ORP/EC SENSOR
Tap on the ORP sensor in the dashboard, new screen
with Calibrate Sensor option will be displayed. You can
follow the same steps as in the pH sensor calibration
(Refer C.7.11) for ORP calibration. In ORP calibration
you need to enter only one buffer value.
Fig. 70: Shows
the Historic data
of pH sensor
Fig. 72: Shows the
steps to invite a guest
Fig. 73:
Shows the
process to
reset wi-fi


