background image

RV Series Automated Dispensing Systems

110

www.nordsonefd.com   [email protected]

   +1-401-431-7000    Sales and service of Nordson EFD dispensing systems are available worldwide.

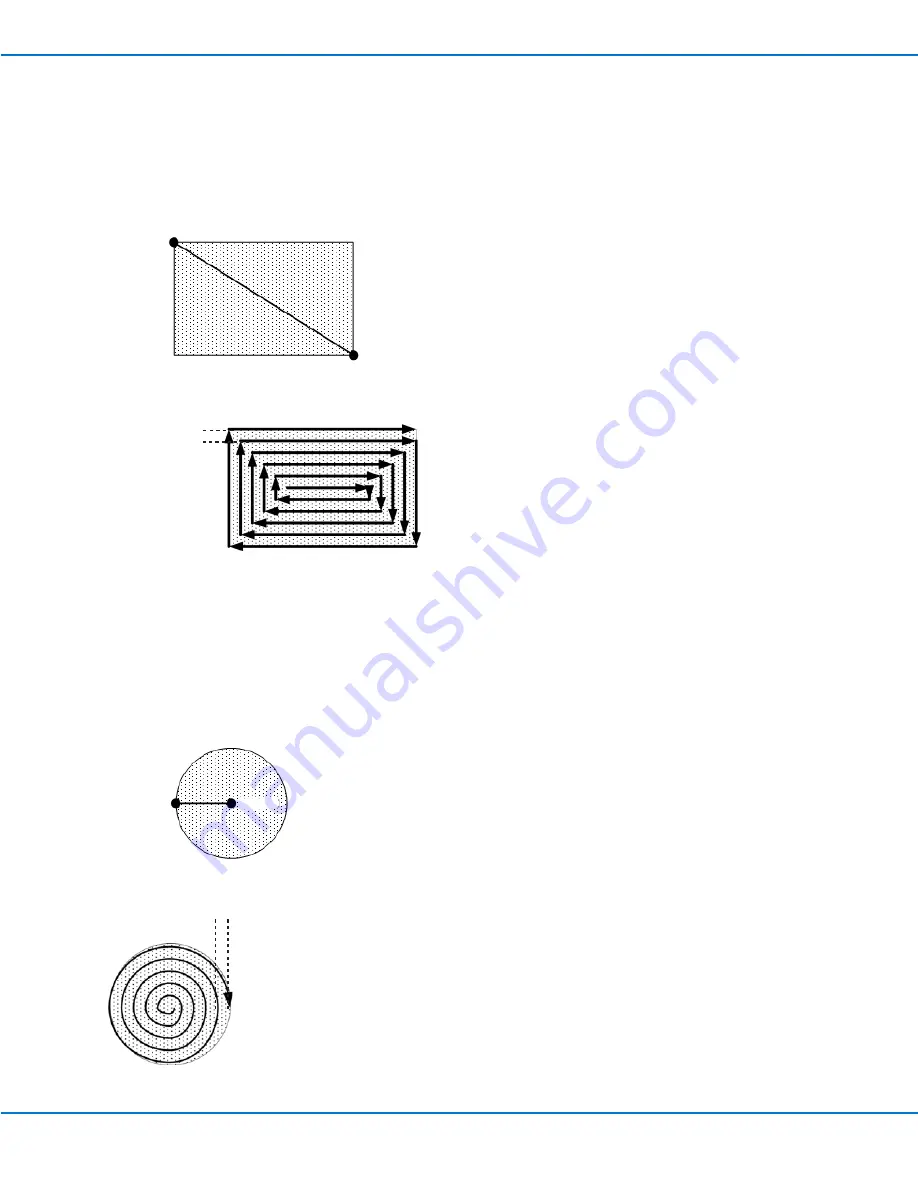
Fill Area: 6. Rectangle (Inner to Outer)

This command fills the defined area by moving the tip along a square, spiral-shaped path from the center of the rectangle to the 
outside edge. After entering a Fill Area Rectangle command, enter a Line Start point at the top left corner of the area to be filled 
and a Line End point at the bottom right corner of that area.

Line Start

Line End

Fill Area

EXAMPLE:

 If a Width of 5 mm is entered, the tip makes the following path:

Width = 5 mm

Fill Area: 7. Circle (Inner to Outer)

This command fills the defined area by moving the tip along a spiral path from the center of the circle to the outside edge. After 
entering a Fill Area Circle command, jog the tip to a point on the center of the circle to be filled and enter that location as a Line 
Start point. Then jog the tip directly across to the outside of the circle and enter that location as a Line End point.

Line End

Line Start

Fill Area

EXAMPLE:

 If a Width of 5 mm is entered, the tip makes the following path:

Width = 5 mm

Appendix A, Command Function Reference 

(continued)

Содержание R3V

Страница 1: ...RV Series Automated Dispensing Systems Operating Manual Electronic pdf files of Nordson EFD manuals are also available at www nordsonefd com ...

Страница 2: ...on more than 50 years of industrial dispensing experience Most questions you will have are answered in this manual However if you need assistance please do not hesitate to contact EFD or your authorized EFD distributor Detailed contact information is provided on the last page of this document The Nordson EFD Pledge Thank You You have just purchased the world s finest precision dispensing equipment...

Страница 3: ...tification 14 RV Front Panel 15 RV Back Panel 15 Camera 16 Installation 17 Unpack the System Components 17 Position the Robot and Install and Connect Components 18 Prepare the Work Surface or Fixture Plate 20 Connect Inputs Outputs Optional 20 Power On the System 21 Concepts 22 About Programs and Commands 22 About Offsets 23 About Marks 24 Overview of the DispenseMotion Software 25 Command Windows...

Страница 4: ...n a Program 65 How to Add Comments to a Program 66 How to Lock or Unlock a Program 67 How to Measure a Path or Circle on a Workpiece 67 How to Create Patterns 68 Dispense Dot Sample Program 68 Lines and Arcs Sample Program 68 Circle Sample Program 69 How to Use the Example Icon 69 How to Dispense on Multiple Workpieces in an Array 70 How to Disable Dispensing for Specific Workpieces in an Array 71...

Страница 5: ...workpiece They are specifically designed and configured for use with Nordson EFD industrial syringe barrel and valve systems Automated dispensing systems offer the flexibility of working either as a stand alone system or as a key part of an automated solution and are easily integrated into in line transfer systems rotary tables and pallet assembly lines The primary components of an automated dispe...

Страница 6: ...CK Risk of electric shock Disconnect power before removing covers and or disconnect lock out and tag switches before servicing electrical equipment If you receive even a slight electrical shock shut down all equipment immediately Do not restart the equipment until the problem has been identified and corrected MAXIMUM AIR PRESSURE Unless otherwise noted in the product manual the maximum air input p...

Страница 7: ...ng or servicing high pressure equipment A jet of high pressure fluid can cut like a knife and cause serious bodily injury amputation or death Fluids penetrating the skin can also cause toxic poisoning WARNING Any injury caused by high pressure liquid can be serious If you are injured or even suspect an injury Go to an emergency room immediately Tell the doctor that you suspect an injection injury ...

Страница 8: ...d Do not operate equipment unless safety guards doors and covers are intact and automatic interlocks are operating properly Do not bypass or disarm any safety devices Keep clear of moving equipment Before adjusting or servicing moving equipment shut off the power supply and wait until the equipment comes to a complete stop Lock out power and secure the equipment to prevent unexpected movement Make...

Страница 9: ...nnect switch first to prevent sparking Know where emergency stop buttons shutoff valves and fire extinguishers are located Preventive Maintenance As part of maintaining continuous trouble free use of this product Nordson EFD recommends the following simple preventive maintenance checks Periodically inspect tube to fitting connections for proper fit Secure as necessary Check tubing for cracks and c...

Страница 10: ...ocal regulations after one time use Do not clean components with strong solvents MEK acetone THF etc Clean cartridge retainer systems and barrel loaders with mild detergents only To prevent fluid waste use Nordson EFD SmoothFlow pistons Action in the Event of a Malfunction If a system or any equipment in a system malfunctions shut off the system immediately and perform the following steps 1 Discon...

Страница 11: ...robot in a location where it is exposed to the following Temperatures lower or higher than 0 40 C 50 104 F or humidity lower or higher than 20 95 Direct sunlight Electrical noise Flammable or corrosive gases Dust or iron powder Sources of splashing water oil or chemicals Radioactive materials magnetic fields or vacuum rooms Power and Grounding Connect the robot and accessories to a properly ground...

Страница 12: ...icro stepping motor 3 phase micro stepping motor Memory capacity PC storage PC storage PC storage Data storage PC storage USB PC storage USB PC storage USB General purpose I O 8 inputs 8 outputs 16 16 optional 8 inputs 8 outputs 16 16 optional 8 inputs 8 outputs 16 16 optional Drive method PTP and CP PTP and CP PTP and CP Dispensing controller External External External Input AC to power supply 10...

Страница 13: ... 0 0 0 O 表示该产品所含有的危险成分或有害物质含量依照EIP A EIP B EIP C 的标准低于SJ T11363 2006 限定要求 Indicates that this toxic or hazardous substance contained in all the homogeneous materials for this part according to EIP A EIP B EIP C is below the limit requirement in SJ T11363 2006 X 表示该产品所含有的危险成分或有害物质含量依照EIP A EIP B EIP C 的标准高于SJ T11363 2006 限定要求 Indicates that this toxic or hazardous substance contained in all the hom...

Страница 14: ...ing systems are available worldwide Monitor and keyboard mouse not shown Robot DispenseMotion controller Syringe barrel for fluid dispensing Fixture plate optional Tip detector optional Operating Features RV Series System Component Identification CCD camera fixed mount camera shown R Series accessory bracket X axis Z axis Y axis R axis ...

Страница 15: ... RV Back Panel Operating Features continued Dispenser port for dispenser controller initiation Power Switch RS232 1 port Ext Control port for the I O safety plug Power Inlet Tactile port for the tip detection device if present EMERGENCY STOP button START button DISPENSER PURGE button SVC USB port for software upgrades RV Front Panel I O Port for input output connections ...

Страница 16: ...l Converts the analog camera image pixels to digital values for extremely precise image management Use the two adjustable dials The upper dial adjusts the exposure how much light is allowed into the image The lower dial focuses the image The default focus height is zero 0 Fixed focal length Variety of lenses available for different focal lengths fields of view etc R Mount CCD Camera Features How t...

Страница 17: ...1 Remove all system components and ship with items from the packaging 2 With assistance carefully lift the robot by its base and transfer it to a stable workbench Never lift the robot by its cross member NOTE All units are shipped from the factory with foam protectors that secure the worktable to the X axis and the Z axis to prevent movement and damage during shipment Nordson EFD recommends retain...

Страница 18: ... Applicability Item Components to Install or Connect Installation Tasks All models Input output safety plug SHORTED Connect the input output safety plug to the Ext Control port to bypass the door switch CAUTION Install this plug only if you want to bypass the door switch When this plug is installed the customer assumes all safety liability All models DispenseMotion controller Mount the DispenseMot...

Страница 19: ...use not shown dongle for wireless keyboard and mouse Connect the monitor Connect the wireless keyboard and mouse dongle to USB 4 on the DispenseMotion controller All models Dispenser components As applicable Mount the syringe barrel or dispensing valve holder as applicable on the Z axis choose mounting holes that allow a maximum workpiece clearance but also allow the dispensing tip to reach all ar...

Страница 20: ...te part numbers A fixture plate mounting hole template is provided below Connect Inputs Outputs Optional All automated dispensing systems provide 8 standard inputs and 8 standard outputs Connect input output wiring to the I O PORT connection on the back of the robot For a wiring diagram refer to I O Port on page 96 There are several ways to use the system inputs outputs Refer to Setting Up Inputs ...

Страница 21: ... output safety plug is installed if applicable EMERGENCY STOP button on the front panel of the robot is not depressed 2 Switch on the DispenseMotion controller monitor and robot 3 Double click the DispenseMotion icon to open the dispensing software 4 Click HOME The robot moves the camera to the home position 0 0 0 and the system is ready 5 Enable the dispensing system including the valve controlle...

Страница 22: ...n a dispense command is registered for that location This action is repeated until the desired dispensing pattern is complete Several examples are provided below Setup commands dictate how dispense commands will be executed Nordson EFD recommends inserting setup commands at the beginning of a program The following setup commands are the most commonly used Backtrack Setup Dispense Dot Setup Dispens...

Страница 23: ...ight that occur when a dispensing tip or nozzle is changed Offsets are taught to the robot during the setup and calibration process which is guided by the Robot Initial Setup wizard This process must be performed for initial startup and also after any change to the system Examples of system changes include the following Any time a component installed on the Z axis such as the syringe barrel or cam...

Страница 24: ...nseMotion controller Best Practices For Selecting a Mark Image The selection should be on the actual workpiece not on the fixture plate because it is the workpiece position that the system adjusts to The selection should be unique There should be only one selection of its kind within the camera view For example don t choose one of many small circles that are within the camera view Sharp features a...

Страница 25: ...g on page 62 The software opens at the Program screen Refer to Navigation and Jogging Window on page 34 Refer to Horizontal and Vertical Toolbar Icons on page 32 Refer to Setup and Dispense Command Icons on page 33 Refer to Secondary View Screen on page 30 Refer to System Setup Screen on page 36 Refer to Camera Screen Tab Bar and Icons on page 37 Refer to Primary View Screen and Tab Bar on page 27...

Страница 26: ...the window for that command Each command window contains the parameters if any that can be set for the command Refer to Appendix A Command Function Reference on page 98 for detailed information on all commands and associated parameters Command window Enter parameters for the command in this window Refer to Appendix A Command Function Reference on page 98 for detailed information on all commands Co...

Страница 27: ...information Needle XY Adjust Automatically checks and adjusts the XY offsets without touching the tip to any surface This button is present only when Needle XY Adjust is enabled on the System Setup screen The system must be properly setup as described under Setting Up and Calibrating the System Required on page 45 Needle Z Detect Automatically checks and adjusts the tip to workpiece offset Z clear...

Страница 28: ...the edit window for the selected command Paste Pastes a cut or copied command into the selected command address Change Command Type Changes the selected command to a different command type Jump To Jumps to a specific Address command or Label command Reflect Flips the selected commands along the X or Y axis thus creating a mirror image An example is provided below 4th Axis Follow Convert Rotates a ...

Страница 29: ...rimary View Screen Right Click Functions continued Parameter Description Initial Angle Sets the angle you to change to Add Point When selected adds a Line Passing command to the program so that tip rotates to the desired angle before continuing with dispensing Reverse to 0 Degree When selected overrides the settings and sets all R values to degree 0 3 The system rotates the selected pattern How to...

Страница 30: ... a visual representation of the programmed pattern and the Path mode icons Refer to Horizontal and Vertical Toolbar Icons on page 32 for an explanation of the icons Refer to Secondary View Screen in Path View on page 31 for additional path view functionality When the Path icon is toggled OFF When the Path icon is toggled OFF shows an actual view of the fixture plate or workpiece surface as seen by...

Страница 31: ...oint and connects the previous command with the next command Optimize Path Opens a path for editing Select Line Path Start and Line Path End to edit the Line Start and Line End points of the pattern Select Arc Path Start and Arc Path End to edit the beginning and end points of an Arc point Select Line Selects entire pattern Reassignment Start Point Reassigns the Line Start point to the selected po...

Страница 32: ...sh Path mode only Refreshes the Secondary View screen See all Path mode only Shows all the programed points on the Secondary View screen Magnify Path mode only Magnifies an area of the Secondary View screen Path Direction Path mode only Provides an arrow to show the direction in which the robot arm will move Move Moves the tip or camera to the XYZR location of a selected address if the address has...

Страница 33: ...Point Wait Point Registers the current location as a Wait Point Park Position Sends the robot to the park position Stop Point Registers the current location as a Stop Point Goto Address Skips to the specified address number in a program Goto Label Skips to the specified Label in a program Icon Name Icon Function Dispense Dot Registers the current location as a Dispense Dot point Line Start Registe...

Страница 34: ...d Relative Sets the origin relative to the coordinates of the workpiece Coordinates are displayed next to the button View 1 Both Views Icon Name Icon Function Jog button toggle Toggles the navigation and jogging window between view 1 and view 2 Fix rotate Used in tandem with the R and R buttons When checked In CCD Mode the camera rotates around a fixed point In Tip Mode the tip rotates around a fi...

Страница 35: ...pecific location do not exceed the axis limits specified under System Setup Axis Limits especially for the Z axis Doing so can damage the robot or cause the tip to collide with the substrate How to Move the Tip to a Specific Location You can use the Move button in the jog window to move the tip to a specific set of coordinates Click Step Reference Image 1 In the jog window click MOVE The Move to P...

Страница 36: ...fer to Setting System Parameters on page 41 Tip Detect Device Used only as needed for manual calibration of the tip to workpiece offset in place of using the Robot Initial Setup wizard Refer to Appendix B Non Wizard Setup Procedures on page 124 Version Shows the current version of the software Auto Purge Refer to How to Set Up Auto Purge Program Cycle Limits or Fluid Working Life Limits on page 84...

Страница 37: ...s access to important setup fields related to the camera Refer to Camera Setup Screen on page 40 Lens Opens the Camera Properties window Refer to Camera Properties Window on page 38 for details Icon Name Icon Function Measure Length Measures the distance between two points Refer to How to Measure a Path or Circle on a Workpiece on page 67 Measure Circle Diameter Measures the diameter of a circle R...

Страница 38: ...actual luminance Pan Moves the visible image horizontally and vertically Shutter Adjusts the level of light entering the camera Red Changes the red levels of the camera image Blue Changes the blue levels of the camera image Gray image Changes the camera image to black and white mode Save Setting Saves the displayed Lens settings as a ccd file CCD parameter file Each ccd file can have its own uniqu...

Страница 39: ... typically lower than Gray High values Range 0 255 Gray High Adjusts the gray high tolerance value The lower the value the less white is tolerated in the image The higher the value the more white is tolerated in the image NOTE Gray High values are typically higher than Gray Low values Range 0 255 Dilation Displays how the image appears after the Dilation calculation Dilation First counter When Dil...

Страница 40: ...dow Section Function Match Affects how the camera searches for marks Refer to Setting How the System Finds Marks Optional on page 59 Offset Used only as needed for manual calibration of the tip to camera offset in place of using the Robot Initial Setup wizard Refer to Appendix B Non Wizard Setup Procedures on page 124 Keypad A numeric keypad appears when data entry fields are present Use the keypa...

Страница 41: ...Fields below for information on system level parameters 3 Click another tab to close the System Setup screen NOTE Settings are automatically saved except for the Model and Language selections Changes to these selections take effect after you EXIT and reopen the DispenseMotion software System Setup Screen Fields NOTE Default values may vary depending on the selected robot model Item Screen Capture ...

Страница 42: ...speeds can compromise accuracy and may disrupt system operation Offset Alarm Sets how much deviation the system allows for offsets The default settings are shown in the screen capture EXAMPLE If Offset Alarm is enabled and the result of an automatic offset performed by clicking Needle Z Detect or Needle XY Adjust is outside the XYZR values specified for Offset Alarm the system displays an alarm La...

Страница 43: ...pability Refer to Appendix D QR Code Scanning Setup on page 134 to set up QR code scanning Multi Needles To dispense using more than one dispenser up to four dispensers possible check this box Refer to Appendix E Multi Needle Setup and Use on page 137 to set up a multi dispenser system Height Sensor Not currently available Set Z to Focus Sets whether the system captures the current Z height value ...

Страница 44: ...ORD The system confirms and immediately implements the password change If a password was entered the system will prompt for the password before opening the System Setup screen If the Password field was blank no password will be required to open the System Setup screen Item Screen Capture Description Model drop down menu Sets the dispensing software configuration this setting must match the system ...

Страница 45: ...tem operation The Robot Initial Setup wizard guides you through the complete setup and calibration process This process must be performed at initial startup and also after any change to the system Examples of system changes include the following Any time a component installed on the Z axis such as the syringe barrel or camera is moved Any time a dispensing tip or nozzle is changed Setup and calibr...

Страница 46: ...lows tip to workpiece offset setup or tip height calibration without the need for the tip to physically touch the sensor Refer to Accessories on page 91 for the optional tip aligner part number Click Step Reference Image 1 Click SYSTEM SETUP OPEN EXPERT 2 11111111 Enter 11111111 then click OK 3 Click CONTROL 4 In the Expert window select R ALIGNER Click OK to save the setting then click OK again t...

Страница 47: ...Step Reference Image 1 Click SYSTEM SETUP OPEN EXPERT 2 11111111 Enter 11111111 then click OK 3 Click CONTROL 4 In the Expert window select 4 under AXIS AMOUNT 5 Click OK to save the setting The system automatically exits the software to allow the change to take effect 6 Continue to Setting Up the System Using the Robot Initial Setup Wizard on page 48 Setting Up and Calibrating the System Required...

Страница 48: ...e device Perform the actions on tabs 1 6 one at a time The actions are also provided in this manual for your reference as needed NOTE The wizard buttons change to the color blue when clicked All the wizard tabs include the following two buttons RESET THE 4 AXIS Click to restart the wizard from Step 1 using the default values RESET COLOR Click to return all selections on the tab to their default se...

Страница 49: ...cally until the tool centering calibration is done Click Step Reference Image 1 If your system does not include the optional tip detector aligner create a crosshair target and skip to step 4 on page 50 Crosshair target created with a removable note 2 If your system includes the tip detector aligner jog the tip until it is positioned about 2 mm above the following as applicable for your system see ...

Страница 50: ...ur system see below for examples The crosshair target you created The sensor on the optional tip detector The crosshairs on the optional tip alignment kit NOTE If present an image of the optional tip detector or tip aligner is shown Click SET next to step 3 5 Click ROTATE next to step 3 The tip rotates 180 6 Jog the tip to the same calibration point used in step 3 Click SET Continued on next page ...

Страница 51: ...es the tip to 5 mm above the point used for the tool centering calibration Needle to B Moves the tip to the point used for the tool centering calibration Needle to A Moves the tip to the test deposit location CCD to A Centers the camera over the test deposit location Reset the 4 Axis Resets the tool centering calibration calculation Click Step Reference Image 7 Click CALCULATE The system performs ...

Страница 52: ... fluid 4 Use the keypad to enter the following recommended dispense dot parameters ON TIME 0 5 DWELL TIME 0 2 5 Click FLUID to dispense a dot of fluid 6 Jog the tip until it is positioned about 2 mm above the dispense dot Click SET NEEDLE 7 Jog the camera until the camera crosshairs are centered over the dispense dot Focus the camera until the image of the dispense dot is clear Refer to Camera on ...

Страница 53: ...n the Mark Library to save the mark as a Mark No then click TEMPLATE when the Template Match window appears The system saves the image in the Mark Library NOTE Be sure to remember the Mark No 6 Click SETUP to go back to the Camera window Offset fields 7 Use the keypad to enter the Mark number in the Mark No field under XY Adjust Reference NOTES Make sure you click ENTER on the keypad to enter the ...

Страница 54: ...Scale window opens NOTE When the camera views an object it converts the pixels to a true measurement For the camera to make this conversion accurately you must teach the camera what the size of an object is in comparison to pixels per inch by setting the camera scale 5 Choose a point of reference on the workpiece and jog the camera so that the reference point is located in the lower right quadrant...

Страница 55: ...g the tip to a good reference point on the workpiece Jog the tip down until it is as close to the workpiece as possible without touching the surface 3 Using a feeler gauge set the desired distance between the bottom of the tip and the workpiece 4 Click SET WORKPIECE SURFACE 5 Click FOCUS The tip moves to the correct focus height Click NEXT 6 Continue to Robot Initial Setup Step 6 Tab Testing the S...

Страница 56: ...tup Click YES OK when prompted for confirmations NOTES When the system performs a Needle Z Detect it automatically performs a Needle XY Adjust directly after performing the Needle Z Detect Refer to How the System Responds to Needle Z Detect or Needle XY Adjust on page 57 for a detailed description of the system response to a Needle Z Detect selection 3 Click SAVE Click FINISH The system is now pro...

Страница 57: ...p to workpiece offset Z clearance Realigns all points in the currently open program to the new tip to workpiece offset Z clearance Automatically performs a Needle XY Adjust sequence shown below When you click NEEDLE XY ADJUST the system performs the following actions Moves the dispensing tip to a preset location on the workpiece Dispenses a dot of fluid Moves the camera over the deposited dot of f...

Страница 58: ...Refer to I O Port on page 96 for wiring diagrams Click Step 1 Click SYSTEM SETUP IO 2 Click the outputs you want turn ON or OFF then click the X to close the window NOTES Inputs flash red when they are turned ON Use only inputs outputs 1 through 8 The remaining I Os are reserved for the system Configuring Input Outputs for a Special Purpose The IO Pin Function feature provides a set of user config...

Страница 59: ...ong system delays in seconds searching for a mark when it reaches the mark area Sense Specifies how accurately the camera aligns with the pixels of a mark based on a value from 1 to 200 When the Sense value is low the camera is slower to align with the mark because it repeatedly checks the position of the mark to achieve high accuracy When the Sense value is higher the camera aligns with the mark ...

Страница 60: ...hen click OK 3 Click CONTROL 4 In the Expert window select or deselect the OFFSET ALL PROGRAM checkbox Click OK to save the setting NOTE The change takes effect immediately but does not change the directory of the currently open program To save the currently open program in the d auto directory use Save As Click EXIT to close the DispenseMotion application allowing the system to update the default...

Страница 61: ... displays units of measure Click Step Reference Image 1 Click SYSTEM SETUP OPEN EXPERT 2 11111111 Enter 11111111 then click OK 3 Click CONTROL 4 In the Expert window select the desired unit of measure under System Unit Click OK to save the setting The system automatically exits the software to allow the change to take effect Restoring the System to the Factory Default Settings To restore all setti...

Страница 62: ...mmand window Follow these procedures to rotate the tip and to set the angle of rotation for a command window IMPORTANT The tip will not rotate either virtually or physically until the tool centering calibration portion of the Robot Initial Setup wizard has been performed This calculation is Step 1 of the wizard To physically rotate the dispense valve installed on the robot Z axis head the system m...

Страница 63: ... 45 Click Step Reference Image 1 Click the MODE icon to place the system in the Tip mode NOTE When the system is in the Tip mode the dispense valve and tip installed on the Z axis head will rotate the green arrow on the camera view screen will also rotate 2 Click R to rotate the tip clockwise Click R to rotate the tip counterclockwise Observe the dispense valve on the robot Z axis head to see the ...

Страница 64: ... Calibrating the System Required on page 45 Click Step Reference Image 1 Click the MODE icon to place the system in the CCD mode NOTE When the system is in the CCD mode the dispensing valve installed on the Z axis head will NOT rotate 2 Click R to rotate the tip clockwise Click R to rotate the tip counterclockwise Observe the green arrow on the Secondary View screen to see the tip rotation 0 180 3...

Страница 65: ... is available to insert a command 2 Jog the dispensing tip to a desired XYZR location by clicking the navigation icons 3 Insert a setup or dispense command that tells the robot what to do Click a command icon or double click anywhere in the address line to select a command from the drop down menu 4 Edit the command parameter settings Refer to the following sections of this manual for information t...

Страница 66: ...mand address line in a program PREREQUISITES The program you want to add comments to is open Click Step Reference Image 1 Select a blank command address line NOTE Comments must be entered on a blank line If you try to enter a comment on a line that includes a command you will disable the command 2 Click DISABLE ADDRESS Enter your comment in the Enter Comment window Click OK to save 3 To delete a c...

Страница 67: ... the measuring tool right click the center of Measure Length or Measure Circle and then click DELETE How to Lock or Unlock a Program Use the Lock Program checkbox on the System Setup screen to protect a program from unauthorized editing When Lock Program is checked operators can only RUN VIEW or PAUSE the currently open program Click Step 1 Open the program you want to lock It should be visible wh...

Страница 68: ...l provides example programming for some of the most common command sequences Use these examples as a guideline for making other patterns Refer to Appendix A Command Function Reference on page 98 for detailed information on all commands Refer to How to Use the Example Icon on page 69 for some pre programmed example programs already created in the DispenseMotion software Dispense Dot Sample Program ...

Страница 69: ...k the Measure Circle Diameter icon on the Camera screen to measure the diameter of a circle on a workpiece Refer to How to Measure a Path or Circle on a Workpiece on page 67 Do not use a non zero rotation angle in a circle command doing so will cause the rotation angle to reset to 0 when the command occurs How to Create Patterns continued How to Use the Example Icon A selection of pre programmed s...

Страница 70: ...up Wizard on page 48 The system is in the CCD Mode Multiple workpieces are properly positioned on the fixture plate Click Step 1 Click the PROGRAM tab then click the Example icon and select FIND MARK STEP REPEAT Click YES when prompted for confirmation A sample Step Repeat X program appears NOTE You can also use Step Repeat Y to dispense onto multiple pieces in an array Refer to Appendix A Command...

Страница 71: ...rrect Step Repeat program for the array on the fixture plate is open Click Step 1 Make sure the Program screen is open 2 Click the STEP REPEAT BLOCK icon The Run Block Select window appears 3 To disable dispensing for specific workpieces click the workpiece locations in the window Selections turn red when disabled Green Enabled Red Disabled Leave the Run Block Select window open during dispensing ...

Страница 72: ...alibration using the Robot Initial Setup wizard Refer to Setting Up the System Using the Robot Initial Setup Wizard on page 48 The system is in the CCD Mode Click Step Reference Image 1 Click CAMERA to go to the camera screen 2 Bring the image into focus Refer to Camera on page 16 as needed for instructions on focusing the camera 3 Click SETUP to go back to the Camera window Offset fields Click SE...

Страница 73: ...ved in the Mark Library Click Step Reference Image 1 Click CAMERA to go to the camera screen 2 Right click any image in the Mark Library then select PROPERTY The Template Match window appears 3 Click AREA Refer to Template Match and Area Windows on page 39 to use the Area window to fine tune how the camera searches for and evaluates the image against other similar areas on the workpiece Click Step...

Страница 74: ...n the workpiece To check the XY orientation of a workpiece The system automatically adjusts the program to compensate for any changes in orientation PREREQUISITES The system is properly set up Refer to Setting Up and Calibrating the System Required on page 45 The system is in the CCD Mode Click Step 1 Determine whether you need to create one mark or two and then create the marks Refer to How to Cr...

Страница 75: ...Refer to Setting Up and Calibrating the System Required on page 45 The system is in the CCD Mode To learn how to use this feature draw a black rectangle with very round corners on a sheet of white paper and use it as a template Overview for Dispensing onto Featureless Workpieces The following tasks are required to create a program for dispensing onto very plain workpieces Creating and saving mark ...

Страница 76: ...tal target on the workpiece Center the red rectangle on the edge of the workpiece by clicking and dragging a corner 4 Double click the crosshairs in the center of the red rectangle and then enter the desired values for Width and Height 20 and 40 in this example Click OK to save the values 5 Click a socket in the Mark Library to save the mark then click TEMPLATE when the Template Match window appea...

Страница 77: ...mands To Use the Edge Adjust Command in a Program Click Step Reference Image 1 Insert four Find Mark commands near the top of the program one for each mark image created in the previous procedure 2 Insert an Edge Adjust command after the Find Mark commands Refer to the sample program provided below as a guideline Click Step Reference Image 8 Repeat steps 3 7 to create horizontal mark 2 Repeat step...

Страница 78: ...and saving a mark image of a segment of the line You will also need to know the length of the line Setting up the search range for the mark images Correctly using the Find Mark Mark Follow and Mark Follow Offset commands in a dispense program To Create a Mark Image for a Curved Line Click Step Reference Image 1 Click CAMERA to go to the camera screen 2 Bring the image into focus Refer to Camera on...

Страница 79: ...mple Click OK Click RANGE again to save 7 Continue to the next procedure To Use Mark Follow and or Mark Follow Adjust in a Program To Use Mark Follow and or Mark Follow Adjust in a Program In this example the Step Repeat X command is used to cause the system to dispense along the curved line PREREQUISITES You have completed To Create a Mark Image for a Curved Line on page 78 Click Step Reference I...

Страница 80: ...present the length and orientation horizontal or vertical of the line The value for COLUMNS X sets how many times you want the camera to view the line and make adjustments For ROW enter 1 For LABEL enter 1 NOTE The X Offset value multiplied by the number of Columns cannot be greater than the total length of the line Because there is only one row the S Path N Path parameter does not have an effect ...

Страница 81: ...the previous Step Repeat command Line 5 in this example except for the Label Change the last parameter from Label to Address and enter the address of the first Line Passing command line 9 in this example 7 Click EXTEND STEP REPEAT The system extends the Step Repeat X command by adding Line Passing commands for many line passing points along the line 8 Insert a blank address after the Line Start co...

Страница 82: ...the pattern before running it Because the line for this example is fairly straight this program works at this point using only a Mark Follow command For deeper curves the Mark Follow Offset command is needed Continue to the next step for an explanation of how to use the Mark Follow Offset command for deeper curves 13 If needed for a line with a deeper curve Insert a MARK FOLLOW OFFSET command and ...

Страница 83: ...1 7000 Sales and service of Nordson EFD dispensing systems are available worldwide Example program using Find Mark Mark Follow and Mark Follow Adjust commands How to Use Mark Follow to Dispense Along a Curved Line continued To Use Mark Follow and or Mark Follow Adjust in a Program continued ...

Страница 84: ... program the number of times the system runs a program called a program cycle is limited according to the values entered for Amount and Count Amount Sets the number of times a program can run Count Shows how many times a program has run To reset Count to 0 click RESET Fluid Working Life If Fluid Working Life is enabled sets the maximum number of minutes that a fluid should be in the system also kn...

Страница 85: ...s 3 Compare the previous XYZR position of one point in the program to its new XYZR position and determine the amount of offset for each XYZR value 4 Enter the offset values in the X Y and Z fields of the Offset window and update the other fields in this window as follows To limit the XYZR offset changes to a specific range of addresses in the program enter the address number range under RANGE To s...

Страница 86: ...edit Valve Heaters or Ramp 3 Click the button for the parameter you want to edit and enter the desired setting Refer to the PICO Toµch Controller Operating Manual for details on settings Click SAVE NOTES The first time you save the system prompts for a file name PICO files are saved on the DispenseMotion controller as pico files under D Save PICO You can use any allowable file name but Nordson EFD...

Страница 87: ...settings you want to edit Valve Heaters or Ramp 4 Click the button for the parameter you want to edit and enter the desired setting Refer to the Toµch Controller Operating Manual for details on settings Click SAVE AS NOTE Every time you make a change and click SAVE AS you will have to overwrite the existing file or create a new file Continue making selections and saving until all desired settings ...

Страница 88: ...ouble click the address row where you want to implement the saved PICO Toµch Controller settings and select PICOTOUCH PARAMETER UPDATE 2 xxxxxxxx In the FILE NUMBER field enter the pico file name that contains the PICO Toµch parameters you want the system to use NOTE The data entered for File Number must exactly match the pico file name Click OK to save NOTE Multiple PicoTouch Parameter Update com...

Страница 89: ...program file for your application 6 Place the workpiece in the correct location on the fixture plate 7 Press the START button on the front of the robot or click RUN on the monitor 8 When necessary refer to the dispensing system manuals to refill the dispenser 9 If an emergency occurs press the EMERGENCY STOP button EMERGENCY STOP button START button DISPENSER PURGE button Running a Program by Scan...

Страница 90: ...dle Z Detect or Needle XY Adjust on page 57 for a detailed description of the system response to a Needle XY Adjust selection Shutting Down the System 1 Click SYSTEM SETUP EXIT to close the DispenseMotion software If prompted to save a file select YES or NO 2 Switch off the following components DispenseMotion controller Monitor Robot 3 Refer to the dispensing system manuals for any special shutdow...

Страница 91: ...2766 Small safety enclosure Europe 7362739 Large safety enclosure R4V 7362767 Large safety enclosure Europe Pre Configured Output Cables Item Part Description 7360551 Standard cable to connect the dispenser and the robot 7360761 Single voltage initiate cable to connect the dispenser and the robot provides different pigtails to connect to different dispensers controllers 7360554 Dual voltage initia...

Страница 92: ...alling any external devices 7360865 Start stop accessory box European Community Tip Detection Kits The optional tip detector or tip alignment devices allow you to automatically update both the XY offsets and the Z height by clicking on Needle Z Detect The Needle Z Detect button is present only on systems that include a tip detection device Refer to Setting Up the Optional Tip Detector or Tip Align...

Страница 93: ...Item Part Description 7363518 Mounting bracket for 794 TC Series valves 7361114 Mounting bracket for xQR41 and 745 Series valves 7362177 Mounting bracket for Liquidyn P Jet and P Dot valves Accessories continued OptiSure Software Key Nordson EFD s OptiSure Automated Optical Inspection AOI software is available within the current DispenseMotion software as an optional add on The AOI feature inspect...

Страница 94: ...Data Dimensions Dimension R3V R4V R6V A width 645 mm 25 745 mm 29 965 mm 38 B height 914 mm 36 914 mm 36 914 mm 36 C depth 552 mm 22 652 mm 26 752 mm 30 Robot Feet Mounting Hole Template Use these dimensions to drill mounting holes for the robot feet Dimension R3V R4V R6V A 400 mm 15 75 500 mm 19 69 500 mm 19 69 B 410 mm 16 14 510 mm 20 08 510 mm 20 08 C B A 4 x M5 tapped holes B A ...

Страница 95: ...n 1 NOM Normally open 2 COM Common 3 EARTH Ground 2 1 3 Pin 1 Pin 2 Pin 3 24V Relay Ext Control Port NOTES Inputs are not polarity sensitive The optional start stop box accessory facilitates input output connections to this port Refer to Start Stop Box on page 92 for part numbers Pin Description 1 Ground 2 Start signal 3 Motor power 4 Motion idle 5 Run Teach 6 Emergency stop 7 Emergency stop 1 7 T...

Страница 96: ...ated at 3 0 Amp Pin Description Pin Description Pin Description 1 Input 1 10 Not connected 19 Output 6 2 Input 2 11 GND 20 Output 7 3 Input 3 12 GND 21 Output 8 4 Input 4 13 GND 22 Not connected 5 Input 5 14 Output 1 23 Not connected 6 Input 6 15 Output 2 24 24 VDC 7 Input 7 16 Output 3 25 24 VDC 8 Input 8 17 Output 4 9 Not connected 18 Output 5 Input schematic Output schematic Pin 25 Input X 24V ...

Страница 97: ...t connections to a robot Inputs Pin 25 PLC Output 24V PLC SW1 Robot I O Port 24VDC Robot I O Port Pin 2 Input 2 Pin 11 Ground Pin 1 Input 1 PLC Ground Outputs External Device Powered by the Robot Pin 24 Device Robot I O Port 24VDC Pin 11 Ground Courtesy 24 VDC output is rated at 3 0 Amp Start and Emergency Stop ESTOP Connections to Ext Control Pin 2 ESTOP Start signal Ext Control port Pin 7 Emerge...

Страница 98: ...end of line dispensing This is useful for high viscosity or stringy fluids to control where the fluid tail falls The illustrations on the next page provide a visual representation of the Backtrack Setup selections Parameter Description Backtrack Length Distance the dispensing tip travels away from the Line End point Backtrack Gap Distance the dispensing tip raises as it moves away from the Line En...

Страница 99: ...ems are available worldwide Appendix A Command Function Reference continued Backtrack Setup continued Example illustrations of Backtrack Setup 0 or blank Normal Backtrack Gap 1 Back Backtrack Gap Backtrack Length 2 Square Back Backtrack Gap Backtrack Length 3 Forward Backtrack Gap Backtrack Length 4 Square Forward Backtrack Gap Backtrack Length ...

Страница 100: ...fy only the points that are selected in the Run Block Select window Refer to How to Disable Dispensing for Specific Workpieces in an Array on page 71 for details Call Pattern Click Function Double click address and select from drop down menu Causes the system to dispense in a pattern that is like another pattern in the program but at the location in the program where the Call Pattern command occur...

Страница 101: ...at are arranged in straight lines and at fixed distances from each other Example of a program that includes a Call Subroutine command Circle Click Function Registers a circle with the circle s center at the current XYZR location Parameter Description Diameter The diameter of the circle in mm Start Angle The angle in degrees from the center of the circle where the start of the circle begins The def...

Страница 102: ...lect from drop down menu Used in tandem with the Circle 3 Point command when a circle is too large to fit in the Secondary View screen in the CCD Mode adjusts the Start Angle and Total Degrees of the large circle Parameter Description Start Angle The angle in degrees from the center of the circle where the start of the circle begins The default of 0 degrees equates to the 3 00 position Default 0 d...

Страница 103: ... slow speed This allows the fluid to cleanly break free from the tip to prevent it from being incorrectly applied The parameters for Dispense End Setup affect how far and how fast the tip raises after dispensing Parameter Description Retract Low Speed The speed in mm s at which the tip raises after dispensing Range 0 150 mm s Retract High Speed After the tip raises the amount specified by Retract ...

Страница 104: ... program and the resulting pattern is shown below Original program and corresponding Path view Program with Dispenser On Dispenser Off commands and an example of the resulting dispense pattern NOTE The Path view in the Secondary View screen will NOT change when you add the Dispenser Off Dispenser On commands as shown in this example this image is only a representation of the resulting dispense pat...

Страница 105: ...Plain Workpiece on page 75 for instructions on using this command End Pattern Click Function Double click address and select from drop down menu Used in tandem with Call Pattern to return the program to the address that occurs just after a Call Pattern command End Program Click Function Registers the current address as the end of the program End Program returns the dispensing tip to the home posit...

Страница 106: ...ment function correctly A Fiducial Mark is different from a Find Mark A Find Mark is used only to check the XY position of a workpiece whereas a Fiducial Mark is used to check the orientation of a workpiece Refer to About Marks on page 24 for more information on marks Fiducial Mark Adjust Click Function Double click address and select from drop down menu Adjusts the program from one workpiece to a...

Страница 107: ...ter to inner 4 Rectangle Band 5 Circle Band 6 Rectangle inner to outer 7 Circle inner to outer Width The distance in mm between the center of the bead being dispensed and the bead that spirals next to it Band The width in mm the completed fill must be from one end to the other Appendix A Command Function Reference continued Fill Area 1 Rectangle S path This command fills the defined area by passin...

Страница 108: ... In any Fill Area command the Z and R values for Line Start and Line End must match Line End Line Start Fill Area EXAMPLE if a Width of 5 mm is entered the tip makes the following path Width 5 mm Fill Area 3 Rectangle Outer to Inner This command fills the defined area by moving the tip along a square spiral shaped path from the outside of the rectangle to the center After entering a Fill Area Rect...

Страница 109: ... Line End EXAMPLE If a Width of 5 mm and a Band of 15 mm are entered the tip makes the following path Band 15 mm Width 5 mm Fill Area 5 Circle Band This command fills a defined circular band area by moving the tip along a spiral path from the outside of the circle to the center After entering a Fill Area Circle Band command jog the tip to a point on the outside limit of the circle to be filled and...

Страница 110: ...t corner of that area Line Start Line End Fill Area EXAMPLE If a Width of 5 mm is entered the tip makes the following path Width 5 mm Fill Area 7 Circle Inner to Outer This command fills the defined area by moving the tip along a spiral path from the center of the circle to the outside edge After entering a Fill Area Circle command jog the tip to a point on the center of the circle to be filled an...

Страница 111: ...shaped area on the workpiece If a change is found the system adjusts the dispense program accordingly EXAMPLE If Start Angle 0 and End Angle 90 the system searches for marks within the specified angle shaped area If a workpiece differs from the previous workpiece within that area the system adjusts the dispense program accordingly If the system cannot find the marks within the specified angle shap...

Страница 112: ...ed data is then used to adjust dispensing accordingly for any height changes between workpieces NOTE This function is not currently available Initialize Click Function Causes the robot to perform an initialization The dispensing tip moves to the home position 0 0 0 and the robot relocates the home position using the home position sensors Input Click Function Causes the program to check for an inpu...

Страница 113: ...used with Line Start and Line End commands to create a stitched pattern An example program and resulting pattern are shown below This command is not recommended for RV systems Parameter Description Jet Step The distance in mm between the stitched dots Pulse Width How long the dispenser stays open in ms for each deposited dot Adjust Offset value in mm that the system applies to each coordinate valu...

Страница 114: ...allow the pressure to equalize before the tip moves to the next point Node Time Delay time that occurs only for a Line Passing command The dispensing tip passes through the Line Passing point and waits at the Line Passing point with the dispenser activated for the specified time period Shutoff Distance The distance before the end of a line when the dispenser closes to prevent excess fluid from bei...

Страница 115: ...ount Parameter Description Address The Address A or Label number the program jumps to The jump to Address A or Label must occur before the current address Count The number of times to execute the loop Mark Adjust Click Function Double click address and select from drop down menu When used in tandem with the Find Mark command causes the system to search for the mark specified in the No number field...

Страница 116: ...ber parameter can be 1 4 NOTE For this function to operate correctly the additional dispensers must be installed and set up Refer to Appendix E Multi Needle Setup and Use on page 137 Needle XY Adjust Click Function Double click address and select from drop down menu Causes the system to perform a Needle XY Adjust check the camera to tip offset and based on the result to take action as specified by...

Страница 117: ...1 Continue The system automatically accepts the camera to tip offset unless out of range and then continues to the next command Output Click Function Causes the program to send an output signal from the specified output port Parameter Description Port 1 8 Sets the output port number 0 Off 1 On Turns the output OFF or ON Park Position Click Function Moves the dispensing tip to the park position spe...

Страница 118: ...D ever_sr history Each time a QA Capture command is executed the system creates a subdirectory under D ever_sr history that is named for the day the command was executed The file path for the saved QA images is D ever_sr history eXXXX_YY QAImage_ZZ where XXXX year YY month and ZZ day of month Directory structure created by the QA Capture command Example of saved QA Capture images Rectangle Adjust ...

Страница 119: ...he system to increase or decrease a coordinate by the assigned numeric value NOTE Unlike the Var command included later in this section Set cannot be used with a Find Mark or Fiducial Mark command Parameter Description Symbol Enter the symbol or character that will represent the assigned Value Value Enter the numeric value that the symbol or character represents Example of a program that includes ...

Страница 120: ... X Offset The distance in mm between each workpiece in the X direction Y Offset The distance in mm between each workpiece in the Y direction Columns X The number of columns in the X direction Rows Y The number of rows in the Y direction 1 S Path or 2 N Path The path of pattern travel Select 1 S Path for an S shaped pattern or 2 N Path for an N shaped pattern Label default or Address The label or a...

Страница 121: ...Y Step Repeat Z Click Function Double click address and select from drop down menu Enables the repeat of the dispensing pattern onto many identical workpieces that are mounted on a fixture plate and aligned in rows and columns Parameter Description Z Offset The distance in mm between each workpiece tier in the Z direction A positive Z Offset value moves the tip away from the work surface A negativ...

Страница 122: ...ect from drop down menu Allows a numeric value to be assigned to a symbol or character once assigned the symbol or character can be used in a program in place of the numeric value A set command can also be used to cause the system to increase or decrease a coordinate by the assigned numeric value Var can be used with the Find Mark and Fiducial Mark commands Parameter Description Symbol Enter the s...

Страница 123: ...e the program cycle time Z Clearance is further defined as an absolute value 0 or a relative value 1 When specified as a relative value it is the distance the tip raises relative to the taught point location When it is specified as an absolute value it is the distance from the Z axis zero position to which the tip raises regardless of the Z axis value of the taught point location Nordson EFD recom...

Страница 124: ...te Click Step Reference Image 1 Click the CAMERA tab 2 Jog the camera to a point of reference that is located on the lower right corner of the workpiece Bring the image into focus Refer to Camera on page 16 as needed for instructions on focusing the camera 3 Click the CAMERA tab and then click SCALE The Scale window opens NOTE When the camera views an object it converts the pixels to a true measur...

Страница 125: ...bove the sensor on the tip detector or the crosshairs on the tip alignment device Sensor on the optional tip detector Crosshairs on the optional tip aligner 3 Under Tip Detect Device click SET next to Move Click YES when prompted for confirmations 4 Under Tip Detect Device enter a value of 10 mm Z Detect Limit 5 Under Tip Detect Device click DETECT Click YES OK when prompted for confirmations The ...

Страница 126: ... Jog the tip to a good reference point on the workpiece 4 Jog the tip down until the desired dispense gap is reached 5 Click CAMERA SETUP to return to the Offset fields 6 Click SET next to Focus NOTE The Set button should be bright blue 7 Click FOCUS next to Set 8 Jog the camera until the camera crosshairs are centered over the dispense dot you created earlier Focus the camera until the image of t...

Страница 127: ...all layers of the open DXF file See All Compresses or resizes the display so that all points of the open DXF file are displayed in the viewing area of the screen Zoom Zooms to the selected area Select All Selects all the points in the DXF file Icon Name Icon Function Select Selects only the points within the area of the rectangle Select Directly Selects one element Cancel Select Cancels any select...

Страница 128: ...this issue enter X and or Y values in the offset fields of the Option window such that the imported XY values change to positive values For example if an imported XY value is 150 150 0 then enter 200 for Offset X and 200 for offset Y click OK and then click the Point Dispense or Line Dispense icon again to refresh the values The new values will be 50 50 0 and the points will be visible on the Seco...

Страница 129: ...r the workpiece is located on the DispenseMotion controller The actual workpiece is properly positioned on the fixture plate Click Step Reference Image 1 Click DXF The DXF screen appears in the Primary View screen 2 Open the DXF file you want to convert to a program The file appears in the Primary View screen 3 or To hide or show layers click HIDE ALL LAYERS or SHOW ALL LAYERS 4 Select the points ...

Страница 130: ...ep is to match the program commands to the actual workpiece NOTES After making any change to the program click REFRESH to update the view in the Secondary View screen to show the changes You may need to zoom out to see the points This can be avoided by entering offset values in the DXF screen Option window Refer to Option X Y under Setting DXF Import Preferences on page 128 8 Click TRANSFORM The P...

Страница 131: ...k the top SET button under Table 11 Click on a point at the far right side of the points shown in the Secondary View screen then click the bottom SET button under Program 12 Jog the tip to the same point on the actual workpiece and then click the bottom SET button under Table 13 Click CHANGE The system updates all XY locations in the program so they align with same XY locations on the actual workp...

Страница 132: ...e Primary View screen 2 Open the DXF file you want to convert to a program The file appears in the Primary View screen Click SELECT ALL Click OPTION The Option window opens 3 Select the SORT PATH checkbox to enable the Sort Path By feature Select the X or Y radio button to specify the direction for the dots to be arrayed Enter the number of dots in the array In this example there are 160 dots NOTE...

Страница 133: ...le worldwide Using the Sort Path By Option continued Appendix C DXF File Import continued Examples of How the Sort By Path Option Affects DXF Imports DXF array import Sort By Path disabled A B C D 1 2 3 4 5 6 7 8 9 DXF array import Sort By Path X enabled A 1 3 4 5 6 7 8 9 10 11 12 13 B DXF array import Sort By Path Y enabled 2 1 3 4 5 7 6 8 9 10 11 12 13 14 15 ...

Страница 134: ...n the robot fixture plate surface for example on the workpiece itself or on the workpiece fixture QR code scanning must be enabled and each QR code must be associated with a program Refer to the procedure below NOTE Bar codes are not supported To Enable QR Code Scanning Click Step Reference Image 1 Click the SYSTEM SETUP tab then click OPEN 2 Check 2D CODE to enable QR code scanning 3 Click the CA...

Страница 135: ... the QR code in view and in focus click TEST to scan the QR code If the system cannot identify the QR code the Nan pop up window appears 4 Adjust the THRESHOLD and EDGE SMOOTH values THRESHOLD Range 0 255 EDGE SMOOTH Range 0 5 5 Click TEST again When the system properly identifies the QR code a window like the one at right appears Repeat steps 4 and 5 until the system recognizes the QR code After ...

Страница 136: ...eded To remove a QR code right click on the QR code and then click DELETE 9 Return to PROGRAM screen and then click RUN to test the program The system finds the QR code scans it opens the associated program and executes the program Refer to the screen captures The system is now set up for QR code scanning Refer to Running a Program by Scanning a QR Code on page 89 for an operating procedure 1 Clic...

Страница 137: ...spenser bracket can be installed on the Z axis to accommodate up to four dispensers When more than one dispenser is installed the camera to tip offset must be set for each dispenser After the system is set up for multi needle operation you can insert the Multi Needle dispense command to specify which dispenser executes the commands that follow the Multi Needle command NOTE For contact dispensing a...

Страница 138: ...se to the crosshair target as possible without touching the target 5 Click SET next to Needle Move This sets the XYZR coordinates for the dispense calibration point The system enters the dispensing tip coordinates in the fields under Needle Move and Set 6 Jog the camera until the camera crosshairs are centered over the crosshair target then focus the camera until the image of the crosshair target ...

Страница 139: ...etector or the one you created Jog the tip down until it as close to the crosshair target as possible without touching the target 11 Click SET next to Needle Move This sets the XYZR coordinates for the dispense calibration point The system enters the dispensing tip coordinates in the fields under Needle Move and Set 12 Jog the camera until the camera crosshairs are centered over the crosshair targ...

Страница 140: ...ains the programming process for two dispensers Repeat steps as needed to add commands for additional dispensers up to four dispensers can be installed Click Step Reference Image 1 MULTI NEEDLE Click the PROGRAM tab Double click the address row where you want to insert a Multi Needle command and select MULTI NEEDLE 2 1 Enter the number of the dispenser to dispense from at this point in the program...

Страница 141: ...OK to save 8 In the Secondary View screen right click and check the NEEDLE 2 checkbox 9 Click the FOCUS icon to focus the camera Jog the camera until the camera crosshairs are centered over the desired target on the workpiece 10 Insert the required commands for Dispenser 2 for example create arc or fills 11 Click END PROGRAM to end the program The system will dispense from Dispenser 1 or Dispenser...

Страница 142: ...itiate Needle Z Detect Output Configuration Description Output Default setting Emergency A signal indicating that the robot has stopped EMG B A signal indicating that the Emergency Stop button on the robot is pressed Running A signal indicating that the dispense program is currently executing Homing A signal indicating that the robot is reinitializing moving to home position Standby A signal indic...

Страница 143: ...ating the System Required on page 45 Click Step Reference Image 1 Connect the signal wiring to the I O Port on the back of the robot 2 Click SYSTEM SETUP OPEN EXPERT 3 11111111 Enter 11111111 then click OK 4 Click IO PIN FUNCTION 5 Click the input or output to configure then select the configuration from the drop down menu Refer to IO Pin Function Configurations on page 142 for a description of th...

Страница 144: ...Image 1 Click Start Programs Accessories Command Prompt 2 At the command prompt type STATUS and press the enter key 3 Next to State the system displays either ENABLED or DISABLED If the State is DISABLED then the DispenseMotion controller is configured correctly for updates Skip to the end of this procedure If the State is ENABLED type DISABLE and press the enter key 4 Type SAVE and press the ente...

Страница 145: ...RV Series Automated Dispensing Systems 145 www nordsonefd com info nordsonefd com 1 401 431 7000 Sales and service of Nordson EFD dispensing systems are available worldwide Notes ...

Страница 146: ...ng material incompatible with equipment when the equipment is installed and operated in accordance with factory recommendations and instructions Nordson EFD will repair or replace free of charge any defective part upon authorized return of the part prepaid to our factory during the warranty period The only exceptions are those parts which normally wear and must be replaced routinely such as but no...

Отзывы: