background image

Camera controls

52

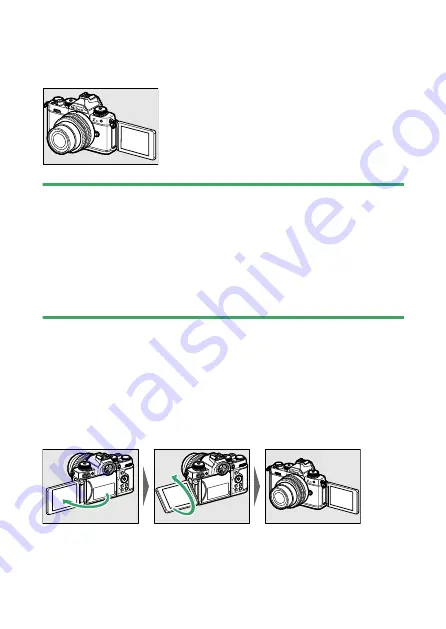
Self-portrait mode

When the monitor is facing the front of the camera, the camera changes
to self-portrait mode (

0

52).

D

Precautions for the monitor

When rotating the monitor, rotate slowly within the allowable range.
Applying excessive force will result in damage to the camera body and
monitor.

When you are not using the monitor, turning it facing inward and setting
it in the camera body is recommended to prevent damage and dirt.

Do not carry the camera by holding the monitor. This could result in
damage to the camera.

Shooting in self-portrait mode

If the monitor is set to the self-portrait mode position, it will switch to
self-portrait mode.
The monitor will display an image as if it were reflected on a mirror
(inverted image), but the actual image is saved from the perspective of
the camera.

In self-portrait mode, you can tap the monitor to set the self-timer.

Содержание Z fc N2016

Страница 1: ...nt thoroughly before using the camera To ensure proper use of the camera be sure to read For your safety page 28 After reading this document keep it readily accessible for future reference DIGITAL CAMERA Reference Guide ...

Страница 2: ...e battery see Charging the battery 074 2 Attach a lens 078 Align the indicator on the camera body with the indicator on the lens q and rotate the lens in the direction shown w A strap can be attached to the camera For more information see Attaching the strap 073 3 Turn the camera on and then choose a language and set the clock 081 Z fc Model Name N2016 ...

Страница 3: ...ctor to AUTO b 2 To focus press the shutter release button halfway i e lightly press the shutter release button stopping when it is pressed halfway 3 Without lifting your finger from the shutter release button press the button the rest of the way down to take the picture 4 View the picture ...

Страница 4: ...r regions where required shape depends on country of sale AN DC23 strap 073 Warranty User s Manual Memory cards are sold separately Purchasers of the lens kit option should confirm that the package also includes a lens D The Nikon Download Center Visit the Nikon download center to download firmware updates NX Studio and other Nikon software and documentation for Nikon products including cameras NI...

Страница 5: ...rds referred to throughout this document as memory cards SD SDHC and SDXC may also on occasion be referred to as SD memory cards Throughout this document battery chargers are referred to as battery chargers or chargers Throughout this document the display in camera monitor and viewfinder during shooting is referred to as the shooting display in most cases the illustrations show the monitor Through...

Страница 6: ...About this document 6 A For your safety For your safety contains important safety instructions Be sure to read them before using the camera For more information see For your safety 028 ...

Страница 7: ...Control panel 40 The monitor and viewfinder 41 Camera controls 44 Viewfinder 44 The M monitor mode button 45 The mode selector 47 The shutter speed dial 47 The command dials 48 The ISO sensitivity dial 49 The exposure compensation dial 50 Monitor 50 Touch controls 54 The DISP button 61 The X and W Q buttons 63 The A g button 63 The G button 64 The i button the i menu 68 The Fn button 71 First step...

Страница 8: ... auto 85 Recording videos b auto 90 Taking photos in video mode 92 Viewing photos 96 Viewing videos 96 Deleting unwanted pictures 98 Basic settings 100 Focus 100 Focus mode 100 AF area mode 102 The touch shutter 110 Manual focus 112 White balance 116 Adjusting white balance 116 Silent photography 121 Rating pictures 123 Protecting pictures from deletion 125 Shooting controls 127 The mode selector ...

Страница 9: ...king focus and exposure 142 The i menu 145 The i menu 145 Still images 147 Set Picture Control 147 White balance 153 Image quality 160 Image size 161 Flash mode 162 Metering 162 Wi Fi connection 164 Active D Lighting 164 Release mode 166 Vibration reduction 171 AF area mode 172 Focus mode 173 Videos 174 Set Picture Control 175 White balance 175 Frame size and rate Video quality 175 Microphone sens...

Страница 10: ...ndar playback 184 Photo information 186 File information 187 Exposure data 188 Highlight display 188 RGB histogram 189 Shooting data 192 Location data 196 Overview 197 The i button playback mode 199 Photos 199 Videos 201 Videos playback paused 202 Playback zoom 209 Using playback zoom 209 Deleting pictures 211 Using the delete button 211 Deleting multiple pictures 212 Menu guide 215 Defaults 215 P...

Страница 11: ... C The photo shooting menu Shooting options 237 Reset photo shooting menu 238 Storage folder 238 Renaming folders 239 Select folder by number 239 Select folder from list 241 File naming 242 Choose image area 243 Image quality 244 Image size 244 RAW recording 245 ISO sensitivity settings 245 White balance 248 The white balance menu Fine tuning 249 The white balance menu Choosing a color temperature...

Страница 12: ...sh control mode 267 Wireless flash options 268 Group flash options 268 Flash mode 269 Flash compensation 269 Release mode 269 Focus mode 269 AF area mode 270 Vibration reduction 270 Auto bracketing 270 Exposure and flash bracketing 271 White balance bracketing 276 ADL bracketing 279 Multiple exposure 281 Creating a multiple exposure 283 HDR high dynamic range 289 Taking HDR photographs 290 Interva...

Страница 13: ...ce 332 Set Picture Control 333 Manage Picture Control 333 Active D Lighting 333 High ISO NR 334 Vignette control 334 Diffraction compensation 334 Auto distortion control 334 Flicker reduction 334 Metering 335 Release mode save frame 335 Focus mode 336 AF area mode 336 Vibration reduction 336 Electronic VR 337 Microphone sensitivity 337 Attenuator 338 Frequency response 338 Wind noise reduction 339...

Страница 14: ...AF 350 a11 Built in AF assist illuminator 351 a12 Manual focus ring in AF mode 352 b Metering exposure 352 b1 Easy exposure compensation 352 b2 Center weighted area 353 b3 Fine tune optimal exposure 353 b4 b mode exposure comp 354 c Timers AE lock 354 c1 Shutter release button AE L 354 c2 Self timer 355 c3 Power off delay 355 d Shooting display 356 d1 CL mode shooting speed 356 d2 Maximum shots pe...

Страница 15: ... f1 Customize i menu 365 Bluetooth connection 366 f2 Custom controls shooting 367 f3 Custom controls playback 375 f4 Customize command dials 377 Reverse rotation 377 Change main sub 378 Menus and playback 378 Sub dial frame advance 379 f5 Release button to use dial 380 f6 Reverse indicators 381 g Video 381 g1 Customize i menu 381 Bluetooth connection 382 g2 Custom controls 382 g3 AF speed 388 g4 A...

Страница 16: ...s 399 Choosing a default fine tuning value 400 Non CPU lens data 400 Save focus position 401 Image Dust Off ref photo 401 Acquiring Image Dust Off reference data 402 Pixel mapping 403 Image comment 404 Input comment 404 Attach comment 404 Copyright information 405 Artist Copyright 405 Attach copyright information 405 Beep options 406 Beep on off 406 Volume 407 Pitch 407 Touch controls 407 Enable d...

Страница 17: ...e wireless remote controller 414 Delete wireless remote controller 414 Assign Fn1 button Assign Fn2 button 414 Conformity marking 415 USB power delivery 415 Energy saving photo mode 417 Slot empty release lock 418 Save load menu settings 419 Save menu settings 422 Load menu settings 422 Reset all settings 423 Firmware version 423 N The retouch menu Creating retouched copies 424 Creating retouched ...

Страница 18: ...ters or smart devices 456 Network options 456 Connecting to computers via Wi Fi 457 What Wi Fi can do for you 457 The Wireless Transmitter Utility 457 Infrastructure and access point modes 457 Connecting in access point mode 459 Connecting in infrastructure mode 465 Uploading pictures 473 Disconnecting and reconnecting 477 Connecting to smart devices 479 The SnapBridge app 479 What SnapBridge can ...

Страница 19: ...ted flash units 497 Remote flash photography 497 Using an on camera flash 498 Flash control mode 501 Flash modes 502 Flash compensation 504 FV lock 505 Remote flash photography 508 What is remote flash photography 508 Controlling remote flash units 509 Using optical AWL with the SB 500 509 Troubleshooting 513 Before contacting customer support 513 Problems and solutions 515 Battery display 515 Sho...

Страница 20: ...ts 559 Other compatible accessories 563 Charging the camera with the charging AC adapter 565 ML L7 Remote Control 567 Software 573 Caring for the camera 574 Storage 574 Cleaning 574 Manual cleaning 575 Caring for the camera and battery Cautions 578 Camera care 578 Battery care 581 Using the charger 583 Using the charging AC adapter 584 Specifications 585 Nikon Z fc digital camera 585 Approved memo...

Страница 21: ...Table of contents 21 Trademarks and licenses 605 Notices 608 Bluetooth and Wi Fi wireless LAN 611 Index 617 ...

Страница 22: ...ll Slide show Rating PHOTO SHOOTING MENU Reset photo shooting menu Storage folder File naming Choose image area Image quality Image size RAW recording ISO sensitivity settings White balance Set Picture Control Manage Picture Control Color space Active D Lighting Long exposure NR High ISO NR Vignette control Diffraction compensation Auto distortion control Flicker reduction shooting Metering Flash ...

Страница 23: ... video recording menu File naming Frame size frame rate Video quality Video file type ISO sensitivity settings White balance Set Picture Control Manage Picture Control Active D Lighting High ISO NR Vignette control Diffraction compensation Auto distortion control Flicker reduction Metering Release mode save frame Focus mode AF area mode Vibration reduction Electronic VR Microphone sensitivity Atte...

Страница 24: ...utter release button AE L c2 Self timer c3 Power off delay d Shooting display d1 CL mode shooting speed d2 Maximum shots per burst CUSTOM SETTINGS MENU d3 Exposure delay mode d4 Shutter type d5 Extended shutter speeds M d6 File number sequence d7 Apply settings to live view d8 Framing grid display d9 Focus peaking d10 View all in continuous mode e Bracketing flash e1 Flash sync speed e2 Flash shut...

Страница 25: ...ightness Viewfinder color balance Limit monitor mode selection Information display AF fine tuning options Non CPU lens data Save focus position Image Dust Off ref photo Pixel mapping Image comment Copyright information Beep options Touch controls Self portrait mode HDMI Airplane mode Connect to smart device Connect to computer Wireless remote ML L7 options Conformity marking USB power delivery ...

Страница 26: ...ode Slot empty release lock Save load menu settings Reset all settings Firmware version RETOUCH MENU RAW processing Trim Resize D Lighting Red eye correction Straighten Distortion control Perspective control Monochrome Overlay pictures Trim video ...

Страница 27: ...Menu list 27 MY MENU Add items Remove items Rank items Choose tab ...

Страница 28: ...icle Failure to observe this precaution could result in accidents or other injury Do not disassemble or modify this product Do not touch internal parts that become exposed as the result of a fall or other accident Failure to observe these precautions could result in electric shock or other injury Should you notice any abnormalities such as the product producing smoke heat or unusual odors immediat...

Страница 29: ...d a child swallow any part of this product seek immediate medical attention Do not entangle wrap or twist the straps around your neck Failure to observe this precaution could result in accidents Do not use batteries chargers AC adapters or USB cables not specifically designated for use with this product When using batteries chargers AC adapters and USB cables designated for use with this product d...

Страница 30: ...equency emissions produced by this product could interfere with equipment onboard aircraft or in hospitals or other medical facilities Remove the battery and disconnect the AC adapter if this product will not be used for an extended period Failure to observe this precaution could result in fire or product malfunction Do not fire the flash in contact with or in close proximity to the skin or object...

Страница 31: ... terminals by touching them to necklaces hairpins or other metal objects Do not expose batteries or the products in which they are inserted to powerful physical shocks Do not step on batteries pierce them with nails or strike them with hammers Charge only as indicated Failure to observe this precaution could result in the batteries leaking overheating rupturing or catching fire If battery liquid c...

Страница 32: ...ld it become wet Discontinue use immediately should you notice any changes in the batteries such as discoloration or deformation Cease charging EN EL25 rechargeable batteries if they do not charge in the specified period of time Failure to observe these precautions could result in the batteries leaking overheating rupturing or catching fire When batteries are no longer needed insulate the terminal...

Страница 33: ...ng or reproduction Note that simply being in possession of material that has been digitally copied or reproduced by means of a scanner digital camera or other device may be punishable by law Items prohibited by law from being copied or reproduced Do not copy or reproduce paper money coins securities government bonds or local government bonds even if such copies or reproductions are stamped Sample ...

Страница 34: ...ctronic circuitry Only Nikon brand electronic accessories including lenses chargers batteries AC adapters and flash accessories certified by Nikon specifically for use with this Nikon digital camera are engineered and proven to operate within the operational and safety requirements of this electronic circuitry The use of non Nikon electronic accessories could damage the camera and may void your Ni...

Страница 35: ...he camera on a trip take a test shot to ensure that the camera is functioning normally Nikon will not be held liable for damages or lost profits that may result from product malfunction D Life long learning As part of Nikon s Life long learning commitment to ongoing product support and education continually updated information is available on line at the following sites For users in the U S A http...

Страница 36: ...137 4 Stereo microphone 090 5 Shutter speed dial 047 0128 6 Shutter speed dial lock release 047 0128 7 Power switch 081 8 Shutter release button 085 9 Video record button 090 10 E focal plane mark 0114 11 Exposure compensation dial 050 0139 12 Control panel 040 13 Photo video selector 085 090 14 Accessory shoe for optional flash unit 0498 0543 15 Mode selector 047 0127 16 Speaker 097 ...

Страница 37: ... illuminator 088 0351 Red eye reduction lamp 0162 0502 Self timer lamp 0169 6 Cover for HDMI USB and microphone connectors 7 HDMI connector 0494 8 Charge lamp 0565 9 USB connector 0415 0489 10 Connector for external microphone 0565 11 Lens release button 079 12 Lens mount 078 0114 13 Fn button 071 0116 14 Body cap 078 ...

Страница 38: ...4 0215 9 W Q button 063 068 0183 0209 10 Memory card access lamp 088 092 11 X button 063 0112 0183 0209 12 Battery chamber memory card slot cover 13 Battery chamber memory card slot cover latch 14 Battery latch 075 15 Memory card slot 075 16 Tripod socket 17 Monitor 050 054 0110 18 M button 045 0397 19 O button 098 0211 20 K button 096 0183 21 Eye sensor 044 22 Viewfinder 044 23 Rubber eyecup 0564...

Страница 39: ...age sensor poke it with cleaning tools or subject it to powerful air currents from a blower These actions could scratch or otherwise damage the sensor For information on cleaning the image sensor see Manual cleaning 0575 D Product serial number The serial number for this product can be found by opening the monitor ...

Страница 40: ...95 is displayed in the control panel If Extended shutter speeds M is set to On the display switches to indicate that the shutter is open when shooting starts with the shutter speed set to 60 seconds or longer Depending on how the lens is mounted a warning may be displayed 0524 When connecting to a computer or smartphone PC may be displayed to indicate that connection is in progress ...

Страница 41: ...pear in the monitor and viewfinder for a full list of indicators see Camera displays 0530 in Technical notes Monitor Viewfinder 1 Shooting mode 0127 2 Focus point 0102 3 Release mode 0166 4 Focus mode 0100 5 AF area mode 0102 6 Active D Lighting 0164 7 Picture Control 0147 0255 8 White balance 0116 0153 0248 ...

Страница 42: ... over 1000 exposures 077 15 Number of exposures remaining 077 0600 16 ISO sensitivity 0137 17 ISO sensitivity indicator 0137 Auto ISO sensitivity indicator 0245 18 Aperture 0130 0131 19 Shutter speed 0128 0131 20 Subject tracking AF 0109 21 Metering 0162 22 Battery indicator 076 23 Shutter type 0357 24 Clock not set indicator 084 25 Vibration reduction indicator 0171 26 Touch shooting 0110 27 AF a...

Страница 43: ...itor Viewfinder 1 Recording indicator 090 No video indicator 092 2 Frame size and rate Video quality 0175 3 Time remaining 090 4 Release mode still photography 0335 5 Sound level 0178 6 Microphone sensitivity 0178 7 Frequency response 0338 ...

Страница 44: ...ers The viewfinder can be used for menus and playback if desired D The diopter adjustment control The viewfinder can be focused by rotating the diopter adjustment control Be careful not to put your fingers or fingernails in your eye A Extended use When using the viewfinder for extended periods you can select Off for Custom Setting d7 Apply settings to live view to ensure that viewfinder brightness...

Страница 45: ...splays Press the M button to cycle through the displays as follows Automatic display switch The camera automatically switches between the viewfinder and monitor displays based on information from the eye sensor Viewfinder only The monitor remains blank The viewfinder is used for shooting menus and playback ...

Страница 46: ...ital SLR cameras During photo mode placing your eye to the viewfinder turns the viewfinder on the monitor remains off after you take your eye away During video mode or playback or while menus are displayed the camera automatically switches between the viewfinder and the monitor based on information from the eye sensor A Monitor mode You can limit the choice of monitor modes available using the Lim...

Страница 47: ... camera sets shutter speed and aperture for optimal exposure S Shutter priority auto You choose the shutter speed the camera selects the aperture for best results A Aperture priority auto You choose the aperture the camera selects the shutter speed for best results M Manual You control both shutter speed and aperture The shutter speed dial In mode S or M you can rotate the shutter speed dial to se...

Страница 48: ...hile pressing the shutter speed dial lock release 1 1 4000 s 1 2 s 2 1 4 s red text 3 B Bulb 0134 4 T Time 0134 5 X Flash sync 0361 6 1 3STEP 1 3 step 0130 The command dials Rotate the command dials to choose settings for aperture or the functions assigned to other camera controls ...

Страница 49: ... b mode the setting is fixed at ISO A AUTO and the camera sets the ISO sensitivity automatically Video mode You can set the ISO sensitivity only with the following settings In all other cases the camera sets the ISO sensitivity automatically Mode M ISO sensitivity settings Auto ISO control mode M in the video recording menu Off ISO sensitivity can be adjusted by holding the ISO sensitivity dial lo...

Страница 50: ... dial to alter exposure from the value suggested by the camera Exposure compensation can be used to make pictures brighter or darker 1 EV No exposure compensation 1 EV Higher values make the subject brighter lower values darker Monitor The orientation and angle of the monitor can be adjusted ...

Страница 51: ...mally use the monitor so that it is facing out and set in the camera body Low angle shooting Turn the monitor facing up to shoot with the camera at low positions High angle shooting Turn the monitor facing down to shoot with the camera at high positions ...

Страница 52: ...onitor turning it facing inward and setting it in the camera body is recommended to prevent damage and dirt Do not carry the camera by holding the monitor This could result in damage to the camera Shooting in self portrait mode If the monitor is set to the self portrait mode position it will switch to self portrait mode The monitor will display an image as if it were reflected on a mirror inverted...

Страница 53: ... delay and the number of shots If you tap the exposure compensation icon w you can change the image brightness Press the shutter release button halfway to focus Press the shutter release button all the way down to take a photo You can use touch AF and touch shutter In video mode press the video record button to record video If the monitor is moved from the self portrait mode position self portrait...

Страница 54: ... more the standby timer will expire The following settings are fixed Release mode Self timer Focus mode in the video recording menu Full time AF Touch controls Enable disable touch controls Enable The viewfinder cannot be used The following functions cannot be used Long exposure NR Auto bracketing HDR high dynamic range Exposure delay mode Extended shutter speeds M When Self portrait mode 0408 in ...

Страница 55: ...r focus or the like Focusing and releasing the shutter Touch the monitor to focus on the selected point touch AF In photo mode the shutter will be released when you lift your finger from the display touch shutter Touch shutter AF settings can be adjusted by tapping the W icon 0110 ...

Страница 56: ...ed settings in the display You can then choose the desired option by tapping icons or sliders Tap Z or press J to select the chosen option and return to the previous display Playback Flick left or right to view other pictures during full frame playback ...

Страница 57: ...just the zoom ratio using stretch gestures to zoom in and pinch gestures to zoom out Use slide gestures to view other parts of the image during zoom Giving the display two quick taps while zoom is in effect cancels zoom To zoom out to a thumbnail view use a pinch gesture during full frame playback Use pinch and stretch to choose the number of images displayed from 4 9 and 72 frames Using a pinch g...

Страница 58: ...cated by a 1 icon to start playback tap the on screen guide Tap the display to pause Tap again to resume Tap Z to exit to full frame playback The i menu Tap the i icon to display the i menu during shooting 068 0145 Tap items to view and change options ...

Страница 59: ...t display area 2 Keyboard area 3 Keyboard selection To position the cursor tap e or f or tap directly in the text display area To cycle through the upper and lower case and symbol keyboards tap the keyboard selection button Navigating the menus Slide up or down to scroll Tap a menu icon to choose a menu ...

Страница 60: ...ricity It may not respond when touched with fingernails or gloved hands Do not touch the screen with sharp objects Do not use excessive force The screen may not respond when covered with third party protective films The screen may not respond when touched simultaneously in multiple locations A Enabling or disabling touch controls Touch controls can be enabled or disabled using the Touch controls i...

Страница 61: ...splays Photo mode 1 Indicators on 2 Simplified display 3 Histogram 1 2 4 Virtual horizon 5 Information display 0530 1 Displayed when On is selected for Custom Setting d7 Apply settings to live view 2 Not displayed if On is selected for Overlay shooting during multiple exposure photography ...

Страница 62: ...mation display does not appear in the viewfinder A Turning off the information display In Custom Setting f2 Custom controls shooting you can assign Live view info display off to turn off the information display at the press of a button Press it again to turn on the display Video mode 1 Indicators on 2 Simplified display 3 Histogram 4 Virtual horizon ...

Страница 63: ... zoom out Playback Press X to zoom in on pictures during full frame playback Press X to increase the zoom ratio W Q to zoom out Pressing W Q when the picture is displayed full frame zooms out to the thumbnail list Pressing W Q when 72 frames are displayed selects calendar playback The A g button Lock the focus and exposure when shooting or protect images during playback Shooting Lock the focus and...

Страница 64: ...the menus 1 D PLAYBACK MENU 0232 2 C PHOTO SHOOTING MENU 0237 3 1 VIDEO RECORDING MENU 0329 4 A CUSTOM SETTINGS MENU 0341 5 B SETUP MENU 0391 6 N RETOUCH MENU 0424 7 O MY MENU m RECENT SETTINGS 0449 8 The d Help icon 068 9 Current settings You can choose the menu displayed The default is MY MENU ...

Страница 65: ...d J button 1 Move cursor up 2 Select highlighted item 3 Display sub menu select highlighted item or move cursor right 4 Move cursor down 5 Cancel and return to previous menu or move cursor left 1 Highlight the icon for the current menu Press 4 to place the cursor in the menu selection area ...

Страница 66: ... 66 2 Select a menu Press 1 or 3 to select the desired menu 3 Position the cursor in the selected menu Press 2 to position the cursor in the selected menu 4 Highlight a menu item Press 1 or 3 to highlight a menu item ...

Страница 67: ...lect the highlighted option Press J to select the highlighted option To exit without making a selection press the G button To exit the menus and return to shooting mode press the shutter release button halfway D Grayed out items Some items and menu options may be unavailable depending on the mode and camera status Unavailable items are displayed in gray ...

Страница 68: ...Q button Press 1 or 3 to scroll Press W Q again to return to the menus A Touch controls You can also navigate the menus using touch controls 054 The i button the i menu For quick access to frequently used settings press the i button or tap the i icon to view the i menu Different menus are displayed during photo mode and video mode ...

Страница 69: ...e can be adjusted by highlighting them in the i menu and rotating a command dial In some cases adjustments can be made using both the main and sub command dials A The playback i menu Pressing the i button during playback displays a context sensitive i menu of frequently used playback options Customizing the i menu The items displayed in the photo mode i menu can be chosen using Custom Setting f1 o...

Страница 70: ...ou want to change and press J A list of the items available for the selected position will be displayed 3 Highlight the desired item and press J The item will be assigned to the selected position and the options shown in Step 2 will be displayed Repeat Steps 2 and 3 as desired 4 Press the G button Changes will be saved and the Custom Settings menu will be displayed ...

Страница 71: ...rotating the command dial In some cases adjustments can be made using both the main and sub command dials Choosing roles for the Fn button The role played by the Fn button can be selected using Custom Setting f2 Custom controls shooting or g2 Custom controls Fn button 1 Highlight Custom Setting f2 Custom controls shooting or g2 Custom controls and press J See The G button 064 for information on us...

Страница 72: ...vailable for the Fn button will be displayed 3 Highlight the desired item and press J The item will be assigned to the Fn button and the options shown in Step 2 will be displayed 4 Press the G button Changes will be saved and the Custom Settings menu will be displayed ...

Страница 73: ...Attaching the strap 73 First steps Attaching the strap To attach a strap whether the supplied strap or one that has been purchased separately ...

Страница 74: ... The charger lamp flashes while charging and lights up when charging is complete An exhausted battery will fully charge in about 2 hours and 30 minutes D If the CHARGE lamp flashes rapidly If the CHARGE lamp flashes rapidly 8 times a second A battery charging error has occurred Unplug the charger and remove and reinsert the battery The ambient temperature is too hot or too cold Use the battery cha...

Страница 75: ...re inserting or removing the battery and memory card Using the battery to keep the orange battery latch pressed to one side slide the battery into the battery chamber until the latch locks it in place Holding the memory card in the orientation shown slide it straight into the slot until it clicks into place ...

Страница 76: ...n by the arrow to release the battery and then remove the battery by hand D Removing the memory card After confirming that the memory card access lamp is off turn the camera off and open the battery chamber memory card slot cover Press the memory card in to eject it q and pull it out to remove it w Battery level The battery level is shown in the shooting display while the camera is on Monitor View...

Страница 77: ...d for about 30 seconds the standby timer will expire and the monitor viewfinder and control panel will turn off A few seconds prior to turning off the displays will dim They can be reactivated by pressing the shutter release button halfway The length of time before the standby timer expires automatically can be selected using Custom Setting c3 Power off delay Standby timer Number of exposures rema...

Страница 78: ...t for illustrative purposes is a NIKKOR Z DX 16 50mm f 3 5 6 3 VR Be careful to prevent dust entering the camera Confirm that the camera is off before attaching the lens Remove the camera body cap q w and rear lens cap e r Align the mounting marks on the camera t and lens y Do not touch the image sensor or lens contacts ...

Страница 79: ...FTZ mount adapter available separately before using F mount lenses Attempting to attach F mount lenses directly to the camera could damage the lens or image sensor Detaching lenses After turning the camera off press and hold the lens release button q while turning the lens in the direction shown w After removing the lens replace the lens caps and camera body cap ...

Страница 80: ...Opening the monitor 80 Opening the monitor Slowly rotate the monitor without using excessive force ...

Страница 81: ...et the camera clock no other operations can be performed until the clock is set 1 Turn the camera on The Language selection screen will be displayed 2 Select a language Press 1 or 3 to highlight the desired language and press J the languages available vary with the country or region in which the camera was originally purchased The Time zone screen will be displayed ...

Страница 82: ...isplay shows the selected cities in the chosen zone and the difference between the time in the chosen zone and UTC The Date format screen will be displayed 4 Choose a date format Highlight the desired date year month and day display order and press J The Daylight saving time screen will be displayed ...

Страница 83: ... press J Selecting On advances the clock one hour to undo the effect select Off The Date and time screen will be displayed 6 Set the clock Press 4 or 2 to highlight date and time items and press 1 or 3 to change them Press J to confirm the date and time setting The message Done will be displayed and the camera switches to shooting mode ...

Страница 84: ...photographs will not be correct use the Time zone and date Date and time option in the setup menu to set the clock to the correct time and date The camera clock is powered by an independent clock battery The clock battery charges when the main battery is inserted in the camera It takes about 2 days to charge Once charged it will power the clock for about a month ...

Страница 85: ...r simple point and shoot photography D Lenses with retractable barrels Lenses with retractable barrels must be extended before use Rotate the zoom ring as shown until the lens clicks into the extended position 1 Select photo mode by rotating the photo video selector to C 2 Rotate the mode selector to AUTO b ...

Страница 86: ...andscape wide orientation Portrait tall orientation 4 Frame the photograph Position the main subject in the AF area brackets 5 The AF area brackets will disappear and a yellow border indicating the focus point appears around the faces of human subjects detected by the camera If the camera detects the subject s eyes the yellow focus point will instead appear over one or the other of their eyes ...

Страница 87: ...ra focuses If the camera is unable to focus the AF area brackets will flash The AF assist illuminator may light to assist the focus operation if the subject is poorly lit If the camera detects human faces or eyes the focus point will light green when the subject is in focus The focus point will flash in red when the camera does not focus ...

Страница 88: ...AF assist illuminator while it is lit 6 Smoothly press the shutter release button the rest of the way down to take the photograph D The memory card access lamp The memory card access lamp will light while the photograph is being recorded Do not remove the memory card or battery ...

Страница 89: ...button in photo mode to zoom in on the view up to about 15 The zoom ratio increases every time you press the X button and decreases every time you press the W Q button When using zoom while shooting a navigation window is displayed at the bottom right of the monitor to show which part of the composition is zoomed in In playback zoom use the multi selector to move to areas of the frame not visible ...

Страница 90: ...o b auto mode can also be used for simple point and shoot video recording 1 Select video mode by rotating the photo video selector to 1 Note that optional flash units cannot be used when the camera is in video mode 2 Rotate the mode selector to AUTO b ...

Страница 91: ... the approximate amount of new footage that can be recorded to the memory card 1 Recording indicator 2 Time remaining Sound is recorded via the built in microphone Do not cover the microphone during recording If you tap your subject in the monitor during recording the focus point will track the subject as it moves through the frame 0109 4 Press the video record button again to end recording ...

Страница 92: ...atically if The maximum length is reached Another mode is selected The photo video selector is rotated to C The lens is removed Sounds made by the camera may be audible in footage recorded During autofocus During vibration reduction When power aperture is used Taking photos in video mode Photos can be taken in video mode by pressing the shutter release button all the way down In Release mode save ...

Страница 93: ...frame varies with the option selected for Frame size frame rate Photos can be taken while recording is in progress Taking photos does not interrupt video recording Note however that only one photo will be taken each time the shutter release button is pressed even if Continuous is selected for Release mode save frame in the video recording menu ...

Страница 94: ...splay appear distorted individual subjects such as trains or cars moving at high speed through the frame may be distorted or the entire frame may appear distorted when the camera is panned horizontally Jagged edges color fringing moiré and bright spots may appear in the display Bright regions or bands may appear in scenes lit by flashing signs and other intermittent light sources or when the subje...

Страница 95: ...rding videos b auto 95 A Zooming in video mode Press the X button in video mode to zoom in on the view 089 Press the X button during video recording to display at 1 1 100 Press the W Q button to cancel zoom ...

Страница 96: ... left or right on the monitor to view other images Videos are indicated by a 1 icon at the upper left of the monitor Press the J button or tap the a icon in the monitor to play back videos To end playback and return to shooting mode press the shutter release button halfway Viewing videos Monitor display and operation during video playback are as follows ...

Страница 97: ...h 5 Progress bar 6 Volume 7 Guide Video playback operations You can perform the following during video playback To Description Pause Press 3 to pause playback Resume Press the J button to resume playback when playback is paused or during rewind advance Rewind advance Press 4 to rewind 2 to advance Speed increases with each press from 2 to 4 to 8 to 16 Keep 4 or 2 pressed to skip respectively to th...

Страница 98: ...ne stop to skip ahead or back 10 s Skip to last or first frame Rotate the sub command dial to skip to the last or first frame Adjust volume Press X to increase volume W Q to decrease Trim video To display the EDIT VIDEO menu pause playback and press the i button Exit Press 1 or K to exit to full frame playback Resume shooting Press the shutter release button halfway to return to shooting mode Dele...

Страница 99: ...cture Press the O button a confirmation dialog will be displayed Press the O button again to delete the image and return to playback To exit without deleting the picture press K A The playback menu Delete item Use Delete in the playback menu to Delete multiple pictures Delete pictures taken on selected dates Delete all pictures in selected folders ...

Страница 100: ...cus mode The focus mode can be selected using the Focus mode items in the i menu photo shooting menu and video recording menu 0173 0269 0336 Option Description AF A AF mode auto switch The camera uses AF S for stationary subjects and AF C for moving subjects Available only in photo mode ...

Страница 101: ...bjects The camera adjusts focus continuously in response to changes in the distance to the subject while the shutter release button is pressed halfway At default settings the shutter can be released whether or not the subject is in focus release priority AF F Full time AF The camera adjusts focus continuously in response to subject movement or changes in composition When the shutter release button...

Страница 102: ...ds or a row of windows in a skyscraper The subject is moving The monitor may brighten or darken while the camera focuses The focus point may sometimes be displayed in green when the camera is unable to focus A Focus position memory To save the focus position even when the camera is turned off set Save focus position in the setup menu to On However some time may be required until the camera can be ...

Страница 103: ...n studio product photography or close ups This option is only available when photo mode is selected and Single AF is chosen for Focus mode d Single point AF The camera focuses on a point selected by the user Use with stationary subjects e Dynamic area AF The camera focuses on a point selected by the user If the subject briefly leaves the selected point the camera will focus based on information fr...

Страница 104: ...moving subjects If the selected focus area contains subjects at different distances from the camera the camera will assign priority to the closest subject The focus areas for Wide area AF L are larger than those for Wide area AF S If Wide area AF L people is selected the camera detects and focuses on human faces or eyes eye detection AF face detection AF 0106 If Wide area AF L animals is selected ...

Страница 105: ...2 Custom controls can be used to configure the Fn button to start subject tracking AF 0367 0382 Subject tracking AF can also be assigned to the lens Fn or Fn2 button 5 Auto area AF people 6 Auto area AF animals A s The center focus point A dot appears in the focus point when it is in the center of the frame A Quick focus point selection For quicker focus point selection choose Alternating points f...

Страница 106: ...2 Detecting faces or eyes of portrait subjects face eye detection AF If Wide area AF L people or Auto area AF people is selected for AF area mode in the photo shooting menu or video recording menu the camera detects human faces and eyes eye detection AF face detection AF A yellow border indicating the focus point appears around the faces of human subjects detected by the camera If the camera detec...

Страница 107: ...and f icons will appear on the focus point You will be able to position the focus point over a different face or eye by pressing 4 or 2 If the subject looks away after their face is detected the focus point will move to track their motion During playback you can zoom in on the face or eye used for focus by pressing J D Face eye detection AF Eye and face detection may not perform as expected if the...

Страница 108: ...subject s eyes the yellow focus point will instead appear over one or the other of their eyes If AF C is selected for focus mode or if AF A is selected and the camera is using AF C the focus point will light yellow when faces or eyes are detected If AF S is selected for focus mode or if AF A is selected and the camera is using AF S the focus point will turn green when the camera focuses If Auto ar...

Страница 109: ...t the faces or eyes of some breeds when Wide area AF L animals or Auto area AF animals is enabled Alternatively the camera may display a border around subjects that are not the faces or eyes of dogs or cats The light from the AF assist illuminator may adversely affect the eyes of some animals select Off for Custom Setting a11 Built in AF assist illuminator Subject tracking AF When Auto area AF Aut...

Страница 110: ...acking and restores the focus point selected before tracking started To exit subject tracking mode press the W Q button D Subject tracking The camera may be unable to track subjects if they are similar in color or brightness to the background change visibly in size color or brightness are too large or too small are too dark or too bright move quickly or leave the frame or are obscured by other obj...

Страница 111: ...r cats the camera will focus on the face or eye closest to the selected point Available only in photo mode V Touch AF Touch the display to focus on the selected point Lifting your finger from the display does not release the shutter If Auto area AF Auto area AF people or Auto area AF animals is selected for AF area mode the camera will track the selected subject as it moves through the frame To sw...

Страница 112: ... multi selector to choose the desired eye D Taking pictures using touch shooting options Touch controls cannot be used for manual focus The shutter release button can be used to take pictures when the W icon is displayed Touch controls cannot be used to take photographs during video recording Even if the camera is set to a continuous release mode touch controls can be used only to take one picture...

Страница 113: ...to zoom in on the view through the lens The focus indicator I in the shooting display can be used to confirm whether the subject in the selected focus point is in focus electronic rangefinding The focus point will also light green when the subject is in focus 1 Focus distance indicator 2 Focus indicator Focus indicator Description steady The subject is in focus ...

Страница 114: ...e camera is having trouble focusing D Lenses with focus mode selection Manual focus mode can be chosen using focus mode selection controls on the lens where available D The focal plane mark and flange back distance Focus distance is measured from the focal plane mark E on the camera body which shows the position of the focal plane inside the camera q Use this mark when measuring the distance to yo...

Страница 115: ...tom Setting d9 Focus peaking objects that are in focus will be indicated by colored outlines that appear when focus is adjusted manually focus peaking Note that focus peaking may not be displayed if the camera is unable to detect outlines Check focus in the shooting display ...

Страница 116: ...ght sources if the desired results cannot be achieved with auto white balance choose another option as described below Adjusting white balance White balance can be selected using the White balance items in the i menu and the photo shooting menu or video recording menu 0153 0248 0332 At default settings white balance can also be selected by holding the Fn button and rotating the main command dial 0...

Страница 117: ... with the conditions in effect when the flash fires i Keep white reduce warm colors Approx 3500 8000 K Eliminate the warm color cast produced by incandescent lighting j Keep overall atmosphere Approx 3500 8000 K Partially preserve the warm color cast produced by incandescent lighting k Keep warm lighting colors Approx 3500 8000 K Preserve the warm color cast produced by incandescent lighting D Nat...

Страница 118: ... Approx 3000 K Use under incandescent lighting I Fluorescent Use under fluorescent lighting choose the bulb type according to the light source Cool white fluorescent Approx 4200 K Day white fluorescent Approx 5000 K Daylight fluorescent Approx 6500 K 5 Flash Approx 5400 K Use for flash photography K Choose color temperature Approx 2500 10000 K Choose the color temperature directly To choose a colo...

Страница 119: ...atural light auto D Natural light auto may not produce the desired results under artificial light Choose 4 Auto or an option that matches the light source D White balance fine tuning At settings other than K Choose color temperature white balance can be fine tuned Use the White balance items in the i menu the photo shooting menu or video recording menu 0154 0249 D Studio flash lighting 4 Auto may ...

Страница 120: ...ayback menu and place a check M next to Shooting data A Color temperature The perceived color of a light source varies with the viewer some may have a red cast while others appear blue Color temperature is an objective measure of the color of a light source expressed in Kelvins K The lower the color temperature the redder the cast q the higher the temperature the bluer the cast w A Choosing a colo...

Страница 121: ...option selected for Custom Setting d4 Shutter type If a release mode other than Continuous H extended is selected the display will briefly go dark when the shutter is released This signals that a photo has been taken Regardless of the settings selected for Beep options in the setup menu beeps will not sound when the camera focuses or while the self timer is in operation Enabling silent photography...

Страница 122: ...odium lamps Distortion associated with motion moving subjects may be distorted or the entire frame may appear distorted if the camera is moved during shooting Jagged edges color fringing moiré and bright spots in the display Bright regions or bands in scenes lit by flashing signs and other intermittent light sources or when the subject is briefly illuminated by a strobe or other bright momentary l...

Страница 123: ...arked as candidates for later deletion Ratings can also be viewed in NX Studio Protected pictures cannot be rated 1 Press the K button to start playback 2 Select the desired picture and press the i button The playback i menu will be displayed 3 Highlight Rating and press J ...

Страница 124: ...ctures 124 4 Choose a rating Rotate the main command dial to choose a rating of from zero to five stars or select d to mark the picture as a candidate for later deletion Press J to select the highlighted option ...

Страница 125: ...g deleted accidentally Protected pictures will however be deleted when the memory card is formatted 1 Press the K button to start playback 2 Select the desired picture and press the A g button Protected pictures are marked with a P icon To remove protection display or highlight the picture and press the A g button again ...

Страница 126: ...es from deletion 126 A Removing protection from all pictures To remove protection from all pictures in the folder or folders currently selected for Playback folder in the playback menu select Unprotect all in the i menu ...

Страница 127: ...UTO b Auto A simple point and shoot mode that leaves the camera in charge of settings 085 090 P Programmed auto The camera sets shutter speed and aperture for optimal exposure S Shutter priority auto Use to freeze or blur motion You choose the shutter speed the camera selects the aperture for best results A Aperture priority auto Use to blur backgrounds or bring both foreground and background into...

Страница 128: ...rture that produce the same exposure can be selected by rotating the main command dial flexible program While flexible program is in effect a flexible program indicator U is displayed To restore default shutter speed and aperture settings rotate the main command dial until the indicator is no longer displayed Flexible program also ends when the mode dial is rotated to another setting or the camera...

Страница 129: ...o set the shutter speed To select X or T or to change from 1 3STEP X T or B rotate while pressing the shutter speed dial lock release 1 1 4000 s 1 2 s 2 1 4 s red text 3 X Flash sync 0361 4 1 3STEP 1 3 step 0130 In mode S long exposures 0134 are not available even if the shutter speed dial is set to B Bulb or T Time To perform long exposures select mode M ...

Страница 130: ...3 or X In mode M you can also select B Bulb or T Time You can set the shutter speed by means other than the shutter speed dial as follows Touch controls 054 Touch controls in self portrait mode 052 A aperture priority auto In aperture priority auto you choose the aperture while the camera automatically adjusts shutter speed for optimal exposure Aperture can be adjusted by rotating the sub command ...

Страница 131: ...y item in the video recording menu 3 If On is selected for ISO sensitivity settings Auto ISO control mode M in the video recording menu the upper limit for ISO sensitivity can be selected using Maximum sensitivity M manual You control both shutter speed and aperture Choose this mode for long time exposures of such subjects as fireworks or the night sky Bulb or Time photography 0134 Shutter speed w...

Страница 132: ...set to 1 3STEP you can use the main command dial to change the shutter speed Shutter speed can also be set to 15 s or 30 s 0130 1 1 4000 s 1 2 s 2 1 4 s red text 3 B Bulb 0134 4 T Time 0134 5 X Flash sync 0361 6 1 3STEP 1 3 step 0130 Aperture Aperture can be adjusted by rotating the sub command dial The minimum and maximum values for aperture vary with the lens ...

Страница 133: ...ra is displayed in the monitor and viewfinder These exposure indicators are displayed as follows Display Optimal exposure Underexposed by 1 3 EV Overexposed by over 3 1 3 EV Monitor Viewfinder If exposure compensation was performed in mode M the reference value for proper exposure in the exposure indicator changes D Exposure warning The displays will flash if the selected settings exceed the limit...

Страница 134: ...M If auto ISO sensitivity control 0245 0331 is enabled ISO sensitivity will automatically be adjusted for optimal exposure at the selected shutter speed and aperture Long time exposures The camera offers two options for long time exposures Bulb and Time Long time exposures can be used for pictures of fireworks night scenery the stars or moving lights A 35 second exposure shot at a shutter speed of...

Страница 135: ...ends when the button is pressed a second time 1 Keep the camera steady for example by using a tripod 2 Rotate the mode selector to M 3 Rotate the shutter speed dial and set the shutter speed to Bulb Bulb or Time Time Bulb Time If the shutter speed dial is set to 1 3STEP use the main command dial to set it to Bulb or Time ...

Страница 136: ...tter release button all the way down a second time D Long time exposures Note that noise bright spots randomly spaced bright pixels or fog may be present in long exposures Bright spots and fog can be reduced by choosing On for Long exposure NR in the photo shooting menu Nikon recommends using a fully charged battery or an optional charging AC adapter to prevent loss of power during long exposures ...

Страница 137: ...se and rotate the ISO sensitivity dial The option currently selected is shown in the display during shooting Photo mode Choose from values of from ISO 100 to 51200 You can set the ISO sensitivity dial to H1 Hi 1 for about one step higher or H2 Hi 2 for about two steps higher from ISO 51200 In mode b the setting is fixed at ISO A AUTO and the camera automatically adjusts ISO sensitivity If Silent p...

Страница 138: ... Off Choose from values of from ISO 100 to 25600 If the ISO sensitivity dial is set to any other value it will be set to ISO 25600 D High ISO sensitivities The higher the ISO sensitivity the less light needed to make an exposure allowing pictures to be taken when lighting is poor and helping prevent blur when the subject is in motion Note however that the higher the sensitivity the more likely the...

Страница 139: ...posure compensation can be adjusted in the range 3 to 3 EV in steps of 1 3 EV Higher values make the subject brighter lower values darker To cancel exposure compensation set the exposure compensation dial to 0 At values other than 0 0 the camera displays a E icon and the exposure indicator 0133 in photo mode or a E icon in video mode You can check the compensation value on the information display ...

Страница 140: ...means other than the exposure compensation dial If you set the exposure compensation dial to C you can adjust the exposure compensation through other means as follows Values between 5 EV and 5 EV are available for photos and between 3 EV and 3 EV for videos Easy exposure compensation 0352 i menu 0145 Touch controls in self portrait mode 052 Lens control ring 0367 0382 ...

Страница 141: ...31 is in effect ISO sensitivity is automatically adjusted according to the value selected for exposure compensation and the overall brightness of the image changes D Using a flash When an optional flash unit is used exposure compensation affects both flash level and exposure altering the brightness of both the main subject and the background Custom Setting e3 Exposure comp for flash can be used to...

Страница 142: ...ure lock is particularly effective with spot and center weighted metering Focus lock Use focus lock to lock focus on the current subject when AF C is selected for focus mode When using focus lock choose an AF area mode other than Auto area AF Auto area AF people or Auto area AF animals Locking focus and exposure 1 Position the subject in the selected focus point and press the shutter release butto...

Страница 143: ...not change even when the composition is altered An AE L icon will be displayed in the monitors 3 Keeping the A g button pressed recompose the photograph and shoot Do not change the distance between the camera and the subject If the distance to the subject changes release the lock and focus again at the new distance ...

Страница 144: ...sure with the shutter release button If On half press is selected for Custom Setting c1 Shutter release button AE L exposure will lock while the shutter release button is pressed halfway D Taking multiple shots at the same focus distance If you locked focus by pressing the A g button focus will remain locked between shots if you keep the A g button pressed Focus will also remain locked if you keep...

Страница 145: ... to frequently used settings To view the menu press the i button Highlight items using the multi selector and press J to view options Highlight the desired option and press J to select and return to the i menu To cancel and return to the previous display press the i button ...

Страница 146: ...an be chosen by rotating the main command dial Options for the selected setting if any can be selected by rotating the sub command dial Some items can be adjusted by rotating either dial Press J to save changes You can also save changes by pressing the shutter release button halfway or highlighting another item ...

Страница 147: ...ize 0161 5 Flash mode 0162 6 Metering 0162 7 Wi Fi connection 0164 8 Active D Lighting 0164 9 Release mode 0166 10 Vibration reduction 0171 11 AF area mode 0172 12 Focus mode 0173 Set Picture Control Choose image processing Picture Control options for new photos according to the scene or your creative intent ...

Страница 148: ...rocessing for balanced results Recommended for most situations R Neutral Minimal processing for natural results Choose for photographs that will later be processed or retouched S Vivid Pictures are enhanced for a vivid photoprint effect Choose for photographs that emphasize primary colors T Monochrome Take monochrome photographs o Portrait Smooth complexions for natural looking portraits p Landsca...

Страница 149: ...or particular effects Choose the type from Dream Morning Pop Sunday Somber Dramatic Silence Bleached Melancholic Pure Denim Toy Sepia Blue Red Pink Charcoal Graphite Binary or Carbon To view Picture Control settings highlight a Picture Control and press 3 Any changes to fine tuning options can be previewed in the display 0150 The option currently selected is shown in the display during shooting ...

Страница 150: ...3 to highlight settings Press 4 or 2 to choose a value in increments of 1 or rotate the sub command dial to choose a value in increments of 0 25 The options available vary with the Picture Control selected To abandon any changes and start over from default settings press the O button Press J to save changes and return to the i menu Picture Controls that have been modified from default settings are...

Страница 151: ...s can be adjusted in the range A 2 to A 2 Picture Control settings Option Description Effect level Mute or heighten the effect of Creative Picture Controls Quick sharp Quickly adjust levels for balanced Sharpening Mid range sharpening and Clarity These parameters can also be adjusted individually Sharpening Control the sharpness of details and outlines Mid range sharpening Adjust the sharpness of ...

Страница 152: ...ected displays saturation options Toning Creative Picture Control Choose the shade of color used for Creative Picture Controls D Filter effects Choose from the following Filter effects Option Description Y yellow These options enhance contrast and can be used to tone down the brightness of the sky in landscape photographs Orange O produces more contrast than yellow Y red R more contrast than orang...

Страница 153: ... Keep overall atmosphere k Keep warm lighting colors D Natural light auto H Direct sunlight G Cloudy M Shade Option J Incandescent I Fluorescent Cool white fluorescent Day white fluorescent Daylight fluorescent 5 Flash K Choose color temperature L Preset manual Pressing 3 when 4 Auto or I Fluorescent is highlighted displays sub options for the highlighted item ...

Страница 154: ...te balance is highlighted in the i menu displays a list of white balance options If an option other than K Choose color temperature is highlighted fine tuning options can be displayed by pressing 3 Any changes to fine tuning options can be previewed in the display G Increase green B Increase blue A Increase amber M Increase magenta ...

Страница 155: ...he i menu displays a list of white balance options When K Choose color temperature is highlighted color temperature options can be viewed by pressing 3 Value for Amber Blue axis Value for Green Magenta axis Press 4 or 2 to highlight digits on the A B amber blue axis You can also highlight the G M green magenta axis Press 1 or 3 to edit the selected item Press J to save changes and return to the i ...

Страница 156: ...ch as 4 Auto J Incandescent and K Choose color temperature may fail to produce the desired results under mixed lighting or lighting with a strong color cast Should this occur white balance can be set to a value measured under the light source used in the final photograph The camera can store up to six values for preset manual white balance 1 Select White balance in the i menu then highlight L Pres...

Страница 157: ... 157 3 Highlight White balance in the i menu and hold the J button to initiate direct measurement mode A L indicator will flash in the shooting display The white balance target r appears in the center of the frame ...

Страница 158: ...arget and measure white balance by tapping the display You cannot move r if an optional flash unit is attached Frame the shot so that the white or gray reference object is in the center of the display If the camera is unable to measure white balance a message will be displayed and the camera will return to direct measurement mode Try measuring white balance again for example with the target r posi...

Страница 159: ... are protected and cannot be changed D Preset manual Selecting a preset At shipment presets d 1 through d 6 are set to 5200 K equivalent to the H Direct sunlight white balance option White balance presets can be viewed by selecting White balance L Preset manual in the photo shooting menu To recall a stored value highlight a preset using the multi selector and press J D Direct measurement mode Dire...

Страница 160: ... is displayed during playback The RAW copies can only be viewed using a computer Deleting the JPEG copies on the camera also deletes the RAW images RAW JPEG normal RAW JPEG basic RAW RAW images have the highest quality and the quality decreases from fine to normal and to basic JPEG fine JPEG normal JPEG basic The option currently selected is shown in the display during shooting ...

Страница 161: ...performed in camera using the RAW processing item in the retouch menu or on a computer using Nikon s NX Studio software NX Studio is available free of charge from the Nikon Download Center A RAW JPEG The camera displays only the JPEG copies of photos recorded at image quality settings of RAW JPEG The RAW copies can only be viewed using a computer Deleting the JPEG copies on the camera also deletes...

Страница 162: ...de Choose a flash mode for optional flash units The options available vary with the shooting mode Option Available in I Fill flash b P S A M J Red eye reduction b P S A M L Slow sync P A K Slow sync red eye P A M Rear curtain sync P S A M s Flash off b P S A M The option currently selected is shown in the display during shooting Metering Metering determines how the camera sets exposure ...

Страница 163: ...rea assigned the greatest weight can be selected using Custom Setting b2 Center weighted area N Spot metering The camera meters a circle with a diameter of 3 5 mm 0 14 in equivalent to approximately 2 5 of the frame This ensures that the subject will be correctly exposed even when the background is much brighter or darker The metered area is centered on the current focus point If AF area mode 0102...

Страница 164: ...pBridge app 0483 The camera displays a Wi Fi icon when Wi Fi is enabled To turn Wi Fi off highlight Wi Fi connection in the i menu and press J if Wi Fi is currently enabled a Close Wi Fi connection prompt will be displayed Press J to end the connection Active D Lighting Preserve details in highlights and shadows creating pictures with natural contrast Use for high contrast scenes for example when ...

Страница 165: ...ff Y Auto Option Description Y Auto The camera automatically adjusts Active D Lighting in response to shooting conditions Z Extra high Choose the amount of Active D Lighting performed from Extra high High Normal and Low P High Q Normal R Low c Off Active D Lighting off The option currently selected is shown in the display during shooting ...

Страница 166: ...ame The camera takes one photograph each time the shutter release button is pressed V Continuous L The camera takes photographs at a selected rate while the shutter release button is pressed The frame advance rate can be chosen by rotating the sub command dial when continuous L is selected in the release mode menu Choose from rates of from 1 to 4 fps W Continuous H The camera takes photos at up to...

Страница 167: ...Still images 167 Pressing 3 when Continuous L is highlighted displays frame advance rate options The option currently selected is shown in the display during shooting ...

Страница 168: ...ended JPEG Approx 11 fps Approx 11 fps RAW 12 bit 14 bit Approx 9 fps Approx 8 5 fps Approx 10 fps if Electronic front curtain shutter is selected for Custom Setting d4 Shutter type D Burst photography Depending on shooting conditions and memory card performance the memory card access lamp may light for anywhere from a few tens of seconds to around a minute Do not remove the memory card while the ...

Страница 169: ...exposure during burst photography D The memory buffer While the shutter release button is pressed halfway the frame count display will show the number of pictures that can be stored in the memory buffer When the buffer is full the display will show r00 and the frame rate will drop The number shown is approximate The actual number of photos that can be stored in the memory buffer varies with camera...

Страница 170: ...se the desired shutter release delay and number of shots Press J to select the highlighted option 3 Frame the photograph and focus The timer will not start if the shutter cannot be released as may be the case for example if the camera is unable to focus when AF S is selected for focus mode ...

Страница 171: ...aking multiple shots The number of shots taken and the interval between shots can be selected using Custom Setting c2 Self timer Vibration reduction Choose whether to enable vibration reduction The options available vary with the lens Option Description C On Choose for enhanced vibration reduction when photographing static subjects Normal D Sport Choose when photographing athletes and other subjec...

Страница 172: ...ning shots In Normal or Sport mode vibration reduction applies only to motion that is not part of the pan If the camera is panned horizontally for example vibration reduction will be applied only to vertical shake If you will use a tripod or monopod with a VR lens camera the settings may differ depending on the lens Consult the lens documentation before use for more information AF area mode AF are...

Страница 173: ...elected is shown in the display during shooting Focus mode Focus mode controls how the camera focuses For more information see Focus mode in the Focus section of Basic settings 0100 Option AF A AF mode auto switch AF S Single AF Option AF C Continuous AF MF Manual focus The option currently selected is shown in the display during shooting ...

Страница 174: ... 0181 9 Electronic VR 0181 10 Vibration reduction 0182 11 AF area mode 0182 12 Focus mode 0182 A Same as photo settings If Same as photo settings is selected for Set Picture Control White balance Active D Lighting or Vibration reduction in the video recording menu a h icon will appear at the top left corner of the i menu Changes made to the setting from the i menu in photo mode will also apply in ...

Страница 175: ...h quality and Normal A star m appears in the icon for Frame size frame rate when High quality is selected Some frame size rate options only support High quality Frame size frame rate The maximum bit rate and recording time for each Frame size frame rate option are shown below The bit rate varies with the option selected for video quality Option1 Max bit rate Max recording time High quality Normal ...

Страница 176: ...d at High quality 4 The following features cannot be used Detection of human dog or cat faces or eyes when Wide area AF L people Wide area AF L animals Auto area AF people or Auto area AF animals is selected for AF area mode Flicker reduction Electronic VR HDMI output while recording videos 5 If you use a memory card that has a capacity over 32 GB you can record up to the maximum length with one v...

Страница 177: ...d In 1920 1080 30p 4 slow motion for example images read at a frame rate of 120p are recorded as a video in 30p A video recorded for about 10 seconds will be played back for about 40 seconds You can see momentary actions in slow motion such as the impact of a ball in sports The frame rates when reading images and when recording and playing back videos are as follows Frame size frame rate Frame rat...

Страница 178: ...annot be used when recording slow motion videos Flicker reduction Electronic VR Recording timecodes HDMI output while recording videos Microphone sensitivity Turn built in or external microphones on or off or adjust microphone sensitivity Option Description bA Adjust microphone sensitivity automatically Microphone off Turn sound recording off b1 b20 Adjust microphone sensitivity manually Choose fr...

Страница 179: ...the sound level is displayed in red the volume is too high Reduce microphone sensitivity D Videos without sound Videos recorded with Microphone off selected for microphone sensitivity are indicated by a 2 icon Wind noise reduction Choose whether to use wind noise reduction when recording videos ...

Страница 180: ...ffect on optional stereo microphones Wind noise reduction for optional stereo microphones that support this feature can be enabled or disabled using microphone controls Metering Choose how the camera sets exposure during video recording For more information see Still images 0162 D Metering Spot metering is not available in video mode Wi Fi connection Enable or disable Wi Fi For more information se...

Страница 181: ...d in the photo shooting menu videos will be shot at a setting equivalent to Normal Electronic VR Choose whether to enable electronic vibration reduction in video mode Option Description On Enable electronic vibration reduction during video recording If the video frame size and rate is set to 1920 1080 120p 1920 1080 100p or 1920 1080 slow motion electronic vibration reduction is disabled Note that...

Страница 182: ...AF area mode in the Focus section of Basic settings 0102 Option d Single point AF f Wide area AF S g Wide area AF L 1 Wide area AF L people Option 2 Wide area AF L animals h Auto area AF 5 Auto area AF people 6 Auto area AF animals Focus mode Focus mode controls how the camera focuses For more information see Focus mode in the Focus section of Basic settings 0100 Option AF S Single AF AF C Continu...

Страница 183: ... Full frame playback Press the K button to view the most recent picture full frame in the display Press 4 to return to the previous frame 2 to skip to the next frame Press 1 3 or the DISP button to view more information on the current picture 0186 ...

Страница 184: ...om 4 to 9 to 72 each time the W Q button is pressed and decreases with each press of the X button Highlight pictures using 1 3 4 or 2 Calendar playback To view images taken on a selected date press the W Q button when 72 images are displayed Use the multi selector 1 3 4 or 2 to highlight a date in the date list q and press W Q to place the cursor in the thumbnail list w ...

Страница 185: ... display tall portrait orientation photographs in tall orientation select On for Rotate tall in the playback menu D Picture review When On is selected for Picture review in the playback menu photographs are automatically displayed after shooting there is no need for you to press the K button If On monitor only is selected photos will not be displayed in the viewfinder In continuous release modes d...

Страница 186: ...tion 2 Exposure data1 3 Highlight display1 4 RGB histogram1 5 Shooting data1 2 6 Location data3 7 Overview data1 8 None picture only 1 1 Displayed only if the corresponding option is selected for Playback display options in the playback menu 2 The shooting data list has multiple pages which can be viewed by pressing 1 or 3 3 Location data are displayed only if embedded in the picture at the time i...

Страница 187: ... 4 Focus point 085 5 Frame number total number of frames 6 Image quality 0160 7 Image size 0161 8 Image area 0243 9 Time of recording 0393 10 Date of recording 0393 11 Rating 0123 12 Folder name 0238 13 File name 0242 Displayed only if Focus point is selected for Playback display options in the playback menu ...

Страница 188: ...tter speed 0128 0131 4 Aperture 0130 0131 5 Exposure compensation value 0139 6 ISO sensitivity 0137 Displayed in red if the picture was taken in mode P S A or M with auto ISO sensitivity control enabled Highlight display 1 Highlights areas that may be overexposed 2 Folder number frame number 0238 ...

Страница 189: ... 1 Folder number frame number 0238 2 White balance 0116 0153 0248 Color temperature 0155 Preset manual 0156 White balance fine tuning 0154 3 Histogram RGB channel 4 Histogram red channel 5 Histogram green channel 6 Histogram blue channel ...

Страница 190: ...ams show tone distribution Pixel brightness tone is plotted on the horizontal axis and the number of pixels on the vertical axis If the image contains objects with a wide range of brightnesses the distribution of tones will be relatively even If the image is dark the distribution will be shifted to the left If the image is bright the distribution will be shifted to the right Increasing exposure co...

Страница 191: ...l exposure when bright ambient lighting makes it difficult to see pictures in the monitor D The histogram display RGB histograms show tone distribution Camera histograms may differ from those displayed in imaging applications Use them as a guide to actual tone distribution ...

Страница 192: ...e compensation value 0139 Optimal exposure tuning2 0353 4 Focal lengths 5 Lens data 6 Focus mode 0100 AF area mode 0102 7 Vibration reduction 0171 8 White balance3 0116 0153 0248 9 White balance fine tuning 0154 10 Color space 0262 11 Camera name 12 Image area 0243 13 Folder number frame number 0238 1 Displayed in red if the picture was taken in mode P S A or M with auto ISO sensitivity control en...

Страница 193: ...Photo information 193 3 Also includes the color temperature for pictures taken using 4 Auto ...

Страница 194: ...ken with optional flash units 0497 0508 1 Flash type 2 Remote flash control 3 Flash mode 0502 4 Flash control mode 0501 Flash compensation 0504 Picture Control data The items displayed vary with the Picture Control in effect when the picture was taken 1 Picture Control 0147 0255 ...

Страница 195: ...differential 0289 HDR smoothing 0289 4 Vignette control 0264 5 Retouch history 0424 Changes are listed in the order applied 6 Image comment 0404 Copyright information Copyright information is only displayed if recorded using the Copyright information item in the setup menu at the time the picture was taken 1 Photographer 0405 2 Copyright holder 0405 ...

Страница 196: ...ata page lists the latitude longitude and other location data downloaded from smartphones or tablets The items listed vary with the device supplying the location data The location data displayed with videos are those reported at the start of recording ...

Страница 197: ...rotect status 0125 4 Retouch indicator 0424 5 Camera name 6 Image comment indicator 0404 7 Location data indicator 8 Histogram 0190 9 Image quality 0160 10 Image size 0161 11 Image area 0243 12 File name 0242 13 Time of recording 0393 14 Date of recording 0393 15 Folder name 0238 16 Rating 0123 ...

Страница 198: ... space 0262 10 Flash mode2 0502 11 White balance 0116 0153 0248 Color temperature 0155 Preset manual 0156 White balance fine tuning 0154 12 Flash compensation2 0504 Commander mode2 13 Exposure compensation value 0139 1 Displayed in red if the picture was taken in mode P S A or M with auto ISO sensitivity control enabled 2 Flash data are displayed only for pictures taken with optional flash units 0...

Страница 199: ...viewed by pressing the i button when thumbnails are displayed Photos Option Description Quick crop 1 Save a copy of the current image cropped to the area visible in the display This option is not available when RGB histograms are displayed 0189 Rating Rate the current picture 0123 Select for upload to smart device Select the current picture for upload 0202 The option displayed varies with the type...

Страница 200: ... the current picture 0125 Unprotect all 2 Remove protection from all pictures in the folder currently selected for Playback folder in the playback menu Side by side comparison 3 Compare retouched copies to the originals 1 Available only during playback zoom 2 Not available during playback zoom 3 Available only when a retouched copy indicated by a p icon or the source picture for a retouched copy i...

Страница 201: ...py is an overlay created from multiple source images press 1 or 3 to view the other images If the source has been copied multiple times press 1 or 3 to view the other copies To view the highlighted picture zoomed in press and hold the X button Press J to return to playback with the highlighted image displayed full frame To exit to playback press the K button The source image will not be displayed ...

Страница 202: ... remove protection from the current picture 0125 Unprotect all Remove protection from all pictures in the folder currently selected for Playback folder in the playback menu Videos playback paused Option Description 9 Choose start end point Trim footage from the current video and save the edited copy in a new file 0204 4 Save current frame Save a selected frame as a JPEG still 0207 Select for uploa...

Страница 203: ...ilt in Wi Fi using Connect to computer in the setup menu 0411 Videos cannot be selected for upload when the camera is connected to a smart device via the SnapBridge app The maximum file size for videos uploaded by other means is 4 GB 1 Select the desired picture and press the i button 2 Highlight Select for upload to smart device or Select for upload to computer and press J The picture will be mar...

Страница 204: ... 2 Pause the video on the new opening frame Press the J button to start playback videos Press 3 to pause Your approximate position in the video can be ascertained from the video progress bar Press 4 or 2 or rotate the main command dial to locate the desired frame 3 Select Choose start end point Press the i button highlight Choose start end point and press J ...

Страница 205: ...the current frame highlight Start point and press J 5 Confirm the new start point If the desired frame is not currently displayed press 4 or 2 to advance or rewind Rotate the main command dial one stop to skip ahead or back 10 s Rotate the sub command dial to skip to the last or first frame ...

Страница 206: ...n tool x and then select the closing frame x as described in Step 5 7 Press 1 to create the copy 8 Preview the copy To preview the copy highlight Preview and press J to interrupt the preview and return to the save options menu press 1 To abandon the current copy and return to Step 5 highlight Cancel and press J ...

Страница 207: ...han two seconds long cannot be edited using Choose start end point Copies have the same time and date of creation as the original D Removing opening or closing footage To remove only the closing footage from a video choose End point in Step 4 press the J button and proceed to Step 7 without pressing the A g button in Step 6 To remove only the opening footage proceed to Step 7 without pressing the ...

Страница 208: ...t frame Press the i button then highlight Save current frame and press J to create a JPEG copy of the current frame D Save current frame Stills are saved at the dimensions selected for Frame size frame rate in the video recording menu when the video was recorded They cannot be retouched Some categories of photo information are not displayed during playback ...

Страница 209: ...zoom in To zoom out press W Q or use pinch gestures A navigation window is displayed during the zoom ratio is altered with the area currently visible indicated by a yellow border A bar below the navigation window shows the zoom ratio turning green at 1 1 The navigation window clears from the display after a few seconds View other areas of image Use the multi selector or glide gestures to view area...

Страница 210: ...other faces View other pictures Rotate the main command dial to view the same location in other photos without changing the zoom ratio selecting a video cancels zoom You can also view other photos by tapping the e or f icon at the bottom of the display Exit to shootin g mode Press the shutter release button halfway or press the K button to exit View menus Press the G button to view the menus ...

Страница 211: ...ress the O button to delete the current picture 1 Select the desired picture with the multi selector and press the O button A confirmation dialog will be displayed To exit without deleting the picture press K 2 Press the O button again The picture will be deleted A Calendar playback During calendar playback you can delete all photographs taken on a selected date by highlighting the date in the dat...

Страница 212: ...all pictures taken on selected dates 0213 R All pictures Delete all pictures in the folder currently selected for Playback folder in the playback menu Deleting selected pictures 1 Select pictures Highlight pictures using the multi selector and press the W Q button to select selected pictures are marked with O icons Selected pictures can be deselected by pressing the W Q button again Repeat until a...

Страница 213: ... Yes and press J to delete the selected pictures Pictures shot on selected dates 1 Select dates Highlight dates using the multi selector and press 2 to select selected dates are marked with M icons Selected dates can be deselected by pressing 2 again Repeat until you have selected all the desired dates ...

Страница 214: ...Deleting pictures 214 2 Delete the pictures Press J a confirmation dialog will be displayed Highlight Yes and press J to delete all the pictures taken on the selected dates ...

Страница 215: ...us are listed below Playback menu defaults Playback menu option Default Delete Playback folder All Playback display options Focus point U Exposure info U Highlights U RGB histogram U Shooting data U Overview U None picture only U Picture review Off Rotate tall On Slide show Picture type Photos and videos Frame interval 2 s ...

Страница 216: ...by number 100 Select folder from list File naming DSC Choose image area DX 24 16 Image quality JPEG normal Image size Large RAW recording 14 bit ISO sensitivity settings ISO sensitivity Auto ISO sensitivity control Off Maximum sensitivity 51200 Maximum sensitivity with c Same as without flash Minimum shutter speed Auto White balance j Keep overall atmosphere Fine tune A B 0 G M 0 ...

Страница 217: ...e NR Off High ISO NR Normal Vignette control Normal Diffraction compensation On Auto distortion control On Flicker reduction shooting Off Metering Matrix metering Flash control Flash control mode TTL Wireless flash options Off Flash mode Fill flash Flash compensation 0 0 Release mode Single frame Focus mode AF mode auto switch AF area mode Auto area AF people Vibration reduction Varies with lens ...

Страница 218: ...e Off Number of shots 2 Overlay mode Average Save individual pictures RAW On Overlay shooting On Select first exposure RAW HDR high dynamic range HDR mode Off Exposure differential Auto Smoothing Normal Save individual pictures RAW Off Interval timer shooting Choose start day time Now Interval 1 min Intervals shots interval 0001 1 Exposure smoothing On Silent photography On ...

Страница 219: ...mbering U Time lapse video Interval 5 s Shooting time 25 min Exposure smoothing On Silent photography On Frame size frame rate 1920 1080 60p Interval priority Off Focus before each shot Off Focus shift shooting No of shots 100 Focus step width 5 Interval until next shot 0 First frame exposure lock On Silent photography On Starting storage folder New folder U ...

Страница 220: ...SC Frame size frame rate 1920 1080 60p Video quality High quality Video file type MOV ISO sensitivity settings Maximum sensitivity 25600 Auto ISO control mode M On ISO sensitivity mode M White balance Same as photo settings Fine tune A B 0 G M 0 Choose color temperature 5000 K Preset manual d 1 Set Picture Control Same as photo settings Manage Picture Control Active D Lighting Off High ISO NR Norm...

Страница 221: ... Matrix metering Release mode save frame Single frame Focus mode Full time AF AF area mode Auto area AF people Vibration reduction Same as photo settings Electronic VR Off Microphone sensitivity Auto Attenuator Disable Frequency response Wide range Wind noise reduction Off Timecode Record timecodes Off Count up method Record run Timecode origin Drop frame On ...

Страница 222: ...points used All points a5 Store points by orientation No a6 AF activation Shutter AF ON a7 Limit AF area mode selection Pinpoint AF M Single point AF L cannot be deselected Dynamic area AF M Wide area AF S M Wide area AF L M Wide area AF L people M Wide area AF L animals M Auto area AF M Auto area AF people M Auto area AF animals M a8 Focus point wrap around No wrap a9 Focus point options Manual f...

Страница 223: ...posure compensation On b2 Center weighted area Φ 8 mm b3 Fine tune optimal exposure Matrix metering 0 Center weighted metering 0 Spot metering 0 Highlight weighted metering 0 b4 b mode exposure comp Enable c1 Shutter release button AE L Off c2 Self timer Self timer delay 10 s Number of shots 1 Interval between shots 0 5 s c3 Power off delay Playback 10 s Menus 1 min Picture review 4 s ...

Страница 224: ... d6 File number sequence On d7 Apply settings to live view On d8 Framing grid display Off d9 Focus peaking Peaking level Off Peaking highlight color Red d10 View all in continuous mode On e1 Flash sync speed 1 200 s e2 Flash shutter speed 1 60 s e3 Exposure comp for flash Entire frame e4 Auto c ISO sensitivity control Subject and background e5 Auto bracketing mode M Flash speed e6 Bracketing order...

Страница 225: ...de Focus mode f2 Custom controls shooting Fn button White balance AE L AF L button AE AF lock OK button Select center focus point Video record button Live view info display off Lens Fn button AE AF lock Lens Fn2 button AF ON Lens control ring Varies with lens f3 Custom controls playback AE L AF L button Protect OK button Zoom on off f4 Customize command dials Reverse rotation Exposure compensation...

Страница 226: ...g1 Customize i menu Set Picture Control White balance Frame size and rate Video quality Microphone sensitivity Wind noise reduction Metering Wi Fi connection Active D Lighting Electronic VR Vibration reduction AF area mode Focus mode g2 Custom controls Fn button White balance AE L AF L button AE AF lock OK button Select center focus point Shutter release button Take photos Lens Fn button AE AF loc...

Страница 227: ...play pattern Off Highlight display threshold 248 Setup menu defaults Setup menu option Default Format memory card Language Default varies with country of purchase Time zone and date Time zone Default varies with country of purchase Date and time Date format Default varies with country of purchase Daylight saving time Off Monitor brightness 0 Monitor color balance A B 0 G M 0 ...

Страница 228: ...y switch M Viewfinder only M Monitor only M Prioritize viewfinder M Information display Dark on light AF fine tuning options AF fine tune Off Fine tune and save lens Default List saved values Non CPU lens data Lens number 1 Focal length mm Maximum aperture Save focus position Off Image Dust Off ref photo Pixel mapping Image comment Attach comment U ...

Страница 229: ...ls Enable disable touch controls Enable Full frame playback flicks LeftVRight Self portrait mode Enable HDMI Output resolution Auto Advanced Output range Auto External recording control Off Airplane mode Disable Connect to smart device Pairing Bluetooth Bluetooth connection Disable Select for upload Bluetooth Auto select for upload Off Wi Fi connection ...

Страница 230: ... Disable Network settings Options Auto upload Off Delete after upload No Upload file as RAW JPEG Deselect all MAC address Wireless remote ML L7 options Wireless remote connection Disable Save wireless remote controller Delete wireless remote controller Assign Fn1 button Same as camera K button Assign Fn2 button Same as camera G button Conformity marking ...

Страница 231: ...Defaults 231 Setup menu option Default USB power delivery Enable Energy saving photo mode Enable Slot empty release lock Enable release Save load menu settings Reset all settings Firmware version ...

Страница 232: ...ntains the following items Item 0 Delete 232 Playback folder 233 Playback display options 233 Picture review 234 Item 0 Rotate tall 234 Slide show 234 Rating 236 D See also Playback menu defaults 0215 Delete G button U D playback menu Delete multiple images For more information see Deleting multiple pictures 0212 Option Description Q Selected pictures Delete selected pictures ...

Страница 233: ... be visible during playback Folders can be renamed using the Storage folder Rename option in the photo shooting menu All Pictures in all folders will be visible during playback Current Only pictures in the current folder will be visible during playback Playback display options G button U D playback menu Choose whether the focus points used when the photograph was taken are displayed during full fr...

Страница 234: ... in the viewfinder when Viewfinder only is selected for monitor mode Off Pictures can only be viewed by pressing the K button Rotate tall G button U D playback menu When On is selected tall portrait orientation pictures will be automatically rotated for display during playback D Rotate tall Images are not rotated automatically during picture review even when On is selected for Rotate tall Slide sh...

Страница 235: ...how highlight Start and press J The following operations can be performed while the slide show is in progress To Description Skip back skip ahead Press 4 to return to the previous frame 2 to skip to the next frame View additional photo info Press 1 or 3 to choose the photo info displayed To hide photo info select None picture only Pause Press J to pause the slide show To restart highlight Restart ...

Страница 236: ...g is displayed when the show ends To restart highlight Restart and press J To end the show highlight Exit and press J Rating G button U D playback menu Rate pictures Highlight pictures using the multi selector 4 or 2 Press 1 or 3 to choose a rating of from zero to five stars or select d to mark the picture as a candidate for later deletion To view the highlighted picture zoomed in press and hold t...

Страница 237: ...38 File naming 242 Choose image area 243 Image quality 244 Image size 244 RAW recording 245 ISO sensitivity settings 245 White balance 248 Set Picture Control 255 Manage Picture Control 257 Color space 262 Item 0 Active D Lighting 262 Long exposure NR 262 High ISO NR 263 Vignette control 264 Diffraction compensation 264 Auto distortion control 265 Flicker reduction shooting 265 Metering 266 Flash ...

Страница 238: ...s shift shooting 319 Silent photography 327 D See also Photo shooting menu defaults 0216 Reset photo shooting menu G button U C photo shooting menu Restore photo shooting menu options to their default values Photo shooting menu reset is not available while a multiple exposure is in progress Storage folder G button U C photo shooting menu Choose the folder in which subsequent pictures will be store...

Страница 239: ... at the current cursor position You can also enter characters by highlighting them with the multi selector and pressing J 1 Text display area 2 Keyboard area To move the cursor to a new position tap the display or rotate the main command dial If a character is entered when the text display area is full the rightmost character will be deleted To delete the character under the cursor press the O but...

Страница 240: ... the operation and return to the main menu if you chose a folder marked W or X it will be selected as the folder for new pictures If you chose a folder number that does not already exist a new folder will be created with that number when you press J In either case subsequent pictures will be stored in the chosen folder To exit without changing the storage folder press the G button D Folder icons F...

Страница 241: ...t folder from list Highlight Select folder from list and press 2 to display the Select folder from list dialog 2 Highlight a folder Press 1 or 3 to highlight a folder 3 Select the highlighted folder Press J to select the highlighted folder and return to the main menu Subsequent photographs will be stored in the selected folder ...

Страница 242: ...ded to record a video of the maximum length would result in a file numbered over 9999 If there is space on the memory card you will nevertheless be able to continue shooting by creating a folder with a number less than 999 and selecting it as the storage folder or changing the options selected for Frame size frame rate and Video quality before recording videos D Startup time Additional time may be...

Страница 243: ...pace have file names of the form _DSCnnnn xxx In each pair of photographs recorded at image quality settings of RAW JPEG the RAW and JPEG images have the same file names but different extensions Choose image area G button U C photo shooting menu The camera offers a choice of the following image areas Option Description a DX 24 16 Pictures are recorded with an image area of 23 5 15 7 mm DX format T...

Страница 244: ...aries with the option selected for image area Image area Image size Size cm in when printed at 300 dpi DX 24 16 Large 5568 3712 pixels Approx 47 1 31 4 cm 18 6 12 4 in Medium 4176 2784 pixels Approx 35 4 23 6 cm 13 9 9 3 in Small 2784 1856 pixels Approx 23 6 15 7 cm 9 3 6 2 in 1 1 16 16 Large 3712 3712 pixels Approx 31 4 31 4 cm 12 4 12 4 in Medium 2784 2784 pixels Approx 23 6 23 6 cm 9 3 9 3 in S...

Страница 245: ...ing menu Choose a bit depth for RAW pictures Option Description q 12 bit RAW pictures are recorded at a bit depth of 12 bits r 14 bit RAW pictures are recorded at a bit depth of 14 bits Files recorded at a bit depth of 14 bits contain more color data than pictures recorded using 12 bit Files recorded at a bit depth of 14 bits are also larger than pictures recorded using 12 bit ISO sensitivity sett...

Страница 246: ...played Auto ISO sensitivity control Highlight On and press J to enable auto ISO sensitivity control If Off is selected the ISO sensitivity will remain fixed at the value selected with the ISO sensitivity dial Maximum sensitivity Choose the upper limit for auto ISO sensitivity control to prevent it being raised too high Maximum sensitivity with c Choose the upper ISO sensitivity limit for photos ta...

Страница 247: ... camera shake when a long lens is attached To view auto shutter speed selection options highlight Auto and press 2 Auto shutter speed selection can be fine tuned by choosing faster or slower minimums Faster settings can be used to reduce blur when photographing fast moving subjects Shutter speeds may drop below the selected minimum if optimal exposure cannot be achieved at the ISO sensitivity chos...

Страница 248: ...sensitivity dial will serve as the maximum sensitivity During flash photography shutter speed is limited to the range defined by the values selected for Custom Settings e1 Flash sync speed and e2 Flash shutter speed White balance G button U C photo shooting menu Adjust white balance to match the color of the light source For more information see White balance in Basic settings 0116 and White balan...

Страница 249: ...ite balance The multi selector can be used to move the cursor up to six steps from the center of the grid along either of the A amber B blue and G green M magenta axes The selected value is displayed to the right of the grid The A amber B blue axis corresponds to color temperature and is ruled in increments of 0 5 A change of 1 is equivalent to approximately 5 mired The G green M magenta axis has ...

Страница 250: ... will make pictures slightly colder but will not actually make them blue D Mired Values in mired are calculated by multiplying the inverse of the color temperature by 106 Any given change in color temperature produces a greater difference in color at low color temperatures than it would at higher color temperatures For example a change of 1000 K produces a much greater change in color at 3000 K th...

Страница 251: ...nu then highlight K Choose color temperature and press 2 2 Choose a color temperature Press 4 or 2 to highlight digits on the A B amber blue axis You can also highlight the G M green magenta axis Press 1 or 3 to edit the selected item A B amber blue axis G M green magenta axis 3 Save changes Press J to save changes and exit to the menus If a value other than 0 is selected for the green G magenta M...

Страница 252: ...cted value is appropriate Preset manual Copying white balance from a photograph The white balance values for existing photographs can be copied to selected presets For information on measuring new values for preset manual white balance see Preset manual 0156 1 Select White balance in the photo shooting menu then highlight L Preset manual and press 2 2 Select a destination Using the multi selector ...

Страница 253: ... source image Use the multi selector to highlight the desired picture To view the highlighted picture zoomed in press and hold the X button 5 Copy white balance Press J to copy the white balance value for the highlighted photograph to the selected preset If the highlighted photograph has a comment the comment will be copied to the comment for the selected preset ...

Страница 254: ...0249 D Edit comment To enter a descriptive comment of up to 36 characters for the current white balance preset select Edit comment in the preset manual white balance menu D Protect To protect the current white balance preset select Protect in the preset manual white balance menu Highlight On and press J the current white balance preset is now protected Protected presets cannot be modified ...

Страница 255: ...according to the scene or your creative intent For more information see Set Picture Control in The i menu 0147 Modifying Picture Controls from the menus Existing preset or custom Picture Controls can be modified to suit the scene or the user s creative intent 1 Select a Picture Control Highlight the desired Picture Control in the Picture Control list and press 2 ...

Страница 256: ... rotate the sub command dial to choose a value in increments of 0 25 The options available vary with the Picture Control selected To quickly adjust levels for balanced Sharpening Mid range sharpening and Clarity highlight Quick sharp and press 4 or 2 To abandon any changes and start over from default settings press the O button 3 Save changes and exit Press J to save changes ...

Страница 257: ...the Manage Picture Control item in the photo shooting menu or video recording menu creating custom Picture Controls that can then be copied to a memory card and used in compatible software or shared among cameras of the same model Manage Picture Control G button U C photo shooting menu Save modified Picture Controls as custom Picture Controls Option Description Save edit Create a new custom Pictur...

Страница 258: ...m Picture Controls 1 Select Save edit Highlight Save edit and press 2 to view Choose Picture Control options 2 Select a Picture Control Highlight an existing Picture Control and press 2 to display edit options To save a copy of the highlighted Picture Control without further modification press J Save as options will be displayed proceed to Step 4 ...

Страница 259: ...and the techniques for editing them are the same as for Set Picture Control Press J to display Save as options when settings are complete To abandon any changes and start over from default settings press the O button 4 Select a destination Choose a destination for the custom Picture Control C 1 through C 9 ...

Страница 260: ...the existing Picture Control The two digit number is assigned automatically Custom Picture Control names can be up to nineteen characters long New characters are added at the cursor position To cycle through the upper and lower case and symbol keyboards tap the keyboard selection button For information on text entry see Text entry 0239 When entry is complete press X to save the new Picture Control...

Страница 261: ...used to copy custom Picture Controls from the camera to a memory card You can also delete custom Picture Controls in a memory card or copy them to the camera Copy to camera Copy import custom Picture Controls from the memory card to the camera The Picture Controls are copied to custom Picture Controls C 1 through C 9 on the camera and can be named as desired Delete from card Delete selected custom...

Страница 262: ...y substitute other color spaces for the color space selected on the camera The color space selected on the camera can be used when pictures are opened in NX Studio D Adobe RGB For accurate color reproduction Adobe RGB images require applications displays and printers that support color management Active D Lighting G button U C photo shooting menu Preserve details in highlights and shadows creating...

Страница 263: ...play The time required to process photos after shooting roughly doubles D Long exposure noise reduction If the camera is turned off before processing is complete the picture will be saved but noise reduction will not be performed High ISO NR G button U C photo shooting menu Photographs taken at high ISO sensitivities can be processed to reduce noise randomly spaced bright pixels Option Description...

Страница 264: ...he amount of vignette control performed from in order from high to low High Normal and Low g Normal f Low Off Vignette control disabled D Vignette control Depending on the scene shooting conditions and type of lens JPEG images may exhibit noise fog or over processing at the edge of the frame that introduces variations in peripheral brightness In addition custom Picture Controls and preset Picture ...

Страница 265: ...elected automatically with some lenses in which case this item will be grayed out and unavailable Flicker reduction shooting G button U C photo shooting menu When On is selected reduce the effects of flicker from such light sources as fluorescent or mercury vapor lamps Flicker can cause uneven exposure or in photographs taken in continuous release modes inconsistent exposure or coloration Note tha...

Страница 266: ...ly lit or feature dark backgrounds The desired results may also not be achieved with decorative lighting displays and other non standard lighting D Flicker reduction shooting in the photo shooting menu Restrictions The Flicker reduction shooting item in the photo shooting menu does not take effect under some conditions including when Continuous H extended is selected for the release mode On is sel...

Страница 267: ...n Camera flash photography 0497 For information on adjusting settings for wireless remote flash units see Remote flash photography 0508 Flash control mode Choose a flash control mode and flash level and adjust other settings for SB 500 SB 400 or SB 300 flash units mounted on the camera accessory shoe Settings for flash units other than the SB 500 SB 400 and SB 300 can only be adjusted using flash ...

Страница 268: ...nly when an SB 500 flash unit is mounted on the camera Option Description Y Optical AWL The remote flash units are controlled using low intensity flashes emitted by the master flash 0509 Off Remote flash photography disabled Group flash options Set flash options for each group when shooting with remote flash photography using an optional flash unit 0508 This option is available only when an SB 500...

Страница 269: ...elative to the background Flash output can be increased to make the main subject appear brighter reduced to prevent glare or otherwise fine tuned to produce the desired result 0504 Release mode G button U C photo shooting menu Choose the operation performed when the shutter is released For more information about release modes see Release mode in The i menu 0166 Focus mode G button U C photo shooti...

Страница 270: ... Lighting ADL or white balance slightly with each shot bracketing the current value Bracketing can be used in situations in which getting the right settings is difficult and there is not time to check results and adjust settings with each shot or to experiment with different settings for the same subject Option Description Auto bracketing set Choose the setting or settings bracketed when auto brac...

Страница 271: ...ther than ADL bracketing is selected for Auto bracketing set Amount Choose how Active D Lighting varies with each shot when ADL bracketing is selected for Auto bracketing set Exposure and flash bracketing No exposure compensation Exposure modified by 1 EV Exposure modified by 1 EV 1 Select AE flash bracketing AE bracketing or Flash bracketing for Auto bracketing set Number of shots and Increment o...

Страница 272: ...enu Shooting options 272 2 Choose the number of shots Highlight Number of shots and press 4 or 2 to choose the number of shots in the bracketing sequence At settings other than 0F a bracketing icon will appear in the display ...

Страница 273: ...racketing programs with an increment of 2 0 or 3 0 EV offer a maximum of 5 shots If a value of 7 or 9 was selected in Step 2 the number of shots will automatically be set to 5 The bracketing programs with an increment of 0 3 EV are listed below Number of shots Exposure and flash bracketing indicator No of shots Bracketing order EVs 0F 0 0 3F 3 0 0 3 0 7 3F 3 0 0 7 0 3 2F 2 0 0 3 2F 2 0 0 3 3F 3 0 ...

Страница 274: ...own in the display While bracketing is in effect the display shows a bracketing icon a bracketing progress indicator and the number of shots remaining in the bracketing sequence After each shot a segment will disappear from the indicator and the number of shots remaining will be reduced by one No shots 3 Increment 0 7 Display after first shot Exposure changes due to bracketing are added to those m...

Страница 275: ...f the camera is turned off before all shots in the sequence have been taken bracketing will resume from the first shot in the sequence when the camera is turned on If the memory card fills before all shots in the sequence have been taken shooting can be resumed from the next shot in the sequence after the memory card has been replaced D Exposure bracketing The settings shutter speed and or apertur...

Страница 276: ...by varying shutter speed 3 Use Custom Setting e5 Auto bracketing mode M to choose whether the camera varies shutter speed aperture or both shutter speed and aperture White balance bracketing 1 Select WB bracketing for Auto bracketing set Number of shots and Increment options will be displayed 2 Choose the number of shots Highlight Number of shots and press 4 or 2 to choose the number of shots in t...

Страница 277: ...quivalent to 5 mired Higher A values correspond to increased amounts of amber Higher B values correspond to increased amounts of blue The bracketing programs with an increment of 1 are listed below Number of shots White balance bracketing indicator No of shots White balance increment Bracketing order 0F 0 1 0 B3F 3 1B 0 B1 B2 A3F 3 1A 0 A2 A1 B2F 2 1B 0 B1 A2F 2 1A 0 A1 3F 3 1A 1B 0 A1 B1 5F 5 1A ...

Страница 278: ...bled Shooting can begin when a new memory card is inserted Cancelling bracketing To cancel bracketing select 0F for Number of shots D White balance bracketing restrictions White balance bracketing is not available at image quality settings of RAW or RAW JPEG D White balance bracketing White balance bracketing affects only color temperature the amber blue axis in the white balance fine tuning displ...

Страница 279: ... Number of shots and press 4 or 2 to choose the number of shots in the bracketing sequence At settings other than 0F a bracketing icon will appear in the display The number of shots determines the bracketing sequence No of shots Bracketing sequence 2 Off Value selected in Step 3 3 Off Low Normal 4 Off Low Normal High 5 Off Low Normal High Extra high If you chose more than two shots proceed to Step...

Страница 280: ...pressing 4 or 2 The following options are available Amount Bracketing sequence OFF L Off Low OFF N Off Normal OFF H Off High OFF H Off Extra high OFF AUTO Off Auto 4 Take pictures Take the number of pictures in the bracketing program While bracketing is in effect the display shows an ADL bracketing icon and the number of shots remaining in the bracketing sequence After each shot the number of shot...

Страница 281: ...quence when the camera is turned on If the memory card fills before all shots in the sequence have been taken shooting can be resumed from the next shot in the sequence after the memory card has been replaced Multiple exposure G button U C photo shooting menu Record two to ten RAW exposures as a single photograph Option Description Multiple exposure mode On series Take a series of multiple exposur...

Страница 282: ...ombining three exposures gain will be set to 1 3 Lighten The camera compares the pixels in each picture and uses only the brightest Darken The camera compares the pixels in each picture and uses only the darkest Save individual pictures RAW On Save both the multiple exposure and the shots that make it up the pictures are saved in RAW format Off Discard the individual shots and save only the multip...

Страница 283: ...the memory card Creating a multiple exposure 1 Highlight Multiple exposure in the photo shooting menu and press 2 2 Choose an option for Multiple exposure mode Highlight Multiple exposure mode and press 2 Highlight a multiple exposure mode using 1 or 3 and press J If On series or On single photo is selected an icon will appear in the display ...

Страница 284: ...ion for Overlay mode Highlight Overlay mode and press 2 Highlight an option using 1 or 3 and press J 5 Choose a setting for Save individual pictures RAW Highlight Save individual pictures RAW and press 2 Highlight an option using 1 or 3 and press J To save both the multiple exposure and the shots that make it up select On the individual shots are saved in RAW format To save only the multiple expos...

Страница 285: ...iew through the lens You can use the earlier exposures as a guide when composing subsequent shots 7 Choose an option for Select first exposure RAW To choose the first exposure from existing RAW pictures highlight Select first exposure RAW and press 2 Use the multi selector to highlight the desired picture To view the highlighted picture zoomed in press and hold the X button After highlighting the ...

Страница 286: ... exposure If On series is selected for Multiple exposure mode you can continue to take additional multiple exposures until Off is selected If On single photo is selected the camera will exit multiple exposure mode once the number of shots selected in Step 3 has been taken D Saved overlays If you took pictures with the image quality set to RAW JPEG images in the JPEG fine image quality will be save...

Страница 287: ...ouch controls after pressing the i button Option Description View progress View a preview created from the exposures recorded to the current point Retake last exposure Retake the most recent exposure Save and exit Create a multiple exposure from the exposures taken to current point Discard and exit Exit without recording a multiple exposure If On is selected for Save individual pictures RAW the in...

Страница 288: ... If On series is selected an additional multiple exposure will be recorded each time the shutter release button is pressed In self timer mode the interval between each shot in the exposure is selected using Custom Setting c2 Self timer Interval between shots Regardless of the value selected for the c2 Number of shots option shooting will however end after the number of shots selected for the multi...

Страница 289: ...at have been recorded to that point if Average is selected for Overlay mode gain will be adjusted to reflect the number of exposures actually recorded The multiple exposure will also end if the standby timer expires after the first exposure has been taken or you press the K button followed by the i button and select either Save and exit or Discard and exit HDR high dynamic range G button U C photo...

Страница 290: ...d HDR photography Exposure differential Choose the difference in exposure between the two shots The higher the value the greater the dynamic range If Auto is selected the camera will automatically adjust the exposure differential to suit the scene Smoothing Choose how much the boundaries between the two images are smoothed Save individual pictures RAW Choose On to save each of the individual shots...

Страница 291: ...C The photo shooting menu Shooting options 291 1 Highlight HDR high dynamic range in the photo shooting menu and press 2 ...

Страница 292: ... press J Option Description 0 On series Take a series of HDR photographs HDR shooting will continue until you select Off for HDR mode On single photo Normal shooting will resume after you have taken a single HDR photograph Off Proceed without taking additional HDR photographs If On series or On single photo is selected an icon will appear in the display ...

Страница 293: ...hlight an option using 1 or 3 and press J Choose higher values for high contrast subjects Note however that choosing a higher value than required may not produce the desired results Match your choice to the level of contrast in the scene If Auto is selected the camera will automatically adjust the exposure differential to suit the scene ...

Страница 294: ...nts the amount the boundaries between the two images are smoothed Higher values produce a smoother composite image 5 Choose a setting for Save individual pictures RAW Highlight Save individual pictures RAW and press 2 Highlight an option using 1 or 3 and press J Choose On to save each of the individual shots used to create the HDR image the shots are saved in RAW format ...

Страница 295: ...hutter release button is pressed all the way down If On series is selected for HDR mode you can continue to take HDR photographs until Off is selected If On single photo is selected HDR will turn off automatically after a single shot HDR photographs are recorded in JPEG format regardless of the option selected for image quality ...

Страница 296: ...t fire In continuous release modes only one photograph will be taken each time the shutter release button is pressed all the way down Long exposure Bulb or Time photography is not available If you set the shutter speed dial to Bulb or Time the Bulb or Time indicator flashes in the display D HDR restrictions HDR cannot be combined with some camera features including modes other than P S A and M fli...

Страница 297: ... the number of shots per interval Exposure smoothing Selecting On allows the camera to adjust exposure to match the previous shot Large changes in subject brightness during shooting may result in apparent variations in exposure This can be addressed by shortening the interval between shots Exposure smoothing will not take effect in mode M if Off is selected for ISO sensitivity settings Auto ISO se...

Страница 298: ...selection when AF S is selected for focus mode and for Custom Setting a1 AF C priority selection when AF C is selected If ISO sensitivity settings Auto ISO sensitivity control in the photo shooting menu is set to On set Minimum shutter speed so that it is shorter than the shooting interval Off Disable interval priority to ensure that photos are correctly exposed Focus before each shot If On is sel...

Страница 299: ... the time lapse video Selecting 1 1 16 16 for Choose image area in the photo shooting menu disables the shutter release Videos created using Time lapse video are recorded in the sRGB color space regardless of the option selected for Color space in the photo shooting menu Off Do not perform additional operations during interval timer photography Starting storage folder Highlight an option and press...

Страница 300: ...ime zone and date in the setup menu and make sure that the camera clock is set to the correct time and date To ensure that shooting is not interrupted use a fully charged battery or an optional charging AC adapter 1 Highlight Interval timer shooting in the photo shooting menu Press 2 to select the highlighted item and view interval timer shooting options ...

Страница 301: ...start day time and press 2 Highlight an option and press J To start shooting immediately select Now To start shooting at a chosen date and time select Choose day time Choose the date and time and press J Choose the interval between shots Highlight Interval and press 2 Choose an interval in hours minutes and seconds and press J ...

Страница 302: ...er of shots per interval is set to two or more the photographs for each interval will be taken at the rate for continuous high speed release mode When Off is selected for Silent photography the maximum number of intervals will vary with the number of shots per interval Enable or disable exposure smoothing Highlight Exposure smoothing and press 2 Highlight an option and press J Selecting On allows ...

Страница 303: ... Silent photography and press 2 Highlight an option and press J Choose an interval priority option Highlight Interval priority and press 2 Highlight an option and press J Choose whether the camera focuses between shots Highlight Focus before each shot and press 2 Highlight an option and press J ...

Страница 304: ...cketing or Time lapse video and press J If you selected AE bracketing choose values for Number of shots and Increment if you selected Time lapse video choose a setting for Frame size frame rate Choose starting folder options Highlight Starting storage folder and press 2 Select the desired options and press J to proceed ...

Страница 305: ... selected for Choose start day time Choose day time The display turns off during shooting Shooting will continue at the selected interval until all shots have been taken D During shooting During interval timer photography the memory card access lamp will flash If the display is turned on by pressing the shutter release button halfway the message Interval timer shooting will be displayed and the Q ...

Страница 306: ...he G button is pressed if the time selected for Interval is very short If Time lapse video is selected for Options pressing J between intervals will end interval timer photography Resuming interval timer shooting Interval timer shooting can be resumed as described below To resume shooting immediately Highlight Restart and press J To resume shooting at a specified time Select Restart option highlig...

Страница 307: ...rval timer shooting in the photo shooting menu highlight Off and press J Note that the menus may not be displayed when the G button is pressed if the time selected for Interval is very short In this case you will need to press J to pause interval timer photography and then select Interval timer shooting in the photo shooting menu highlight Off and press J ...

Страница 308: ...re If shooting cannot proceed at current settings for example if shutter speed is set to Bulb or Time the Interval is 00 00 00 or the start time is in less than a minute a warning will be displayed in the monitor Interval timer photography will not start if On is selected for both Silent photography and Interval priority and 00 00 0 5 is selected for Interval If On is selected for Silent photograp...

Страница 309: ...l timer photography Restrictions Interval timer photography cannot be combined with some camera features including video recording long time exposures Bulb or Time the self timer bracketing HDR high dynamic range multiple exposures and focus shift D When On is selected for Silent photography Selecting On for Silent photography disables some camera features including ISO sensitivities of Hi 1 and H...

Страница 310: ...oths abrupt changes in exposure Large changes in subject brightness during shooting may result in apparent variations in exposure This can be addressed by shortening the interval between shots Exposure smoothing will not take effect in mode M if Off is selected for ISO sensitivity settings Auto ISO sensitivity control in the photo shooting menu Silent photography Select On to silence the shutter a...

Страница 311: ...m shutter speed is longer than the interval the time selected for the interval will take priority over the selected shutter speed Off Disable interval priority to ensure that photos are correctly exposed Focus before each shot If On is selected the camera will focus between shots Recording time lapse videos D Before shooting Time lapse videos are shot using the video crop Take test shots and check...

Страница 312: ...C The photo shooting menu Shooting options 312 1 Highlight Time lapse video in the photo shooting menu Press 2 to select the highlighted item and view the Time lapse video menu ...

Страница 313: ...ight Interval and press 2 Choose an interval in minutes and seconds and press J Choose an interval longer than the slowest anticipated shutter speed Choose the total shooting time Highlight Shooting time and press 2 Choose a shooting time in hours and minutes and press J The maximum shooting time is 7 hours and 59 minutes ...

Страница 314: ...ng and press 2 Highlight an option and press J Selecting On smooths abrupt changes in exposure Enable or disable silent photography Highlight Silent photography and press 2 Highlight an option and press J Choose the frame size and rate Highlight Frame size frame rate and press 2 Highlight an option and press J ...

Страница 315: ... and press 2 Highlight an option and press J Choose whether the camera focuses between shots Highlight Focus before each shot and press 2 Highlight an option and press J If On is selected for Focus before each shot the camera will focus before each shot according to the option currently selected for focus mode ...

Страница 316: ... selected for Shooting time in Step 2 Ending shooting To end shooting before all the photos are taken press J or select Time lapse video in the photo shooting menu highlight Off and press J Note that the menus may not be displayed when the G button is pressed if the time selected for Interval is very short A video will be created from the frames shot to the point where shooting ended and normal ph...

Страница 317: ... maximum length 3 Memory card indicator D Picture review The K button cannot be used to view pictures while shooting is in progress The current frame will however be displayed for a few seconds after each shot if On or On monitor only is selected for Picture review in the playback menu Note that other playback operations cannot be performed while the frame is displayed The current frame may not be...

Страница 318: ...Regardless of the option selected for Custom Setting c3 Power off delay Standby timer the standby timer will not expire while recording is in progress Shooting may end if camera controls are used settings are changed or an HDMI cable is connected A video will be created from the frames shot to the point where shooting ended The following end shooting without a beep sounding or a video being record...

Страница 319: ...e long exposure noise reduction and flicker reduction Focus shift shooting G button U C photo shooting menu Focus shift automatically varies focus over a series of shots Use it to take photos that will later be combined using focus stacking to create a single image with increased depth of field Before using focus shift choose a focus mode of AF A AF S or AF C and a release mode other than E Option...

Страница 320: ...On The camera locks exposure for all shots at the setting for the first frame Off The camera adjusts exposure before each shot Silent photography Select On to eliminate shutter sounds during shooting Selecting On does not completely silence the camera Camera sounds may still be audible for example during autofocus or aperture adjustment in the latter case most noticeably at apertures smaller i e a...

Страница 321: ... shift the camera takes a series of shots starting from a selected focus position and continuing toward infinity Given that shooting ends when infinity is reached the starting focus position should be slightly in front of i e closer to the camera than the closest point on the subject Do not move the camera after focusing 2 Highlight Focus shift shooting in the photo shooting menu Press 2 to select...

Страница 322: ...d for photographs of insects or other small objects On the other hand only a few may be needed to photograph a landscape from front to back with a wide angle lens Choose the amount the focus distance changes with each shot Highlight Focus step width and press 2 Choose a focus step width and press J Press 4 to reduce the focus step width 2 to increase Note that high settings increase the risk that ...

Страница 323: ... for the flash to charge A setting of 00 is recommended when shooting without a flash Enable or disable first frame exposure lock Highlight First frame exposure lock and press 2 Highlight an option and press J Off is recommended if lighting and other conditions will not change during shooting On when photographing landscapes and the like under variable lighting Selecting On locks exposure at the v...

Страница 324: ...ons Highlight Starting storage folder and press 2 Select the desired options and press J to proceed Highlight an option and press 2 to select selected items are marked with a check M To deselect remove the check from U a selected option highlight it and press 2 again Place a check M next to New folder to create a new folder for each new sequence Place a check M next to Reset file numbering to rese...

Страница 325: ...the start of shooting and progressing out toward infinity by the selected focus step distance with each shot Shooting ends when the selected number of shots has been taken or focus reaches infinity Ending focus shift photography To end shooting before all shots have been taken either select Focus shift shooting in the photo shooting menu highlight Off and press J or press the shutter release butto...

Страница 326: ...the selected number of shots has been taken Regardless of the option selected for Custom Setting c3 Power off delay Standby timer the standby timer will not expire while shooting is in progress If you are using a flash choose an interval longer than the time needed for the flash to charge If the interval is too short the flash may fire at less than the power needed for full exposure If shooting ca...

Страница 327: ...uding ISO sensitivities of Hi 1 and Hi 2 flash photography exposure delay mode long exposure noise reduction and flicker reduction A Close ups Because focus depth is reduced at short focus distances we recommend choosing smaller focus steps and increasing the number of shots when photographing subjects close to the camera Silent photography G button U C photo shooting menu Eliminate shutter sounds...

Страница 328: ...adjustment in the latter case most noticeably at apertures smaller i e at f numbers higher than f 5 6 Flash photography is disabled Long exposure noise reduction is disabled The electronic shutter is used regardless of the option selected for Custom Setting d4 Shutter type Regardless of the settings selected for Beep options in the setup menu beeps will not sound when the camera focuses or while t...

Страница 329: ...Frame size frame rate 330 Video quality 330 Video file type 331 ISO sensitivity settings 331 White balance 332 Set Picture Control 333 Manage Picture Control 333 Active D Lighting 333 High ISO NR 334 Vignette control 334 Item 0 Diffraction compensation 334 Auto distortion control 334 Flicker reduction 334 Metering 335 Release mode save frame 335 Focus mode 336 AF area mode 336 Vibration reduction ...

Страница 330: ...le naming G button U 1 video recording menu Choose the three letter prefix used in naming the image files in which videos are stored the default prefix is DSC 0242 Frame size frame rate G button U 1 video recording menu Choose the video frame size in pixels and frame rate For more information see Frame size and rate Video quality in The i menu 0175 Video quality G button U 1 video recording menu C...

Страница 331: ...sitivity Choose the upper limit for auto ISO sensitivity control to prevent it being raised too high The selected value serves as the upper limit for ISO sensitivity in modes P S and A and when On is selected for Auto ISO control mode M in mode M Auto ISO control mode M If you select On and press the J button the camera will automatically adjust the ISO sensitivity for video mode in mode M If Off ...

Страница 332: ... user the ISO sensitivity will be shown in the displays D Auto ISO sensitivity control At high ISO sensitivities noise randomly spaced bright pixels fog or lines may increase At high ISO sensitivities the camera may have difficulty focusing The foregoing can be prevented by choosing a lower value for ISO sensitivity settings Maximum sensitivity White balance G button U 1 video recording menu Choos...

Страница 333: ...he option currently selected for photos 0255 Manage Picture Control G button U 1 video recording menu Save modified Picture Controls as custom Picture Controls 0257 Active D Lighting G button U 1 video recording menu Preserve details in highlights and shadows creating videos with natural contrast Select Same as photo settings to use the option currently selected for photos 0164 0181 ...

Страница 334: ...ding menu Reduce diffraction in videos 0264 Auto distortion control G button U 1 video recording menu Reduce barrel and pin cushion distortion in videos 0265 Flicker reduction G button U 1 video recording menu Reduce flicker and banding when shooting under fluorescent or mercury vapor lighting during video recording Choose Auto to allow the camera to automatically choose the correct frequency If A...

Страница 335: ...he desired results in modes other than M If this is the case select mode M and choose a shutter speed adapted to the frequency of the local power supply 50Hz 1 100 s 1 50 s 1 25 s 60Hz 1 125 s 1 60 s 1 30 s Metering G button U 1 video recording menu Choose how the camera meters exposure in video mode Spot metering is not available in the video recording menu 0162 Release mode save frame G button U...

Страница 336: ...hown in the shooting display While video recording is in progress only one photo will be taken each time the shutter release button is pressed Focus mode G button U 1 video recording menu Choose a focus mode for video recording 0100 AF area mode G button U 1 video recording menu Choose how the camera focuses in video mode 0102 Vibration reduction G button U 1 video recording menu Adjust vibration ...

Страница 337: ...ty G button U 1 video recording menu Turn built in or external microphones on or off or adjust microphone sensitivity Option Description Auto Adjust microphone sensitivity automatically Manual Adjust microphone sensitivity manually Choose from values of from 1 to 20 The higher the value the higher the sensitivity the lower the value the lower the sensitivity Microphone off Turn sound recording off...

Страница 338: ...Select Enable to reduce microphone gain and prevent audio distortion when recording videos in loud environments Frequency response G button U 1 video recording menu Choose the range of frequencies to which built in and external microphones respond Option Description S Wide range Record a wide range of frequencies Choose for everything from music to the bustling hum of a city street T Vocal range C...

Страница 339: ...rding videos Time codes are available only with videos recorded in MOV format Option Description Record timecodes On Record time codes The time code appears in the shooting display On with HDMI output Time codes will be included with footage saved to external recorders connected to the camera via an HDMI cable The camera supports Atomos SHOGUN NINJA and SUMO series Monitor recorders Off Time codes...

Страница 340: ...to the current time as reported by the camera clock Before proceeding select Time zone and date in the setup menu and make sure that the camera clock is set to the correct time and date Drop frame Select On to compensate for discrepancies between the frame count and the actual recording time at frame rates of 30 and 60 fps D HDMI devices Selecting On with HDMI output for Record timecodes may disru...

Страница 341: ...341 A Custom Settings Fine tuning camera settings To view Custom Settings select the A tab in the camera menus Custom Settings are used to customize camera settings to suit individual preferences The Custom Settings menu is divided into two levels ...

Страница 342: ...ptions 350 a10 Low light AF 350 a11 Built in AF assist illuminator 351 a12 Manual focus ring in AF mode 2 352 b Metering exposure b1 Easy exposure compensation 352 Item 0 b2 Center weighted area 353 b3 Fine tune optimal exposure 353 b4 b mode exposure comp 354 c Timers AE lock c1 Shutter release button AE L 354 c2 Self timer 355 c3 Power off delay 355 d Shooting display d1 CL mode shooting speed 3...

Страница 343: ...Item 0 f2 Custom controls shooting 367 f3 Custom controls playback 375 f4 Customize command dials 377 f5 Release button to use dial 380 f6 Reverse indicators 381 g Video g1 Customize i menu 381 g2 Custom controls 382 g3 AF speed 388 g4 AF tracking sensitivity 389 g5 Highlight display 389 1 Items modified from default values are indicated by asterisks U 2 Available with compatible lenses only D See...

Страница 344: ... the shutter release button is pressed release priority F Focus Photos can be taken only when the camera is in focus focus priority a2 AF S priority selection G button U A Custom Settings menu Choose whether photos can be taken before the camera focuses when AF S is selected Option Description G Release Photos can be taken whenever the shutter release button is pressed release priority F Focus Pho...

Страница 345: ... objects crossing your field of view If Auto area AF Auto area AF people or Auto area AF animals is selected for AF area mode blocked shot AF response will function in mode 3 when 2 or 1 Quick is selected a4 Focus points used G button U A Custom Settings menu Choose the number of focus points available for manual focus point selection when an option other than Auto area AF Auto area AF people or A...

Страница 346: ... selection The number of focus points available in Pinpoint AF Wide area AF L Wide area AF L people or Wide area AF L animals mode does not change a5 Store points by orientation G button U A Custom Settings menu Choose whether separate focus points can be selected for wide landscape orientation for tall portrait orientation with the camera rotated 90 clockwise and for tall orientation with the cam...

Страница 347: ...tom Settings Fine tuning camera settings 347 Select No to use the same focus point regardless of camera orientation Camera rotated 90 counter clockwise Landscape wide orientation Camera rotated 90 clockwise ...

Страница 348: ... focus If AF ON only is selected the camera will not focus when the shutter release button is pressed halfway Focus can only be adjusted using other controls to which AF ON has been assigned using Custom Setting f2 Custom controls shooting Out of focus release To choose whether the shutter can be released even in circumstances in which it would normally be disabled select Custom Setting a6 AF acti...

Страница 349: ...heck M are available for selection via the sub command dial To complete the operation press J a8 Focus point wrap around G button U A Custom Settings menu Choose whether focus point selection wraps around from one edge of the display to another If Wrap is selected focus point selection will wrap around from top to bottom bottom to top right to left and left to right so that for example pressing mu...

Страница 350: ...ocus points are displayed in dynamic area AF mode Option Description On Display both the selected focus point and surrounding focus points Off Display only the selected focus point a10 Low light AF G button U A Custom Settings menu Choose On for more accurate focus under low light conditions when AF S is selected for focus mode or when AF A is selected and you are shooting in AF S This option only...

Страница 351: ...mode when lighting is poor Option Description On In photo mode the illuminator will light as required when AF S is selected for focus mode or when AF A is selected and you are shooting in AF S Off The illuminator does not light to assist the focus operation The camera may not be able to focus when lighting is poor D The AF assist illuminator The AF assist illuminator has a range of about 1 3 m 3 f...

Страница 352: ...ton and then press it halfway again Disable The lens focus ring cannot be used for manual focus while autofocus mode is selected b Metering exposure b1 Easy exposure compensation G button U A Custom Settings menu Choose whether exposure compensation can be performed with the command dial when the exposure compensation dial is set to C Option Description On Auto reset Exposure compensation can be a...

Страница 353: ...hted metering is selected the camera assigns the greatest weight to an area in the center of the shooting display when setting exposure Custom Setting b2 Center weighted area is used to choose the size of the area given the greatest weight when Center weighted metering is selected b3 Fine tune optimal exposure G button U A Custom Settings menu Use this option to fine tune the exposure value select...

Страница 354: ...b4 b mode exposure comp G button U A Custom Settings menu When set to Disable the exposure compensation cannot be adjusted in mode b c Timers AE lock c1 Shutter release button AE L G button U A Custom Settings menu Choose whether exposure locks when the shutter release button is pressed Option Description O On half press Pressing the shutter release button halfway locks exposure P On burst mode Ex...

Страница 355: ...mber of shots is more than 1 c3 Power off delay G button U A Custom Settings menu Choose how long the monitor or viewfinder remains on when no operations are performed Different settings can be chosen for Playback Menus Picture review and Standby timer Standby timer determines how long the monitor viewfinder or control panel remains on after the shutter release button is pressed halfway The monito...

Страница 356: ...r of photos that can be taken in a single burst when a shutter speed of 1 s or slower is selected in mode S or M D The memory buffer Custom Setting d2 Maximum shots per burst is used to select the number of shots that can be taken in a single burst The number of shots that can be taken before the memory buffer fills and shooting slows varies with image quality and other settings When the buffer is...

Страница 357: ...ront curtain shutter for all photos D Mechanical shutter Mechanical shutter is not available with some lenses D The electronic front curtain shutter The fastest shutter speed available when Electronic front curtain shutter is selected is 1 2000 s d5 Extended shutter speeds M G button U A Custom Settings menu If you select On you can extend the shutter speed when shooting in mode M up to 900 second...

Страница 358: ...mory card is inserted file numbering restarts from 0001 If the current folder already contains images file numbering will instead continue from the highest file number in the current folder If you select Off after selecting On the camera will store the current file number File numbering will resume from the previously stored value the next time On is selected Reset Reset the file numbering for On ...

Страница 359: ... number of files needed to record a video of the maximum length would result in a file numbered over 9999 To resume shooting choose Reset for Custom Setting d6 File number sequence and then either format the memory card or insert a new memory card D Folder numbering If a picture is taken when the current folder contains 5000 pictures or a picture numbered 9999 a new folder will be created and sele...

Страница 360: ...ed photo shoots A g icon appears in the shooting display d8 Framing grid display G button U A Custom Settings menu Display 3 3 9 divisions or 4 4 16 divisions grid lines which are useful for checking composition on the display d9 Focus peaking G button U A Custom Settings menu When focus peaking is enabled in manual focus mode objects that are in focus are indicated by colored outlines in the disp...

Страница 361: ...c will be activated if the actual shutter speed is faster than 1 200 s If the flash supports auto FP high speed sync the camera can select shutter speeds as fast as 1 4000 s In mode S or M the user can select shutter speeds as fast as 1 4000 s when using flash units that support auto FP high speed sync In mode S or M if the shutter speed dial is set to X the shutter speed will be set to 1 200 s 1 ...

Страница 362: ...e selected for Custom Setting e1 Flash sync speed by setting the shutter speed dial to X An X flash sync indicator will appear in the shooting display together with the flash sync speed D Auto FP high speed sync Auto FP high speed sync allows the flash to be used at the highest shutter speed supported by the camera When 1 200 s Auto FP is selected the camera automatically enables auto FP high spee...

Страница 363: ... Entire frame The camera adjusts both the flash level and exposure This changes the exposure for the entire frame E Background only Exposure compensation is adjusted for the background only e4 Auto c ISO sensitivity control G button U A Custom Settings menu Choose what the camera targets for exposure adjustment when auto ISO sensitivity control is enabled during flash photography Option Descriptio...

Страница 364: ...et AE flash bracketing AE bracketing F Flash speed Shutter speed and flash level Shutter speed G Flash speed aperture Shutter speed aperture and flash level Shutter speed and aperture H Flash aperture Aperture and flash level Aperture I Flash only Flash level If a flash is not used when On is selected for Auto ISO sensitivity control and Flash speed Flash speed aperture or Flash aperture is select...

Страница 365: ... the highest value Custom Setting e6 Bracketing order has no effect on the order of the shots taken when ADL bracketing is selected for Auto bracketing Auto bracketing set in the photo shooting menu f Controls f1 Customize i menu G button U A Custom Settings menu Choose the items listed in the i menu displayed when the i button is pressed in photo mode Highlight a position in the i menu press J an...

Страница 366: ...acketing 270 Multiple exposure 281 2 HDR high dynamic range 289 7 Interval timer shooting 296 8 Time lapse video 310 Item 0 9 Focus shift shooting 319 L Silent photography 327 v Release mode 166 w Custom controls shooting 367 z Exposure delay mode 356 O Shutter type 357 y Apply settings to live view 359 W Focus peaking 360 3 Monitor viewfinder brightness 394 396 Z Bluetooth connection 366 U Wi Fi ...

Страница 367: ...ring Choose the roles played by the controls below Highlight the desired control and press J Option 2 Fn button j AE L AF L button k OK button z Video record button S Lens Fn button 3 Lens Fn2 button l Lens control ring The roles that can be assigned to these controls are as follows Option 2 j k1 z S 3 l K Select center focus point 4 4 A AF ON 4 4 4 4 F AF lock only 4 4 4 4 E AE lock Hold 4 4 4 4 ...

Страница 368: ...rix metering 4 4 4 M Center weighted metering 4 4 4 N Spot metering 4 4 4 t Highlight weighted metering 4 4 4 1 Bracketing burst 4 4 4 4 RAW 4 4 4 4 n Subject tracking 4 4 4 L Silent photography 4 4 4 b Live view info display off 4 4 4 4 4 b Framing grid display 4 4 4 4 p Zoom on off 4 4 4 4 4 4 O MY MENU 4 4 4 4 3 Access top item in MY MENU 4 4 4 4 K Playback 4 4 4 J Choose image area 4 4 8 Image...

Страница 369: ... range 4 4 z Exposure delay mode 4 4 W Focus peaking 4 w Choose non CPU lens number 4 4 X Focus M A 42 3 q Aperture 43 E Exposure compensation 43 None 4 4 4 4 4 4 43 1 Regardless of the option selected when Auto area AF Auto area AF people or Auto area AF animals is chosen for AF area mode the button functions only to initiate subject tracking AF 0102 2 Available with compatible lenses only 3 Rega...

Страница 370: ...D AE lock Reset on release Exposure locks when the control is pressed Exposure remains locked until the control is pressed a second time the shutter is released or the standby timer expires C AE lock only Exposure locks while the control is pressed B AE AF lock Focus and exposure lock while the control is pressed r FV lock Press the control to lock flash value for optional flash units press again ...

Страница 371: ...s pressed 1 Bracketing burst If the control is pressed when an option other than WB bracketing is selected for Auto bracketing Auto bracketing set in the photo shooting menu in continuous release mode the camera will take all the shots in the current bracketing program and repeat the bracketing burst while the shutter release button is pressed In single frame release mode shooting will end after t...

Страница 372: ...trol when Auto area AF Auto area AF people or Auto area AF animals is selected for AF area mode enables subject tracking the focus point will change to a targeting reticle and the monitor and viewfinder to subject tracking displays To end subject tracking AF press the control again or press the W Q button L Silent photography Press the control to perform silent photography Press again to cancel si...

Страница 373: ...hoose an image quality option and the sub command dial to select image size m White balance To choose a white balance option hold the button and rotate the main command dial Some options offer sub options that can be selected by rotating the sub command dial h Set Picture Control Press the control and rotate a command dial to choose a Picture Control y Active D Lighting Press the control and rotat...

Страница 374: ...ain command dial to choose the focus mode the sub command dial to choose the AF area mode t Auto bracketing Press the control and rotate the main command dial to choose the number of shots and the sub command dial to select the bracketing increment or Active D Lighting amount Multiple exposure Press the control and rotate the main command dial to choose the mode and the sub command dial to choose ...

Страница 375: ...otating the lens control ring autofocus with manual override The control ring can be used for manual focus while the shutter release button is pressed halfway To refocus using autofocus lift your finger from the shutter release button and then press it halfway again q Aperture Rotate the lens control ring to adjust aperture E Exposure compensation Rotate the lens control ring when the exposure com...

Страница 376: ...on the area around the current focus point the zoom ratio is selected in advance Press again to cancel zoom To choose the zoom ratio highlight Zoom on off and press 2 Zoom is available in both full frame and thumbnail playback None The control has no effect k OK button n Thumbnail on off Press the control to toggle between full frame playback 4 9 and 72 frame thumbnail playback and calendar playba...

Страница 377: ...k u Choose folder Press the control to display the Choose folder dialog where you can then choose a folder for playback Regardless of the option selected pressing J when a video is displayed full frame starts video playback f4 Customize command dials G button U A Custom Settings menu Customize the operation of the main and sub command dials Reverse rotation Reverse the direction of rotation of the...

Страница 378: ...main command dial will be used to set aperture in mode A only Autofocus setting If On is selected and Focus mode AF area mode has been assigned to a control using Custom Setting f2 Custom controls shooting you can choose the AF area mode by holding the control and rotating the main command dial and focus mode by holding the control and rotating the sub command dial Menus and playback Choose the ro...

Страница 379: ...the sub menu for the highlighted option Rotating it left displays the previous menu 2 On picture review excluded As for On except that the command dials cannot be used for playback during picture review Off Use the multi selector to choose the picture displayed during full frame playback or to highlight pictures or menu items The sub command dial cannot be used to select highlighted items To selec...

Страница 380: ...that are normally made by holding a button and rotating a command dial to be made by rotating the command dial after the button is released This ends when the button is pressed again the shutter release button is pressed halfway or the standby timer expires Release button to use dial applies to controls to which the following roles have been assigned using Custom Settings f2 Custom controls shooti...

Страница 381: ...egative values on the right W The indicator is displayed with negative values on the left and positive values on the right g Video g1 Customize i menu G button U A Custom Settings menu Choose the items listed in the i menu displayed when the i button is pressed in video mode Highlight a position in the i menu press J and select the desired item The following items can be assigned to the i menu Ite...

Страница 382: ...ction 179 v Release mode save frame 335 Item 0 W Focus peaking 360 9 Highlight display 389 3 Monitor viewfinder brightness 394 396 Z Bluetooth connection 382 U Wi Fi connection 164 180 L Wireless remote connection 413 Bluetooth connection Enable or disable Bluetooth g2 Custom controls G button U A Custom Settings menu Choose the operations performed in video mode using the camera controls or lens ...

Страница 383: ...tton j AE L AF L button k OK button G Shutter release button S Lens Fn button 3 Lens Fn2 button l Lens control ring The roles that can be assigned to these controls are as follows Option 2 j k1 G S 3 l K Select center focus point 4 4 A AF ON 4 4 4 F AF lock only 4 4 4 E AE lock Hold 4 4 4 C AE lock only 4 4 4 B AE AF lock 4 4 4 n Subject tracking 4 4 4 ...

Страница 384: ... 4 4 4 C Take photos 4 1 Record videos 4 4 4 m White balance 4 h Set Picture Control 4 y Active D Lighting 4 w Metering 4 c Release mode save frame 4 z Focus mode AF area mode 4 H Microphone sensitivity 4 W Focus peaking 4 X Focus M A 42 3 q Power aperture 43 E Exposure compensation 43 None 4 4 4 4 4 43 1 Regardless of the option selected when Auto area AF Auto area AF people or Auto area AF anima...

Страница 385: ...ol is pressed E AE lock Hold Exposure locks when the control is pressed Exposure lock does not end when the shutter is released Exposure remains locked until the control is pressed a second time or the standby timer expires C AE lock only Exposure locks while the control is pressed B AE AF lock Focus and exposure lock while the control is pressed n Subject tracking Pressing the control when Auto a...

Страница 386: ...e zoom ratio is selected in advance Press again to cancel zoom O MY MENU Press the control to display MY MENU 3 Access top item in MY MENU Press the control to jump to the top item in MY MENU Select this option for quick access to a frequently used menu item K Playback Press the control to start playback C Take photos Press the shutter release button all the way down to take a photograph with an a...

Страница 387: ...ocus mode AF area mode Hold the control and rotate the main command dial to choose the focus mode the sub command dial to choose the AF area mode H Microphone sensitivity Press the control and rotate a command dial to adjust microphone sensitivity W Focus peaking Press the control and rotate the main command dial to choose a peaking level and the sub command dial to select the peaking color X Focu...

Страница 388: ...cates that power aperture cannot be used The display may flicker while aperture is adjusted g3 AF speed G button U A Custom Settings menu Choose the focus speed in video mode when the focus mode is set to AF C or AF F Use When to apply to choose when the selected option applies Option Description D Always The camera focuses at the selected speed at all times in video mode E Only while recording Fo...

Страница 389: ...tain focus on your original subject If the subject leaves the selected focus area when 1 High is selected the camera will respond by quickly shifting focus to a new subject in the same area g5 Highlight display G button U A Custom Settings menu Choose whether shading is used to indicate highlights bright areas of the frame during video recording Display pattern To enable the highlight display sele...

Страница 390: ... brightnesses that will be shown as highlights If 255 is selected the highlight display will show only areas that are potentially overexposed D Highlight display If both the highlight display and focus peaking are enabled only focus peaking will be displayed in manual focus mode To view the highlight display in manual focus mode select Off for Custom Setting d9 Focus peaking Peaking level ...

Страница 391: ...er brightness 396 Viewfinder color balance 396 Limit monitor mode selection 397 Information display 397 AF fine tuning options 397 Non CPU lens data 400 Save focus position 401 Image Dust Off ref photo 401 Item 0 Pixel mapping 403 Image comment 404 Copyright information 405 Beep options 406 Touch controls 407 Self portrait mode 408 HDMI 408 Airplane mode 408 Connect to smart device 408 Connect to ...

Страница 392: ...423 D See also Setup menu defaults 0227 Format memory card G button U B setup menu Format memory cards Note that formatting permanently deletes all pictures and other data on the card Before formatting be sure to make backup copies as required D During formatting Do not turn the camera off or remove memory cards until the message Format memory card clears from the display ...

Страница 393: ...usted regularly Option Description Time zone Choose a time zone Date and time is automatically set to the time in the new time zone Date and time Set the camera clock to the time in the selected Time zone Date format Choose the order in which the day month and year are displayed Daylight saving time Select On to turn daylight saving time on Off to turn it off Selecting On automatically advances th...

Страница 394: ...is the active display It cannot be adjusted when Viewfinder only is selected for monitor mode or when your eye is to the viewfinder Higher values increase the drain on the battery Monitor color balance G button U B setup menu Adjust monitor color balance to your taste Monitor color balance can only be adjusted when the monitor is the active display It cannot be adjusted when Viewfinder only is sel...

Страница 395: ...tor color balance applies only to menus playback and the shooting display photos and videos taken with the camera are not affected The reference image is either the last picture taken or in playback mode the picture last displayed If the memory card contains no pictures an empty frame will be displayed instead To choose a different picture press the W Q button Highlight the desired picture and pre...

Страница 396: ...he battery Option Description Auto Viewfinder brightness is adjusted automatically in response to lighting conditions Manual Press 1 or 3 to adjust brightness manually Choose higher values for increased brightness lower values for reduced brightness Viewfinder color balance G button U B setup menu Adjust viewfinder color balance to your taste Viewfinder color balance can only be adjusted when the ...

Страница 397: ...rmation display G button U B setup menu Adjust the appearance of the information display according to lighting conditions Dark on light Light on dark Option Description w Dark on light To make the display easier to read in bright locations the monitor lights and the lettering is displayed in black x Light on dark To make the display easier to read in dark locations the monitor dims and the letteri...

Страница 398: ...s Press 1 or 3 to highlight items and press 4 or 2 to choose from values between 20 and 20 The larger the fine tuning value the farther the focal point is from the lens the smaller the value the closer the focal point The display shows the current and previous values The camera can store values for up to 40 lens types If a lens for which values have already been saved is used the fine tuning value...

Страница 399: ...s identifier The serial number is automatically entered for Z mount lenses and some F mount lenses D Deleting saved values To delete values saved using Fine tune and save lens highlight the desired lens in the List saved values list and press O Creating and saving fine tuning values 1 Attach the lens to the camera 2 Select AF fine tuning options in the setup menu then highlight Fine tune and save ...

Страница 400: ...he new value Choosing a default fine tuning value 1 Select AF fine tuning options in the setup menu then highlight Default and press 2 2 Press 4 or 2 to fine tune autofocus Choose from values between 20 and 20 The current value is shown by g the previously selected value by j The larger the fine tuning value the farther the focal point is from the lens the smaller the value the closer the focal po...

Страница 401: ...gain The focus position may change depending on the zoom operation and temperature changes This function is enabled only when a Z mount lens with an autofocus function is attached If set to On it may take some time before you can operate the camera after turning it on Image Dust Off ref photo G button U B setup menu Acquire reference data for the Image Dust Off option in NX Studio Image Dust Off p...

Страница 402: ...halfway In autofocus mode focus will automatically be set to infinity In manual focus mode set focus to infinity manually 3 Press the shutter release button the rest of the way down to acquire Image Dust Off reference data The monitor turns off when the shutter release button is pressed If the reference object is too bright or too dark the camera may be unable to acquire Image Dust Off reference d...

Страница 403: ...l mapping G button U B setup menu Pixel mapping checks and optimizes the camera image sensor If you notice unexpected bright spots appearing in pictures taken with the camera perform pixel mapping as described below Pixel mapping is available only when a Z mount lens or an optional FTZ mount adapter is attached To prevent unexpected loss of power use a fully charged battery or an optional charging...

Страница 404: ... U B setup menu Add a comment to new photographs as they are taken Comments can be viewed in NX Studio s Info tab Input comment Input a comment of up to 36 characters Highlight Input comment and press 2 to display a text entry dialog For information on text entry see Text entry 0239 Attach comment To attach the comment to subsequent photographs highlight Attach comment press 2 and confirm that a c...

Страница 405: ...ter the names of the photographer maximum 36 characters and copyright holder maximum 54 characters Highlight Artist or Copyright and press 2 to display a text entry dialog For information on text entry see Text entry 0239 Attach copyright information To attach copyright information to subsequent photographs highlight Attach copyright information press 2 and confirm that a check M appears in the ad...

Страница 406: ...in the photo information display Beep options G button U B setup menu Beep on off Turn the beep speaker on or off If On is selected for Beep on off beeps sound when the self timer counts down interval timer photography time lapse video recording or focus shift ends the camera focuses in photo mode note that this does not apply if AF C is selected for focus mode or when AF A is selected and you are...

Страница 407: ...of the beep from High and Low Touch controls G button U B setup menu Adjust settings for monitor touch controls Enable disable touch controls Enable or disable touch controls Select Playback only to enable touch controls in playback mode only Full frame playback flicks Choose whether the next image in full frame playback is displayed by flicking left or by flicking right Option Description S LeftU...

Страница 408: ...osition HDMI G button U B setup menu Adjust settings for connection to HDMI devices 0494 Airplane mode G button U B setup menu Select Enable to disable the camera s built in Bluetooth and Wi Fi functions Connect to smart device G button U B setup menu Connect to smartphones or tablets smart devices via Bluetooth or Wi Fi Pairing Bluetooth Pair with or connect to smart devices using Bluetooth ...

Страница 409: ...pload as they are taken Photos are uploaded in JPEG format at a size of 2 megapixels even if other upload size and format options are selected with the camera Photos taken in video mode will not be uploaded They must be uploaded manually Manually select for upload Upload selected pictures Transfer marking appears on the selected pictures Deselect all Remove transfer marking from all pictures Wi Fi...

Страница 410: ...e the camera password Channel Choose a channel Select Auto to have the camera choose the channel automatically Select Manual to choose the channel manually Current settings View current Wi Fi settings Reset connection settings Select Yes to reset Wi Fi settings to default values Upload while off If On is selected upload of images to smart devices connected via Bluetooth or Wi Fi will continue even...

Страница 411: ... to create a new network profile 0459 0465 If more than one profile already exists you can press J to select a profile from a list To edit an existing profile highlight it and press 2 Option Description General Profile name Rename the profile The default profile name is the same as the network SSID Password protection Select On to require that a password be entered before the profile can be change...

Страница 412: ...ose Auto or Manual Authentication encryption Choose OPEN or WPA2 PSK AES Password If WPA2 PSK AES is selected for Authentication encryption you can choose the camera password TCP IP Adjust TCP IP settings for infrastructure connections An IP address is required If Enable is selected for Obtain automatically the IP address and sub net mask for infrastructure mode connections will be acquired via a ...

Страница 413: ...ansfer before you selected Yes are not deleted Deletion may be suspended during some camera operations Upload file as When uploading RAW JPEG images choose whether to upload both the RAW and JPEG files or only the JPEG copy The option chosen for Upload file as takes effect when On is selected for Auto upload Deselect all Select Yes to remove transfer marking from all images Upload of images with a...

Страница 414: ...l be terminated Disable Disconnect the ML L7 Save wireless remote controller Pair the camera with an ML L7 When the camera is in pairing standby press and hold the power button on the remote control for about 3 seconds or longer When pairing is complete the remote control status lamp flashes green at about 3 second intervals Only one remote control can be paired per camera Only the last paired rem...

Страница 415: ...rds with which the camera complies USB power delivery G button U B setup menu Choose whether optional charging AC adapters or computers connected via USB can be used to power the camera USB power delivery USB power delivery allows the camera to be used while limiting the drain on the battery Option Description Enable The camera draws power from connected devices while on Connected devices will als...

Страница 416: ... only be supplied to the camera when the battery is inserted A USB power delivery icon appears in the shooting display when the camera is powered by an external source For more information see Charging the camera with the charging AC adapter 0565 ...

Страница 417: ...en power is supplied only to charge the camera battery The conditions under which the power supplied by external devices is used to power the camera or charge the battery are shown below Option selected for USB power delivery CameraExternal power source used for Enable On Power delivery Off Charging Disable On Off Charging Includes instances in which the power switch is in the OFF position but Blu...

Страница 418: ...in self portrait mode during zoom while the camera is connected to another device via HDMI or while the camera is connected to and exchanging data with a computer via USB Selecting Disable increases the drain on the battery Slot empty release lock G button U B setup menu Choose whether the shutter can be released when no memory card is inserted in the camera Option Description a Release locked The...

Страница 419: ...f the same model The following settings are saved Settings that can be saved and loaded PLAYBACK MENU Playback display options Picture review Rotate tall PHOTO SHOOTING MENU File naming Choose image area Image quality Image size RAW recording ISO sensitivity settings White balance Set Picture Control Custom Picture Controls are saved as Auto Color space Active D Lighting Long exposure NR High ISO ...

Страница 420: ... Flash control Flash mode Flash compensation Focus mode AF area mode Vibration reduction the options available vary with the lens Auto bracketing VIDEO RECORDING MENU File naming Frame size frame rate Video quality Video file type ISO sensitivity settings White balance Set Picture Control Custom Picture Controls are saved as Auto Active D Lighting High ISO NR Vignette control ...

Страница 421: ...area mode Vibration reduction the options available vary with the lens Electronic VR Microphone sensitivity Attenuator Frequency response Wind noise reduction Timecode excepting Timecode origin CUSTOM SETTINGS MENU All items SETUP MENU Language Time zone and date except Date and time Limit monitor mode selection Information display Non CPU lens data Save focus position Image comment ...

Страница 422: ... card is full an error will be displayed and settings will not be saved Saved settings can only be used with other cameras of the same model Load menu settings Load saved settings from a memory card Note that Load menu settings is available only when a memory card containing saved settings is inserted D Saved settings Settings are saved to files named NCSET is an identifier that varies from camera...

Страница 423: ... update the firmware A Updating the firmware To update the camera firmware you can use either a computer or smart device When using a computer You can confirm if there is a new firmware version at the Nikon Download Center For the update procedure see the firmware download website When using a smart device If the camera and your smart device are already paired using the SnapBridge app the app will...

Страница 424: ... not inserted in the camera or if a memory card does not contain pictures Retouched copies are saved to new files separate from the original pictures The retouch menu contains the following items Item 0 7 RAW processing 428 k Trim 431 8 Resize 432 i D Lighting 436 j Red eye correction 437 Z Straighten 438 Item 0 a Distortion control 438 e Perspective control 439 l Monochrome 440 o Overlay pictures...

Страница 425: ... select 2 Select a picture Highlight a picture using the multi selector To view the highlighted picture zoomed in press and hold the X button Press J to select the highlighted picture 3 Select retouch options For more information see the section for the selected item To exit without creating a retouched copy press G The retouch menu will be displayed ...

Страница 426: ...N The retouch menu Creating retouched copies 426 4 Create a retouched copy Press J to create a retouched copy Retouched copies are indicated by a p icon ...

Страница 427: ...applied to copies created using other retouch options although multiple edits may result in reduced image quality or faded colors With the exception of Trim video each item can be applied only once Some items may be unavailable depending on the items used to create the copy Items that cannot be applied to the current image are grayed out and unavailable D Image quality Copies created from RAW pict...

Страница 428: ...ictures can be created on the camera as described below 1 Select RAW processing in the retouch menu Highlight RAW processing and press 2 2 Choose how pictures are selected Option Description Select picture s Create JPEG copies of selected RAW images Multiple RAW images can be selected Select date Create JPEG copies of all RAW pictures taken on selected dates Select folder Create JPEG copies of all...

Страница 429: ...ess the W Q button again the icon will no longer be displayed All images will be processed using the same settings Press J to proceed once selection is complete If you chose Select date Highlight dates using the multi selector and press 2 to select M or deselect U All images taken on dates marked with a check M will be processed using the same settings Press J to proceed once selection is complete...

Страница 430: ...e setting in effect when the photograph was taken if applicable select Original 1 Image quality 0244 2 Image size 0244 3 White balance 0248 4 Exposure compensation 0139 5 Set Picture Control 0255 6 High ISO NR 0263 7 Color space 0262 8 Vignette control 0264 9 Active D Lighting 0164 10 Diffraction compensation 0264 To exit without copying the photographs press the K button ...

Страница 431: ...ress the G button when a confirmation dialog is displayed highlight Yes and press J D RAW processing RAW processing is available only with RAW images created with this camera RAW images created with other cameras or images in formats other than RAW cannot be selected Exposure compensation can only be set to values between 2 and 2 EV Trim G button U N retouch menu Create a cropped copy of the selec...

Страница 432: ...p as a separate file D Cropped pictures Depending on the size of the cropped copy playback zoom may not be available when cropped copies are displayed The crop size appears at upper left in the crop display The size of the copy varies with crop size and aspect ratio Resize G button U N retouch menu Create small copies of selected photographs Resizing multiple images If you accessed the retouch men...

Страница 433: ...nu Creating retouched copies 433 1 Select Resize in the retouch menu Highlight Resize and press 2 2 Choose a size Highlight Choose size and press 2 Highlight the desired size length in pixels using 1 and 3 and press J ...

Страница 434: ... 434 3 Choose how pictures are selected Option Description Select picture s Resize selected pictures Multiple pictures can be selected Select date Resize all pictures taken on selected dates Select folder Resize all pictures in a selected folder ...

Страница 435: ...utton again the 8 will no longer be displayed The selected pictures will all be copied at the size selected in Step 3 Press J to proceed once selection is complete If you chose Select date Highlight dates using the multi selector and press 2 to select M or deselect U All pictures taken on dates marked with a check M will be copied at the size selected in Step 3 Press J to proceed once selection is...

Страница 436: ...efore all copies have been created press the G button when a confirmation dialog is displayed highlight Yes and press J D Resize Depending on the copy size playback zoom may not be available when resized copies are displayed D Lighting G button U N retouch menu D Lighting brightens shadows It is ideal for dark or backlit photographs Before After The edit display shows before and after images ...

Страница 437: ...cting from the retinas of portrait subjects Red eye correction is available only with photographs taken using a flash Red eye that cannot be detected by the camera will not be corrected Press J to save the retouched copy D Red eye correction Note the following Red eye correction may not always produce the expected results In very rare circumstances red eye correction may be applied to portions of ...

Страница 438: ...tortion control G button U N retouch menu Create copies with reduced peripheral distortion this can reduce barrel distortion in pictures taken with wide angle lenses or pin cushion distortion in pictures taken with telephoto lenses Select Auto to let the camera correct distortion automatically and then make fine adjustments using the multi selector Select Manual to reduce distortion manually The e...

Страница 439: ...copy D Distortion control Note that greater amounts of distortion control result in more of the edges being cropped out Perspective control G button U N retouch menu Create copies that reduce the effects of perspective in photos taken looking up from the base of a tall object The effect can be previewed in the edit display Note that greater amounts of perspective control result in more of the edge...

Страница 440: ...e following monochrome tints Option Description Black and white Copy photographs in black and white Sepia Copy photographs in sepia Cyanotype Copy photographs in blue and white monochrome The effect can be previewed in the edit display In the case of Sepia or Cyanotype color saturation can be adjusted using the multi selector Press 1 to increase 3 to decrease The changes are reflected in the previ...

Страница 441: ...ing photographs to create a single picture that is saved separately from the originals One RAW image can be overlaid on another using additive blending Add or multiple images can be combined using Lighten or Darken Add Overlay two RAW images to create a single new JPEG copy 1 Select Overlay pictures in the retouch menu Highlight Overlay pictures and press 2 ...

Страница 442: ...cture overlay options with Picture 1 highlighted 3 Highlight the first image Press J to display a picture selection dialog listing only RAW images where you can use the multi selector to highlight the first photograph in the overlay To view the highlighted picture zoomed in press and hold the X button ...

Страница 443: ...nd select Picture 2 then select the second photo as described in Steps 3 and 4 6 Adjust gain The overlay of Picture 1 and Picture 2 can be previewed in the Preview column Highlight Picture 1 or Picture 2 and optimize exposure for the overlay by pressing 1 or 3 to adjust gain Choose from values between 0 1 and 2 0 in increments of 0 1 The effects are relative to the default value of 1 0 no gain For...

Страница 444: ...n To proceed without previewing the overlay highlight Save and press J 8 Preview the overlay To preview the overlay highlight Overlay and press J To select new photos or adjust gain press W Q You will be returned to Step 6 9 Save the overlay Press J while the preview is displayed to save the overlay and display the resulting image ...

Страница 445: ... image area RAW recording The overlay has the same photo info including date of recording metering shutter speed aperture shooting mode exposure compensation focal length and image orientation and values for white balance and Picture Control as the photograph selected for Picture 1 Copyright information however is not copied to the new image The comment is similarly not copied instead the comment ...

Страница 446: ...ure and uses only the brightest Darken The camera compares the pixels in each picture and uses only the darkest 2 Choose how pictures are selected Option Description Select individual pictures Select pictures for the overlay one by one Select consecutive pictures Select two pictures the overlay will include the two pictures and all images between them Select folder The overlay will include all pic...

Страница 447: ...ose Select consecutive pictures All pictures in a range chosen using the multi selector will be combined using the option selected in Step 1 Use W Q to select the first and last pictures in the desired range The first and last pictures are indicated by icons and the pictures between them by icons You can alter your selection by using the multi selector to highlight different pictures to serve as t...

Страница 448: ...Discard and exit and press J D Lighten Darken The overlay will include only pictures created with this camera Pictures created with other cameras cannot be selected The overlay will include only pictures created with the same options selected for Choose image area Image size The image quality setting for the completed overlay is that of the highest quality picture it contains Overlays that include...

Страница 449: ...ng a custom menu My Menu can be used to create and edit a customized list of up to 20 items from the playback photo shooting video recording Custom Settings setup and retouch menus Options can be added deleted and reordered as described below Adding items to My Menu 1 Select Add items in O MY MENU Highlight Add items and press 2 ...

Страница 450: ... a menu Highlight the name of the menu containing the item you wish to add and press 2 3 Select an item Highlight the desired menu item and press J 4 Position the new item Press 1 or 3 to position the new item and press J to add it to My Menu ...

Страница 451: ... L Items indicated by a V icon cannot be selected Repeat Steps 1 4 to select additional items Removing items from My Menu 1 Select Remove items in O MY MENU Highlight Remove items and press 2 2 Select items Highlight items and press 2 to select M or deselect Continue until all the items you wish to remove are selected L ...

Страница 452: ...g items while in My Menu Items can also be removed by highlighting them in O MY MENU and pressing the O button a confirmation dialog will be displayed Press the O button again to remove the selected item Reordering items in My Menu 1 Select Rank items in O MY MENU Highlight Rank items and press 2 2 Select an item Highlight the item you wish to move and press J ...

Страница 453: ...Recent settings 453 3 Position the item Press 1 or 3 to move the item up or down in My Menu and press J Repeat Steps 2 3 to reposition additional items 4 Exit to O MY MENU Press the G button to return to O MY MENU ...

Страница 454: ...ing RECENT SETTINGS 1 Select Choose tab in O MY MENU Highlight Choose tab and press 2 2 Select m RECENT SETTINGS Highlight m RECENT SETTINGS in the Choose tab menu and press J The name of the menu will change from MY MENU to RECENT SETTINGS ...

Страница 455: ...d settings are listed D Removing items from the recent settings menu To remove an item from the RECENT SETTINGS menu highlight it and press the O button a confirmation dialog will be displayed Press O button again to remove the selected item D Displaying My Menu Selecting Choose tab in the RECENT SETTINGS menu displays the items shown in Step 2 of Displaying RECENT SETTINGS 0454 Highlight OMY MENU...

Страница 456: ...s 456 Establishing wireless connections to computers or smart devices Network options The camera can connect to computers via Wi Fi 0457 or establish wireless connections to smartphones or tablets smart devices 0479 ...

Страница 457: ...be able to connect to the computer from the camera The Wireless Transmitter Utility is available for download from the Nikon Download Center Be sure to download the latest version after reading the release notes and system requirements https downloadcenter nikonimglib com Infrastructure and access point modes Either of the following two methods can be used to establish wireless connections between...

Страница 458: ...nect to the Internet while connected to the camera To create a new host profile select Direct connection to computer in the connection wizard Infrastructure mode The camera connects to a computer on an existing network including home networks via a wireless router The computer can still connect to the Internet while connected to the camera To create a new network profile select Search for Wi Fi ne...

Страница 459: ...ng wireless network Connection to computers beyond the local area network is not supported You can connect only to computers on the same network Connecting in access point mode 1 Select Connect to computer in the camera setup menu then highlight Network settings and press 2 2 Highlight Create profile and press J ...

Страница 460: ...Connecting to computers via Wi Fi 460 3 Highlight Direct connection to computer and press J The camera SSID and encryption key will be displayed ...

Страница 461: ...e taskbar Select the SSID displayed by the camera in Step 3 When prompted to enter the network security key enter the encryption key displayed by the camera in Step 3 The computer will initiate a connection to the camera macOS Click the wireless LAN icon in the menu bar Select the SSID displayed by the camera in Step 3 ...

Страница 462: ...tion key displayed by the camera in Step 3 The computer will initiate a connection to the camera 5 Start pairing When prompted launch the Wireless Transmitter Utility on the computer 6 Select the camera in the Wireless Transmitter Utility Select the name displayed by the camera in Step 5 and click Next ...

Страница 463: ...In the Wireless Transmitter Utility enter the authentication code displayed by the camera The camera will display an authentication code Enter the authentication code in the dialog displayed by the Wireless Transmitter Utility and click Next ...

Страница 464: ...ting that pairing is complete press J In the Wireless Transmitter Utility click Next you will be prompted to choose a destination folder For more information see online help for the Wireless Transmitter Utility A wireless connection will be established between the camera and computer when pairing is complete ...

Страница 465: ...onnect to the camera via the wireless network list on your computer A wireless connection has now been established between the camera and the computer Pictures taken with the camera can be uploaded to the computer as described in Uploading pictures 0473 Connecting in infrastructure mode 1 Select Connect to computer in the camera setup menu then highlight Network settings and press 2 2 Highlight Cr...

Страница 466: ...or encryption key press X in Step 3 Next press J and choose from the following options Option Description Push button WPS For routers that support push button WPS Press the WPS button on the router and then press the camera J button to connect PIN entry WPS The camera will display a PIN Using a computer enter the PIN on the router For more information see the documentation provided with the router...

Страница 467: ...rk is not encrypted proceed to Step 6 If the desired network is not displayed press X to search again D Hidden SSIDs Networks with hidden SSIDs are indicated by blank entries in the network list To connect to a network with a hidden SSID highlight a blank entry and press J Next press J the camera will prompt you to provide an SSID Enter the network name and press X Press X again the camera will no...

Страница 468: ... and enter the encryption key for the wireless router For more information see the documentation for the wireless router Press X when entry is complete Press X again to initiate the connection A message will be displayed for a few seconds when the connection is established ...

Страница 469: ...nce an IP address has been assigned Enter manually Enter the IP address and sub net mask manually Rotate the main command dial to highlight segments Press 4 or 2 to change the highlighted segment and press J to save changes Next press X a configuration complete message will be displayed Press X again to display the sub net mask Press 1 or 3 to edit the sub net mask and press J a configuration comp...

Страница 470: ...rs via Wi Fi 470 7 Start pairing When prompted launch the Wireless Transmitter Utility on the computer 8 Select the camera in the Wireless Transmitter Utility Select the name displayed by the camera in Step 7 and click Next ...

Страница 471: ...In the Wireless Transmitter Utility enter the authentication code displayed by the camera The camera will display an authentication code Enter the authentication code in the dialog displayed by the Wireless Transmitter Utility and click Next ...

Страница 472: ...ting that pairing is complete press J In the Wireless Transmitter Utility click Next you will be prompted to choose a destination folder For more information see online help for the Wireless Transmitter Utility A wireless connection will be established between the camera and computer when pairing is complete ...

Страница 473: ...ctures Pictures can be selected for upload during playback They can also be uploaded automatically as they are taken D Destination folders By default images are uploaded to the following folders Windows Users user name Pictures Wireless Transmitter Utility macOS Users user name Pictures Wireless Transmitter Utility The destination folder can be selected using the Wireless Transmitter Utility For m...

Страница 474: ...load icon will appear on the picture If the camera is currently connected to a network upload will begin immediately and the icon will turn green Otherwise upload will begin when a connection is established Repeat Steps 2 3 to upload additional pictures D Removing upload marking Repeat Steps 2 3 to remove transfer marking from selected images To remove transfer marking from all pictures select Con...

Страница 475: ...the memory card Be sure a memory card is inserted in the camera Videos and photos taken during video mode are not uploaded automatically when recording is complete They must instead be uploaded from the playback display The transfer icon Upload status is indicated by the transfer icon W white Send The picture has been selected for automatic upload but upload has not yet begun X green Sending Uploa...

Страница 476: ...shows Now sending preceded by the name of the file being sent Errors are also displayed here 2 Signal strength Wireless signal strength 3 Pictures time remaining The number of pictures remaining and the time needed to send them The time remaining is an estimate only D Loss of signal Wireless transmission may be interrupted if the signal is lost Upload of pictures with send marking can be resumed b...

Страница 477: ...ng Wi Fi connection Close Wi Fi connection in the photo mode i menu or connecting to a smart device via Wi Fi or Bluetooth D Access point mode An error will occur if the computer s wireless connection is disabled before the camera s Disable camera Wi Fi first Reconnecting To reconnect to an existing network select Enable for Connect to computer Wi Fi connection in the setup menu or select Wi Fi co...

Страница 478: ...able camera Wi Fi before connecting D Multiple network profiles If the camera has profiles for more than one network it will reconnect to the last network used Other networks can be selected using the Connect to computer Network settings option in the setup menu ...

Страница 479: ...e latest SnapBridge news Carefully read any license agreements or the like displayed when SnapBridge is launched and only proceed if you are willing to accept them What SnapBridge can do for you The tasks that can be performed using the SnapBridge app are outlined below For details see the SnapBridge app online help https nikonimglib com snbr onlinehelp en index html Downloading pictures from the ...

Страница 480: ...g Before connecting via Bluetooth for the first time you will need to pair the camera and smart device D Before pairing Enable Bluetooth on the smart device For details see the documentation provided with the device Ensure that the batteries in the camera and smart device are fully charged to prevent the devices turning off unexpectedly Check that there is space available on the camera memory card...

Страница 481: ...2 Smart device Launch the SnapBridge app and tap Connect to camera in the tab If this is the first time you have launched the app you should instead tap Connect to camera in the welcome display 3 Smart device Follow the on screen instructions When prompted tap the category for your camera and then tap the pairing option when prompted to choose the connection type Tap the camera name when prompted ...

Страница 482: ...nstructions on both devices to complete pairing Tap the pairing button on the smart device and press the J button on the camera The camera and smart device will each display a message when pairing is complete The camera will then automatically exit to the menus The camera and smart device are now paired For information on using the SnapBridge app see online help ...

Страница 483: ...orget the camera before returning to Step 1 The request to forget the camera is made via the iOS Settings app D Disabling Bluetooth To disable Bluetooth select Disable for Connect to smart device Pairing Bluetooth Bluetooth connection in the camera setup menu Connecting to a previously paired smart device Once the smart device has been paired with the camera you will be able to connect simply by e...

Страница 484: ... the camera and smart device in Wi Fi mode Some operations are performed using the camera others on the smart device Additional instructions are available via SnapBridge online help 1 Smart device Launch the SnapBridge app open the tab tap and select Wi Fi mode If this is the first time you have launched the app you should instead tap Connect to camera in the welcome display When prompted tap the ...

Страница 485: ...Fi connection in the setup menu then highlight Establish Wi Fi connection and press J The camera SSID and password will be displayed D Enabling Wi Fi You can also enable Wi Fi by selecting Wi Fi connection Establish Wi Fi conn with smart device in the i menu for shooting mode ...

Страница 486: ... the Wi Fi settings display select the camera SSID and enter the password displayed by the camera in Step 3 5 Smart device After adjusting device settings as described in Step 4 return to the SnapBridge app After establishing a Wi Fi connection to the camera the smart device will display Wi Fi mode options The camera will display a message stating that the connection is complete The camera and sma...

Страница 487: ...Connecting to smart devices 487 D Terminating Wi Fi mode To end the Wi Fi connection tap in the SnapBridge tab When the icon changes to tap and select Exit Wi Fi mode ...

Страница 488: ...ngs for the host computer or wireless router and adjust camera settings appropriately 0411 The camera displays a no memory card error The memory card is inserted incorrectly or not at all Confirm that the memory card is correctly inserted 075 Upload is interrupted and fails to resume Upload will resume if the camera is turned off and then on again 0473 The connection is unreliable If Auto is selec...

Страница 489: ...o the computer for viewing and editing For information on establishing wireless connections to computers see Connecting to computers via Wi Fi in Establishing wireless connections to computers or smart devices 0457 1 USB Type C connector for connection to camera 2 USB connector for connection to computer Choose a cable with a connector that matches the connector on the computer Installing NX Studi...

Страница 490: ...the camera off and ensuring that a memory card is inserted connect the USB cable as shown You also have the option of inserting the camera memory card into the computer s card slot if available or a third party card reader Before doing so check that the card is compatible with the reader or card slot 2 Turn the camera on The Nikon Transfer 2 component of NX Studio will start Nikon Transfer 2 is im...

Страница 491: ...Connecting to computers via USB 491 3 Click Start Transfer Pictures on the memory card will be copied to the computer 4 Turn the camera off Disconnect the USB cable when transfer is complete ...

Страница 492: ...n Transfer 2 as the application that opens when the camera is detected D Transferring videos Do not attempt to transfer videos from the memory card while it is inserted in a camera of a different make or model Doing so could result in the videos being deleted without being transferred D Connecting to computers Do not turn the camera off or disconnect the USB cable while transfer is in progress Do ...

Страница 493: ...mputers via USB 493 To ensure that data transfer is not interrupted be sure the camera battery is fully charged D USB hubs Connect the camera directly to the computer do not connect the cable via a USB hub or keyboard ...

Страница 494: ...at matches the connector on the HDMI device TVs After tuning the TV to the HDMI input channel turn the camera on and press the K button to view pictures on the television screen Audio playback volume can be adjusted using the controls on the TV Camera controls cannot be used If the camera is paired with a smart device running the SnapBridge app the device can be used to control playback remotely w...

Страница 495: ...eo signal input range varies with the HDMI device Auto which matches the output range to the HDMI device is recommended in most situations If the camera is unable to determine the correct RGB video signal output range for the HDMI device you can choose from the following options Limited range For devices with an RGB video signal input range of 16 to 235 Choose this option if you notice a loss of d...

Страница 496: ...os to an external device select Standby timer and choose No limit or a time longer than the anticipated recording time An icon will be displayed in the camera monitor when On is selected A is displayed during standby B during video recording During recording check the recorder and recorder display to ensure that footage is being saved to the device Note that selecting On may disrupt the footage ou...

Страница 497: ...ts When using a flash select Off for Silent photography in the photo shooting menu Camera mounted flash units Take pictures using a flash unit mounted on the camera See the following pages for more information Remote flash photography Take pictures with one or more remote flash units using wireless flash control Advanced Wireless Lighting or AWL For more information see Remote flash photography 05...

Страница 498: ...documentation provided with the unit for details 2 Turn on the camera and flash unit The flash will begin charging the flash ready indicator c will appear in the shooting display when charging is complete 3 Choose the flash control mode 0501 and flash mode 0502 4 Adjust shutter speed and aperture 5 Take pictures ...

Страница 499: ...e with normal operation of the camera but also damage the flash sync circuits of the camera and or flash D i TTL flash control When an optional flash unit that supports the Nikon Creative Lighting System is attached and set to TTL the camera uses monitor pre flashes for balanced or standard i TTL fill flash flash control i TTL flash control is not available with flash units that do not support the...

Страница 500: ... Standard i TTL fill flash Flash output is adjusted to bring lighting in the frame to a standard level the brightness of the background is not taken into account Recommended for shots in which the main subject is emphasized at the expense of background details or when exposure compensation is used Standard i TTL fill flash is activated automatically when Spot metering is selected ...

Страница 501: ...l mode item in the photo shooting menu Settings for flash units other than the SB 500 SB 400 and SB 300 can only be adjusted using flash unit controls Option Description TTL Flash output is adjusted automatically in response to shooting conditions Flash compensation can be adjusted using Flash compensation in the photo shooting menu Manual Choose the flash level manually Flash output is selected u...

Страница 502: ...for portraits The red eye reduction lamp on the camera or flash unit lights before the flash fires reducing red eye A flash unit with red eye reduction is required The desired results may not be achieved if the subject or camera moves before the shutter is released this setting is not recommended with moving subjects or in other situations requiring a quick shutter response b P S A M L Slow sync S...

Страница 503: ...se of a tripod is recommended P A M Rear curtain sync The flash fires just before the shutter closes creating the effect of a stream of light behind moving light sources Selecting P or A after choosing this option sets the flash mode to slow sync Note that photos may be prone to blurring due to camera shake at slow shutter speeds Use of a tripod is recommended P S A M s Flash off The flash does no...

Страница 504: ...output can be increased to make the main subject appear brighter reduced to prevent glare or otherwise fine tuned to produce the desired result Choose from values of from 3 to 1 in steps of 1 3 Higher values make the subject brighter lower values darker At values other than 0 0 a Y icon will appear in the shooting display Normal flash output can be restored by setting flash compensation to 0 0 Fla...

Страница 505: ...n ISO sensitivity and aperture FV lock is not available in b mode 1 Assign FV lock to a control using Custom Setting f2 Custom controls shooting 2 Mount a CLS compatible flash unit on the camera accessory shoe 3 Turn the flash unit on and choose a flash control mode of monitor pre flash qA or A If you are using an SB 500 SB 400 or SB 300 mounted on the camera accessory shoe choose TTL for Flash co...

Страница 506: ...ocus 5 Lock flash level After confirming that the flash ready indicator c appears in the shooting display press the FV lock control the flash unit will emit a monitor pre flash to determine the appropriate flash level Flash output will lock and an FV lock icon r will appear in the shooting display 6 Recompose the shot ...

Страница 507: ...n to shoot If desired additional pictures can be taken without releasing FV lock Repeat Steps 6 to 7 to take additional shots 8 Release FV lock Press the FV lock control to release FV lock and confirm that the FV lock icon r is no longer displayed in the shooting display ...

Страница 508: ...s Lighting or AWL For information on using a flash unit mounted on the camera accessory shoe see On Camera flash photography 0497 Throughout this chapter operations involving the camera and accessories connected to the camera are indicated by C operations involving remote flash units by f For more information on using remote flash units f see the documentation provided with the flash unit ...

Страница 509: ... adjusted from the camera For more information see Using optical AWL with the SB 500 0509 See the documentation provided with the flash units for more information Settings for other flash units must be adjusted using flash unit controls For more information see the documentation provided with the flash unit in question Using optical AWL with the SB 500 When an optional flash unit SB 500 is mounted...

Страница 510: ...Controlling remote flash units 510 1 C Highlight Group flash options in the Flash control display and press 2 ...

Страница 511: ...he master flash and the remote flash units in each group The following options are available Option Description TTL i TTL flash control qA Auto aperture Available only with compatible flash units M Choose the flash level manually off The remote units do not fire Comp cannot be adjusted Select 3 for Channel 3 f Set the channel of the remote flash units to 3 ...

Страница 512: ...sh ready lights for all flash units are lit D Remote flash photography Position the sensor windows on the remote flash units to pick up the light from the master flash Particular care is required if the master flash is mounted on a hand held camera Be sure that direct light or strong reflections from the remote flash units do not enter the camera lens in TTL mode or the photocells on the remote fl...

Страница 513: ...following sections Problems and solutions 0515 Alerts and error messages 0524 STEP 2 Turn the camera off and remove the battery then wait about a minute re insert the battery and turn the camera on The camera may continue to write data to the memory card after shooting Wait at least a minute before removing the battery STEP 3 Search Nikon websites For support information and answers to frequently ...

Страница 514: ...items and other features may be unavailable To access menu items that are grayed out or features that are otherwise unavailable try restoring default settings using the Reset all settings item in the setup menu Note however that wireless network profiles copyright information and other user generated entries will also be reset Once reset settings cannot be restored ...

Страница 515: ...r modes available using the Limit monitor mode selection item in the setup menu Adjust settings as required Dust lint or other foreign matter on the eye sensor may prevent it functioning normally Clean the eye sensor with a blower The viewfinder is out of focus Rotate the diopter adjustment control to adjust viewfinder focus If adjusting viewfinder focus does not correct the problem set the focus ...

Страница 516: ... conjunction with HDR Photos are out of focus Is the camera in manual focus mode To enable autofocus select AF A AF S AF C or AF F for focus mode Autofocus does not perform well under the following conditions In these cases use manual focus or focus lock Autofocus does not perform well if there is little or no contrast between the subject and the background the focus point contains objects at diff...

Страница 517: ...t available when Auto area AF Auto area AF people or Auto area AF animals is selected for AF area mode The camera is slow to record photos Is On selected for Long exposure NR in the photo shooting menu Photographs and videos do not appear to have the same exposure as the preview shown in the display The effects of changes to settings that affect exposure and color are not visible in the display wh...

Страница 518: ...lso try such techniques as removing lens filters choosing a different shutter speed or using silent photography Shooting ends unexpectedly or does not start Shooting may end automatically to prevent the camera overheating for example if The ambient temperature is high The camera has been used for extended periods to record videos The camera has been used in continuous release modes for extended pe...

Страница 519: ...serve as sources for preset manual white balance White balance WB bracketing is unavailable White balance bracketing is not available when a RAW or RAW JPEG option is selected for image quality White balance bracketing cannot be used in multiple exposure and HDR modes The effects of Set Picture Control differ from image to image Auto is selected for Set Picture Control or as the basis for a custom...

Страница 520: ...ecording menu Was the video recorded with Manual chosen for Microphone sensitivity in the video recording menu and a low sensitivity selected Playback RAW pictures are not visible during playback The camera displays only the JPEG copies of pictures taken with RAW JPEG fine RAW JPEG normal or RAW JPEG basic selected for Image quality Pictures taken with other cameras are not displayed Pictures reco...

Страница 521: ...rmat Pictures are not displayed on HDMI devices Confirm that an HDMI cable is correctly connected Output to HDMI devices does not function as expected Confirm that an HDMI cable is correctly connected Is On selected for HDMI Advanced External recording control in the setup menu Pictures may display correctly if default settings are restored using the Reset all settings item in the setup menu The e...

Страница 522: ...t devices via auto upload If Foreground is selected for Auto link Link mode in the SnapBridge tab pictures will not be uploaded to the smart device automatically while the SnapBridge app is running in the background Pictures will only be uploaded when the SnapBridge app is displayed running in the foreground on the smart device Check that the camera is paired with the smart device Check that the c...

Страница 523: ...Confirm that Airplane mode in the setup menu is set to Disable The remote control cannot be used when the camera and computer are connected via USB and are communicating End the USB connection The camera does not respond even when the ML L7 Remote Control is used The camera and ML L7 Remote Control optional are not connected Press the power button on the remote control to connect them If L is not ...

Страница 524: ... battery l is also displayed flashing in the control panel Lens is not correctly attached Ensure that the lens is correctly attached Ensure that retractable lenses are extended This indicator is also displayed when a non CPU lens is attached via a mount adapter but in this case no action need be taken Bulb flashes Bulb selected in mode S Change shutter speed Select mode M Time flashes Time selecte...

Страница 525: ...speed Shooting mode A Choose smaller aperture higher f number Subject too dark limits of camera exposure metering system exceeded Increase ISO sensitivity Shooting mode P Use optional flash unit flash can also be used if alert is still displayed after following settings are adjusted in mode S or A Shooting mode S Choose slower shutter speed Shooting mode A Choose wider aperture lower f number c fl...

Страница 526: ...entative Card flashes The memory card is write protected locked Slide the lock switch to the write position 0598 Error messages The following error messages may appear in the camera display Shutter release disabled Recharge battery Battery exhausted Replace with spare battery Charge battery This battery cannot be used It does not communicate properly with this camera To use the camera safely choos...

Страница 527: ...not correctly formatted Format memory card Replace with correctly formatted memory card FTZ mount adapter firmware version not supported Upgrade FTZ firmware The firmware of the mount adapter is not the latest version Update the firmware of the mount adapter to the latest version For information on firmware updates see the Nikon website for your area Recording interrupted Please wait Memory card d...

Страница 528: ...ile File has been modified using computer application or does not conform to DCF file standard File is corrupt Do not overwrite images using computer applications Cannot select this file Selected picture cannot be retouched Retouch options are available only with pictures taken with or previously retouched on camera This video cannot be edited Selected video cannot be edited Videos created with ot...

Страница 529: ... lenses F mount lenses can be mounted on Z mount cameras using an FTZ mount adapter Some features may not be available depending on the lens used Information on the F mount lenses that can be used with Z mount cameras and on any restrictions that may apply can be found in Compatible F Mount Lenses available from the Nikon Download Center https downloadcenter nikonimglib com en products 491 FTZ htm...

Страница 530: ...0127 2 Flexible program indicator 0128 3 AF area brackets 0102 4 Flash mode 0502 5 Interval timer indicator 0296 1 icon 084 No memory card indicator 075 0533 6 Release mode 0166 7 Focus point 085 0102 8 Focus mode 0100 9 AF area mode 0102 10 Active D Lighting 0164 11 Picture Control 0147 12 Bluetooth connection indicator 0408 Airplane mode 0408 ...

Страница 531: ...or 0276 ADL bracketing indicator 0279 HDR indicator 0290 Multiple exposure indicator 0283 19 Number of shots in exposure and flash bracketing sequence 0271 Number of shots in WB bracketing sequence 0276 Number of shots in ADL bracketing sequence 0279 HDR exposure differential 0290 Number of multiple exposure 0283 20 Exposure indicator Exposure 0133 Exposure compensation 0139 Auto bracketing 0270 ...

Страница 532: ...Remote control connection indicator 0570 25 ISO sensitivity 0137 26 ISO sensitivity indicator 0137 Auto ISO sensitivity indicator 0245 27 Exposure compensation indicator 0139 28 Flash compensation indicator 0504 29 Subject tracking AF 0109 30 Aperture 0130 0131 31 Shutter speed 0128 0131 32 Flash sync indicator 0361 33 FV lock indicator 0505 34 Metering 0162 35 Autoexposure AE lock 0142 ...

Страница 533: ...359 45 Temperature warning D Temperature warnings If the camera temperature becomes elevated a temperature warning and count down timer will be displayed When the timer reaches zero the shooting display will turn off The timer turns red when the thirty second mark is reached In some cases the timer may be displayed immediately after the camera is turned on D No memory card inserted If no memory ca...

Страница 534: ... mode 0127 2 Flexible program indicator 0128 3 Shutter speed 0128 0131 4 Aperture 0130 0131 5 Exposure indicator Exposure 0133 Exposure compensation 0139 Exposure and flash bracketing 0271 WB bracketing 0276 ADL bracketing 0279 6 Flash sync indicator 0361 ...

Страница 535: ...WB bracketing indicator 0276 ADL bracketing indicator 0279 HDR indicator 0290 Multiple exposure indicator 0283 10 k appears when memory remains for over 1000 exposures 077 11 Number of exposures remaining 077 0600 12 i icon 0145 13 ISO sensitivity 0137 14 ISO sensitivity indicator 0137 Auto ISO sensitivity indicator 0245 15 FV lock indicator 0505 16 Autoexposure AE lock 0142 ...

Страница 536: ...delay mode 0356 22 Interval timer indicator 0296 1 icon 084 23 Flash control mode 0501 24 Beep indicator 0406 25 Battery indicator 076 26 USB power delivery 0415 27 Wi Fi connection 0164 28 Release mode 0166 29 AF area mode 0102 30 Focus mode 0100 31 Vibration reduction 0171 32 Active D Lighting 0164 33 Metering 0162 34 Image size 0161 35 White balance 0116 0153 0248 36 Set Picture Control 0147 37...

Страница 537: ...trol 0494 3 Frame size and rate Video quality 0175 4 Time remaining 090 5 Timecode 0339 6 File name 0242 7 Wind noise reduction 0179 8 Release mode still photography 0335 9 Sound level 0178 10 Microphone sensitivity 0178 11 Frequency response 0338 12 Electronic VR indicator 0181 13 Highlight display 0389 ...

Страница 538: ...ndicator 076 2 Vibration reduction 0171 3 Flash mode 0502 4 Release mode 0166 5 Focus mode 0100 6 AF area mode 0102 7 Active D Lighting 0164 8 Picture Control 0147 9 White balance 0116 0153 0248 10 Image quality 0160 11 Image size 0161 12 Image area 0243 ...

Страница 539: ...flash bracketing indicator 0271 WB bracketing indicator 0276 ADL bracketing indicator 0279 HDR indicator 0290 Multiple exposure indicator 0283 17 Subject tracking AF 0109 18 Number of shots in exposure and flash bracketing sequence 0271 Number of shots in WB bracketing sequence 0276 Number of shots in ADL bracketing sequence 0279 HDR exposure differential 0290 Number of multiple exposure 0283 ...

Страница 540: ...ty indicator 0137 Auto ISO sensitivity indicator 0245 24 Exposure compensation indicator 0139 25 Flash compensation indicator 0504 26 Exposure indicator Exposure 0133 Exposure compensation 0139 Auto bracketing 0270 27 Aperture 0130 0131 28 Shutter speed 0128 0131 29 Flash sync indicator 0361 30 Autoexposure AE lock 0142 31 Flexible program indicator 0128 32 Shooting mode 0127 33 Metering 0162 ...

Страница 541: ... 0505 36 Exposure delay mode 0356 37 Shutter type 0357 Silent photography 0121 38 Flicker detection 0265 39 Interval timer indicator 0296 1 icon 084 No memory card indicator 075 0533 40 Temperature warning 41 AF area brackets 0102 42 Live view preview indicator 0359 ...

Страница 542: ... File name 0242 4 External recording control 0494 5 Recording indicator 090 No video indicator 092 6 Timecode 0339 7 Time remaining 090 8 Release mode still photography 0335 9 Sound level 0178 10 Microphone sensitivity 0178 11 Frequency response 0338 12 Wind noise reduction 0179 13 Highlight display 0389 ...

Страница 543: ...tween the camera and compatible flash units Features available with CLS compatible flash units Flash unit 0 SB 5000 543 SB 910 SB 900 SB 800 545 SB 700 547 SB 600 549 SB 500 550 Flash unit 0 SB R200 552 SB 400 554 SB 300 555 SU 800 557 SB 5000 Supported features Single flash i TTL i TTL balanced fill flash 41 Standard i TTL fill flash 42 qA Auto aperture 4 A Non TTL auto GN Distance priority manua...

Страница 544: ...ess flash control 4 qA Auto aperture 4 A Non TTL auto M Manual 4 RPT Repeating flash 4 Remote i TTL i TTL 4 A B Quick wireless flash control 4 qA A Auto aperture non TTL auto 43 M Manual 4 RPT Repeating flash 4 Radio controlled Advanced Wireless Lighting Color Information Communication flash 4 Color Information Communication LED light Auto FP high speed sync 44 FV lock 45 ...

Страница 545: ...ted with the master flash 4 Available only in i TTL qA A GN and M flash control modes 5 Available only in i TTL flash control mode or when the flash is configured to emit monitor pre flashes in qA or A flash control mode SB 910 SB 900 SB 800 Supported features Single flash i TTL i TTL balanced fill flash 41 Standard i TTL fill flash 42 qA Auto aperture 43 A Non TTL auto 43 GN Distance priority man...

Страница 546: ...e i TTL i TTL 4 A B Quick wireless flash control 4 qA A Auto aperture non TTL auto 44 M Manual 4 RPT Repeating flash 4 Radio controlled Advanced Wireless Lighting Color Information Communication flash 4 Color Information Communication LED light Auto FP high speed sync 45 FV lock 46 Red eye reduction 4 Camera modeling illumination Unified flash control Camera flash unit firmware update 47 ...

Страница 547: ...vailable only in i TTL flash control mode or when the flash is configured to emit monitor pre flashes in qA or A flash control mode 7 Firmware updates for the SB 910 and SB 900 can be performed from the camera SB 700 Supported features Single flash i TTL i TTL balanced fill flash 41 Standard i TTL fill flash 4 qA Auto aperture A Non TTL auto GN Distance priority manual 4 M Manual 4 RPT Repeating f...

Страница 548: ...ting flash 4 Radio controlled Advanced Wireless Lighting Color Information Communication flash 4 Color Information Communication LED light Auto FP high speed sync 42 FV lock 43 Red eye reduction 4 Camera modeling illumination Unified flash control Camera flash unit firmware update 4 1 Not available with spot metering 2 Available only in i TTL GN and M flash control modes 3 Available only in i TTL ...

Страница 549: ...lash 42 qA Auto aperture A Non TTL auto GN Distance priority manual M Manual 4 RPT Repeating flash Optical Advanced Wireless Lighting Master Remote flash control i TTL i TTL A B Quick wireless flash control qA Auto aperture A Non TTL auto M Manual RPT Repeating flash Remote i TTL i TTL 4 A B Quick wireless flash control 4 ...

Страница 550: ...t Auto FP high speed sync 43 FV lock 44 Red eye reduction 4 Camera modeling illumination Unified flash control Camera flash unit firmware update 1 Not available with spot metering 2 Can also be selected via the flash unit 3 Available only in i TTL and M flash control modes 4 Available only in i TTL flash control mode SB 500 Supported features Single flash i TTL i TTL balanced fill flash 41 Standar...

Страница 551: ...sh control 42 i TTL i TTL 42 A B Quick wireless flash control qA Auto aperture A Non TTL auto M Manual 42 RPT Repeating flash Remote i TTL i TTL 4 A B Quick wireless flash control 4 qA A Auto aperture non TTL auto M Manual 4 RPT Repeating flash 4 Radio controlled Advanced Wireless Lighting Color Information Communication flash 4 Color Information Communication LED light 4 ...

Страница 552: ...ith spot metering 2 Can be selected using the Flash control item in the camera menus 3 Available only in i TTL and M flash control modes 4 Available only in i TTL flash control mode SB R200 Supported features Single flash i TTL i TTL balanced fill flash Standard i TTL fill flash qA Auto aperture A Non TTL auto GN Distance priority manual M Manual RPT Repeating flash Optical Advanced Wireless Light...

Страница 553: ...te i TTL i TTL 4 A B Quick wireless flash control 4 qA A Auto aperture non TTL auto M Manual 4 RPT Repeating flash Radio controlled Advanced Wireless Lighting Color Information Communication flash Color Information Communication LED light Auto FP high speed sync 41 FV lock 42 Red eye reduction Camera modeling illumination Unified flash control Camera flash unit firmware update ...

Страница 554: ...ngle flash i TTL i TTL balanced fill flash 41 Standard i TTL fill flash 4 qA Auto aperture A Non TTL auto GN Distance priority manual M Manual 42 RPT Repeating flash Optical Advanced Wireless Lighting Master Remote flash control i TTL i TTL A B Quick wireless flash control qA Auto aperture A Non TTL auto M Manual RPT Repeating flash Remote i TTL i TTL ...

Страница 555: ...mation Communication LED light Auto FP high speed sync FV lock 43 Red eye reduction 4 Camera modeling illumination Unified flash control Camera flash unit firmware update 1 Not available with spot metering 2 Can be selected using the Flash control item in the camera menus 3 Available only in i TTL flash control mode SB 300 Supported features Single flash i TTL i TTL balanced fill flash 41 Standard...

Страница 556: ...Remote flash control i TTL i TTL A B Quick wireless flash control qA Auto aperture A Non TTL auto M Manual RPT Repeating flash Remote i TTL i TTL A B Quick wireless flash control qA A Auto aperture non TTL auto M Manual RPT Repeating flash Radio controlled Advanced Wireless Lighting Color Information Communication flash 4 Color Information Communication LED light ...

Страница 557: ... in i TTL flash control mode The SU 800 Wireless Speedlight Commander When mounted on a CLS compatible camera the SU 800 can be used as a commander for SB 5000 SB 910 SB 900 SB 800 SB 700 SB 600 SB 500 or SB R200 flash units Group flash control is supported for up to three groups The SU 800 itself is not equipped with a flash Supported features Single flash i TTL i TTL balanced fill flash Standard...

Страница 558: ...rture A Non TTL auto M Manual RPT Repeating flash Remote i TTL i TTL A B Quick wireless flash control qA A Auto aperture non TTL auto M Manual RPT Repeating flash Radio controlled Advanced Wireless Lighting Color Information Communication flash Color Information Communication LED light Auto FP high speed sync 42 FV lock 43 Red eye reduction Camera modeling illumination ...

Страница 559: ...LR cameras This camera is not included in the digital SLR category in the documentation for the SB 80DX SB 28DX and SB 50DX If the flash ready indicator c flashes for about three seconds after a photograph is taken in i TTL or non TTL auto mode the flash has fired at full power and the photograph may be underexposed CLS compatible flash units only i TTL flash control can be used at ISO sensitiviti...

Страница 560: ...tly to the camera Reduce ISO sensitivity or increase the distance between the camera and the battery pack The camera provides AF assist illumination as required AF assist illuminators on optional flash units will not light When an SC series 17 28 or 29 sync cable is used for off camera flash photography correct exposure may not be achieved in i TTL mode We recommend that you select standard i TTL ...

Страница 561: ...need to set the flash control mode for the master or at least one remote group to TTL qA or A D Other flash units The following flash units can be used in non TTL auto A and manual modes The options available do not vary with the lens used Flash unit Supported features SB 80DX SB 28DX SB 28 SB 26 SB 25 SB 24 Non TTL auto Manual Repeating flash Rear curtain sync1 SB 50DX SB 23 SB 29 SB 21B SB 29S M...

Страница 562: ...ame Auto aperture qA Area metered by flash exposure meter Non TTL auto A D Flash compensation for optional flash units In i TTL and auto aperture qA flash control modes the flash compensation selected with the optional flash unit or the camera Flash control item is added to the flash compensation selected with the Flash compensation item in the photo shooting menu A Studio strobe lighting To adjus...

Страница 563: ...livery in the setup menu For more information see USB power delivery 0415 Filters Neutral Color NC filters can be used to protect the lens Filters may cause ghosting when the subject is framed against a bright light or when a bright light source is in the frame Filters can be removed if ghosting occurs Matrix metering may not produce the desired results with filters with exposure factors filter fa...

Страница 564: ...cessories DK 32 Rubber Eyecup A rubber eyecup that can be fitted to the camera viewfinder The DK 29 makes the image in the viewfinder easier to see preventing eye fatigue Remove Replace Mount adapters FTZ Mount Adapter An adapter that allows NIKKOR F mount lenses to be used with digital cameras that support interchangeable Z mount lenses For information on attaching removing maintaining and using ...

Страница 565: ...e A wireless Bluetooth microphone Use the ME W1 for off camera recording Remote controls ML L7 Remote Control Pair it with the camera and shoot videos and photos remotely D Attaching and removing the accessory shoe cover The cover slides into the shoe as shown To remove the cover hold the camera firmly press the cover down with a thumb and slide it in the direction shown Charging the camera with t...

Страница 566: ... An exhausted battery will fully charge in about 1 hour and 40 minutes Unplug the charging AC adapter and remove the cable from the camera when charging is complete D The charging AC adapter If the battery cannot be charged using the charging AC adapter for example because the battery is not compatible or the temperature of the camera is elevated the charge lamp will flash rapidly for about 30 sec...

Страница 567: ...specifications some computers will not supply current to power the camera or charge the battery ML L7 Remote Control You can operate the camera from the remote control by pairing 0570 the optional ML L7 Remote Control with the camera With this camera you can perform the operation in Remote control part names and functions for Z fc 0568 Connecting the camera and remote control via Bluetooth is call...

Страница 568: ...ording and press again to end recording 4 Power button When pressed the remote control turns on and starts searching for a paired camera If you press and hold it for 3 seconds or longer the remote control will start searching for unpaired cameras Pressing the power button while the remote control is on will turn it off 5 Status lamp The remote control status and shooting operation status are indic...

Страница 569: ... press and hold Bulb shooting works the same way as Time shooting 7 Multi selector Same operation as the multi selector on the camera 8 J select button Same operation as the J button on the camera 9 Fn1 function 1 Fn2 function 2 button Use functions registered beforehand 0414 By default pressing the Fn1 button on the remote control is the same operation as the K button on the camera while the Fn2 ...

Страница 570: ...te A Remote control status lamp for Z fc Color Status Description Green Flashing about every second Detecting paired camera Green Flashing quickly about every 0 5 seconds Pairing Green Flashing about every 3 seconds Connected to the camera Orange Flashes once Start shooting photo Orange Flashes twice End shooting photo Red Flashes once Start recording video Red Flashes twice End recording video Co...

Страница 571: ...ion to those devices will be terminated 2 Press and hold the power button on the remote control 3 seconds or longer The camera and remote control will start pairing In the meantime the remote control status lamp flashes at about 0 5 second intervals When pairing is complete the camera and remote control will be connected L is displayed in the shooting display If a message indicating that pairing f...

Страница 572: ... with a paired remote control 1 Select Wireless remote ML L7 options Wireless remote connection Enable in the camera setup menu and press J 2 Press the power button on the remote control The camera and remote control are automatically connected ...

Страница 573: ... the latest version as earlier versions may be unable to download pictures from the camera Wireless Transmitter Utility The Wireless Transmitter Utility is required if the camera is to be connected to a network Pair the camera with the computer and download pictures via Wi Fi Webcam Utility A module that allows you to connect the camera to a computer with a USB cable and use the camera as a webcam...

Страница 574: ...quires cleaning The procedures are detailed below Do not use alcohol thinner or other volatile chemicals Camera body Use a blower to remove dust and lint then wipe gently with a soft dry cloth After using the camera at the beach or seaside wipe off sand or salt with a cloth lightly dampened in distilled water and dry the camera thoroughly Important The following are not covered under warranty dama...

Страница 575: ...alfunction Manual cleaning Dirt or dust entering the camera when lenses are exchanged or the body cap is removed may adhere to the surface of the image sensor and affect your photographs The sensor can be cleaned manually as described below Note however that the sensor is extremely delicate and easily damaged we recommend that manual cleaning be performed only by a Nikon authorized service represe...

Страница 576: ...th a blower Do not use a blower brush The bristles could damage the sensor Dirt that cannot be removed with a blower can only be removed by Nikon authorized service personnel Under no circumstances should you touch or wipe the sensor 4 Replace the lens or supplied body cap ...

Страница 577: ...r foreign matter adhering to the image sensor clean the image sensor as described in Manual cleaning 0575 or have the sensor cleaned by authorized Nikon service personnel Photographs affected by the presence of foreign matter on the sensor can be retouched using the clean image options available in some imaging applications D Servicing the camera and accessories The camera is a precision device an...

Страница 578: ...and outside the camera and cause damage When you bring the camera to a place with a temperature difference place the camera in a carrying case or plastic bag and seal it beforehand When the camera has adapted to the ambient temperature take it out from the bag and use it Keep away from strong magnetic fields Static charges or the magnetic fields produced by equipment such as radio transmitters cou...

Страница 579: ...lements are easily damaged remove dust and lint with a blower If using an aerosol blower keep the can vertical to prevent the discharge of liquid that could damage glass elements To remove fingerprints and other stains from the lens apply a small amount of lens cleaner to a soft cloth and wipe the lens carefully Do not touch the image sensor Under no circumstances should you exert pressure on the ...

Страница 580: ...vals To prevent mold or mildew take the camera out of storage at least once a month insert the battery and release the shutter a few times Turn the product off before removing the battery Removing the battery while the camera is on could damage the product Particular care should be taken not to remove or disconnect the power source while images are being recorded or deleted Monitor viewfinder The ...

Страница 581: ...es appear in pictures that include bright lights or back lit subjects Battery care Precautions for use If improperly handled batteries may rupture or leak causing the product to corrode Observe the following precautions when handling batteries Turn the product off before replacing the battery Batteries may be hot after extended use Keep the battery terminals clean Use only batteries approved for u...

Страница 582: ... 0 C 32 F or above 40 C 104 F Failure to observe this precaution could damage the battery or impair its performance Charge the battery indoors at ambient temperatures of 5 C 35 C 41 F 95 F The battery will not charge if its temperature is below 0 C 32 F or above 60 C 140 F Capacity may be reduced and charging times increase at battery temperatures from 0 C 32 F to 15 C 59 F and from 45 C 113 F to ...

Страница 583: ...arked drop in the time a fully charged battery retains its charge when used at room temperature indicates that it requires replacement Purchase a new rechargeable battery Do not attempt to charge fully charged batteries Continuing to charge the battery after it is fully charged can impair battery performance Recycling used batteries Recycle rechargeable batteries in accord with local regulations b...

Страница 584: ...rging Failure to observe this precaution could in very rare instances result in the camera showing that charging is complete when the battery is only partially charged Disconnect and reconnect the adapter to begin charging again Do not short the adapter terminals Failure to observe this precaution could result in overheating and damage to the charger Unplug the adapter when it is not in use Do not...

Страница 585: ...ikon Z mount Lens Compatible lenses Z mount NIKKOR lenses F mount NIKKOR lenses mount adapter required restrictions may apply Effective pixels Effective pixels 20 9 million Image sensor Type 23 5 15 7 mm CMOS sensor Nikon DX format Total pixels 21 51 million Dust reduction system Image Dust Off reference data NX Studio software required ...

Страница 586: ...rding videos at other frame sizes 1920 1080 File format image quality NEF RAW 12 or 14 bit JPEG JPEG Baseline compliant with fine approx 1 4 normal approx 1 8 or basic approx 1 16 compression NEF RAW JPEG Single photograph recorded in both NEF RAW and JPEG formats Picture Control System Auto Standard Neutral Vivid Monochrome Portrait Landscape Flat Creative Picture Controls Dream Morning Pop Sunda...

Страница 587: ...y 1 0 m 1 Eyepoint 19 5 mm 1 0 m 1 from back end of viewfinder eyepiece lens Diopter adjustment 3 3 m 1 Eye sensor Automatically switches between monitor and viewfinder displays Monitor Monitor 7 5 cm 3 0 in approx 1040k dot vari angle TFT touch sensitive LCD with 170 viewing angle approximately 100 frame coverage and color balance and 11 level manual brightness controls Shutter Type Electronicall...

Страница 588: ...elf timer Approximate frame advance rate Continuous L Approx 1 4 fps Continuous H Approx 5 fps Continuous H extended Approx 11 fps Maximum frame advance rate as measured by in house tests Self timer 2 s 5 s 10 s 20 s 1 9 exposures at intervals of 0 5 1 2 or 3 s Exposure Metering system TTL metering using camera image sensor Metering mode Matrix metering Center weighted metering Weight of 75 given ...

Страница 589: ... 51200 step sizes of 1 3 EV can also be set to approx 1 EV above ISO 51200 ISO 102400 equivalent or to approx 2 EV above ISO 51200 ISO 204800 equivalent auto ISO sensitivity control available Active D Lighting Auto Extra high High Normal Low and Off Multiple exposure Add average lighten darken Other options HDR high dynamic range photo mode flicker reduction Autofocus Type Hybrid phase detection c...

Страница 590: ...ea AF L animals auto area AF auto area AF people auto area AF animals Focus lock Press the A g button or press shutter release button halfway single servo AF AF S Flash Flash control TTL i TTL flash control i TTL balanced fill flash is used with matrix center weighted and highlight weighted metering standard i TTL fill flash with spot metering Flash mode Front curtain sync slow sync rear curtain s...

Страница 591: ...r temperature Bracketing Bracketing Exposure and or flash white balance and ADL Video Metering system TTL metering using camera image sensor Metering mode Matrix center weighted or highlight weighted Frame size pixels and frame rate 3840 2160 4K UHD 30p progressive 25p 24p 1920 1080 120p 100p 60p 50p 30p 25p 24p 1920 1080 slow motion 30p 4 25p 4 24p 5 Actual frame rates for 120p 100p 60p 50p 30p 2...

Страница 592: ...3 EV auto ISO sensitivity control ISO 100 25600 available with selectable upper limit P S A Auto ISO sensitivity control ISO 100 25600 with selectable upper limit b Auto ISO sensitivity control ISO 100 25600 Active D Lighting Same as photo settings Extra high High Normal Low and Off Other options Time lapse video recording electronic vibration reduction time codes Playback Playback Full frame and ...

Страница 593: ...IEEE 802 11b g n a ac U S A Canada Mexico IEEE 802 11b g n a other countries in the Americas Operating frequency 2412 2462 MHz channel 11 Africa Asia Bolivia Europe and Oceania 2412 2462 MHz channel 11 5180 5825 MHz 5180 5580 MHz 5660 5700 MHz and 5745 5825 MHz U S A Canada Mexico 2412 2462 MHz channel 11 5180 5805 MHz 5180 5320 MHz and 5745 5805 MHz other countries in the Americas Maximum output ...

Страница 594: ...urce Battery One EN EL25 rechargeable Li ion battery Charging AC adapter EH 7P charging AC adapter available separately Tripod socket Tripod socket 0 635 cm 1 4 in ISO 1222 Dimensions weight Dimensions Approx 134 5 93 5 43 5 mm 5 3 3 7 1 8 in width height depth Weight Approx 445 g 15 7 oz with battery and memory card but without body cap approx 390 g 13 8 oz camera body only Operating environment ...

Страница 595: ...or notice Nikon will not be held liable for damages that may result from any mistakes that this document may contain MH 32 Battery Charger Rated input AC 100 to 240 V 50 60 Hz 0 21 A Rated output DC 8 4 V 1 12 A MAX Supported batteries EN EL25 Rechargeable Li ion Battery Charging time Approx 2 hours 30 minutes Time required to charge battery at an ambient temperature of 25 C 77 F when no charge re...

Страница 596: ... EN EL25 Rechargeable Li ion Battery Type Rechargeable lithium ion battery Rated capacity 7 6 V 1120 mAh Operating temperature 0 C 40 C 32 F 104 F Dimensions Approx 34 50 5 18 mm 1 4 2 0 0 8 in Weight Approx 53 g 1 9 oz ...

Страница 597: ...ip to another person you should also use the Reset all settings item in the camera setup menu to delete network settings and other personal information D Supported standards DCF Version 2 0 The Design Rule for Camera File System DCF is a standard widely used in the digital camera industry to ensure compatibility among different makes of camera Exif version 2 31 The camera supports Exif Exchangeabl...

Страница 598: ...ontact the manufacturer for information on features operation and limitations on use A The write protect switch SD memory cards are equipped with a write protect switch Sliding the switch to the lock position write protects the card protecting the data it contains A indicator and a Card warning appear in the shooting display when a write protected card is inserted If you attempt to release the shu...

Страница 599: ... 23 C 73 4 F 2 C 3 6 F with a NIKKOR Z DX 16 50mm f 3 5 6 3 VR lens under the following test conditions one photograph taken at default settings once every 30 s The number of shots is the number of shots that can be taken using a fully charged portable charger to supply power to a camera with a fully charged battery EN EL25 2 The number of times the camera battery EN EL25 can be fully charged usin...

Страница 600: ... bit Large Approx 24 4 MB 764 frames 36 frames JPEG fine Large Approx 9 5 MB 2100 frames 83 frames Medium Approx 6 6 MB 3400 frames 100 frames Small Approx 3 7 MB 6400 frames 100 frames JPEG normal Large Approx 5 7 MB 4100 frames 100 frames Medium Approx 3 5 MB 6800 frames 100 frames Small Approx 2 0 MB 12300 frames 100 frames JPEG basic Large Approx 2 4 MB 8000 frames 100 frames Medium Approx 1 7...

Страница 601: ...Memory card capacity 601 3 Maximum number of exposures that can be stored in memory buffer at ISO 100 If Auto distortion control is set to On the number of exposures may drop ...

Страница 602: ...duce battery endurance Keeping the shutter release button pressed halfway Repeated autofocus operations Taking RAW photographs Slow shutter speeds Using camera Wi Fi wireless LAN and Bluetooth features Using the camera with optional accessories connected Repeatedly zooming in and out Taking pictures at low ambient temperatures To ensure that you get the most from rechargeable Nikon EN EL25 batteri...

Страница 603: ...red at 23 C 73 4 F 2 C 3 6 F with a NIKKOR Z DX 16 50mm f 3 5 6 3 VR lens and a SanDisk SDSDXVE 032G JNJIP memory card Measurement performed at default settings Each shot can be up to 29 minutes 59 seconds in length If camera temperature rises recording may end before maximum length or size is reached ...

Страница 604: ... about 1 3 m 3 ft 4 in 9 ft 10 in Some lenses or lens hoods may block the illuminator at certain focus distances Remove the lens hood before shooting For information on restrictions when shooting with the camera s illuminator see the Nikon Download Center https downloadcenter nikonimglib com ...

Страница 605: ...he HDMI logo and High Definition Multimedia Interface are trademarks or registered trademarks of HDMI Licensing LLC The Bluetooth word mark and logo are registered trademarks owned by Bluetooth SIG Inc and any use of such marks by Nikon is under license Wi Fi and the Wi Fi logo are trademarks or registered trademarks of the Wi Fi Alliance All other trade names mentioned in this document or the oth...

Страница 606: ... and any associated documentation the Data Files or Unicode software and any associated documentation the Software to deal in the Data Files or Software without restriction including without limitation the rights to use copy modify merge publish distribute and or sell copies of the Data Files or Software and to permit persons to whom the Data Files or Software are furnished to do so provided that ...

Страница 607: ...tware without prior written authorization of the copyright holder D AVC Patent Portfolio License THIS PRODUCT IS LICENSED UNDER THE AVC PATENT PORTFOLIO LICENSE FOR THE PERSONAL AND NON COMMERCIAL USE OF A CONSUMER TO i ENCODE VIDEO IN COMPLIANCE WITH THE AVC STANDARD AVC VIDEO AND OR ii DECODE AVC VIDEO THAT WAS ENCODED BY A CONSUMER ENGAGED IN A PERSONAL AND NON COMMERCIAL ACTIVITY AND OR WAS OB...

Страница 608: ...ass B digital device pursuant to Part 15 of the FCC rules These limits are designed to provide reasonable protection against harmful interference in a residential installation This equipment generates uses and can radiate radio frequency energy and if not installed and used in accordance with the instructions may cause harmful interference to radio communications However there is no guarantee that...

Страница 609: ...face cables sold or provided by Nikon for your equipment Using other interface cables may exceed the limits of Class B Part 15 of the FCC rules Nikon Inc 1300 Walt Whitman Road Melville New York 11747 3064 U S A Tel 631 547 4200 Power cable At voltages over AC 125 V U S A only The power cable must be rated for the voltage in use be at least AWG no 18 gauge and have SVG insulation or better with a ...

Страница 610: ...nces for human health and the environment that might result from incorrect disposal For more information contact the retailer or the local authorities in charge of waste management This symbol on the battery indicates that the battery is to be collected separately The following apply only to users in European countries All batteries whether marked with this symbol or not are designated for separat...

Страница 611: ...mic Development Canada s licence exempt RSSs Operation is subject to the following two conditions 1 this device may not cause harmful interference and 2 this device must accept any interference received including interference that may cause undesired operation FCC WARNING The FCC requires the user to be notified that any changes or modifications made to this device that are not expressly approved ...

Страница 612: ...ions However there is no guarantee that interference will not occur in a particular installation If this equipment does cause harmful interference to radio or television reception which can be determined by turning the equipment off and on the user is encouraged to try to correct the interference by one or more of the following measures Reorient or relocate the receiving antenna Increase the separ...

Страница 613: ...rth for an uncontrolled environment and meets the FCC radio frequency RF Exposure Guidelines and RSS 102 of the ISED radio frequency RF Exposure rules Please refer to the SAR test report that was uploaded to FCC website Compliance with RSS 247 Issue 2 6 4 Data transmission is always initiated by software which is the passed down through the MAC through the digital and analog baseband and finally t...

Страница 614: ... pdf Wi Fi Operating frequency 2412 2462 MHz channel 11 Africa Asia Bolivia Europe and Oceania 2412 2462 MHz channel 11 5180 5825 MHz 5180 5580 MHz 5660 5700 MHz and 5745 5825 MHz U S A Canada Mexico 2412 2462 MHz channel 11 5180 5805 MHz 5180 5320 MHz and 5745 5805 MHz other countries in the Americas Maximum output power EIRP 2 4 GHz band 8 1 dBm 5 GHz band 7 9 dBm countries in the Americas Bluet...

Страница 615: ...a anywhere within its range the following may occur if security is not enabled Data theft Malicious third parties may intercept wireless transmissions to steal user IDs passwords and other personal information Unauthorized access Unauthorized users may gain access to the network and alter data or perform other malicious actions Note that due to the design of wireless networks specialized attacks m...

Страница 616: ...th and Wi Fi wireless LAN 616 A Conformity marking Some of the information related to standards with which the camera complies can be viewed using the Conformity marking option in the setup menu A Certificates ...

Страница 617: ...Auto area AF people 105 6 Auto area AF animals 105 L Matrix metering 163 M Center weighted metering 163 N Spot metering 163 t Highlight weighted metering 163 M Monitor mode button 45 G button 64 i button 68 145 K button 96 O button 99 A g button 63 142 W button 63 X button 63 d Help 68 i menu 68 145 b mode exposure comp 354 A Access point mode 457 459 Active D Lighting 164 ADL bracketing 279 AE fl...

Страница 618: ...e 91 Bulb 134 C Calendar playback 184 Camera mounted flash units 497 Center weighted area 353 Center weighted metering 163 Charger 74 Charging AC adapter 565 Choose color temperature White balance 118 Choose image area 243 Choose start end point 204 CL mode shooting speed 356 Clarity Set Picture Control 151 Cloudy White balance 118 Color space 262 Color temperature 120 155 251 Command dial 48 Comp...

Страница 619: ...e 356 Exposure indicators 133 Extended shutter speeds M 357 Eye detection AF 106 F Face detection AF 106 File information 187 File naming 242 330 File number sequence 358 Fill flash 162 502 Filter effects Set Picture Control 152 Fine tune optimal exposure 353 Firmware version 423 Flange back distance 114 Flash White balance 118 Flash bracketing 271 Flash compensation 269 504 Flash control 267 Flas...

Страница 620: ...cent White balance 118 Information display 397 Infrastructure mode 458 465 Interval timer shooting 296 IP address 469 ISO sensitivity 137 ISO sensitivity dial 49 137 ISO sensitivity dial lock release 49 137 ISO sensitivity settings 245 331 L Landscape Set Picture Control 148 Language 393 Limit AF area mode selection 349 Limit monitor mode selection 397 Location data 196 Long exposure NR 262 Long t...

Страница 621: ...on selected dates 213 PIN entry WPS 466 Pinpoint AF 103 Pixel mapping 403 Playback display options 233 Playback folder 233 Playback menu 232 Portrait Set Picture Control 148 Power off delay 77 355 Preset manual White balance 119 156 252 Press the shutter release button all the way down 88 Press the shutter release button halfway 87 Programmed auto 128 Protect 125 Push button WPS 466 Q Quick crop 1...

Страница 622: ...nu 391 Shade White balance 118 Sharpening Set Picture Control 151 Shooting data 192 Shutter speed 128 131 Shutter type 357 Shutter priority auto 128 Shutter release button AE L 354 Shutter speed dial 47 128 131 Shutter speed dial lock release 47 128 131 Silent photography 121 327 Single AF 101 Single frame 166 335 Single point AF 103 Slide show 234 Slot empty release lock 418 Slow sync 162 502 Slo...

Страница 623: ...inder 44 Viewfinder brightness 396 Viewfinder color balance 396 Vignette control 264 334 Virtual horizon 61 62 Vivid Set Picture Control 148 W WB bracketing 276 White balance 116 153 248 Wi Fi connection 164 180 409 411 Wi Fi mode 483 Wide area AF L 104 Wide area AF L animals 104 Wide area AF L people 104 Wide area AF S 104 Wind noise reduction 339 Wireless remote ML L7 options 413 Wireless Transm...

Страница 624: ...CT1H02 11 6MO00211 02 ...

Отзывы: