521
Connecting an Ethernet Cable or WT-6
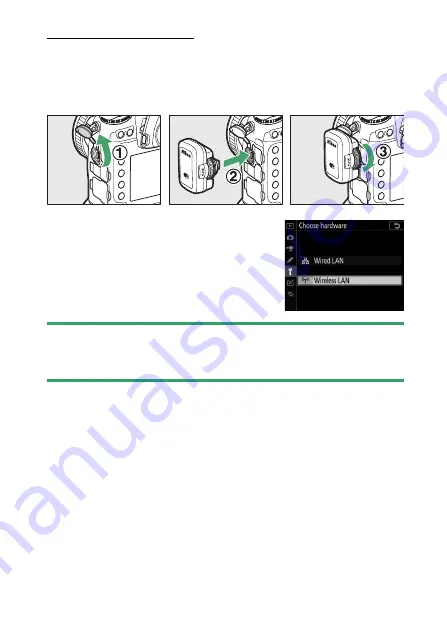
Attaching the WT-6
Rotate the peripheral connector cover up out of the way (
q
)
and fully insert the connectors on the WT-6 into the camera’s
peripheral connector (
w
). Rotate the locking wheel to lock the
WT-6 in place (
e
).
•
Select [
Wireless LAN
] for [
Wired LAN/
WT
] > [
Choose hardware
] in the setup
menu.
D
Choosing a Power Source
To prevent the camera powering off unexpectedly during setup or data
transfer, use a fully-charged battery or an optional AC adapter.
Содержание D6
Страница 148: ...96 The R Button Live View Selector Rotated to 1 1 Indicators on 2 Simplified display 3 Histogram 4 Virtual horizon ...
Страница 149: ...97 The Focus Mode Selector Choose AF for autofocus M for manual focus The Focus Mode Selector ...
Страница 514: ...462 Connecting to Smart Devices 2 Open the tab and tap Wi Fi mode 3 Smart device Tap Wi Fi connection when prompted ...
Страница 516: ...464 Connecting to Smart Devices 6 Smart device Return to the smart device and tap Next ...
Страница 657: ...605 HTTP Server 6 Click Language and choose the desired option Choose the desired language ...
Страница 737: ...685 Optical AWL 7 C f Take the photograph after confirming that the flash ready lights for all flash units are lit ...
Страница 1047: ...995 O My Menu m Recent Settings 4 Exit to O MY MENU Press the G button to return to O MY MENU ...
Страница 1197: ......


