9
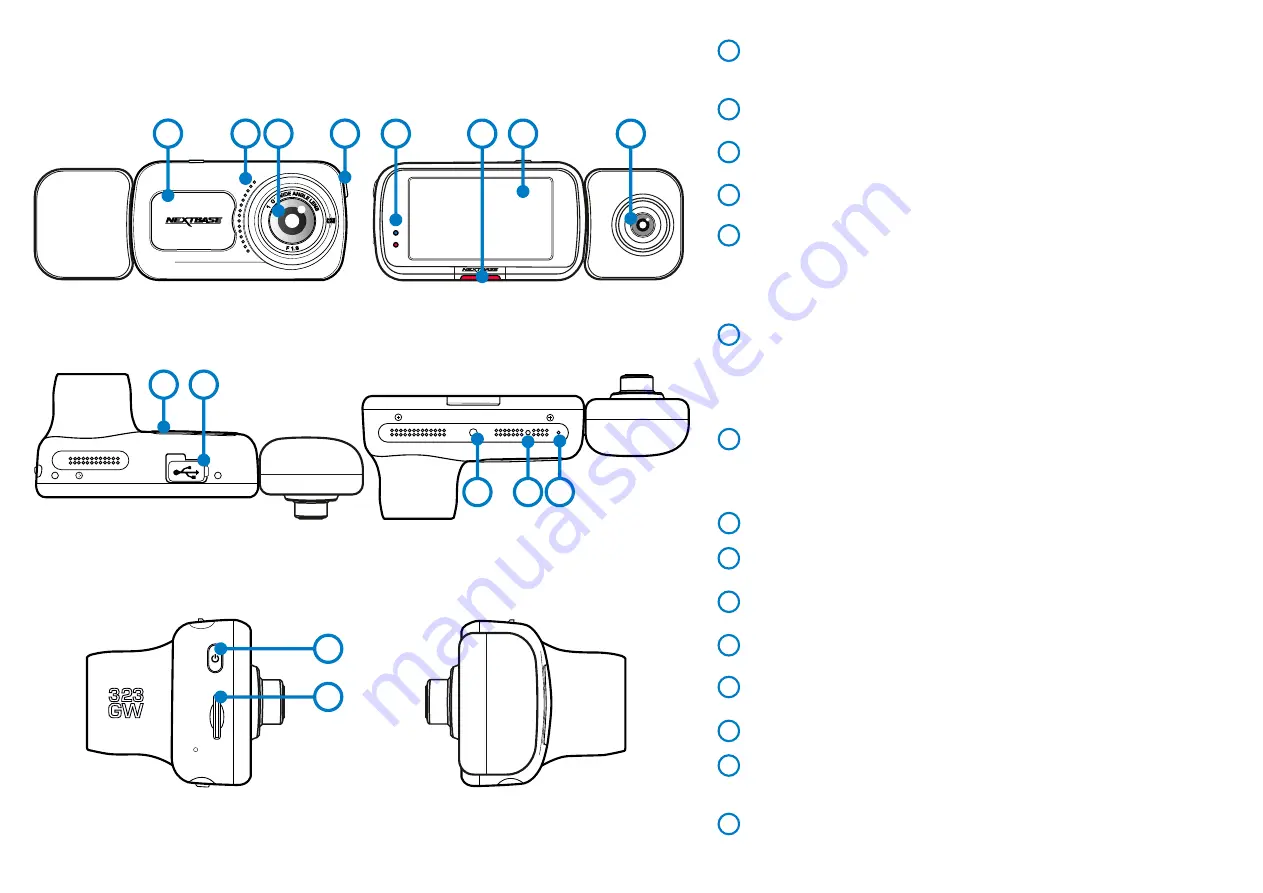
Camera Parts and Controls
See below to identify the parts and controls of your Dash Cam
5
7
8
6
4
3
4
1
2
Dust Cover
Mounting point located under the dust cover
(Regulation markings can also be found underneath the dust cover)
Speaker
Integrated speaker for audio playback
Camera Lens
Wide angle 140º
Power Button
Press and hold for 2 seconds to turn the Dash Cam On/Off
1
2
3
4
LEDs
Top: Blue
The Blue LED will be on while the Dash Cam is charging. It will turn off
-
when charging is complete, even if the Dash Cam is still plugged in.
Bottom: Red
The Red LED is permanently on while the Dash Cam is active. It will flash while recording.
-
Protect Button
Press whilst recording to protect the current file in event of an emergency situation.
Note:
-
When the 'Protect' function is activated a file containing 10 seconds prior to the incident
and 20 seconds after is written to the Protected folder.
Screen
2.5" Inch High Resolution Screen.
Tap the screen to take a photo; this applies both when recording and when not.
If a Rear Cam is attached, touch the centre of the Front Facing view to take a photo. This will
save 2 photos, one from the Front Facing camera, and one from the Rear Facing camera.
Cabin View Camera Lens
Camera pointing into the vehicle, to record both driver and passengers.
6
5
7
8
Dust Cover
Mount point located under the dust cover
USB Cover
USB port located under the dust cover
Light Sensor
Automatically adjusts the screen brightness relative to the ambient light levels.
Reset Button
Press to force the Dash Cam to restart.
Microphone
Integrated microphone for audio recording
9
10
11
12
13
Power Button
Press and hold for 2 seconds to turn the Dash Cam On/Off.
Short press acts as a back button when in the menus.
MicroSD Card Slot
Insert the MicroSD card here, taking care that the gold contacts
are facing towards the rear of the Dash Cam.
14
15
9
10
Reset
11
13
12
14
15
Содержание 323GW
Страница 1: ...User Manual...
Страница 40: ...40 NBDVR323GW ENG R3...


