background image

17

Positioning Your Dash Cam

Please read and follow the notes below for the safe operation of your Dash Cam within your vehicle.

Before using the device on your windscreen, check the state and local laws and ordinances where you drive.
Some laws prohibit or restrict the placement of objects on the windscreen of a motor vehicle.
IT IS THE USER'S RESPONSIBILITY TO MOUNT THE DEVICE IN COMPLIANCE WITH ALL APPLICABLE LAWS
AND ORDINANCES.
Always mount your Nextbase™ device in a location that does not obstruct the driver's view of the road. 
Nextbase does not assume any responsibility for any fines, penalties, or damages that may be incurred
as a result of any state or local law or ordinance relating to the use of your Nextbase device.

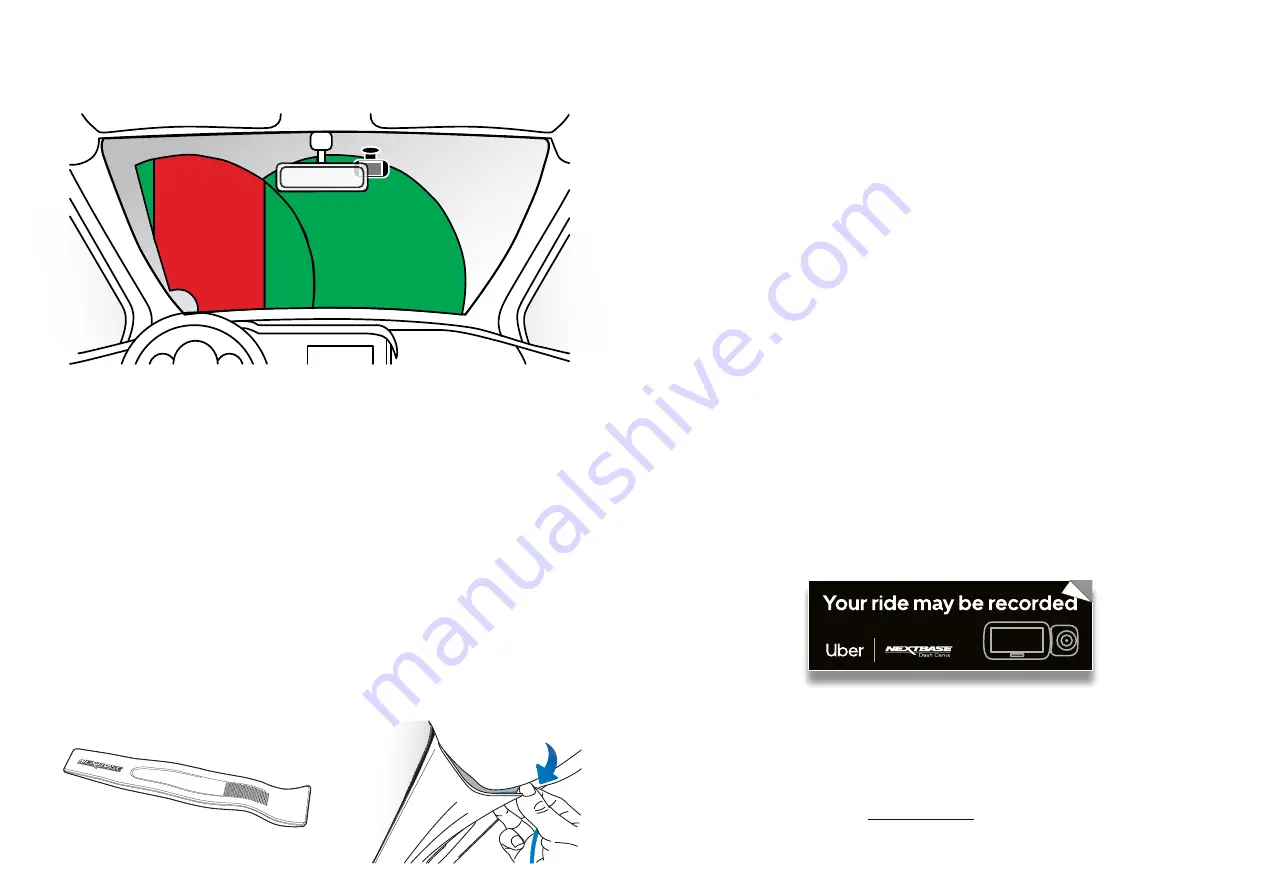
As per the installation instructions, you must install the Dash Cam so it does NOT obstruct the driver’s view
of the road (red, above), preferably on the passenger side of the vehicle and behind the rear view mirror.
The Dash Cam needs to view through a clear section of windscreen in an area swept by the windscreen
wipers (green, above). However, the Dash Cam should be installed so as not to intrude significantly within
the wiped area.  A 40mm intrusion into the green wiped area is the maximum permitted by UK law.

Hiding the Cable

Make sure the hanging cable does not obstruct your view out of your rear window. Ensure that there are 
no kinks in the cable as you are stowing it. If necessary, use the cable tidy tool supplied with your Dash Cam;
this can be used to help pry open the lining of your car (see illustration below).

Notes On Positioning Your Dash Cam


 -

 Do NOT mount the Dash Cam in front of the driver, as depicted by the red area in the illustration

      to the left of this page.


 -

 When installing the Dash Cam in a vehicle, always place the device securely against the

      windscreen and where possible conceal the power cable under trim.


-

 Make sure that the Dash Cam power cable does not interfere with the drivers operating controls,

     such as the steering wheel, pedals or gear levers. 


-

 Do NOT mount the Dash Cam in front of an airbag field of deployment or in a position to

     obscure any mirrors.


 -

 It is recommended NOT to operate the Dash Cam whilst driving. The automatic Start-Stop

     technology incorporated within the device negates any need to operate the controls whilst driving.


-

 Adjust any settings or review recordings whilst stationery, not whilst driving.


-

 After the preliminary SETUP has been carried out upon the Dash Cam, adjust the Screen Saver

     settings to either ON or Speed display (showing only your speed). Turning the Screen Saver ON
     will blank the screen 30 seconds after starting the vehicle and therefore the screen will NOT be a
     distraction to the driver. 

Recording Passengers

You MUST let passengers know they are being recorded. Apply the double sided stickers (below)
to all passenger-door windows, in a place they can be easily read by those entering the vehicle.
The stickers must not obscure or impede the driver’s view of the road in any way.

Accessories

Multiple accessories can be purchased for your Nextbase  Dash Cam, including a Polarising Filter,
and a Hardwire Kit. Some of these products can effect where you should position your camera.
For more information on how to position and use these products, download the

Nextbase Accessories Manual

’ PDF a 

www.nextbase.com.

Содержание 323GW

Страница 1: ...User Manual...

Страница 2: ...iver Assisstance Emergency SOS MyNextbase Connect Pairing Device Video Mode Folder Selection Screen Playback Mode Photo Rear Camera Display and Taking Screenshots Playback Mode Video Playback Mode Vid...

Страница 3: ...card fails to record a serious incident therefore using a suitable SD card is imperative Introduction to your Dash Cam This range of Nextbase Dash Cams has been designed specifically with ease of use...

Страница 4: ...responsibility for any damage or injury caused when the dash cam is in use 12 Before you can use your Dash Cam it is essential that it is fully charged Connect your Dash Cam via the USB port to a home...

Страница 5: ...warnings could result in an accident or collision resulting in death or serious injury Distraction Warning This device is intended to enhance the situational awareness when used properly If used impro...

Страница 6: ...se follow the steps below Note The Regulatory Information inc the FCC ID is embedded with the Dash Cam s rmware applied to the gift box and included within this User Manual The FCC ID cannot be change...

Страница 7: ...W X 240 H pixels x RGB 720 16 9 MicroSD U3 card up to 128GB 8 128GB U3 Card For best results use a Nextbase branded SD Card 8GB MicroSD 45 minutes of recording 16GB MicroSD 90 minutes of recording 32...

Страница 8: ...tically when motion is detected keeping your car safe when parked Built in Microphone Speaker Record audio to compliment the video recordings Nextbase Cloud Service View and share your footage online...

Страница 9: ...econds after is written to the Protected folder Screen 2 5 Inch High Resolution Screen Tap the screen to take a photo this applies both when recording and when not If a Rear Cam is attached touch the...

Страница 10: ...nnect to Dash Cam Dash Cam Live View See a live feed direct from your Dash Cam Dash Cam Select to pair a new Dash Cam with your smart phone or view currently paired devices Uber Driver Account Nextbas...

Страница 11: ...ion to App Google Play Store iOS App Store Before you can use your Dash Cam it is essential that it is fully charged Connect your Dash Cam via the USB port to a home power source such as a PC or home...

Страница 12: ...your footage to Uber for review Follow the on screen instructions to upload your footage Enter your Uber account details and allow permissions below Finish Setup Your Uber information will be display...

Страница 13: ...in 2 Remove dust cover from the Dash Cam Remove the dust cover that is located on the front of the Dash Cam to gain access to the mounting point To remove the dust cover lift the cover away from the b...

Страница 14: ...9 10 of the Nextbase Accessories Manual for further information Route the power cable around the windshield to the 12 24Vdc socket ensuring that your view is not obstructed and that the cable is not...

Страница 15: ...the windscreen Ensure that objects on the Dash Cam display appear level and adjust as required 8 Attach the Dash Cam to the windscreen When you are satisfied with the placement and orientation of the...

Страница 16: ...era to look out of the rear window of your vehicle Use both hands to steady the Cabin View Camera When adjusting the Cabin View Camera lens it is recommended to have the Cabin View full screen on your...

Страница 17: ...Notes On Positioning Your Dash Cam Do NOT mount the Dash Cam in front of the driver as depicted by the red area in the illustration to the left of this page When installing the Dash Cam in a vehicle a...

Страница 18: ...at the Mount and Dash Cam do not obstruct the driver s view Removing Adhesive Residue If you wish to remove the adhesive mount from your windscreen use hot soapy water or an alcohol based solution to...

Страница 19: ...at SD Card Default Settings Driver Assistance Emergency SOS MyNextbase Setup Phone Paired Devices Press the Menu button to enter the Dash Cam s Video Menu system Menus Settings MyNextbase Exposure Adj...

Страница 20: ...required Press MENU to exit and return to the Setup Menu Time and date settings will be over written upon satellite connection Note 9 10 11 12 13 14 15 Speed Units Choose between MPH and KMH Options M...

Страница 21: ...xtbase Connect app to begin monitoring key sensors in your smartphone such as GPS accelerometers and the pedometer The camera and app will notify you that it has begun monitoring your smartphone s sen...

Страница 22: ...er Emergency SOS feedback Countdown NOT stopped by user no movement Emergency Services call user s registered phone number Emergency Responders sent to user s location User Does Not Answer user is ass...

Страница 23: ...on and tell the operator that the crash detection feature sent an alert and that you missed the call back Can I set it off inadvertently What happens if I receive a call and don t need an ambulance In...

Страница 24: ...ithin this menu you will be able to manage your connected devices You will be able to connect and set up new devices as seen in your Dash Cam s First Time Use and manage devices which are already conn...

Страница 25: ...ows to scroll through your photos Delete Delete the current photo If you try to delete a protected file you will see a pop up telling you to unprotect the file first 1 2 3 4 5 6 Rear Camera Picture in...

Страница 26: ...Tapping on the PiP window opens the Rear View in full screen Tapping again minimises the Rear View back down to PiP If a Rear Cam is attached touch the centre of the Front Facing view yellow dotted a...

Страница 27: ...unprotect Play Play the current video file Navigation Use the forward and backward arrows to scroll through your videos Delete Delete the current video file If you try to delete a protected file you...

Страница 28: ...5 Press Play to begin playback Playback The white ball indicates your position Press Trim Start to move the Trim Start Indicator Continue Playback The white ball indicates your position Press Trim End...

Страница 29: ...elete Preview Mode Protect While in Preview Mode press the Protect Button to protect unprotect a file When a file is protected a red padlock icon will appear in the top left of the screen You cannot p...

Страница 30: ...e website help support send diagnostics register your Dash Cam contact us and about Playback Window Displays Dash Cam videos playing in MyNextbase Connect Map Displays your journey if the video playin...

Страница 31: ...finished adding annotations press Continue to proceed 4 Add Title Screen Optional Add a title screen to your video The title will be displayed for 4 seconds at the start of your video To add a title c...

Страница 32: ...ideo sharing service for owners of Nextbase Dash Cams Once your video has nished uploading you will be e mailed a secure link to watch your video online or download it to your computer Videos will be...

Страница 33: ...rrently active i e R05 3 Ways to Update Firmware on your Dash Cam There are a number of ways for you to update your firmware version Connect your Dash Cam s SD Card to PC or Mac using a card reader Th...

Страница 34: ...footage to fail to record in the first place 32GB Approx 4 hours footage 64GB Approx 8 hours footage 128GB Approx 16 hours footage SD Card Q A Q Why should I buy a Nextbase branded SD card Can t I ju...

Страница 35: ...rned on Parking Mode and now can t stop the recording Reset the Dash Cam to the default settings within the Setup Menu and try again Should the problem persist call the US helpline or call your local...

Страница 36: ...le use policies which can be found at www Nextbase com Online Auction Purchases of Non New Goods Products purchased through online auctions are not eligible for Nextbase warranty coverage Online aucti...

Страница 37: ...ave other legal rights which vary from state to state and from country to country If implied warranties cannot be disclaimed under the laws of your state or country then such warranties are limited in...

Страница 38: ...ffers a wide range of Dash Cams to best suit your driving needs For our full range of Dash Cam s at www nextbase com Accessories Ready for the Drive Everything you might need for video storage Dash Ca...

Страница 39: ...base Emergency Response Parking Mode Alexa Built in 622GW 4K 30 FPS 1440P 30 FPS 1440P 30 FPS Alexa Built in Alexa Built in Alexa Built in 1080P 60 FPS 1080P 30 FPS 720P 30 FPS Yes Front 4K 1440p 1080...

Страница 40: ...40 NBDVR323GW ENG R3...

Отзывы: