background image

31

To use MyNextbase Player  to edit your recorded files, you need to ensure that the file you wish to edit is

currently playing in the Playback Window. You can do this by double clicking the file as it appears in the File
List window. When the file is playing, click on the ‘Edit’ button to begin the 6 step editing process.

1.   Join Videos (Optional)

     The first step allows you to join multiple videos together. Please note that the videos you join together
     must all be the same resolution. Your video will appear in the centre of the screen, with buttons on either
     side to add additional videos before or after the chosen video file. Clicking either of these buttons will
     open up the list of files in your library that can be added. Once added, these will appear next to your
     original video file.
     The order of the video files can be altered by clicking and dragging a video. To remove a video, hover
     over the chosen file and a ‘Remove Video’ option will appear. Click to remove this video.
     Once you are happy with the video(s) selected, click on the continue button to move to step 2.

2.  Trim Video

     Trimming the video allows you to shorten your selected clip to only include the incident or event that
     you are interested in. To the left of the Playback Timeline is a green marker, indicating the beginning of
     your video. To the right of the Playback Timelime is a red marker, indicating the end of your video. These
     can be dragged to a point on the Timeline of your choosing; when exporting, MyNextbase Player will
     create a single video file from the footage located between the markers. The white marker indicates your
     current playback position.

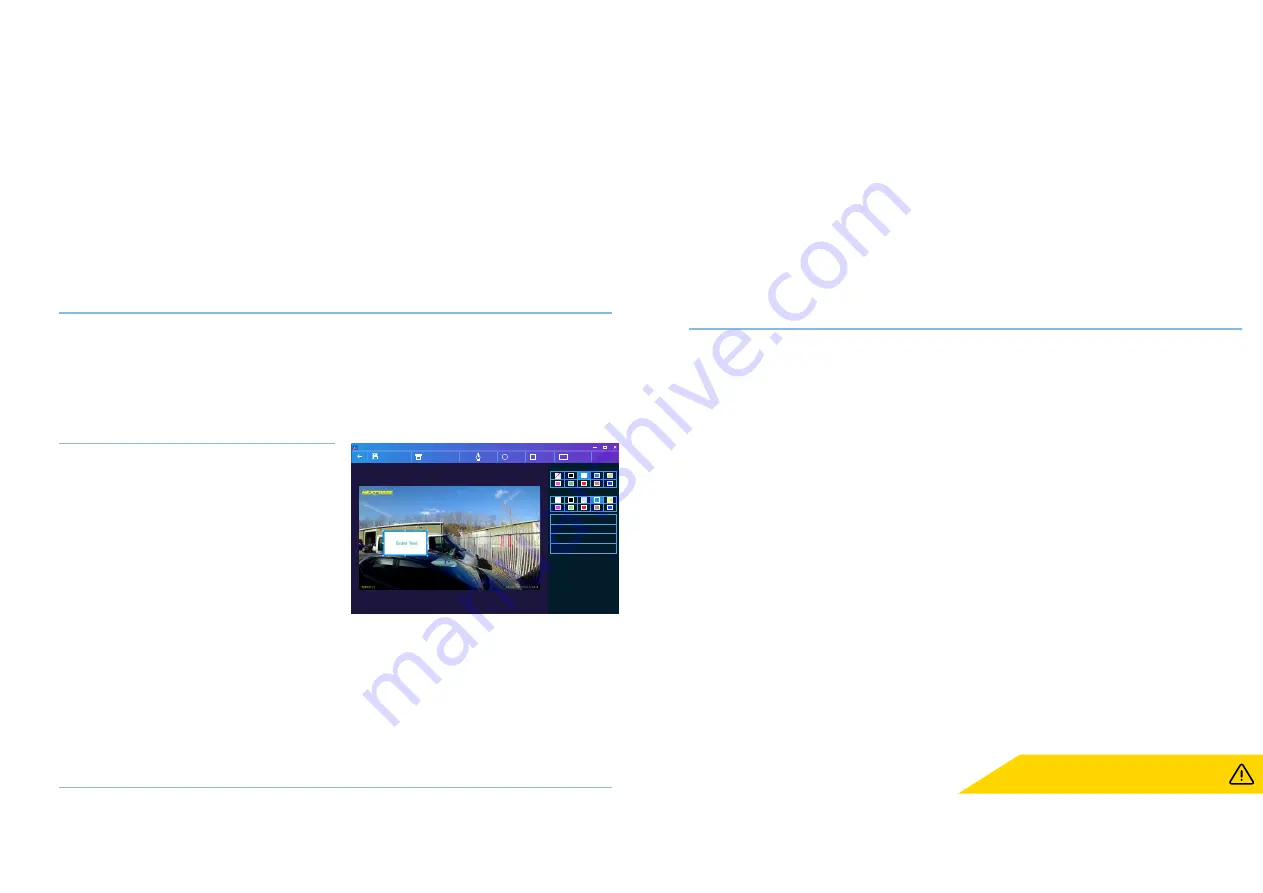
3.   Annotate Video (Optional)

     During the video there may be an object or incident
     that you wish to highlight, annotating you video will
     allow you to do this. When you annotate a frame,
     your video will pause at the specified frame and
     display any annotations that you have added.
     The video will resume after 4 seconds.

     To begin adding annotations, find the frame you
     wish to annotate (using the white marker, and
     left/right arrows to scroll through frames), and click
     on the ‘

Add Annotation

’ button to open the annotation

     screen. Along the top of the annotation screen you will see the annotation tools; Draw, Circle, Square,
     Rectangle, and Text. Clicking any of these options will add an editable annotation to that frame.
     This shape/text can be moved, resized, and rotated using the handles on the sides and corners of the
     selected annotation. 

     When you have finished your annotation, click ‘

Save and Close

’ to return to the Add Annotation screen,

     where more annotations can be added. When you have finished adding annotations, press ‘

Continue

     to proceed.

4.   Add Title Screen (Optional)

     Add a title screen to your video. The title will be displayed for 4 seconds at the start of your video. To add
     a title, click inside the white rectangle and type the desired title. Press ‘

Continue

’ to proceed.

5.  Output Settings (Optional)

     The final step in the editing process allows you to specify the quality of your video file
     and the data included.

     The Video Resolution determines the quality of the video footage; by default the video resolution
     will be set to output at the same quality as the original files. Lowering the Video Resolution will
     produce lower resolution files but will also reduce the size of the file and lower the time it takes
     to produce the file. Stamps for GPS, number plate, and time can also be removed, as well as the
     audio and GPS data from the video by ticking the corresponding box. Once the data has been
     removed it cannot be added back into the edited video. This will not affect the original file.

     Lastly, you can specify the name of the file being created and the location that you would like
     it saved. When you have chosen your output settings click on the ‘

Confirm

’ button and

     MyNextbase Player will begin processing your video.

6.   Process Video

     During step 6, MyNextbase Player will process your video clip(s) and edits, and produce a single file
     in the location specified. This can take some time and will depend on the number and length of
     video files being joined and video resolution. Once the video has been processed, it will be added
     to your MyNextbase Player file list.

Video Sharing

Videos can be shared to social media and insurers through the ‘

Share Video

’ button. When a

destination is selected (i.e Facebook), the target web page will open in your default browser.
You will then be asked to sign into your account, and once you are logged in, the browser will
close and a pop up will show your upload’s progress. When the file is finished uploading you
will see an option to view your uploaded file. Videos can also be upload to the Nextbase  server;

you will be e-mailed a secure link to view or download your video. This link can be sent to your insurer,
without the need to  transfer a large video file.
Videos will be  automatically deleted 30 days after upload.

More Features

When a video is being played back in the Playback Window, press ‘

Crtl + i

’ to open a window displaying

all of the metadata for that video including information such as: file name and size, resolution and frame
rate, max and average speeds, GPS information, and more.

Some functions, such as GPS data, are available
only on select models.

MyNextbase Player - Editing Videos

Annotation window

MyNextbase Player

Bring to Front

Fill Colour

Text

Bring Forwards

Bring Backwards

Send to Back

Abc

Rectangle

Square

Circle

Draw

Delete Annotation

Save and Close

Stroke Colour

Содержание 323GW

Страница 1: ...User Manual...

Страница 2: ...iver Assisstance Emergency SOS MyNextbase Connect Pairing Device Video Mode Folder Selection Screen Playback Mode Photo Rear Camera Display and Taking Screenshots Playback Mode Video Playback Mode Vid...

Страница 3: ...card fails to record a serious incident therefore using a suitable SD card is imperative Introduction to your Dash Cam This range of Nextbase Dash Cams has been designed specifically with ease of use...

Страница 4: ...responsibility for any damage or injury caused when the dash cam is in use 12 Before you can use your Dash Cam it is essential that it is fully charged Connect your Dash Cam via the USB port to a home...

Страница 5: ...warnings could result in an accident or collision resulting in death or serious injury Distraction Warning This device is intended to enhance the situational awareness when used properly If used impro...

Страница 6: ...se follow the steps below Note The Regulatory Information inc the FCC ID is embedded with the Dash Cam s rmware applied to the gift box and included within this User Manual The FCC ID cannot be change...

Страница 7: ...W X 240 H pixels x RGB 720 16 9 MicroSD U3 card up to 128GB 8 128GB U3 Card For best results use a Nextbase branded SD Card 8GB MicroSD 45 minutes of recording 16GB MicroSD 90 minutes of recording 32...

Страница 8: ...tically when motion is detected keeping your car safe when parked Built in Microphone Speaker Record audio to compliment the video recordings Nextbase Cloud Service View and share your footage online...

Страница 9: ...econds after is written to the Protected folder Screen 2 5 Inch High Resolution Screen Tap the screen to take a photo this applies both when recording and when not If a Rear Cam is attached touch the...

Страница 10: ...nnect to Dash Cam Dash Cam Live View See a live feed direct from your Dash Cam Dash Cam Select to pair a new Dash Cam with your smart phone or view currently paired devices Uber Driver Account Nextbas...

Страница 11: ...ion to App Google Play Store iOS App Store Before you can use your Dash Cam it is essential that it is fully charged Connect your Dash Cam via the USB port to a home power source such as a PC or home...

Страница 12: ...your footage to Uber for review Follow the on screen instructions to upload your footage Enter your Uber account details and allow permissions below Finish Setup Your Uber information will be display...

Страница 13: ...in 2 Remove dust cover from the Dash Cam Remove the dust cover that is located on the front of the Dash Cam to gain access to the mounting point To remove the dust cover lift the cover away from the b...

Страница 14: ...9 10 of the Nextbase Accessories Manual for further information Route the power cable around the windshield to the 12 24Vdc socket ensuring that your view is not obstructed and that the cable is not...

Страница 15: ...the windscreen Ensure that objects on the Dash Cam display appear level and adjust as required 8 Attach the Dash Cam to the windscreen When you are satisfied with the placement and orientation of the...

Страница 16: ...era to look out of the rear window of your vehicle Use both hands to steady the Cabin View Camera When adjusting the Cabin View Camera lens it is recommended to have the Cabin View full screen on your...

Страница 17: ...Notes On Positioning Your Dash Cam Do NOT mount the Dash Cam in front of the driver as depicted by the red area in the illustration to the left of this page When installing the Dash Cam in a vehicle a...

Страница 18: ...at the Mount and Dash Cam do not obstruct the driver s view Removing Adhesive Residue If you wish to remove the adhesive mount from your windscreen use hot soapy water or an alcohol based solution to...

Страница 19: ...at SD Card Default Settings Driver Assistance Emergency SOS MyNextbase Setup Phone Paired Devices Press the Menu button to enter the Dash Cam s Video Menu system Menus Settings MyNextbase Exposure Adj...

Страница 20: ...required Press MENU to exit and return to the Setup Menu Time and date settings will be over written upon satellite connection Note 9 10 11 12 13 14 15 Speed Units Choose between MPH and KMH Options M...

Страница 21: ...xtbase Connect app to begin monitoring key sensors in your smartphone such as GPS accelerometers and the pedometer The camera and app will notify you that it has begun monitoring your smartphone s sen...

Страница 22: ...er Emergency SOS feedback Countdown NOT stopped by user no movement Emergency Services call user s registered phone number Emergency Responders sent to user s location User Does Not Answer user is ass...

Страница 23: ...on and tell the operator that the crash detection feature sent an alert and that you missed the call back Can I set it off inadvertently What happens if I receive a call and don t need an ambulance In...

Страница 24: ...ithin this menu you will be able to manage your connected devices You will be able to connect and set up new devices as seen in your Dash Cam s First Time Use and manage devices which are already conn...

Страница 25: ...ows to scroll through your photos Delete Delete the current photo If you try to delete a protected file you will see a pop up telling you to unprotect the file first 1 2 3 4 5 6 Rear Camera Picture in...

Страница 26: ...Tapping on the PiP window opens the Rear View in full screen Tapping again minimises the Rear View back down to PiP If a Rear Cam is attached touch the centre of the Front Facing view yellow dotted a...

Страница 27: ...unprotect Play Play the current video file Navigation Use the forward and backward arrows to scroll through your videos Delete Delete the current video file If you try to delete a protected file you...

Страница 28: ...5 Press Play to begin playback Playback The white ball indicates your position Press Trim Start to move the Trim Start Indicator Continue Playback The white ball indicates your position Press Trim End...

Страница 29: ...elete Preview Mode Protect While in Preview Mode press the Protect Button to protect unprotect a file When a file is protected a red padlock icon will appear in the top left of the screen You cannot p...

Страница 30: ...e website help support send diagnostics register your Dash Cam contact us and about Playback Window Displays Dash Cam videos playing in MyNextbase Connect Map Displays your journey if the video playin...

Страница 31: ...finished adding annotations press Continue to proceed 4 Add Title Screen Optional Add a title screen to your video The title will be displayed for 4 seconds at the start of your video To add a title c...

Страница 32: ...ideo sharing service for owners of Nextbase Dash Cams Once your video has nished uploading you will be e mailed a secure link to watch your video online or download it to your computer Videos will be...

Страница 33: ...rrently active i e R05 3 Ways to Update Firmware on your Dash Cam There are a number of ways for you to update your firmware version Connect your Dash Cam s SD Card to PC or Mac using a card reader Th...

Страница 34: ...footage to fail to record in the first place 32GB Approx 4 hours footage 64GB Approx 8 hours footage 128GB Approx 16 hours footage SD Card Q A Q Why should I buy a Nextbase branded SD card Can t I ju...

Страница 35: ...rned on Parking Mode and now can t stop the recording Reset the Dash Cam to the default settings within the Setup Menu and try again Should the problem persist call the US helpline or call your local...

Страница 36: ...le use policies which can be found at www Nextbase com Online Auction Purchases of Non New Goods Products purchased through online auctions are not eligible for Nextbase warranty coverage Online aucti...

Страница 37: ...ave other legal rights which vary from state to state and from country to country If implied warranties cannot be disclaimed under the laws of your state or country then such warranties are limited in...

Страница 38: ...ffers a wide range of Dash Cams to best suit your driving needs For our full range of Dash Cam s at www nextbase com Accessories Ready for the Drive Everything you might need for video storage Dash Ca...

Страница 39: ...base Emergency Response Parking Mode Alexa Built in 622GW 4K 30 FPS 1440P 30 FPS 1440P 30 FPS Alexa Built in Alexa Built in Alexa Built in 1080P 60 FPS 1080P 30 FPS 720P 30 FPS Yes Front 4K 1440p 1080...

Страница 40: ...40 NBDVR323GW ENG R3...

Отзывы: