4.
Alignment and Measurement
on the cross hair in the lower right corner, next to the "Start" button. To deactivate the cursor
uncheck the box or right click the cross hair.
"Center Cursors":
Click to center the cursors symmetrically on the measurement window.
"Appearance":
Choose between a light or a dark theme for the
scout
Link
Control Software.
4.3.3.
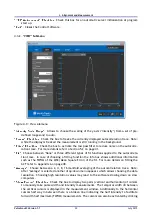
"TRIGGER" Submenu
Figure 4.10.: Trigger submenu
In case the repetition rate of the laser under test is below 50 kHz the
scout
Link
has to be triggered
with a synchronization signal. The trigger signal must have the same timing as the laser repetition
rate in order to reconstruct a proper autocorrelation trace of the pulse train. The "TRIGGER"
submenu contains settings of the electronic parameters to adapt the
scout
Link
optimally for the
incoming trigger signal. For more details please refer to Section 4.4 on page 34. The following
parameters are available:
"Trigger-Level (mV)":
The voltage level at which the
scout
Link
registers an incoming trigger sig-
nal is set here in
mV
. Change this value if a trigger signal is not recognized by the
scout
Link
.
If available the trigger level can be easily checked with an oscilloscope.
"Trigger-Delay (µs)":
A temporal delay between a the trigger impulse and the intensity measure-
ment of the detector of the autocorrelator can be set for proper synchronization. Changing
this value may impair the strength of the signal dramatically if the trigger and pulse are not
synchronized properly.
"Trigger-Impedance":
Set the appropriate input impedance for the trigger signal. For the impedance
value refer to speci cations of the measured external trigger source.
"Trigger-Frequency (Hz)":
Display of frequency if a trigger input signal is recognized.
"Triggermode":
Check this box to choose between triggered and untriggered measurement. Note
that the checkbox is only active if a trigger signal is already detected by the
scout
Link
.
Pulse
Scout2 Version 1.1
31
July 2015

