3.
Installation
1. Insert the USB Flash Drive that was included with your
Pulse
Scout2
into the USB port of your
computer.
2. Navigate to the Flash Drive and start the "setup.exe" via the Windows Explorer.
3. Follow the instructions during installation of the software. Note: After installation of the
Control Software is automatically prompted to install the appropriate font.
3.5.
Installation of the Optical Head
You will need at least one detector module incl. crystal to use the
Pulse
Scout2
for autocorrela-
tion measurements. If you have purchased more than one detector module make sure that the
one tting your laser wavelength range is mounted. If the suitable detector module is not al-
ready mounted, install the desired detector module as described below in the Paragraphs 3.5.1
"Mounting / Exchange of the SHG Crystal" and 3.5.2 "Exchange of the Detector Unit". Upon delivery
the SHG crystal is packed separately and must be installed in any case before starting the rst
measurement.
3.5.1.
Mounting / Exchange of the SHG Crystal
Upon delivery there is no crystal installed in the optical head of the
Pulse
Scout2
. It comes in a
separate box to protect it from damage and has to be installed before using the
Pulse
Scout2
for
the rst time. Please note that you will need to order at least one detector module in addition to
the base unit in order for the
Pulse
Scout2
to work. As the measurable wavelength range depends
on the choice of crystal it may also be necessary to exchange the crystal module at a later time in
order to adapt the measurement range to your needs.
To install or exchange the crystal module proceed as follows:
Caution! A laser beam may emerge in an upward direction when
opening the optical head top cover, if the unit is not properly
blocked nor the laser switched off.
1. Block or switch off the laser beam.
2. Switch off controller.
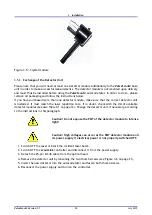
3. Remove the thumb screw and pull open the lid (see Figure 3.4 on page 19).
4. In order to exchange the crystal module, pull it out (as the crystal module is delivered in a
separate box, this is not necessary if the crystal module is mounted for the rst time).
5. Insert new crystal module (see Figure 3.5 on page 20).
6. Close crystal lid.
7. Turn on controller.
Figure 3.4.: Base unit without top cover. With mounted crystal (left) and without crystal (right)
Pulse
Scout2 Version 1.1
19
July 2015


